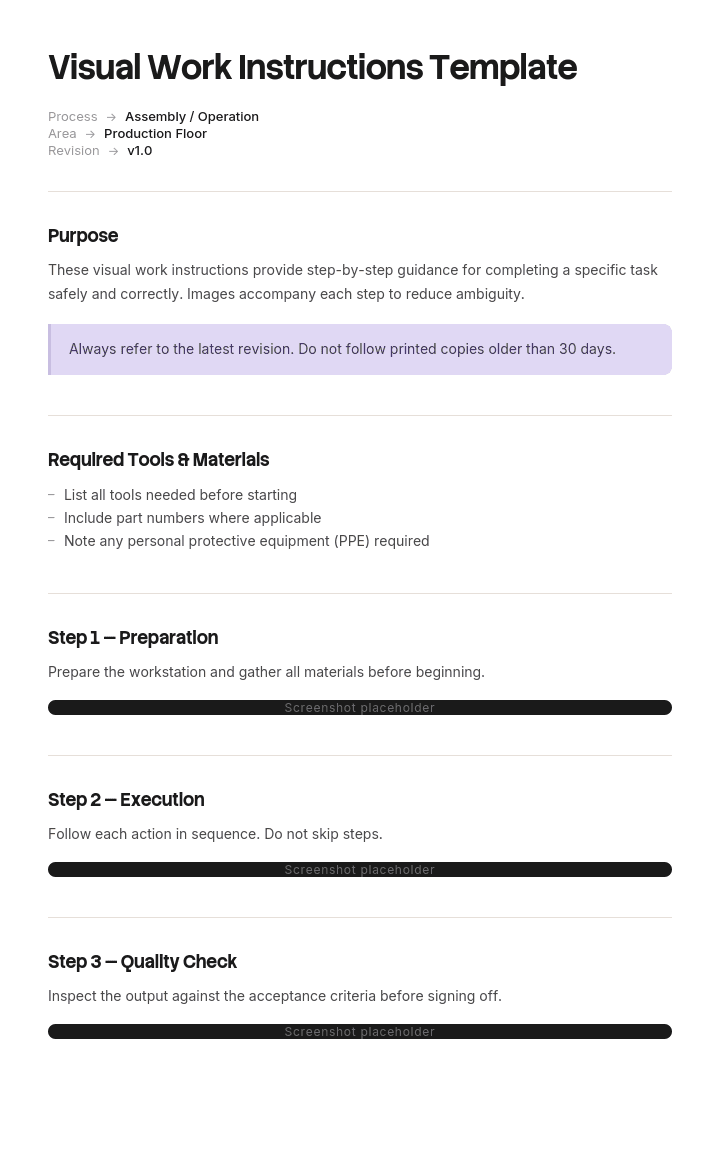
Use this template
Visual work instructions make complex tasks easier to understand, perform and standardize - especially in manufacturing, where consistency and safety are critical. With Trupeer, you can save hours on documentation by starting with a ready-to-use visual work instructions template, customizing it with your brand guidelines, and turning it into engaging video instructions that combine screen recordings, AI avatars, voiceovers and visuals.
What is a free visual work instructions template?
A free visual work instructions template is a reusable structure for instructions where images carry most of the meaning: assembly, setup, inspection, software tasks, anything a person performs by recognising something rather than by reading about it.
The general form is covered elsewhere. A work instruction is the task level document, safety work instructions add the controls and the hazard content, and project work instructions cover one off work performed by somebody unfamiliar with it.
This page is about the images specifically, and it argues that most visual work instructions contain the wrong pictures. Not too few and not badly produced. The wrong subject.
Format follows use. A free visual work instructions template Word file suits the document, since it handles images beside text well. A free visual work instructions template PowerPoint layout suits the version displayed at a workstation, where placement matters. A free visual work instructions template PDF is the controlled copy, and a free visual work instructions template Excel version suits the register of which instructions exist and when their images were last checked.
Most visual work instructions photograph the wrong thing
Open any visual work instruction and look at what the images actually show.
In most cases you will see a person performing the step. Hands holding a tool. A part being lifted into position. Somebody reaching towards a control panel. The photographs are clear, well lit and correctly placed beside the relevant text.
They also convey almost nothing.
An image of hands turning a bolt tells the reader that a bolt is turned, which the text already said. An image of a part being offered up to an assembly usually obscures the very feature that determines whether it is the right way round, because there are hands in front of it. A general view of the workstation tells somebody who works there every day nothing at all.
What a reader needs from an image is the thing that is hard to put into words. Which of two similar connectors. Which orientation. What correct looks like closely enough that they can compare it to what is in front of them. Whether the slightly odd thing they are looking at is a fault or is normal.
None of that is an activity. All of it is a difference.
So the useful question when producing an image is not what happens at this step. It is what could somebody get wrong here, and what would that look like.
How to customize this template in Trupeer
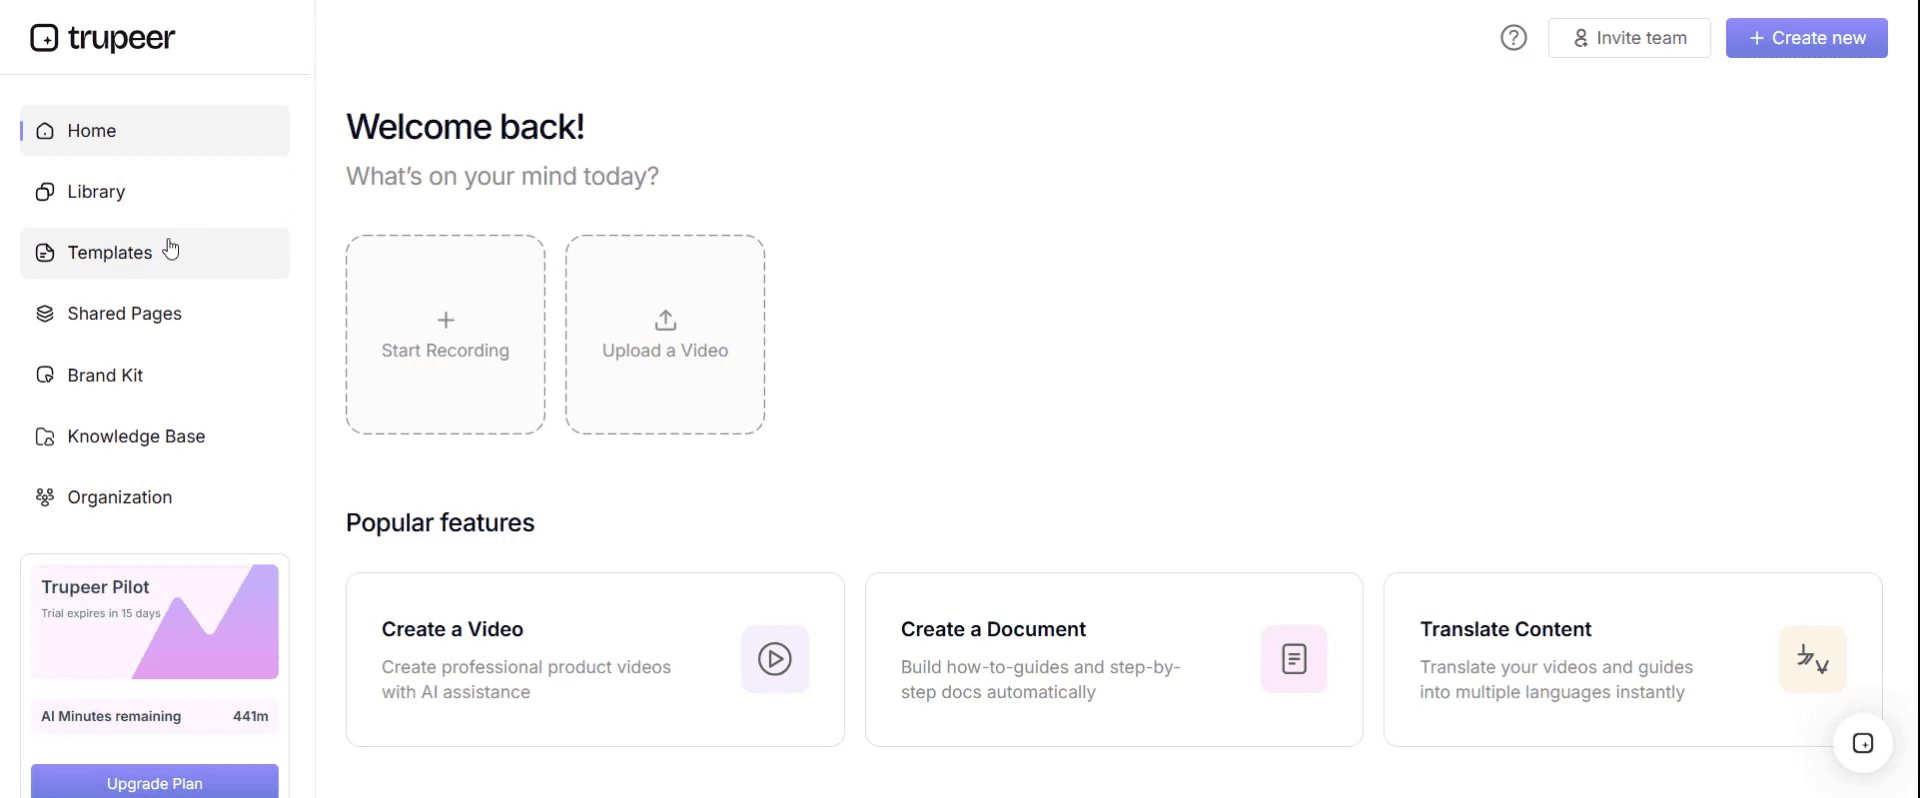
Step 1: Open the Templates Section
Go to the Templates section from the main navigation.
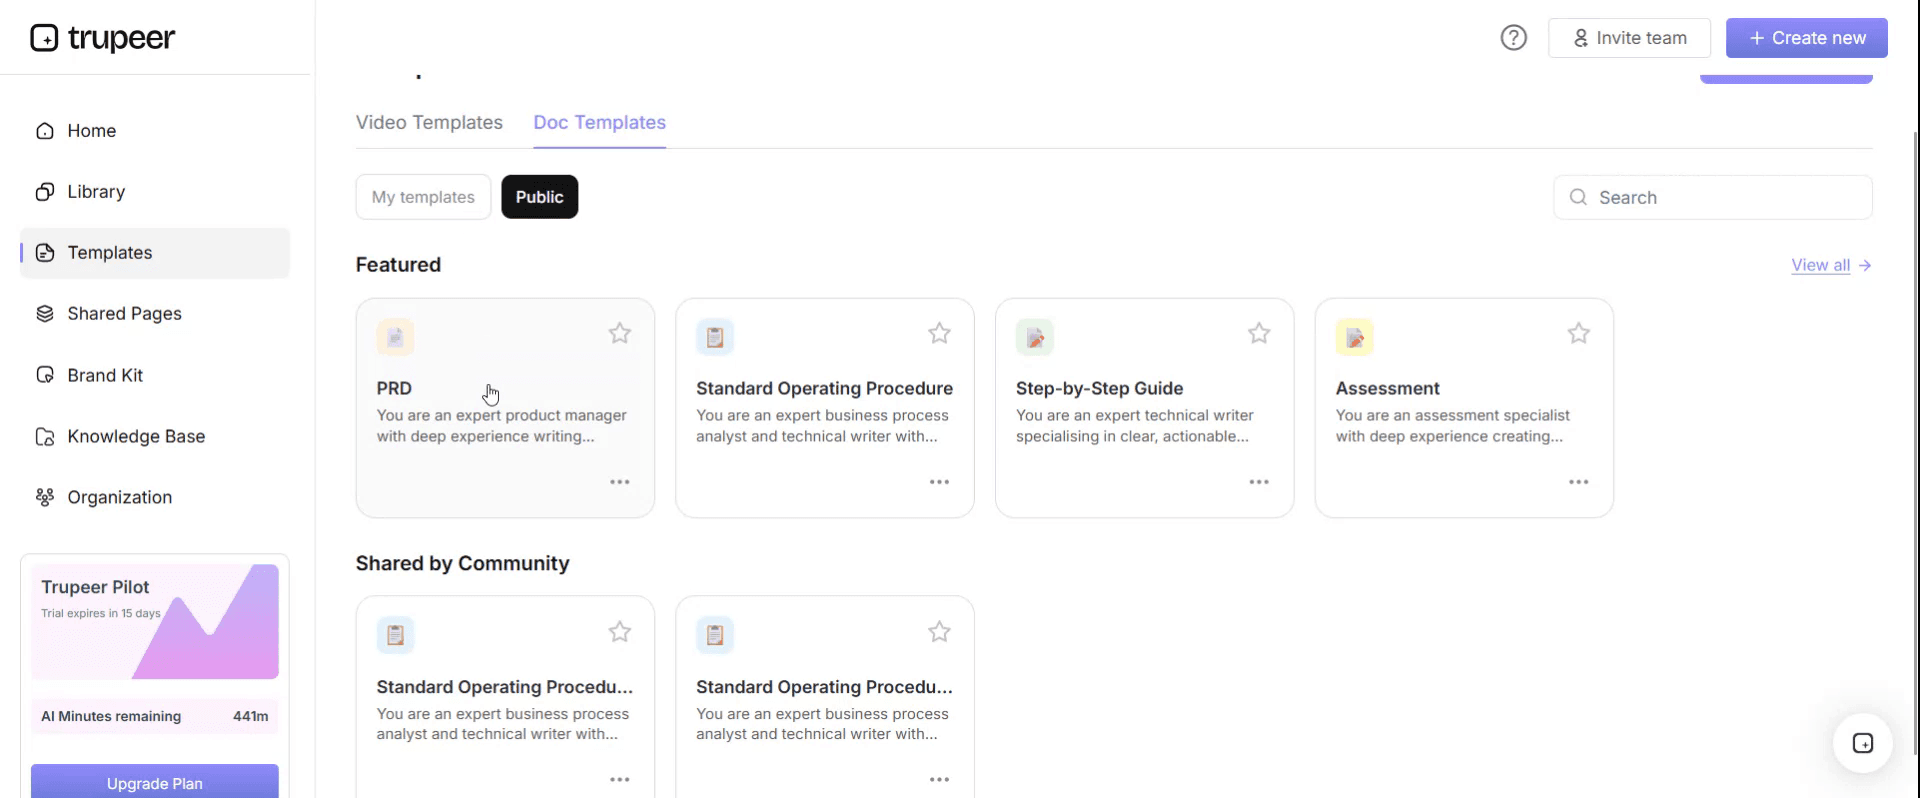
Step 2: Select and Open a Template
Click on any template you want to work with to open it.
Step 3: Expand the Template View
If needed, expand the template view to see the full layout and details clearly.

Step 4: Edit the Template
Click on Edit to start modifying the selected template.
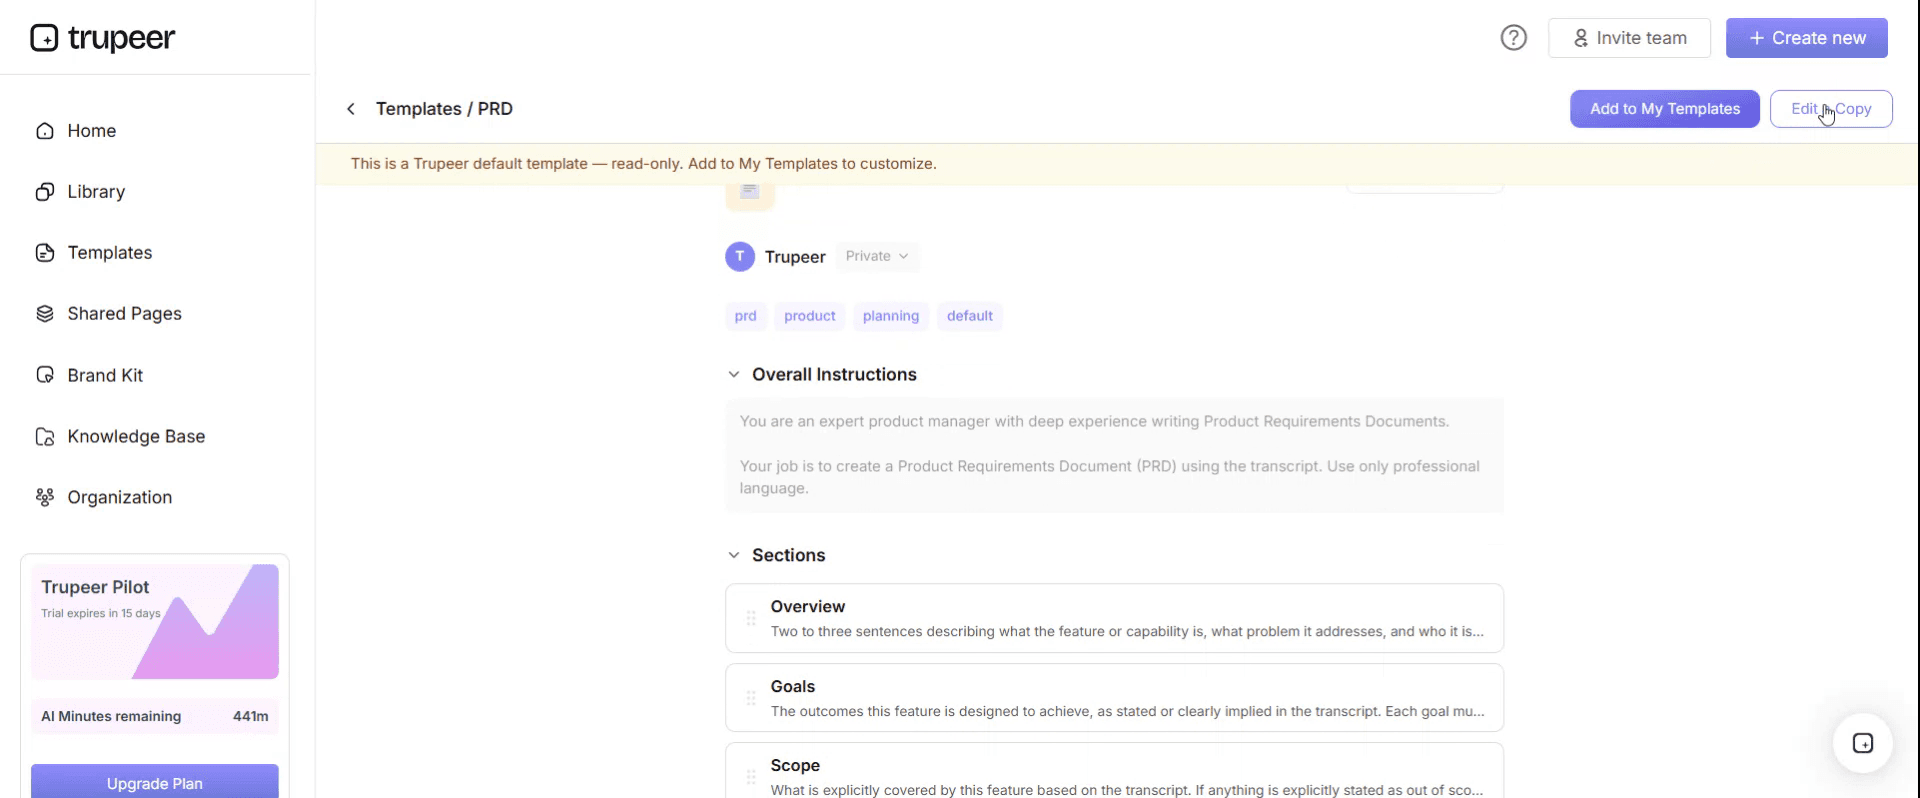
Within the editor, you can:
Add new sections
Define or update formatting rules
Add a logo and adjust its position and related settings
Step 5: Save Your Customized Template
After making all necessary changes, click Save to store the updated template as your own.
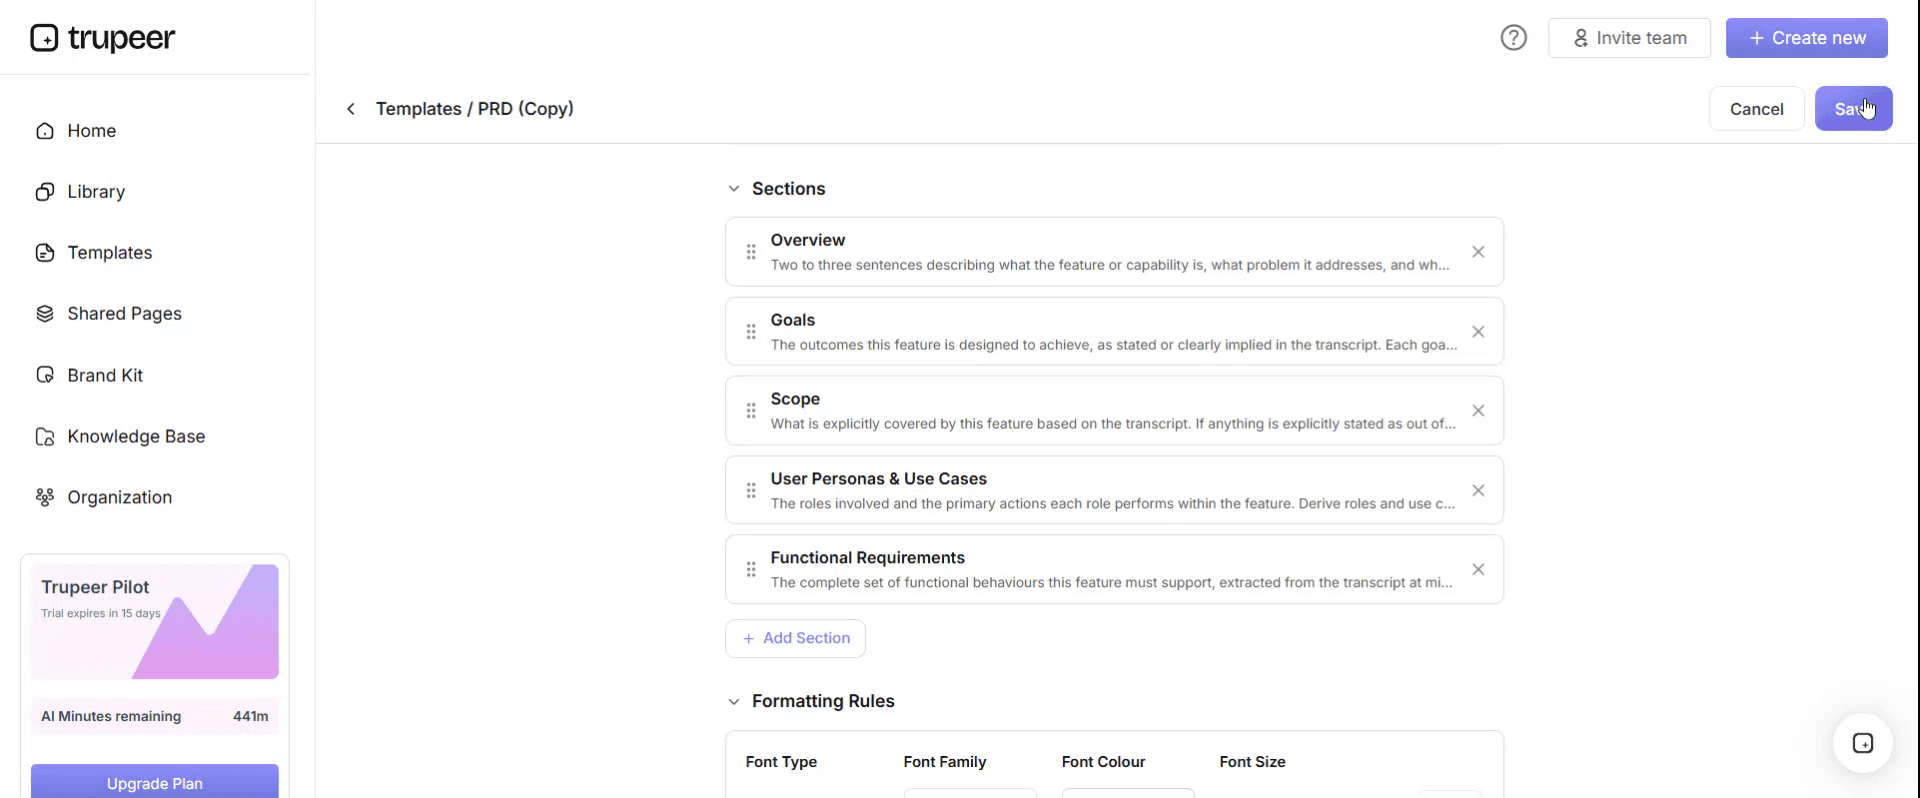
Step 6: Preview and Fine-Tune the Template
When you want to see how your customized template looks, open the Preview.
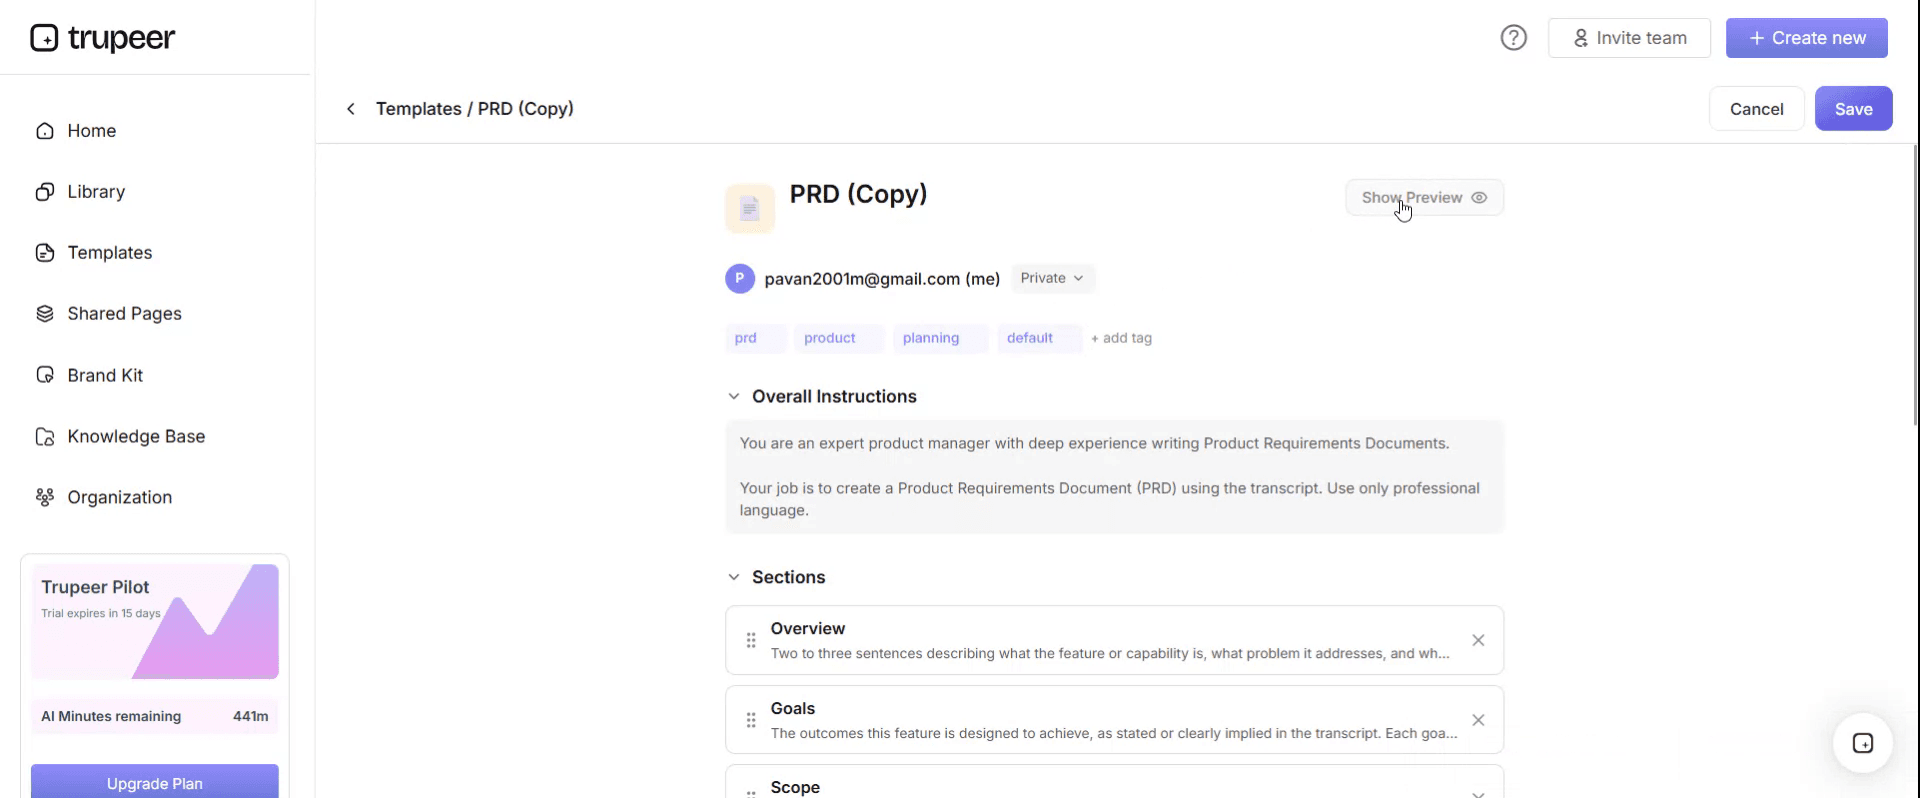
From the preview screen, you can continue to make adjustments directly if needed, ensuring the template appears exactly as you want.
With a visual work instructions template you can:
Save hours on documentation: Skip the blank page with a pre-built framework you can quickly adapt.
Improve accuracy: Visual instructions reduce errors by helping workers see exactly what to do.
Stay on-brand: Apply your logo, colors and fonts using Trupeer's brand kit - so every instruction looks consistent with your identity.
Train faster: Workers learn quicker with video-based instructions than with text-only guides. Great for frontline training videos.
Reach global teams: Translate work instructions into 65+ languages with a single click.
Stay updated: Edit the instructions once and Trupeer regenerates the video automatically.
Show the difference, including what wrong looks like
Two rules follow, and the second is the one nearly everybody omits.
Photograph the state, not the action. The result of the step rather than the performance of it. A correctly seated connector, photographed with nothing in front of it, is worth more than any number of images of somebody seating it.
Where something can be done two ways, show both. Paired images, side by side, one labelled correct and one labelled incorrect, with the discriminating feature marked on each.
That second rule is the one that changes outcomes, and the reason is a point about how checking works. A reader given only a picture of the correct state has to notice a difference between that picture and what is in front of them, which requires them to already know which features matter. A reader given both pictures has the difference pointed out for them, which is a far easier cognitive task and one they can perform reliably while tired.
Showing the wrong state feels counterintuitive, and there is one legitimate caution. In a safety context, images of unsafe practice can be remembered as instruction, so the incorrect image should show a wrong outcome rather than a person behaving unsafely, and should be clearly marked. A reversed bracket is fine. Somebody reaching into a machine is not.
Beyond that, the objection is usually aesthetic. Instructions showing failure modes look less polished than instructions showing everything going smoothly, and the polished version is the one that lets defects through.
The division of labour between text and image
The second discipline, and it makes documents shorter.
Text and image should carry different information. Where they carry the same information, one of them is redundant and the document is longer than it needs to be, which matters because length reduces the chance of anything being read.
The image carries what is hard to describe. Appearance, position, orientation, colour, which of several similar things, what correct looks like.
The text carries what cannot be shown. Sequence, values, torques, durations, thresholds, warnings, what to do if it fails, and anything conditional.
There is a two part test for any step, and it takes seconds.
Cover the text. Could somebody perform the step from the image alone? Then cover the image. Could they perform it from the text alone?
If the answer is yes to both, one of them is redundant and should go. If the answer is no to both, they are duplicating each other's weaknesses rather than complementing them, and the step needs rewriting. The healthy answer is no to both individually but yes to the pair, which means each is carrying something the other cannot.
What a visual work instructions template must contain
Nine components. The paired images row is the addition.
Component | What it does |
|---|---|
Task and revision | What this covers, version, and which product or equipment revision it applies to. |
Tools, parts and consumables | Listed once, with images where parts are visually similar. |
Steps, one action each | Numbered, with the action in text. |
State image per step | The result of the step, unobstructed, annotated. |
Paired images where two outcomes are possible | Correct and incorrect, marked, with the discriminating feature indicated. |
Values and thresholds in text | Torques, dimensions, times, tolerances. Never in an image, because images get reshot and values get lost. |
Warnings before the step | Immediately before, not collected at the front. |
Image date and revision | Per image, so a photograph of superseded equipment is identifiable. |
Owner and last verified | Who owns it and when somebody last checked it against the actual job. |
The image date row sounds fussy and prevents a specific failure. Visual instructions are reshot piecemeal, so a document frequently contains images from three different equipment revisions with no way of telling which is which.
Free visual work instructions template: the structure to copy
Filled with a real example rather than placeholders. The task is fitting a mounting bracket during seat frame assembly.
Copy from here.
Task and revision. Fit rear mounting bracket, seat frame type 4. Instruction revision 11. Applies to frames from product revision C onward. Earlier frames use a different bracket, see revision 9 of this instruction.
Tools, parts and consumables. Torque wrench, 13mm socket. Bracket part 4471-C, image shown, note the chamfered corner. Two M8 bolts, part 2210. Do not substitute part 4471-B, which is visually similar and has no chamfer.
Step 4, as a worked example of the format.
Action, in text. Fit the bracket to the rear cross member with the chamfered corner facing the seat pan, and secure with two M8 bolts to 24 Nm.
State image. The bracket in position, unobstructed, photographed from above with the chamfered corner arrowed and labelled. No hands in frame.
Paired images. Two photographs side by side, same angle. The left labelled correct, chamfer toward the seat pan, arrowed. The right labelled incorrect, chamfer toward the floor, arrowed. Both fit and both bolt up, which is why this pair exists.
Why it matters, in text. Fitted the wrong way round the load passes through the weld rather than the bolted joint. The frame will pass a visual check and will not pass a load test.
Values, in text only. 24 Nm, both bolts, torque wrench confirms with an audible click.
Check. Chamfer visible from above when standing at the operator position. If you cannot see the chamfer, the bracket is reversed.
Warning, before step 4. None applicable to this step. Warnings for the press operation at step 7 appear immediately before step 7.
Image dates. All images in this instruction shot on 14 May against product revision C. Step 7 images shot 3 June following the guard modification.
Owner and last verified. Owned by manufacturing engineering. Verified against the line on 20 June by walking the job with an operator.
Copy to here.
Note that the paired images exist for step 4 and not for most other steps. They are expensive and they belong only where two outcomes are genuinely possible.
Visual work instructions example: seventy one percent showed hands
Cranmere Seating manufactures seating for buses and coaches and employs about three hundred and ten people.
Its assembly instructions were visual and had been for years. The seat frame instruction ran to twenty two steps, each with a photograph. They were well produced, consistently lit, and placed correctly beside the relevant text.
A rear mounting bracket on one frame type could be fitted two ways round. Both fitted. Both bolted up. One put the load path through a weld rather than through the bolted joint.
The photograph at that step showed an operator offering the bracket up to the cross member, hands in shot, obscuring the chamfered corner that indicates the orientation.
The bracket was fitted reversed on an estimated four percent of production over eleven weeks. Roughly seventy six frames out of nineteen hundred.
It was found at a customer's incoming inspection, not at Cranmere. Recall of shipped units and rework of stock came to about three hundred and ten thousand pounds, followed by a customer audit and nine weeks on enhanced incoming inspection, which delayed payment on everything shipped in that period.
The audit afterwards looked at three hundred and forty images across forty six visual work instructions and classified what each one showed.
Seventy one percent showed an action being performed. Hands, tools in motion, a part being moved.
Nineteen percent showed a correct end state.
Four percent showed a comparison between a correct and an incorrect outcome.
Six percent were general views of a workstation.
So on a document set that everybody described as visual, four percent of the images were doing the thing images are uniquely good at.
The rule adopted afterwards was narrow. Any step where a part or setting can be applied two ways gets a paired image, correct and incorrect, with the discriminating feature marked on both. Action photographs were removed unless the action itself was the difficulty, which it occasionally is for anything requiring a particular technique.
Forty six instructions were reshot over five weeks.
Fourteen months on there had been no further orientation defects of that class.
The side effect was unexpected. Average images per instruction fell from seven point four to five point one, because removing the action photographs took out more than the paired images added. The documents got shorter and more useful at the same time, which is not the usual trade.
How to create visual work instructions in six steps
Watch the job and write down what people get wrong. Not the steps, the errors. Ask the inspector, ask the line leader, look at the defect data. That list decides where images are needed.
Write the text first, one action per step. Including the values, which never go in an image.
For each step, ask what could be done two ways. Those steps get paired images. Most steps do not need one.
Photograph states, not actions. The result, unobstructed, with nothing in front of the feature that matters.
Annotate directly on the image. An arrow and two words. An unmarked photograph of a busy assembly is a puzzle rather than an instruction.
Apply the cover test to every step. Cover the text, then cover the image. If either alone is sufficient, remove the other.
Step one is what makes the rest efficient. Images produced from a defect list go where they are needed. Images produced by photographing every step produce a long document with four percent of its pictures earning their place.
Photographs, drawings or screenshots?
Three kinds of image, each better at something.
Photographs show what the thing actually looks like, including the surrounding clutter the reader will also see. Best for recognition tasks: which part, what correct looks like, is this fault normal. Their weakness is that they show everything, including irrelevant detail, so tight cropping and annotation matter more than image quality.
Line drawings and exploded views show what a photograph cannot: hidden features, internal relationships, the order in which parts stack. They are also expensive to produce and to modify, which is why they persist unchanged for years after the product has moved on. Worth it where the geometry genuinely cannot be photographed.
Screenshots are the software equivalent and behave differently from both, because the thing they depict changes every few weeks rather than every few years. That difference dominates everything about maintaining them, and it is the subject of the final section.
A practical rule for all three. Show the smallest area that contains the discriminating feature plus enough context to locate it. Full frame images reduced to fit a page are unreadable at the size they will actually be viewed.
Visual work instructions, standard work or an SOP?
Four documents, and the distinctions determine what belongs where.
Visual work instructions are task level, image led, and exist so somebody can perform a task correctly by recognising things.
Standard work covers a repeating operation with a cycle time and a required pace, and carries takt time and standard work in process alongside the sequence. The standard work template covers it, and the distinction from a work instruction is that standard work exists to be improved against rather than only followed.
A standard operating procedure covers a process across roles, answering who does what in what order. The SOP template covers it.
Safety work instructions carry hazard and control content with the specific obligations that follow, covered on the safety work instructions page. Anything involving regulated hazards belongs there and needs competent person review.
The practical error is putting values and torques into an image. Reshoot the image and the value is gone, and image files get replaced far more often than text does.
What a free visual work instructions template cannot fix
Images nobody has budgeted to maintain. Every image is a commitment to reshoot it. Most visual instruction sets decay here first, and the decay is invisible until somebody works to a photograph of equipment that has been modified. Neither a free visual work instructions template Word free download nor a general work instruction template Word free download changes that arithmetic.
A defect list nobody has looked at. No free visual work instructions template free download tells you where your errors occur, and that list is what decides which steps need paired images.
Values buried in pictures. A torque figure in an annotation will be lost at the next reshoot.
A process too variable to photograph. Where every job is different, images of one instance mislead. Those tasks need a decision framework rather than a visual instruction.
Producing and reshooting the images
The argument above has an obvious cost. Paired images, annotated, per step where two outcomes are possible, reshot whenever the product or the interface changes.
For physical assembly there is no way around photography. Somebody stands at the line with a camera, shoots the states, crops and annotates them, and does it again after a design change. Cranmere's five week reshoot across forty six instructions is roughly what that costs, and it was worth it against three hundred and ten thousand pounds. Being honest about it: a recording tool does not solve the physical case.
Where the task is on a screen, the arithmetic is completely different, and screen based tasks are now a large share of what visual work instructions cover: system entry, inspection recording, quality sign off, warehouse scanning, order processing.
Trupeer AI handles that case directly. Somebody performs the task once while recording, and the output is a written step by step instruction with screenshots already captured, annotated and placed, alongside a video, in your own branding. Reshooting after an interface change means re-recording rather than recapturing thirty screens individually, which is what decides whether a screen based visual instruction is accurate in year two.
Record it. Brand it. Translate it. Trupeer it.
Two further points. Recording two operators performing the same screen task shows where they diverge, and divergence is where the paired image is needed. And where a workforce includes several first languages, the same recording produces the same instruction in each, which matters more for visual instructions than for prose, because a translated caption on an untranslated screenshot helps nobody.
The material sits in your knowledge base and doubles as training for new operators. Consistency across your documents is a matter of setting the brand kit once, and setup is covered in the document template setup guide.
Frequently Asked Questions
Is there a free visual work instructions template Word version?
Word handles images beside text well and is where most of these are produced. A free visual work instructions template Word file is the right working format, and a work instructions template Word download will give you the general structure to build on.
Two settings matter. Insert images as inline rather than floating, so they stay with their step when the document is edited, and turn off row splitting in tables so a step and its image never separate across a page.
Is there a free visual work instructions template Word free download?
Widely available, and nearly all of them provide a step table with an image column, which is the correct structure and the easy part.
What none provides is a second image column for the incorrect state. Adding it takes a minute and is the change that catches the class of defect described on this page. Most steps will leave it blank, which is fine.
Is there a work instruction template Word free download for general use?
Yes, and the general version is the sensible starting point for a visual instruction too, since the structure is the same and the images are what you add. A work instruction template Word free download will give you task, tools, numbered steps and a version block.
The additions specific to visual instructions are an image date per image, a column for paired images, and a rule that values and torques stay in text.
Is there a free visual work instructions template PowerPoint version?
Slides suit the version displayed at a workstation, because you control placement precisely and can size images for viewing from a metre away. A free visual work instructions template PowerPoint layout is genuinely good for that.
The cost is maintenance, since everything is positioned by hand and adding a step means moving what follows. Produce the display version from a document rather than maintaining slides as the master.
Is there a free visual work instructions template PDF?
PDF is the controlled and issued copy, which matters here because these documents are frequently part of a quality system and an auditor may ask which revision was in force.
Export a free visual work instructions template PDF at each revision with the instruction revision and the applicable product revision on every page. Keep superseded versions rather than overwriting them.
Is there a free visual work instructions template Excel version?
Excel is poor for the instruction and useful for the register behind it. A free visual work instructions template Excel file works well as a list of every instruction with its owner, revision, the product revision it applies to, and when its images were last checked.
That register is what prevents the most common decay problem, which is a document containing images from three different equipment revisions with nothing to indicate which is which.
Is there a free visual work instructions template free download worth using?
The step and image table takes twenty minutes to build and every published version is broadly the same, so a free visual work instructions template free download saves little.
Judge any of them on one question. Is there space for an image of the incorrect state? None have it, and that is the image that lets an operator check their own work rather than hoping it looks right.
How many images should a visual work instruction have?
Fewer than most have. Cranmere's average fell from just over seven per instruction to just over five when action photographs were removed, and the instructions became more useful.
The right number is one state image per step where appearance matters, plus a paired set for each step where two outcomes are possible. Steps where the text is sufficient need no image at all, and adding one there costs maintenance without adding clarity.