
How to Resize a Design in Canva – Quick Steps for Any Format
Learn how to resize a design in Canva with or without Pro. Easily change dimensions for social media, print, or custom sizes.
This document provides a detailed process for adjusting the dimensions of a board and canvas using Canva's resizing feature.
To resize your design in Canva, click the "Resize" button at the top of the editor. You can pick from preset sizes or enter your own custom dimensions. If you need something more advanced, the "Magic Switch" tool can help you reformat your design for different platforms or even translate it into other languages.
Detailed Steps:
1. Open the Resize Tool:
In the Canva editor, find the "Resize" button in the top menu it's usually marked with an icon.
2. Pick How You Want to Resize:
Predefined Sizes: Choose from popular sizes for platforms like Instagram, Facebook, and more.
Custom Size: Type in your desired width and height. You can also lock or unlock the aspect ratio depending on your needs.
Magic Switch: Use this tool to quickly adapt your design into different formats, languages, or even content types like presentations or social posts.
3. Apply the Resize:
Select which pages you want to resize either all of them or just specific ones. Canva will then adjust the design, copy and resize it, or create multiple new versions depending on your selection.
4. Resize Individual Elements:
To adjust the size of text boxes, images, or other elements, just drag the corner handles or input exact dimensions.
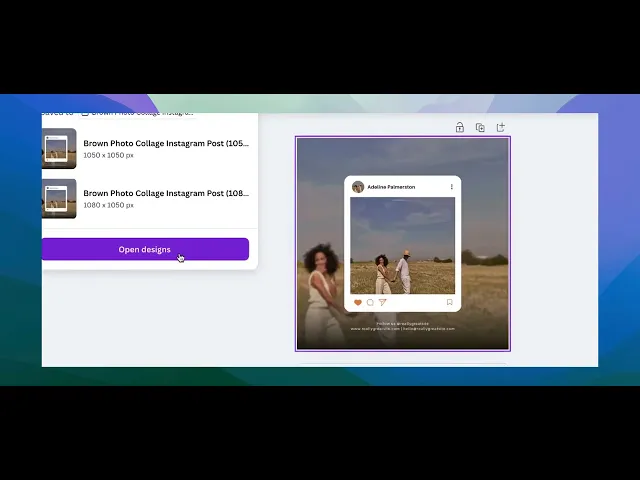
Step-by-Step Guide: How To Resize Design In Canva
Step 1
Begin by opening your design in Canva. At the top of the screen, click on "Resize."

Step 2
Choose the "Custom Size" option to specify your desired dimensions. Once selected, you can opt to customize copy and resize the design accordingly.

Step 3
Wait for the design to download. Once complete, you will notice that the file has been successfully resized.

Step 4
To manually resize the design, return to the homepage. On the homepage, create a new design.
Go back to the Home page.
Click Create a design > Custom size and enter the new dimensions.

Step 5
Copy all elements from the original design and paste them into the new design with the adjusted dimensions.
You may need to adjust the placement or size of elements to fit the new dimensions.

Pro tips for successfully editing the dimensions of a board in Canva
Use the "Resize" tool for Pro users: If you’re on Canva Pro, use the "Resize" option in the top toolbar to adjust the dimensions of your design instantly.
Manually set dimensions for free users: Create a new design with custom dimensions by clicking "Custom Size" on the home page and inputting the desired width and height.
Lock aspect ratio for proportional resizing: When resizing, ensure the "lock" icon is enabled to maintain the proportions of your design.
Adjust elements after resizing: After changing dimensions, reposition and resize elements to ensure they fit perfectly within the new board size.
Download in the correct resolution: When resizing for printing or large displays, download the design in PNG or PDF Print format to preserve quality.
Common pitfalls and how to avoid them for editing dimensions of a board in Canva
Losing design alignment: Changing dimensions can disrupt the layout of your design elements.
Fix: Reposition and resize elements after adjusting the board dimensions to restore alignment.Aspect ratio distortion: Resizing without maintaining the aspect ratio can stretch or squash your design.
Fix: Use the "lock" icon to preserve the proportions while resizing.Limited resizing for free users: Free Canva users cannot directly resize existing designs.
Fix: Manually create a new design with the desired dimensions and copy-paste elements from the old design.Image quality reduction: Enlarging a design may lower the resolution of embedded images.
Fix: Start with high-resolution images to avoid quality issues when resizing.Unintended blank spaces: Resizing may create additional blank areas in your design.
Fix: Fill or adjust the new spaces with complementary design elements or background colors.
Common FAQs for how to edit dimensions of a board in Canva
How do I resize a board in Canva?
Pro users can use the "Resize" tool in the top toolbar. Free users need to create a new design with custom dimensions.What are the maximum dimensions allowed in Canva?
Canva allows a maximum design size of 8000 x 3125 pixels.Can I resize a board without losing design quality?
Yes, use high-resolution images and maintain the aspect ratio to preserve quality when resizing.Is resizing available for free Canva users?
Free users cannot directly resize an existing design but can manually recreate it with new dimensions.How to screen record on mac?
To screen record on a Mac, you can use Trupeer AI. It allows you to capture the entire screen and provides AI capabilities such as adding AI avatars, add voiceover, add zoom in and out in the video. With trupeer’s AI video translation feature, you can translate the video into 30+ languages.How to add an AI avatar to screen recording?
To add an AI avatar to a screen recording, you'll need to use an AI screen recording tool. Trupeer AI is an AI screen recording tool, which helps you create videos with multiple avatars, also helps you in creating your own avatar for the video.How to screen record on windows?
To screen record on Windows, you can use the built-in Game Bar (Windows + G) or advanced AI tool like Trupeer AI for more advanced features such as AI avatars, voiceover, translation etc.How to add voiceover to video?
To add voiceover to videos, download trupeer ai chrome extension. Once signed up, upload your video with voice, choose the desired voiceover from trupeer and export your edited video.How do I Zoom in on a screen recording?
To zoom in during a screen recording, use the zoom effects in Trupeer AI which allows you to zoom in and out at specific moments, enhancing the visual impact of your video content.
People also ask
Technical Documentation Generator
Related Tutorials

