

كيفية تجميع العناصر في كانفا
تعرّف على كيفية تجميع العناصر وفك تجميعها في Canva لنقلها وتحريرها معًا. مثالي لتنظيم التخطيطات وتسريع سير عمل التصميم لديك.
إن عملية تجميع العناصر في Canva طريقة بسيطة تتيح للمستخدمين إدارة عدة عناصر معًا.
تتيح هذه الميزة سهولة تغيير الحجم والنقل وتحرير العناصر كوحدة واحدة، مما يبسّط عملية التصميم ويعزز الكفاءة.
يتيح لك تجميع العناصر في Canva نقل عدة عناصر أو تغيير حجمها أو تحريرها كوحدة واحدة، وهو أمر رائع للحفاظ على اتساق التخطيط.
على سطح المكتب
1. حدِّد العناصر
انقر واسحب المؤشر فوق العناصر.
أو اضغط باستمرار على Shift وانقر على كل عنصر على حدة.
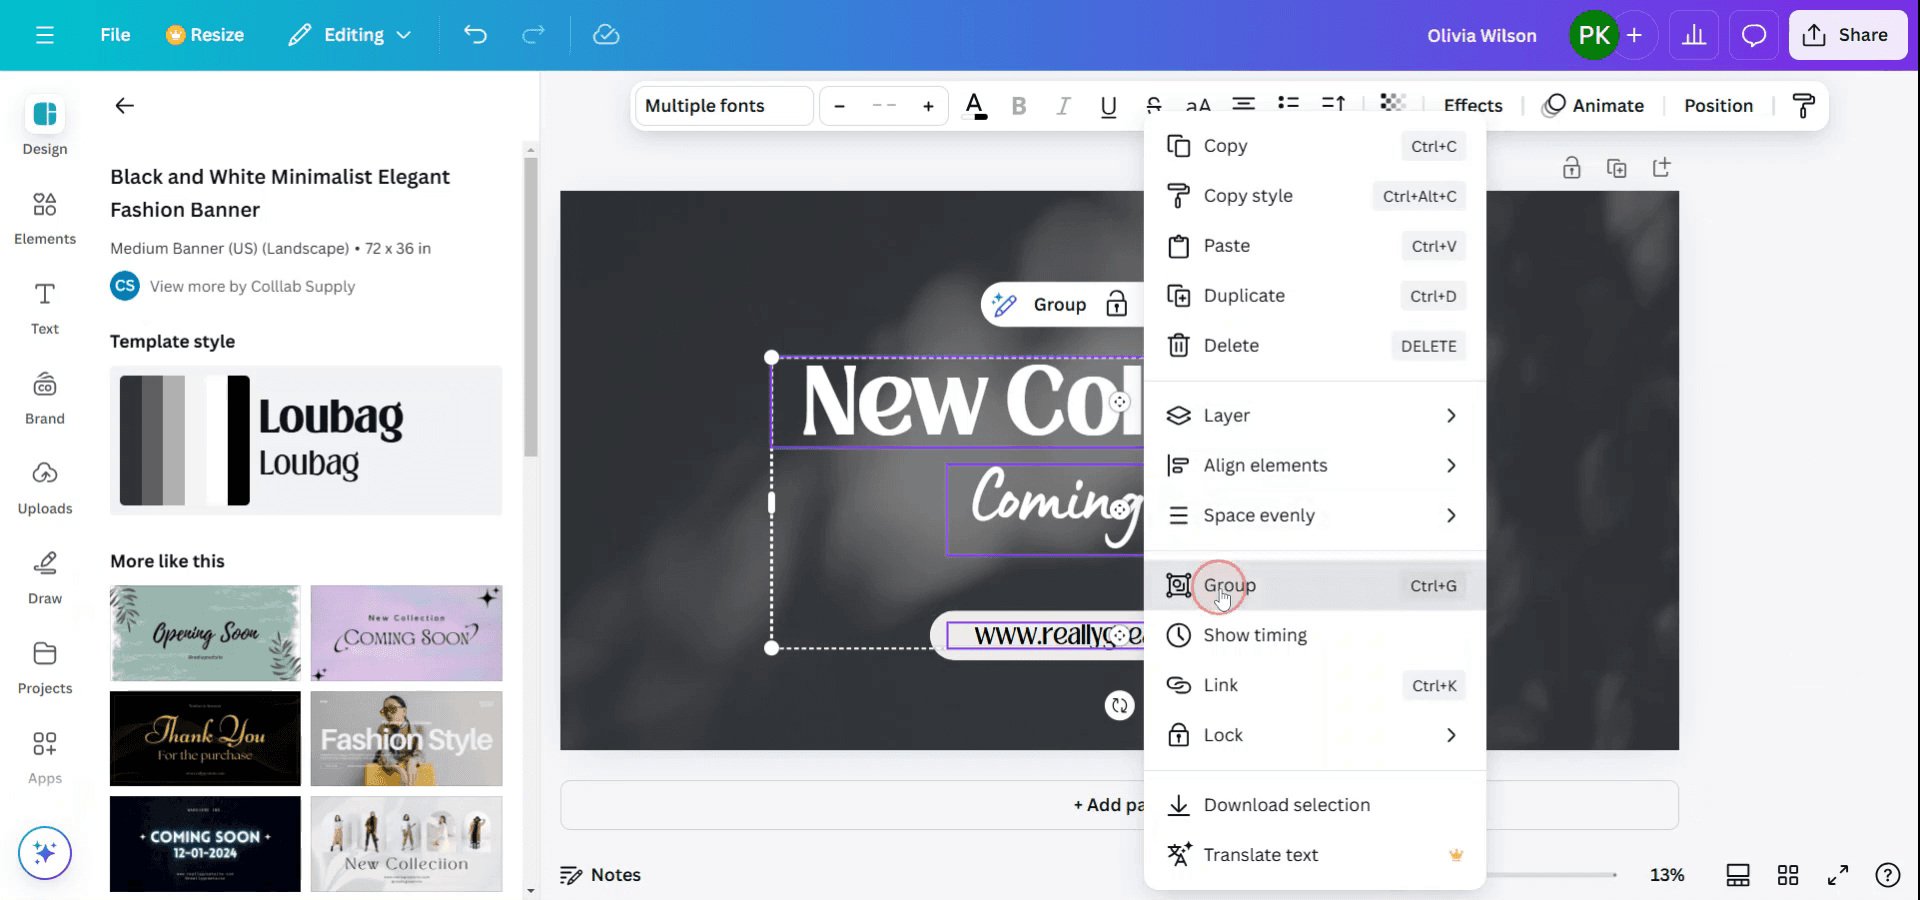
2. اجمع العناصر
انقر بزر الماوس الأيمن واختر “تجميع”
أو استخدم الاختصار:
Ctrl + G (Windows)
Cmd + G (Mac)
أو انقر زر “تجميع” في شريط الأدوات العلوي.
3. تم!
الآن يمكنك نقل المجموعة بأكملها أو تدويرها أو تغيير حجمها كوحدة واحدة.
على الجوال
1. اضغط مطولًا
اضغط مطولًا على أحد العناصر حتى ترى خيار “تحديد عدة عناصر”.
2. اضغط على عناصر إضافية
اضغط على جميع العناصر الأخرى التي تريد تضمينها.
3. اضغط على “تجميع”
استخدم زر “تجميع” في شريط الأدوات العائم.
إلغاء تجميع العناصر
سطح المكتب: حدِّد المجموعة ثم إما
انقر بزر الماوس الأيمن > إلغاء التجميع
أو استخدم Ctrl + Shift + G (Windows) / Cmd + Shift + G (Mac)
الجوال: اضغط على العناصر المجمعة ثم اضغط على “إلغاء التجميع”.
دليل خطوة بخطوة: كيفية تجميع العناصر في Canva
الخطوة 1
لبدء تجميع العناصر في Canva، حدّد أولًا العناصر المطلوبة من خلال الضغط باستمرار على مفتاح Shift. يتيح لك هذا الإجراء تحديد عدة عناصر في الوقت نفسه.

الخطوة 2
بعد تحديد العناصر التي تريد تجميعها، انقر بزر الماوس الأيمن لفتح قائمة السياق. من هذه القائمة، اختر خيار "تجميع" لضم العناصر المحددة معًا. أو يمكنك استخدام اختصار لوحة المفاتيح بالضغط على Ctrl + G لتجميعها بسرعة.
نصائح احترافية لتجميع العناصر في Canva
تحديد عدة عناصر:
اضغط باستمرار على مفتاحShift(أوCmdعلى جهاز Mac) وانقر على جميع العناصر التي تريد تجميعها. أو يمكنك النقر والسحب لتحديد عدة عناصر دفعة واحدة.تجميع العناصر المحددة:
بعد تحديد العناصر، انقر بزر الماوس الأيمن على أحدها واختر "تجميع" من قائمة السياق، أو اضغط علىCtrl + G(Windows) أوCmd + G(Mac).تغيير الحجم والتحريك معًا:
بعد التجميع، يمكنك تغيير حجم جميع العناصر أو تحريكها معًا كعنصر واحد. ما عليك سوى النقر والسحب على المجموعة لإعادة تموضعها، أو استخدام الزوايا لتغيير حجم المجموعة بالكامل.فك التجميع عند الحاجة:
إذا كنت بحاجة إلى تعديل عنصر واحد داخل مجموعة، فانقر بزر الماوس الأيمن واختر "فك التجميع" أو استخدم الاختصارCtrl + Shift + G(Windows) أوCmd + Shift + G(Mac).تجميع العناصر للاتساق:
يمكن أن يساعدك التجميع في الحفاظ على المحاذاة والاتساق في تصميمك من خلال ضمان تحرك عدة عناصر وتغيير حجمها معًا.
الأخطاء الشائعة وكيفية تجنبها عند تجميع العناصر في Canva
تجميع العناصر الخاطئة بالخطأ:
الحل: تحقق جيدًا من العناصر التي حددتها قبل التجميع. يمكنك دائمًا فك التجميع وإعادة العملية إذا لزم الأمر.عدم القدرة على تعديل عنصر واحد:
الحل: بعد التجميع، تذكر أنه يمكنك فك التجميع لإجراء تعديلات فردية. يؤدي فك التجميع مؤقتًا إلى فصل العناصر لإجراء تعديلات تفصيلية.عدم المحاذاة بعد التجميع:
الحل: تأكد من أن العناصر مصطفّة بشكل صحيح قبل التجميع. استخدم أدوات المحاذاة في Canva (مثل الشبكة والالتقاط) للتأكد من أن كل شيء متباعد بشكل متساوٍ.تجميع الطبقات بالخطأ:
الحل: إذا قمت بتجميع عنصر متعدد الطبقات (مثل عنصر خلفية وعنصر أمامي)، فتأكد من أن جميع العناصر التي تريد تجميعها موجودة في الطبقة نفسها.عدم معرفة متى يجب التجميع:
الحل: قم بتجميع العناصر عندما تحتاج إلى نقلها أو تغيير حجمها أو تعديلها بشكل متناسق عبر تصميمك. تجنب التجميع إذا كنت بحاجة إلى تعديلها بشكل مستقل.
الأسئلة الشائعة حول التجميع في Canva
كيف أجمع عدة عناصر في Canva؟
اضغط باستمرار على مفتاحShift(أوCmdعلى جهاز Mac) وحدد العناصر التي تريد تجميعها، ثم انقر بزر الماوس الأيمن واختر "تجميع" أو اضغط علىCtrl + G(Windows) أوCmd + G(Mac).هل يمكنني تجميع النص مع الصور في Canva؟
نعم، يمكنك تجميع أي عناصر، بما في ذلك النصوص والصور، طالما تم تحديدها معًا.هل يمكنني إلغاء تجميع العناصر في Canva؟
نعم، يمكنك إلغاء التجميع بالنقر بزر الماوس الأيمن واختيار "إلغاء التجميع" أو استخدام الاختصارCtrl + Shift + G(Windows) أوCmd + Shift + G(Mac).هل يمكنني تحريك مجموعة من العناصر دفعة واحدة؟
نعم، بعد تجميعها، يمكنك نقل المجموعة بأكملها بالنقر عليها وسحبها.ماذا يحدث إذا جمعت العناصر عن طريق الخطأ؟
يمكنك إلغاء تجميعها بسهولة بالنقر بزر الماوس الأيمن واختيار "إلغاء التجميع" أو باستخدام اختصار لوحة المفاتيح.كيف أسجّل الشاشة على mac?
لـتسجيل الشاشة على جهاز Mac، يمكنك استخدام Trupeer AI. فهو يتيح لك التقاط الشاشة بالكامل ويوفر إمكانات ذكاء اصطناعي مثل إضافة صور رمزية بالذكاء الاصطناعي، وإضافة تعليق صوتي، وإضافة تكبير وتصغير في الفيديو. وباستخدام ميزة ترجمة الفيديو بالذكاء الاصطناعي من trupeer، يمكنك ترجمة الفيديو إلى أكثر من 30 لغة.كيف أضيف صورة رمزية بالذكاء الاصطناعي إلى تسجيل الشاشة?
لإضافة صورة رمزية بالذكاء الاصطناعي إلى تسجيل الشاشة، ستحتاج إلى استخدام أداة تسجيل شاشة بالذكاء الاصطناعي. Trupeer AI هي أداة تسجيل شاشة بالذكاء الاصطناعي، تساعدك على إنشاء مقاطع فيديو بعدة صور رمزية، كما تساعدك في إنشاء صورتك الرمزية الخاصة للفيديو.كيف أسجّل الشاشة على windows?
لتسجيل الشاشة على Windows، يمكنك استخدام Game Bar المدمجة (Windows + G) أو أداة ذكاء اصطناعي متقدمة مثل Trupeer AI للحصول على ميزات أكثر تقدمًا مثل الصور الرمزية بالذكاء الاصطناعي، والتعليق الصوتي، والترجمة، إلخ.كيف أضيف تعليقًا صوتيًا إلى الفيديو?
لإضافة تعليق صوتي إلى مقاطع الفيديو، نزّل إضافة Chrome الخاصة بـ trupeer ai. بعد التسجيل، ارفع الفيديو الخاص بك مع الصوت، واختر التعليق الصوتي المطلوب من Trupeer ثم صدّر الفيديو المعدّل الخاص بك.كيف أقوم بالتكبير في تسجيل الشاشة?
للتكبير أثناء تسجيل الشاشة، استخدم تأثيرات التكبير في Trupeer AI والتي تتيح لك التكبير والتصغير في لحظات محددة، مما يعزز التأثير البصري لمحتوى الفيديو الخاص بك.
يسأل الناس أيضًا
دروس ذات صلة

