
How to Upload an Image to ChatGPT
Learn how to upload images to ChatGPT and get insights from visuals. Step-by-step guide to sending pictures in your conversation and getting image-based help.
This document provides a step-by-step guide to uploading an image to ChatGPT.
You will learn how to attach an image from your computer or Google Drive, and how to prompt ChatGPT for further interaction with the uploaded image.
You can upload images to ChatGPT using mobile, web, desktop apps, or even the API. Here's how:
1. Mobile App
Open the ChatGPT app and log in.
Tap the plus (+) icon in the message bar.
Choose to upload a photo or take a new one.
Optionally, annotate or circle parts of the image.
Tap Next, add your text prompt, then tap Send.
2. Web Interface
Open chat.openai.com.
In the message bar, click the paperclip icon.
Select and upload an image from your computer.
Add your prompt and click Send.
3. macOS App
Open the ChatGPT Mac app.
Click the plus (+) icon in the message input area.
Choose Upload file (from your system) or Take photo (using your webcam).
Add your prompt and send.
4. API (Developers)
Use the API to upload an image by:
Providing an image URL,
Sending a base64-encoded image,
Using a file ID from OpenAI storage.
Combine it with a text prompt in your API call.
Step-by-Step Guide: How To Upload Image To ChatGPT
Step 1
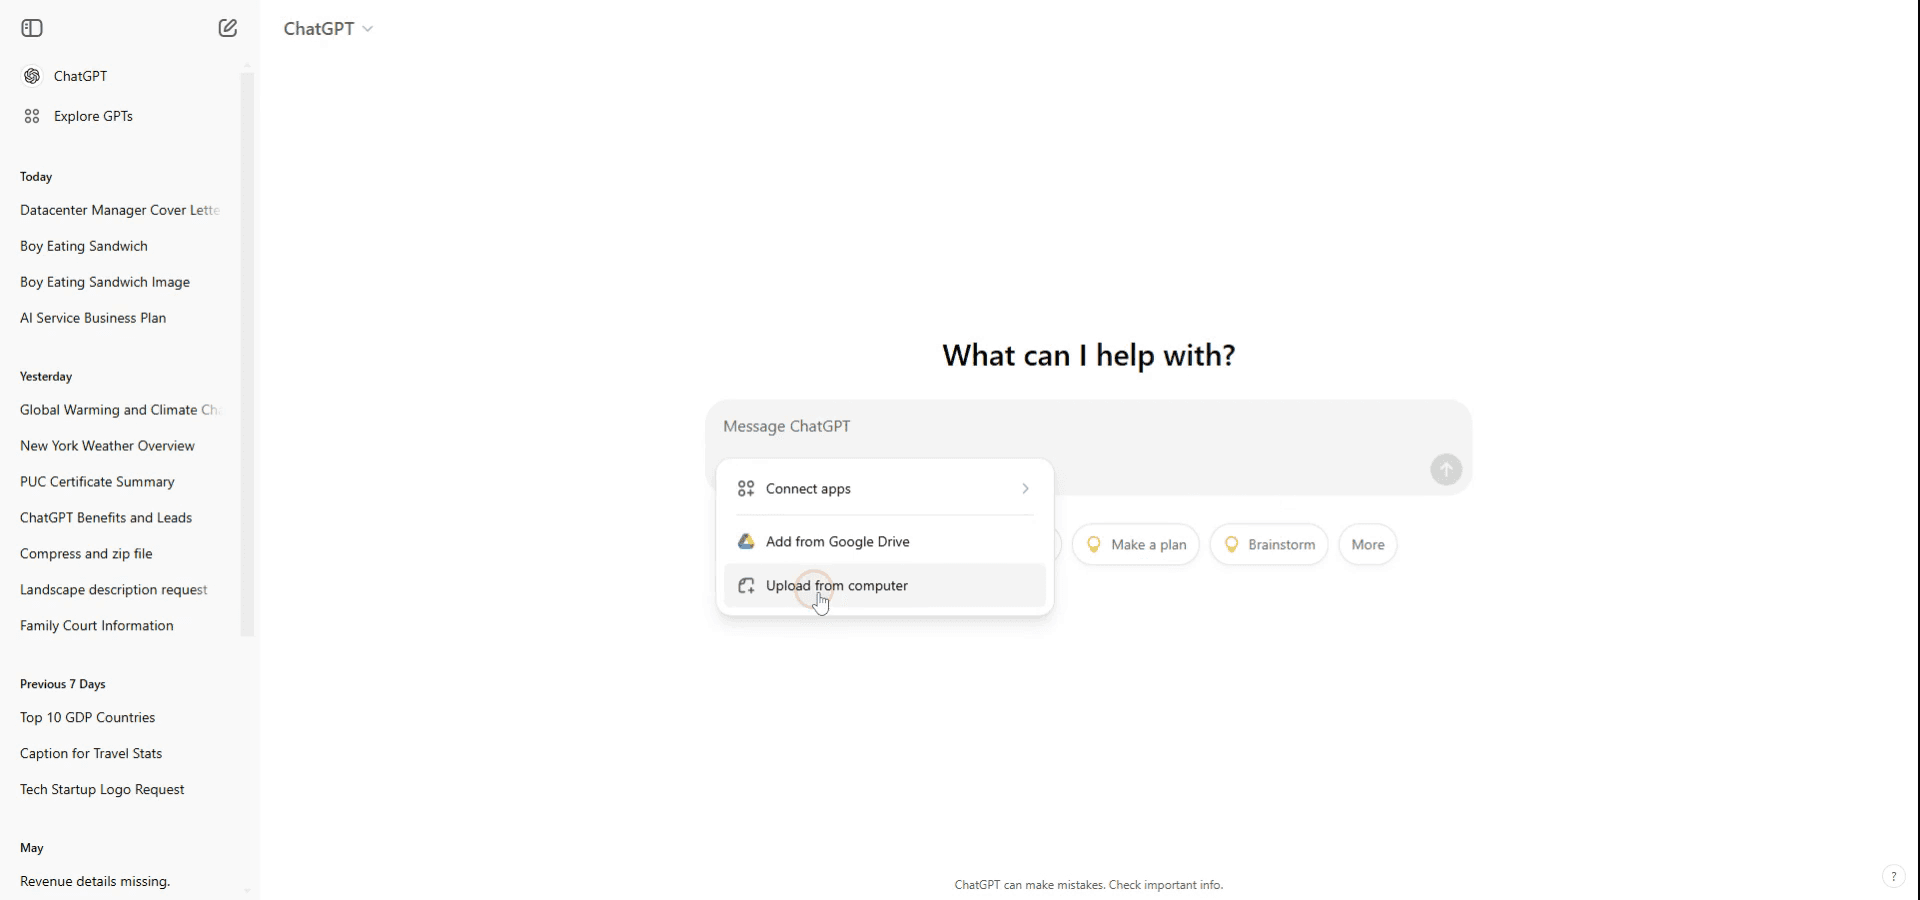
To upload an image to ChatGPT, click on the attach button located on the chat box. From there, you have the option to add your picture from Google Drive or other sources.

Step 2
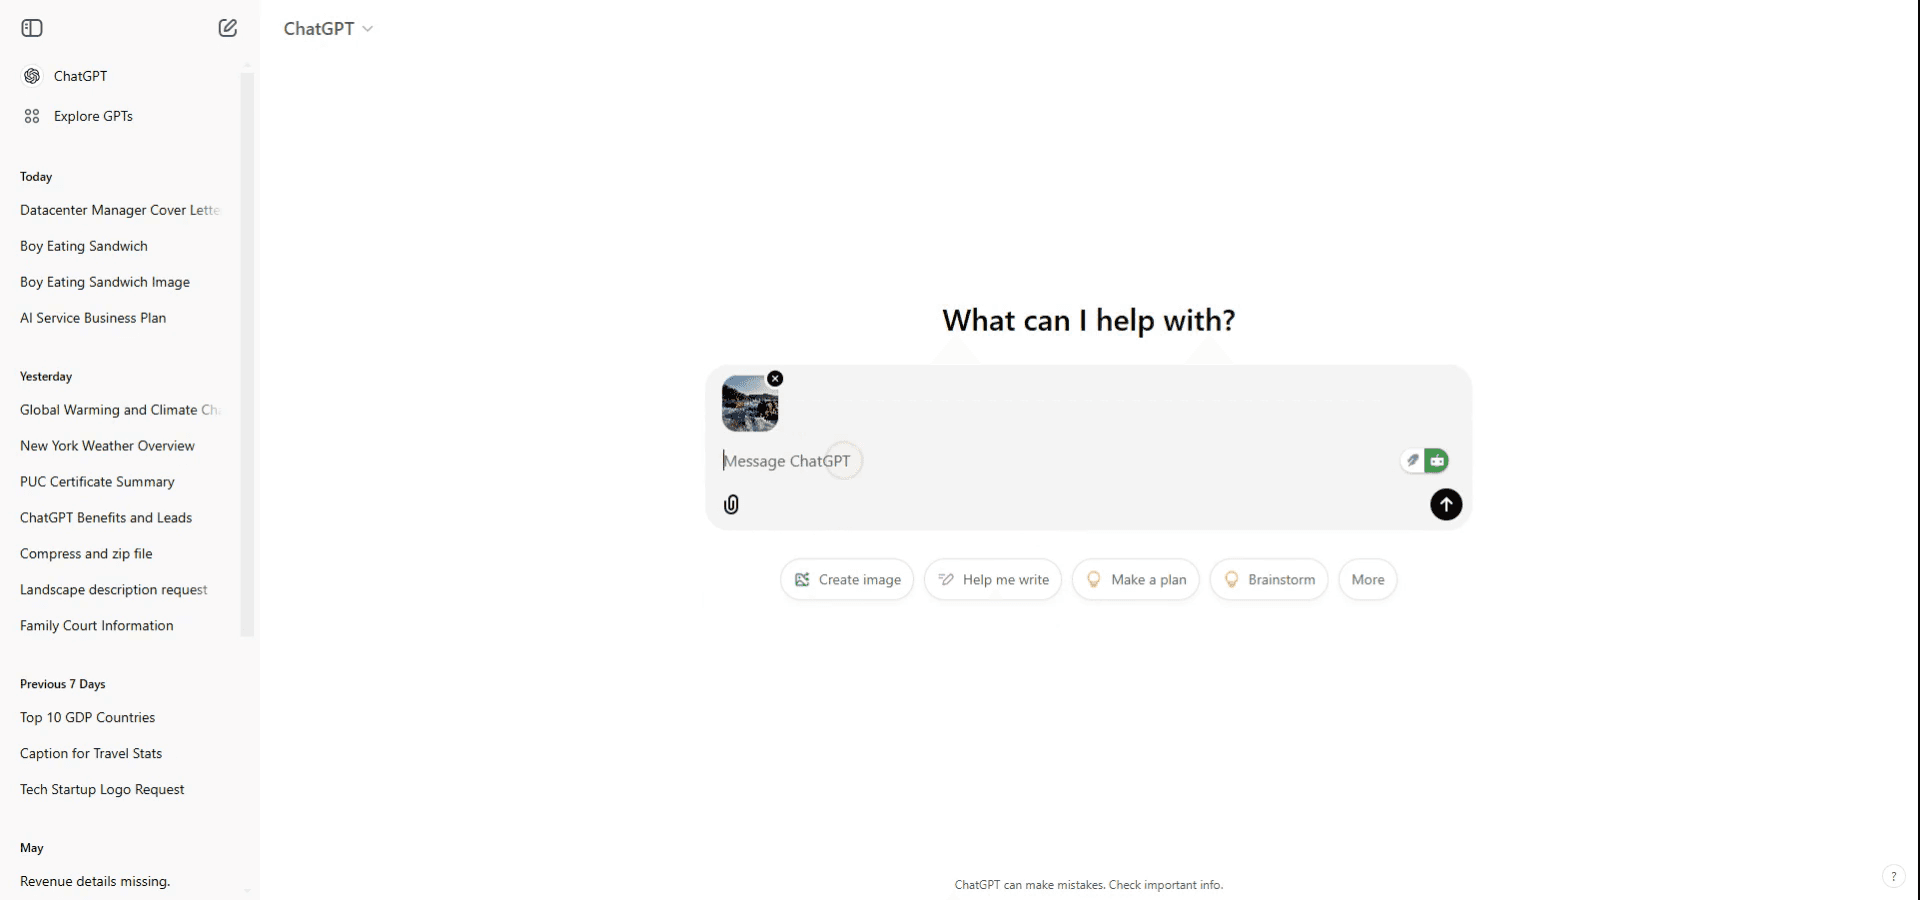
Alternatively, you can upload an image from your computer. In this example, we will upload an image from the computer. Navigate to the image on your device and click on it.
Step 3
Click on the upload button. The file will now be successfully attached to your ChatGPT conversation.
Step 4
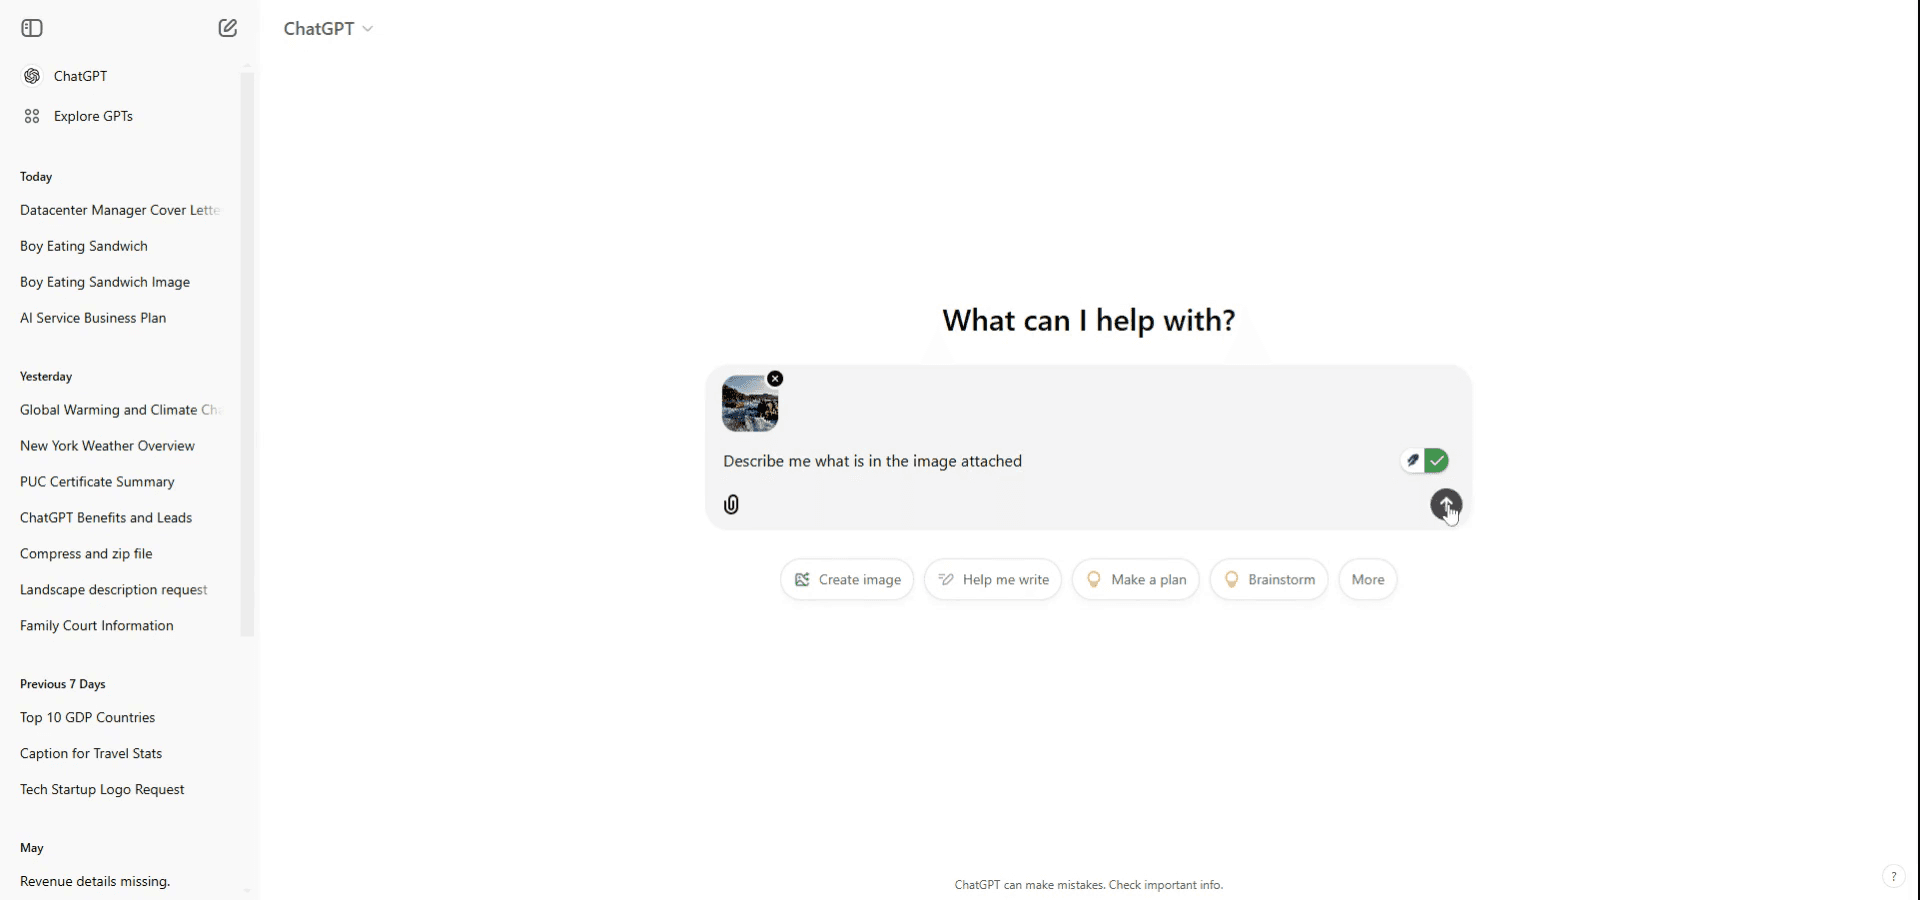
Use a prompt to specify what you wish to do with the image. For example, you might say, "Describe the image attached." ChatGPT will then analyze and describe the image based on your request.
Pro tips for uploading an image to ChatGPT
Ensure Image is Accessible: Before uploading, make sure the image is saved on your device or accessible via a URL.
Use the Right Platform: Uploading images to ChatGPT is possible only on platforms that support this feature, such as certain apps or websites integrated with ChatGPT's image-upload capabilities.
Give Context: Provide a brief description or context about the image so that ChatGPT can assist you better with the image you upload.
Common pitfalls and how to avoid them for uploading an image to ChatGPT
Platform Limitations: Not all platforms or versions of ChatGPT allow image uploads.
Ensure you're using a platform or interface that supports image input capabilities.File Size Issues: Uploading a very large image may result in upload errors.
Resize the image if necessary to reduce the file size before uploading.Lack of Context: Uploading an image without explaining what you're seeking might lead to generic or unhelpful responses.
Always accompany your image with a clear explanation of what you need assistance with.
Common FAQs for uploading an image to ChatGPT
How do I upload an image to ChatGPT?
Depending on the platform you're using, you can either click an upload button or drag and drop your image into the chat box.Can ChatGPT interpret images?
Yes, ChatGPT can assist with analyzing or describing images when uploaded to supported platforms.What types of images can I upload?
Most platforms that support image upload allow common formats like JPEG, PNG, and GIF.How to screen record on mac?
To screen record on a Mac, you can use Trupeer AI. It allows you to capture the entire screen and provides AI capabilities such as adding AI avatars, add voiceover, add zoom in and out in the video. With trupeer’s AI video translation feature, you can translate the video into 30+ languages.How to add an AI avatar to screen recording?
To add an AI avatar to a screen recording, you'll need to use an AI screen recording tool. Trupeer AI is an AI screen recording tool, which helps you create videos with multiple avatars, also helps you in creating your own avatar for the video.How to screen record on windows?
To screen record on Windows, you can use the built-in Game Bar (Windows + G) or advanced AI tool like Trupeer AI for more advanced features such as AI avatars, voiceover, translation etc.How to add voiceover to video?
To add voiceover to videos, download trupeer ai chrome extension. Once signed up, upload your video with voice, choose the desired voiceover from trupeer and export your edited video.How do I Zoom in on a screen recording?
To zoom in during a screen recording, use the zoom effects in Trupeer AI which allows you to zoom in and out at specific moments, enhancing the visual impact of your video content.
Suggested Reads
Technical Documentation Generator
How to Turn an Image into a Coloring Page in Canva
How to Print Double Sided on Canva
Related Tutorials

