
How to Share Your GitHub Profile
Learn how to share your GitHub profile with others using a direct link or QR code. Perfect for job applications, networking, or showcasing your projects.
This document provides a clear and concise guide on how to share your GitHub profile.
Follow these simple steps to quickly find and share your profile link, ensuring easy access for collaborators, recruiters, or your professional network.
Sharing your GitHub profile is easy. Just go to your profile page, copy the URL from your browser’s address bar, and paste it wherever you need like your resume or LinkedIn. The link will look something like: https://github.com/yourusername. You can also share individual project repositories and even link your social profiles.
Here’s a step-by-step guide:
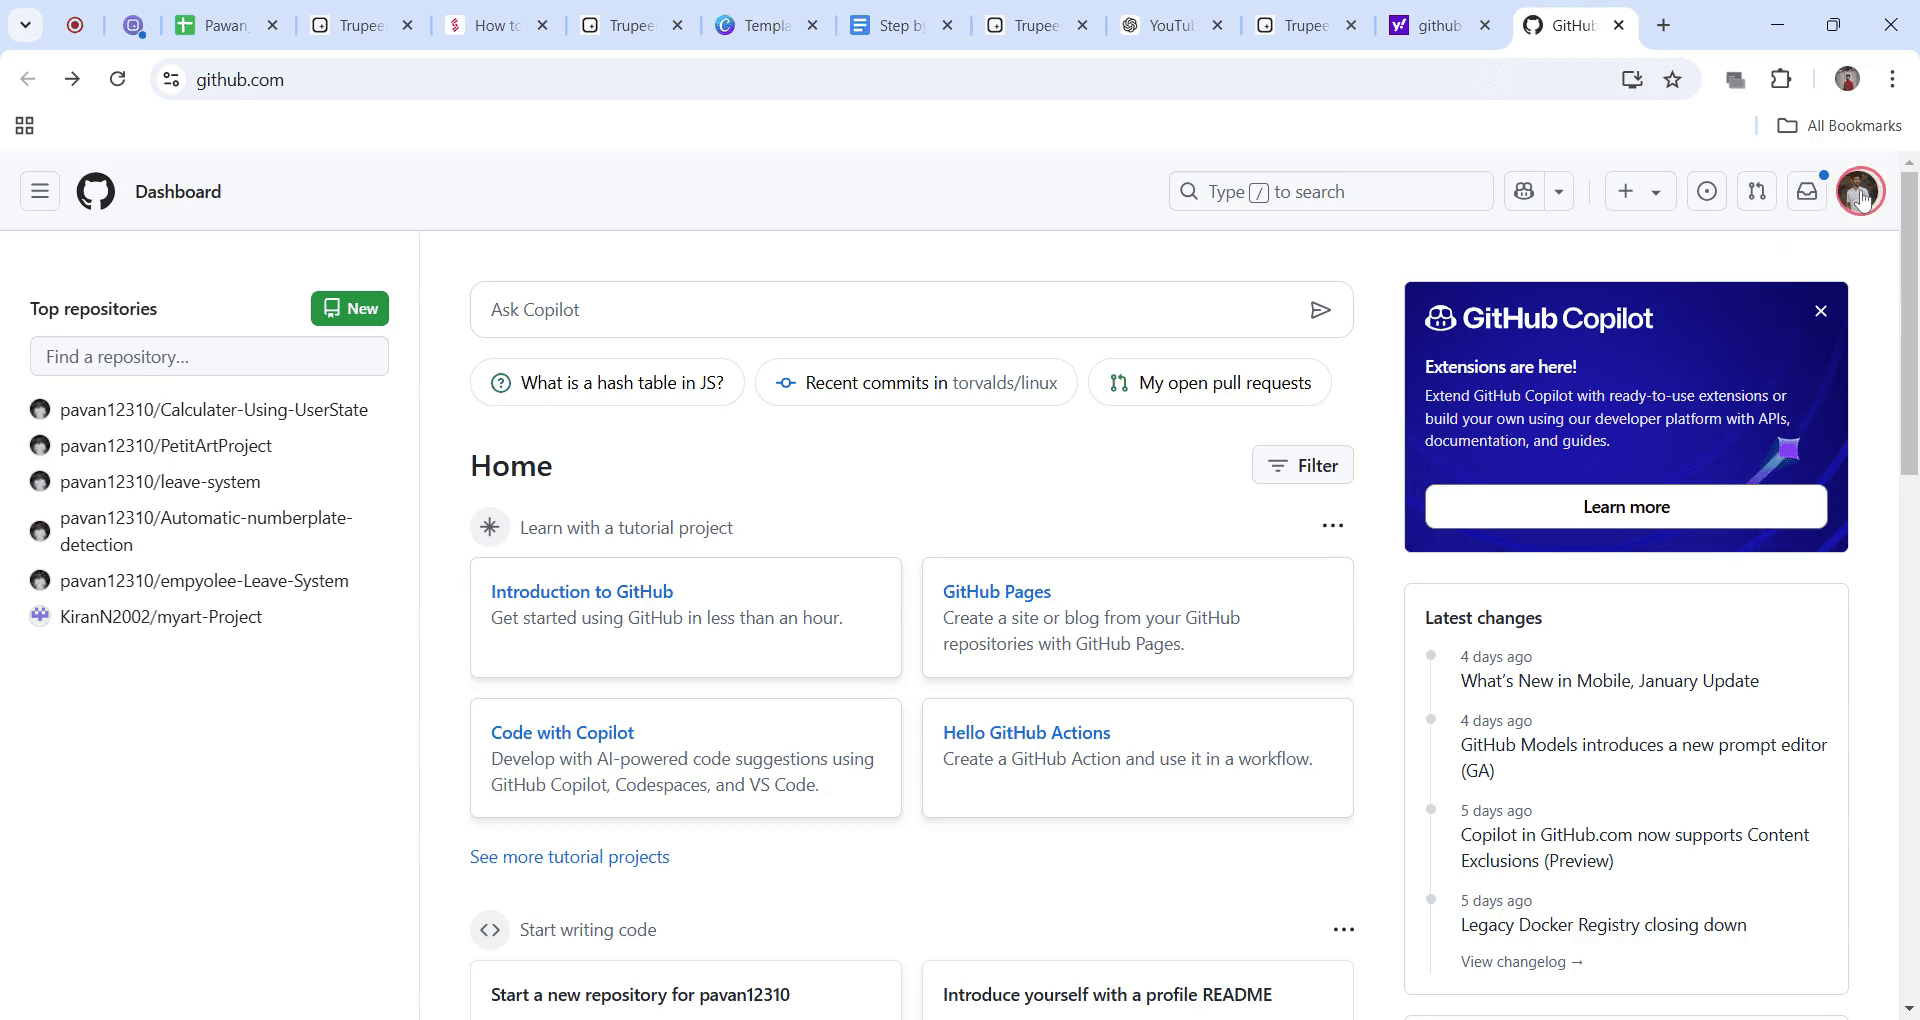
1. Go to your GitHub profile:
Click your profile picture in the top-right corner of GitHub, then select "Your profile" from the dropdown.
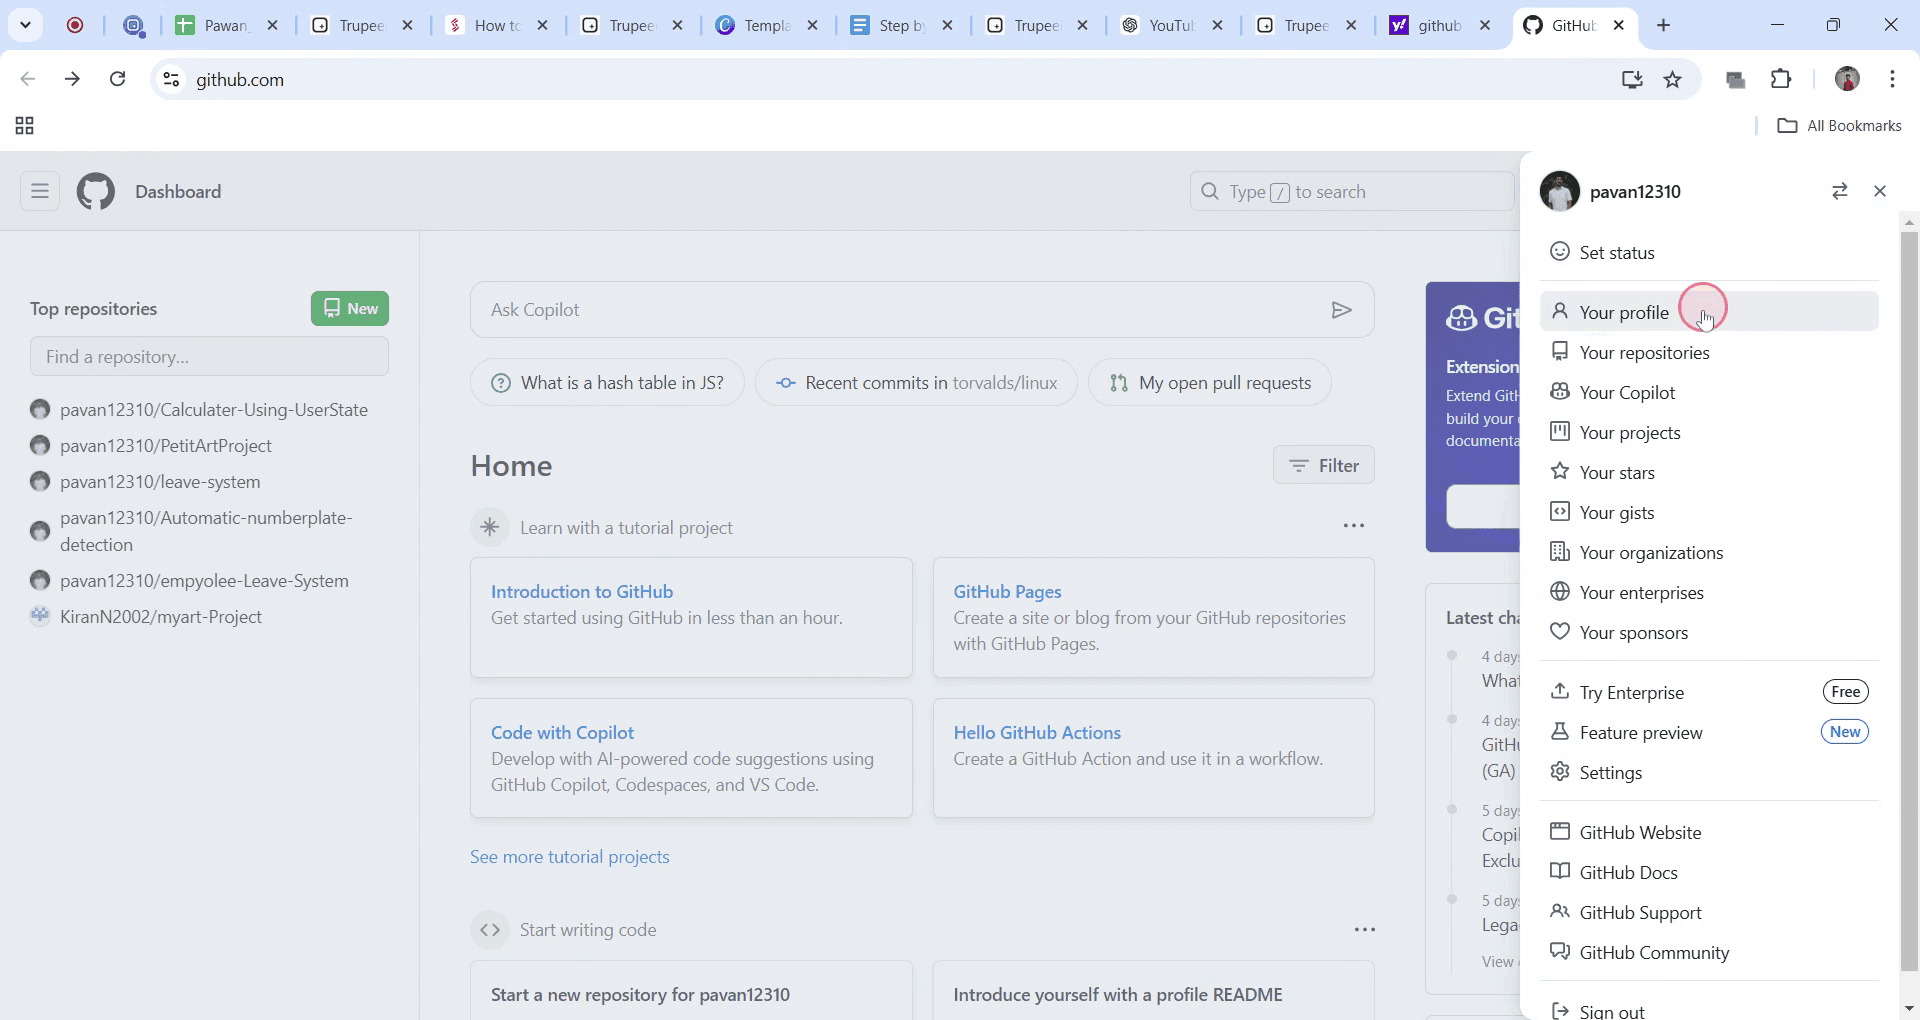
2. Copy your profile URL:
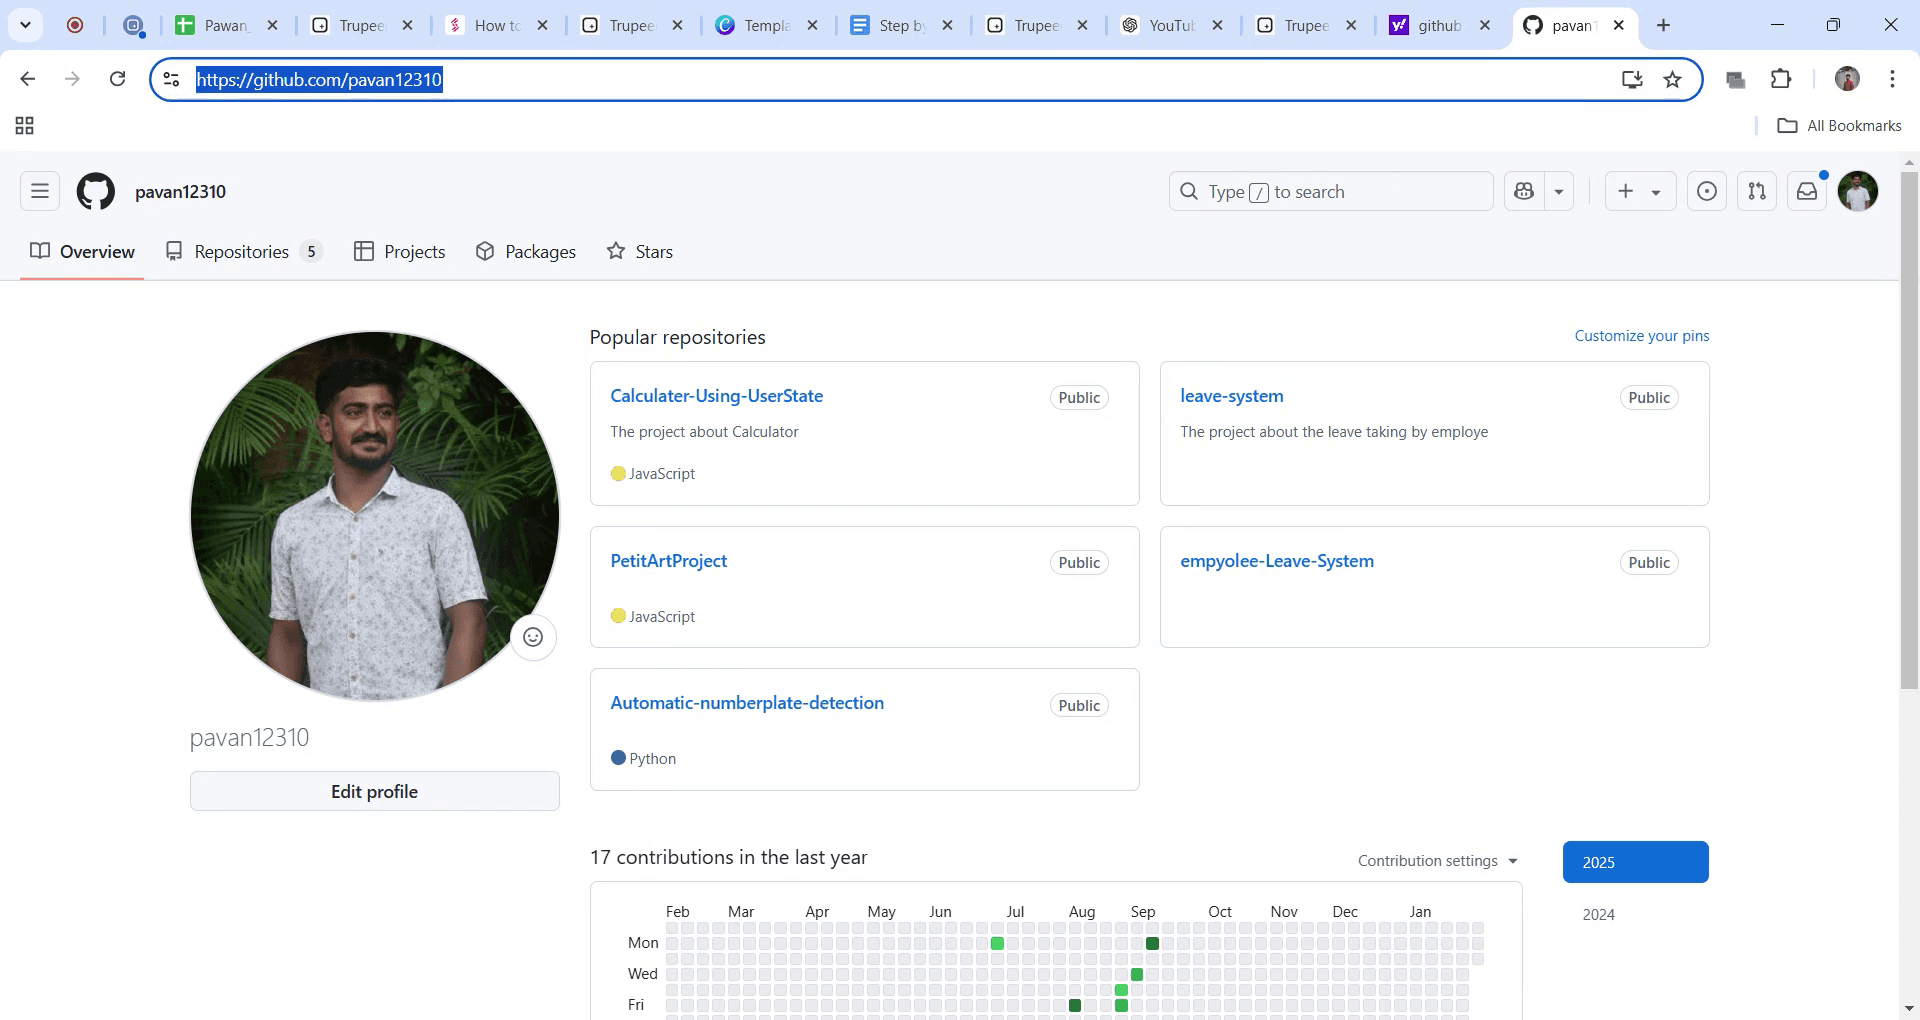
Once your profile page loads, just copy the web address from your browser’s address bar.
3. Share the link:
You can now paste that URL into job applications, LinkedIn, emails anywhere you want people to view your work.
4. Share a specific repository:
To highlight a specific project, go to that repo and copy the URL in your browser. Share that link instead of your main profile.
5. Add social links to your profile:
Want to help people find you elsewhere?
Head to Settings, scroll to the Social accounts section, and paste in links to your other profiles (like Twitter or LinkedIn).
Step-by-Step Guide: How to Share Your GitHub Profile
Step 1
Begin by locating the profile picture in the top right corner of your Getup interface. Click on the profile picture.
Step 2
From the drop-down menu that appears, select and click on "Your Profile."
Step 3
Once your profile page is displayed, navigate to the address bar and highlight the URL of your Getup profile. This is the link you can share whenever necessary.
Pro-tips for sharing a GitHub profile
You can easily share your GitHub profile by copying the URL from the address bar and sending it to others.
Customize your GitHub profile by adding a bio, social media links, and highlighting important repositories to give visitors an overview of your work.
Ensure that you review your profile visibility settings if you wish to share certain repositories or details with specific people.
Common pitfalls & how to avoid them while sharing a GitHub profile
Not checking the visibility of your repositories ensure that your repositories are public or that the people you share them with have access to private ones.
Overlooking profile customization make sure your profile bio and repository list are up-to-date to give a clear picture of your work.
Sharing sensitive information avoid exposing sensitive data, like API keys or personal information, in your profile or repositories.
Common FAQs for sharing a GitHub profile
How do I get the link to my GitHub profile?
You can get the link by navigating to your profile page on GitHub, and then copying the URL from the address bar.Can I share my GitHub profile with a specific person?
Yes, you can share your profile link directly with anyone. If you have private repositories, ensure you’ve granted them access as collaborators.How do I make my GitHub profile public?
To make your profile public, go to your GitHub settings, and under Profile, ensure the Public Profile option is enabled.Can I customize my GitHub profile?
Yes, you can customize your profile by adding a bio, social media links, and repositories that you want to highlight.How do I share a specific repository on my GitHub profile?
Go to the repository page, and simply copy the URL from your browser’s address bar, then share it with others.How to screen record on mac?
To screen record on a Mac, you can use Trupeer AI. It allows you to capture the entire screen and provides AI capabilities such as adding AI avatars, add voiceover, add zoom in and out in the video. With trupeer’s AI video translation feature, you can translate the video into 30+ languages.How to add an AI avatar to screen recording?
To add an AI avatar to a screen recording, you'll need to use an AI screen recording tool. Trupeer AI is an AI screen recording tool, which helps you create videos with multiple avatars, also helps you in creating your own avatar for the video.How to screen record on windows?
To screen record on Windows, you can use the built-in Game Bar (Windows + G) or advanced AI tool like Trupeer AI for more advanced features such as AI avatars, voiceover, translation etc.How to add voiceover to video?
To add voiceover to videos, download trupeer ai chrome extension. Once signed up, upload your video with voice, choose the desired voiceover from trupeer and export your edited video.How do I Zoom in on a screen recording?
To zoom in during a screen recording, use the zoom effects in Trupeer AI which allows you to zoom in and out at specific moments, enhancing the visual impact of your video content.
Suggested Reads
Technical Documentation Generator
How to Turn an Image into a Coloring Page in Canva
How to Print Double Sided on Canva
Related Tutorials

