
Come eliminare una presentazione Canva – Tutorial passo passo
Devi rimuovere una presentazione da Canva? Scopri come eliminare definitivamente una presentazione Canva dai tuoi progetti in pochi clic.
Questa guida fornisce istruzioni passo passo su come eliminare una presentazione in Canva. Segui queste istruzioni dettagliate per assicurarti che la presentazione venga rimossa correttamente dal tuo account.
Nota che il processo prevede prima lo spostamento della presentazione nel Cestino, con la possibilità di eliminarla definitivamente da lì.
Se vuoi rimuovere una presentazione dal tuo spazio di lavoro Canva, puoi farlo facilmente spostandola nel cestino. Ecco come:
Istruzioni passo passo:
Vai alla home page di Canva
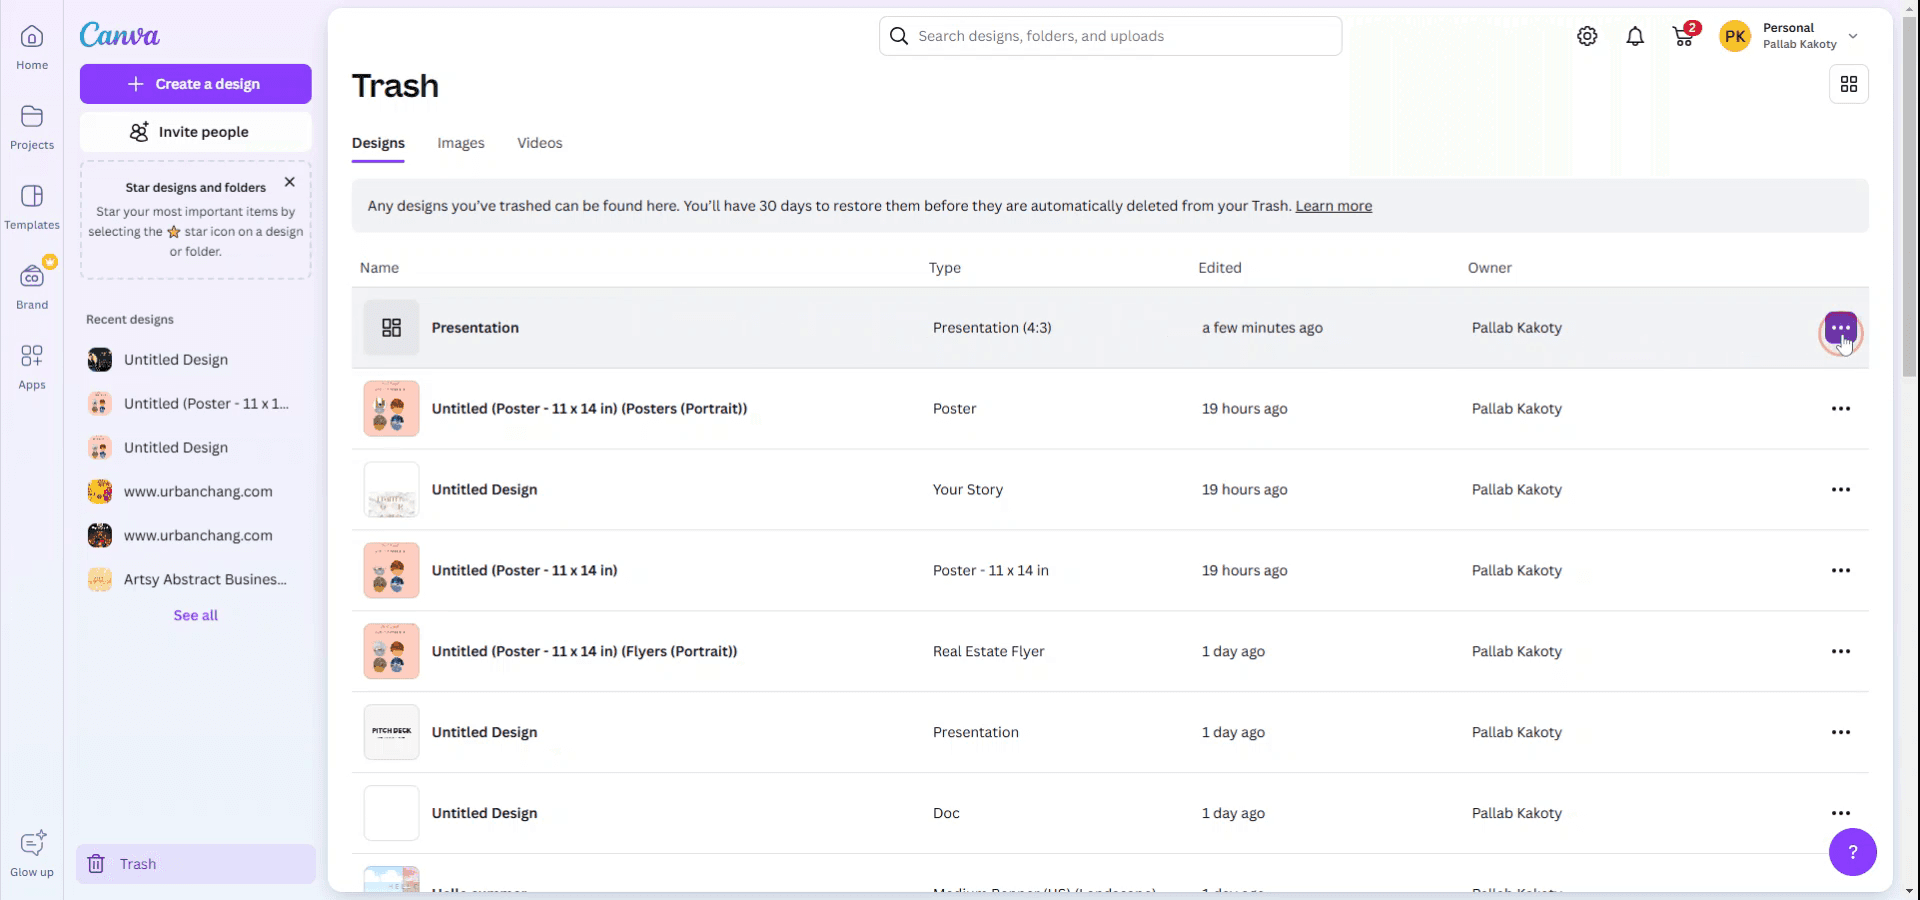
Vai su canva.com e accedi al tuo account.Individua la presentazione
Trova l'anteprima del progetto della presentazione che desideri eliminare in “Design recenti” o “Progetti.”Fai clic sui tre puntini (icona Altro)
Passa il mouse sull'anteprima e fai clic sui tre puntini nell'angolo in alto a destra.Seleziona “Sposta nel cestino”
Dal menu a discesa, scegli “Sposta nel cestino” per rimuovere il design dal tuo spazio di lavoro.
Ulteriori suggerimenti:
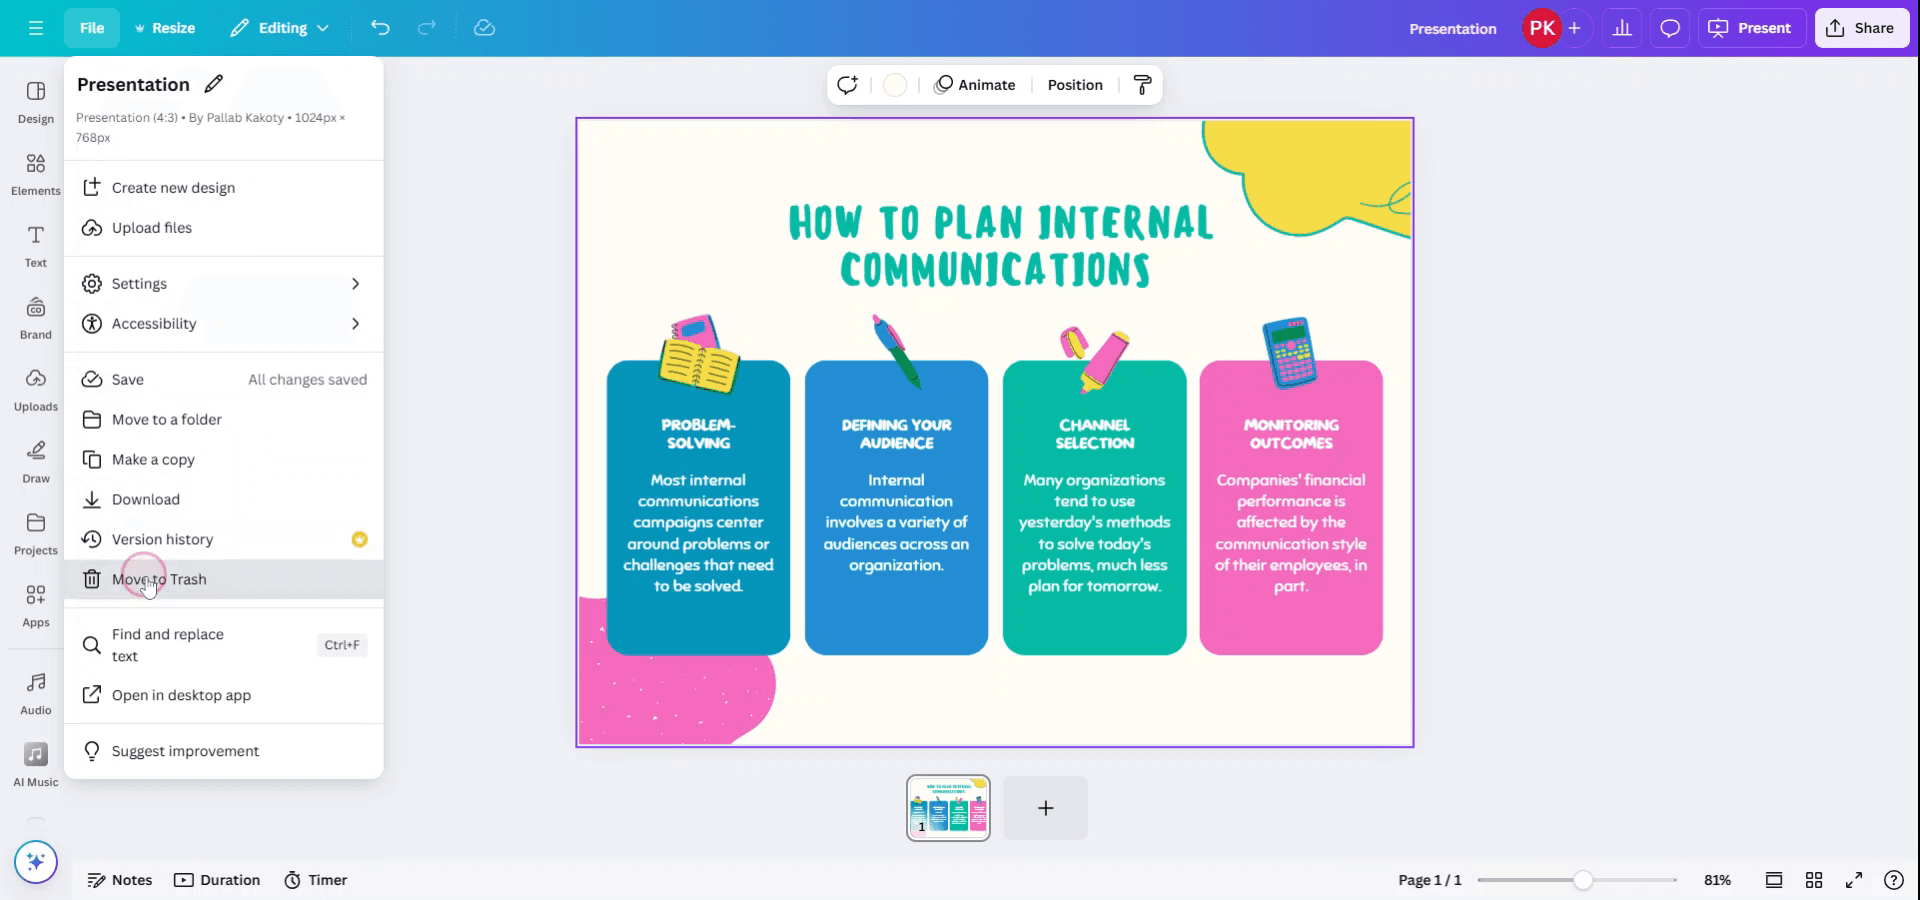
Durante la modifica: Puoi anche spostare una presentazione nel cestino dalla vista dell'editor facendo clic su File > Sposta nel cestino.
Design condivisi: Se il design è stato condiviso con te, puoi rimuoverlo dalla tua visualizzazione, ma solo il proprietario originale può eliminarlo definitivamente.
Recupero dal cestino: I design spostati nel cestino rimangono nella sezione Cestino per 30 giorni (a meno che non vengano eliminati definitivamente). Puoi ripristinarli se necessario.
Guida passo passo: come eliminare una presentazione in Canva
Passaggio 1
Accedi al tuo account Canva e apri la presentazione che desideri eliminare.
Passaggio 2
Nella presentazione aperta, vai al menu in alto e seleziona 'File'.

Passaggio 3
Dal menu a discesa 'File', scegli l'opzione 'Sposta nel cestino'.
Passaggio 4
Verrà visualizzato un pop-up che chiede conferma per spostare la presentazione nel Cestino.

Passaggio 5
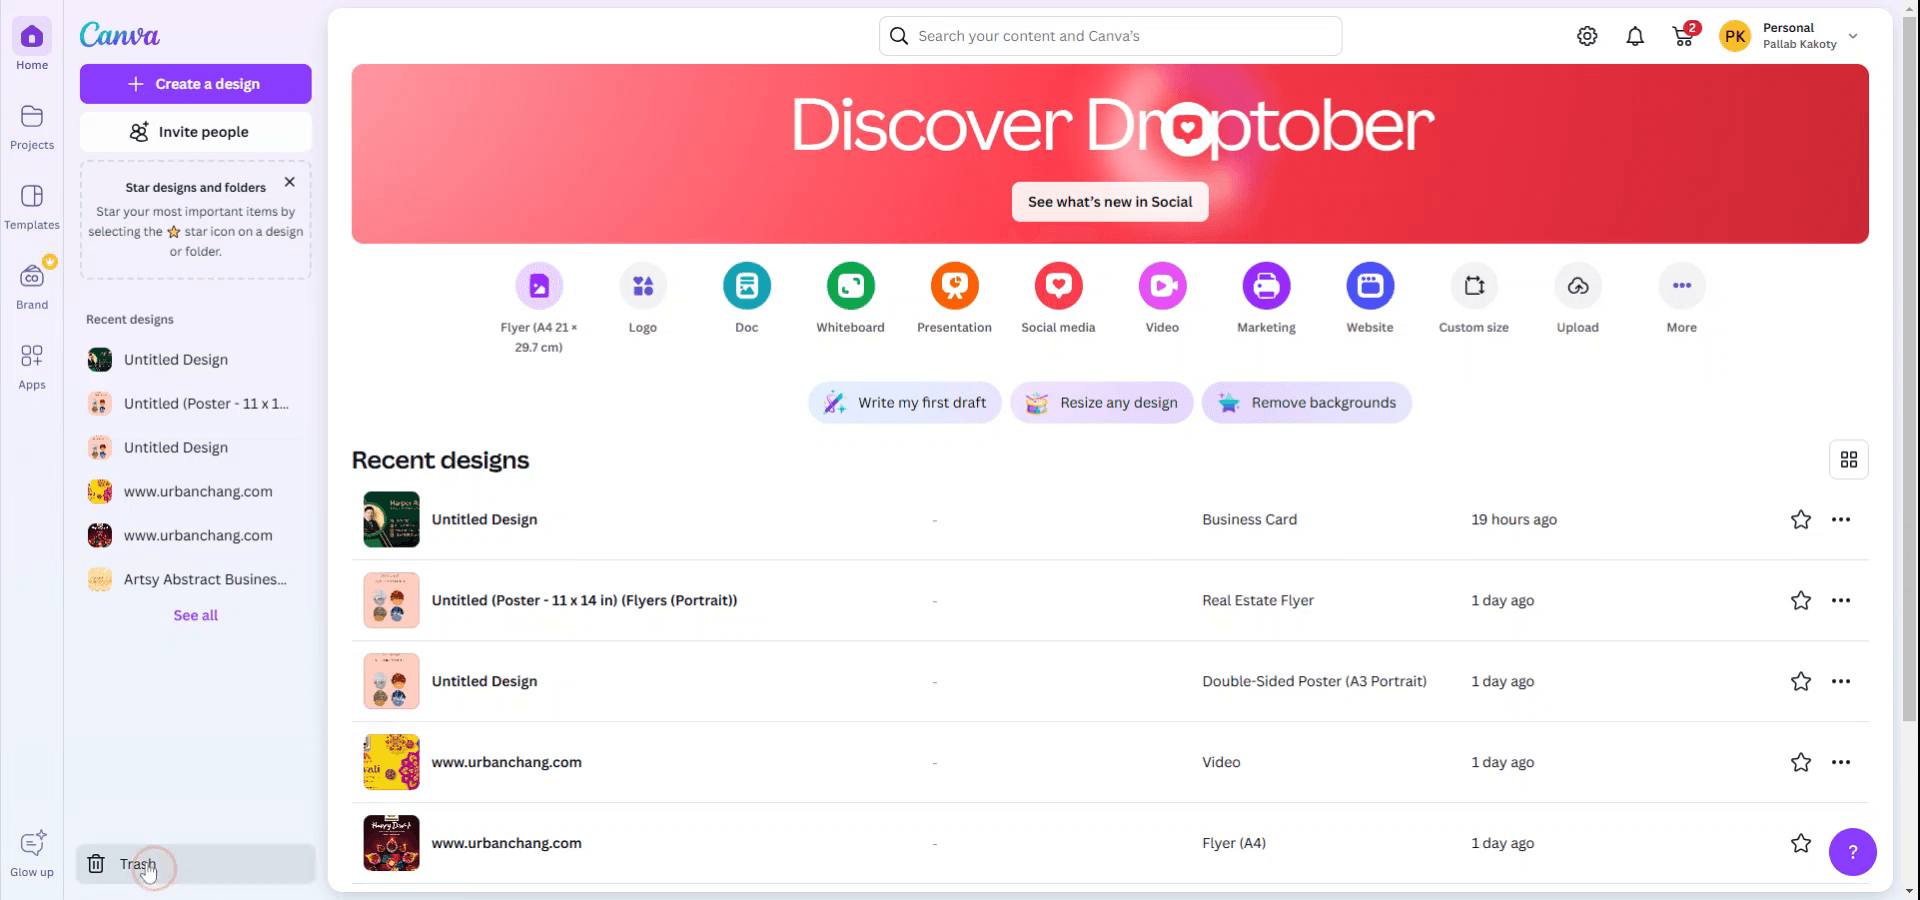
Una volta confermato, il file verrà automaticamente spostato nel Cestino. Per eliminarlo definitivamente, fai clic su 'Cestino' nel menu Home.
Passaggio 6
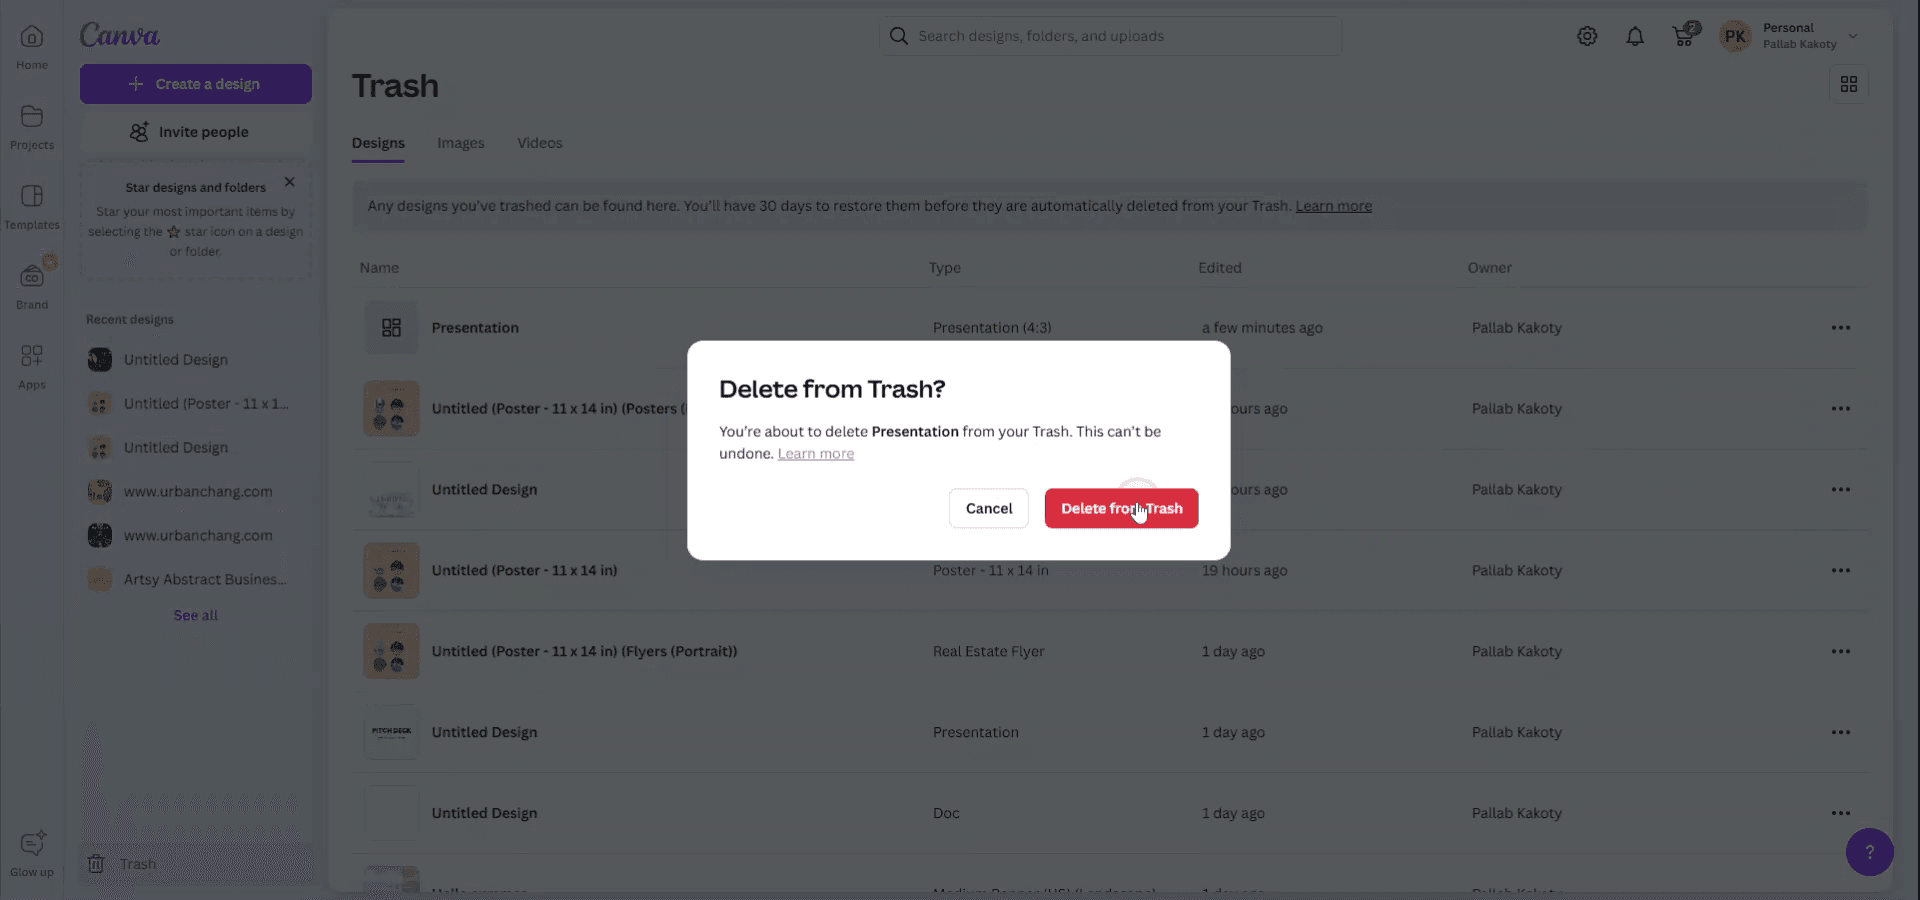
Individua la presentazione nel Cestino. Fai clic sul menu a tre puntini associato alla presentazione e seleziona 'Elimina dal cestino.'
Passaggio 7
Sarà necessaria una conferma finale per eliminare definitivamente la presentazione dal Cestino.
Consigli utili per eliminare una presentazione Canva
Apri il design in Canva:
Vai alla homepage di Canva e apri il design che desideri eliminare.Vai alla sezione "Tutti i tuoi progetti":
Nella barra laterale sinistra, fai clic su "Tutti i tuoi progetti" per visualizzare l'elenco delle presentazioni salvate.Seleziona la presentazione:
Passa il cursore sopra la presentazione che vuoi eliminare. Sulla miniatura appariranno tre puntini (altre opzioni).Fai clic sui tre puntini e seleziona "Sposta nel cestino":
Dal menu a discesa, scegli "Sposta nel cestino" per eliminare il design. In questo modo la presentazione verrà spostata nel cestino.Svota il cestino (opzionale):
Per eliminare definitivamente la presentazione, vai al tuo Cestino (che si trova nella barra laterale sinistra), trova la presentazione e fai clic su "Elimina per sempre."
Errori comuni e come evitarli quando elimini una presentazione Canva
Eliminare per errore il file sbagliato:
Soluzione: Controlla attentamente il design prima di fare clic su "Sposta nel cestino" per assicurarti di eliminare la presentazione corretta.Non svuotare il cestino:
Soluzione: Dopo aver spostato un design nel Cestino, ricorda che non viene eliminato definitivamente finché non svuoti il Cestino. Se sei sicuro di voler eliminare il file, vai alla cartella Cestino e rimuovilo definitivamente.Il design è ancora visibile dopo l'eliminazione:
Soluzione: A volte, ci vuole un momento prima che il design scompaia dall'area di lavoro dopo essere stato spostato nel Cestino. Aggiorna la pagina se il design è ancora visibile.Confondere il cestino con l'archivio:
Soluzione: Assicurati di spostare il design nel "Cestino" e non di archiviarlo. I design archiviati non vengono eliminati e possono essere ripristinati in seguito.Non riuscire a annullare l'eliminazione:
Soluzione: Canva offre una finestra di 30 giorni per ripristinare gli elementi dal Cestino. Se devi recuperare un design eliminato, fallo entro quel periodo.
FAQ comuni per eliminare una presentazione di Canva
Come posso eliminare definitivamente una presentazione di Canva?
Apri "Tutti i tuoi design", passa il mouse sulla presentazione, fai clic sui tre puntini e seleziona "Sposta nel cestino." Poi vai nel Cestino e fai clic su "Elimina per sempre."Posso annullare l'eliminazione di una presentazione di Canva?
Sì, puoi ripristinare una presentazione dal Cestino entro 30 giorni dall'eliminazione andando nel Cestino e facendo clic su "Ripristina."L'eliminazione della mia presentazione influirà sugli altri utenti?
Se stai lavorando a una presentazione condivisa, quando la elimini viene rimosso solo il tuo accesso. Gli altri utenti potrebbero ancora avere accesso, a meno che non la eliminino anche dai loro account.Esiste un modo per eliminare più presentazioni contemporaneamente?
Al momento, Canva non supporta l'eliminazione in blocco. Dovrai eliminare ogni presentazione singolarmente.Cosa succede a una presentazione nel Cestino?
Le presentazioni nel Cestino possono ancora essere recuperate per un massimo di 30 giorni. Dopo tale periodo, verranno eliminate definitivamente.Come registrare lo schermo su Mac?
Per registrare lo schermo su un Mac, puoi usare Trupeer AI. Ti consente di catturare l'intero schermo e offre funzionalità IA come l'aggiunta di avatar IA, aggiungere una voce fuori campo e aggiungere zoom avanti e indietro nel video. Con la funzione di traduzione video IA di Trupeer, puoi tradurre il video in oltre 30 lingue.Come aggiungere un avatar IA alla registrazione dello schermo?
Per aggiungere un avatar IA a una registrazione dello schermo, dovrai usare uno strumento di registrazione dello schermo IA. Trupeer AI è uno strumento di registrazione dello schermo IA che ti aiuta a creare video con più avatar e ti aiuta anche a creare il tuo avatar per il video.Come registrare lo schermo su Windows?
Per registrare lo schermo su Windows, puoi usare la Game Bar integrata (Windows + G) oppure uno strumento IA avanzato come Trupeer AI per funzionalità più avanzate come avatar IA, voce fuori campo, traduzione ecc.Come aggiungere una voce fuori campo al video?
Per aggiungere una voce fuori campo ai video, scarica l'estensione Chrome di trupeer ai. Una volta registrato, carica il tuo video con audio, scegli la voce fuori campo desiderata da trupeer ed esporta il video modificato.Come posso ingrandire in una registrazione dello schermo?
Per ingrandire durante una registrazione dello schermo, usa gli effetti di zoom in Trupeer AI, che consentono di ingrandire e ridurre in momenti specifici, migliorando l'impatto visivo dei contenuti video.
Le persone chiedono anche
Generatore di documentazione tecnica
Come ruotare un documento in Canva
Come usare la maschera in Canva
Tutorial correlati

