

كيفية زيادة حجم الخلية في جداول بيانات Google
تعلّم كيفية ضبط حجم الخلايا في Google Sheets عن طريق تغيير حجم الصفوف والأعمدة. يوضّح لك هذا الدليل طرقًا سريعة لتخصيص تخطيط جدول البيانات.
توضح هذه العملية كيفية تعديل حجم الخلايا في جداول بيانات Google من خلال ضبط أبعاد الصفوف أو الأعمدة.
إذا كنت تحتاج إلى مزيد من المساحة في خلاياك عموديًا أو أفقيًا، فيمكنك بسهولة ضبط ارتفاع الصف أو عرض العمود. جداول بيانات Google توفر كلاً من خيارات السحب اليدوي والإدخال الدقيق لتغيير الحجم.
1. تغيير حجم الأعمدة:
اسحب حد العمود:
حرّك مؤشر الماوس إلى الحافة اليمنى من رأس العمود (حيث توجد الأحرف). عندما يظهر السهم ذو الرأسين، انقر واسحب لجعل العمود أعرض.
انقر بزر الماوس الأيمن ثم غيّر الحجم:
انقر بزر الماوس الأيمن على حرف العمود، ثم اختر “تغيير حجم العمود”، وبعد ذلك أدخل العرض بالبكسل. يمكنك أيضًا اختيار “ملاءمة البيانات” ليقوم جداول بيانات Google بضبطه تلقائيًا بناءً على المحتوى.
2. تغيير حجم الصفوف:
اسحب حد الصف:
مرّر المؤشر فوق الحافة السفلية لرقم الصف. عندما ترى السهم المزدوج، اسحب الحد لزيادة ارتفاع الصف.
انقر بزر الماوس الأيمن ثم غيّر الحجم:
انقر بزر الماوس الأيمن على رقم الصف، واختر “تغيير حجم الصف”، ثم اكتب الارتفاع الذي تفضله. يمكنك أيضًا اختيار “ملاءمة البيانات” هنا إذا لزم الأمر.
3. خيارات أخرى:
التحجيم التلقائي:
انقر نقرًا مزدوجًا على حافة صف أو عمود لإعادة تغيير حجمه تلقائيًا ليتناسب مع المحتوى بشكل مثالي.
تغيير حجم عدة عناصر دفعة واحدة:
يمكنك تحديد عدة صفوف أو أعمدة وسحب أحد الحدود — أو النقر بزر الماوس الأيمن ثم تغيير الحجم — لضبطها جميعًا معًا.
استخدم قائمة التنسيق:
لمزيد من التحكم، انتقل إلى قائمة “التنسيق” حيث يمكنك ضبط حجم الخلايا بدقة إلى جانب خيارات التنسيق الأخرى.
دليل خطوة بخطوة: كيفية زيادة حجم الخلايا في جداول بيانات Google
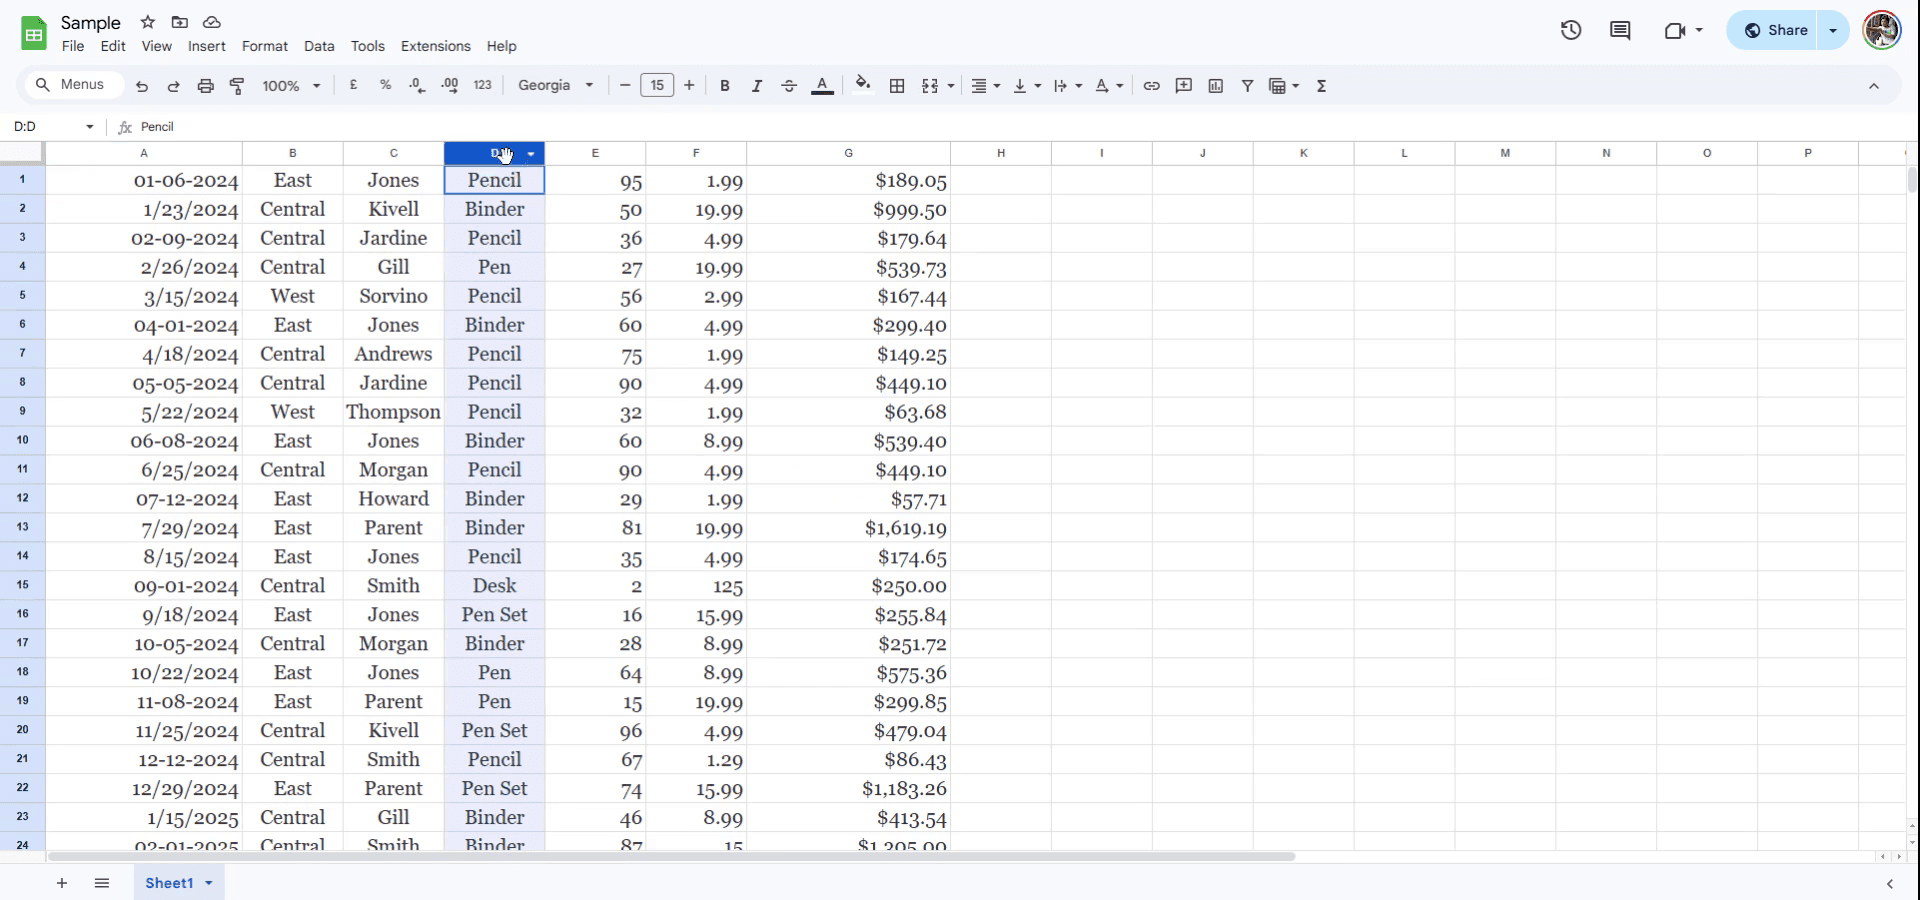
الخطوة 1
لتغيير حجم صف أو عمود، ابدأ بتحديد رقم الصف المحدد أو رأس حرف العمود. في هذا المثال، تم تحديد العمود D.
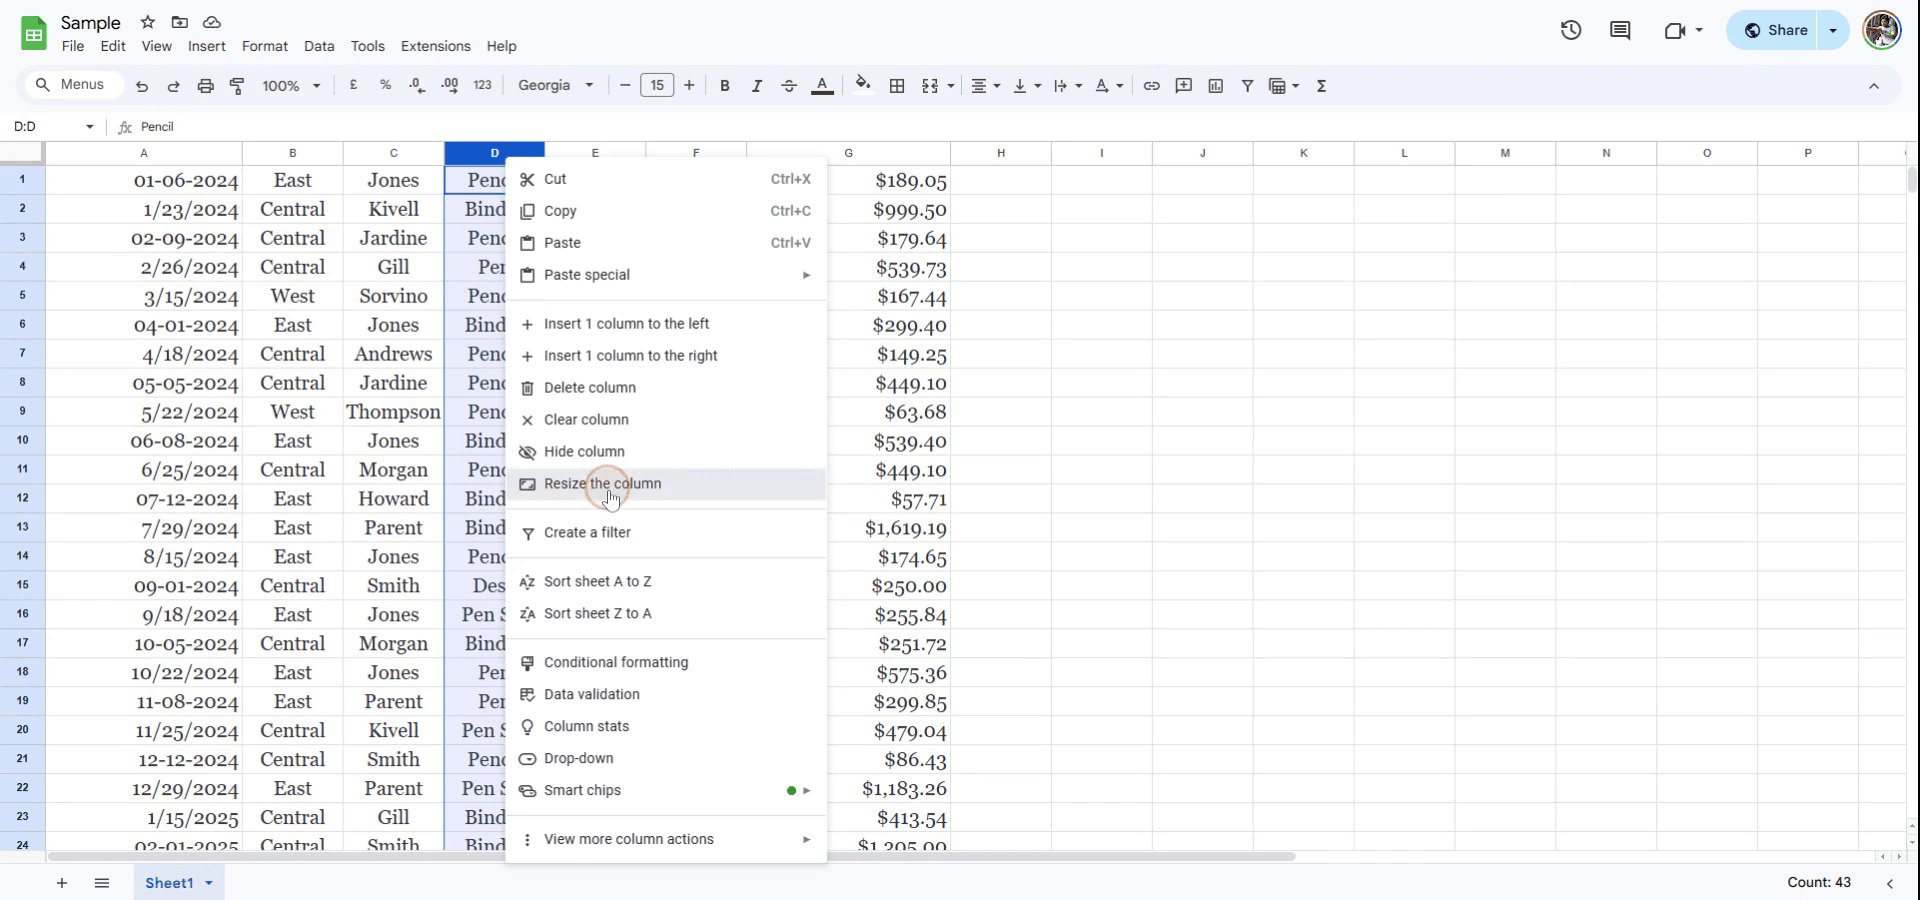
الخطوة 2
بعد ذلك، انقر بزر الماوس الأيمن على رأس الصف أو العمود المحدد. من قائمة السياق التي تظهر، اختر خيار تغيير الحجم للعمود أو الصف، وفقًا لتحديدك.
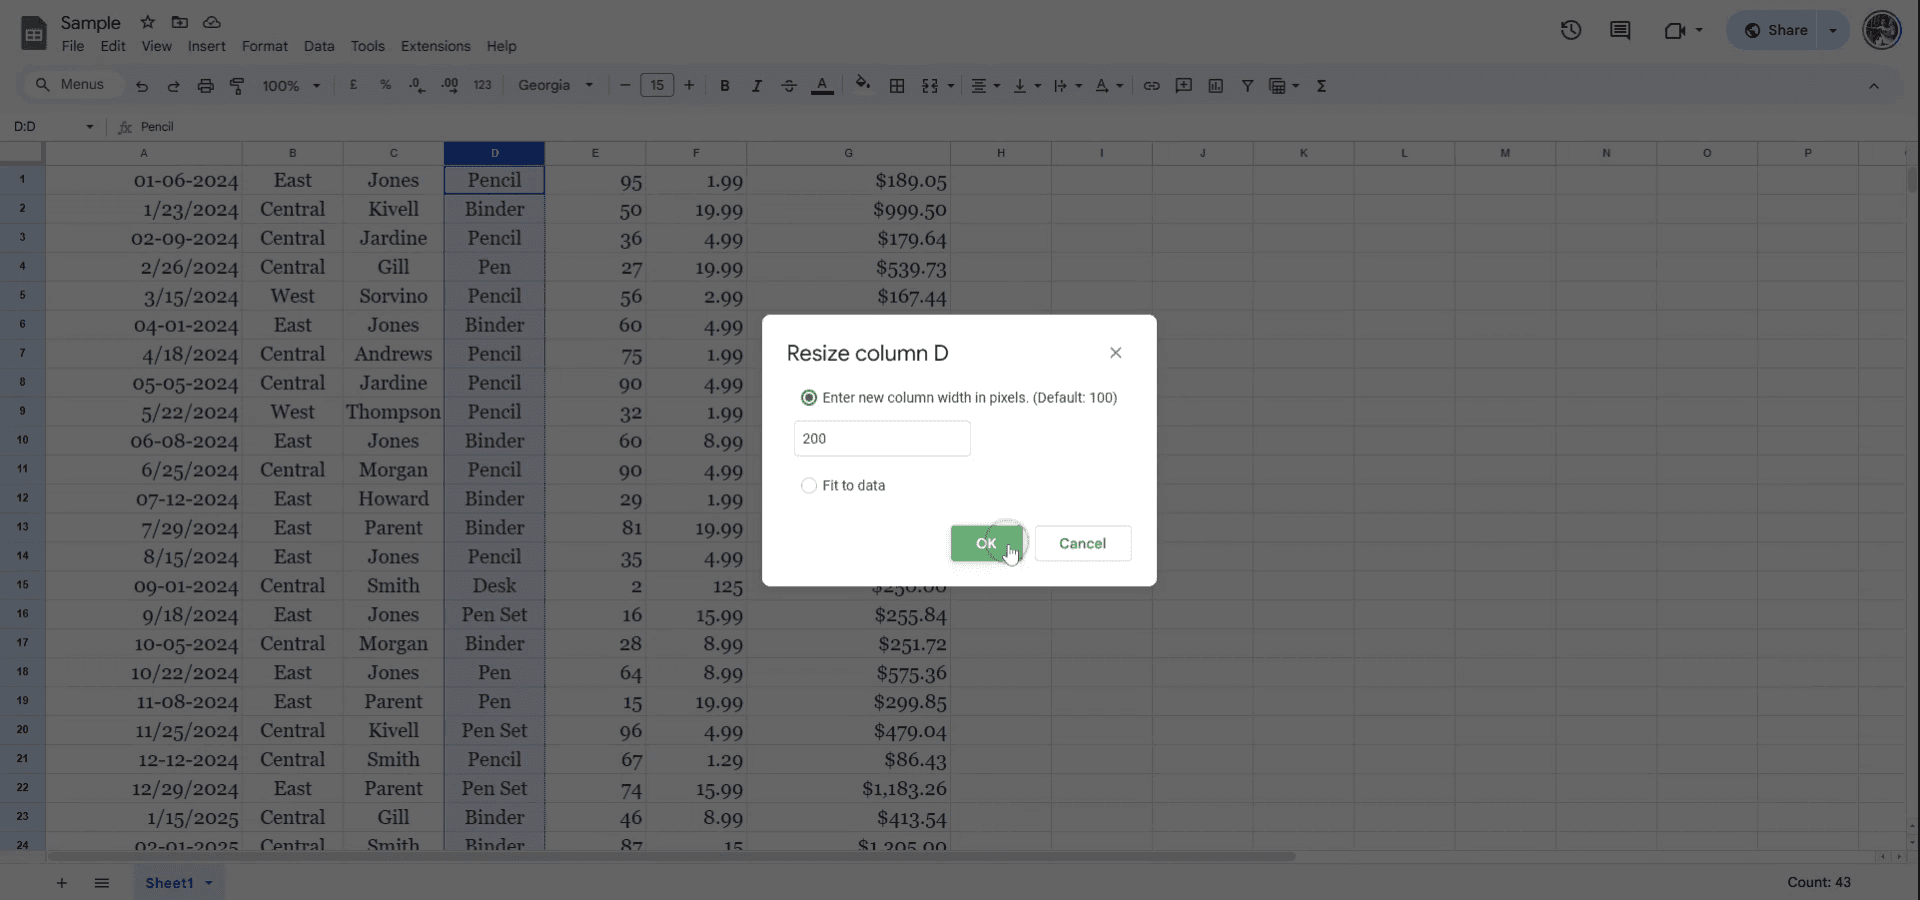
الخطوة 3
يمكنك إدخال حجم جديد بالبكسل إذا رغبت. بدلاً من ذلك، يمكنك اختيار ملاءمة البيانات تلقائيًا. بعد اتخاذ خيارك، انقر على "موافق" لتطبيق التغييرات. سيُعاد تغيير حجم الصف أو العمود وفقًا لذلك.
نصائح احترافية لزيادة حجم الخلايا في جداول بيانات Google
تغيير حجم الأعمدة/الصفوف يدويًا: مرّر المؤشر فوق الخط الفاصل بين أحرف الأعمدة أو أرقام الصفوف حتى يظهر سهم مزدوج الطرفين، ثم انقر واسحب لتغيير حجم الخلية.
استخدم خيار تغيير الحجم: انقر بزر الماوس الأيمن على رأس العمود أو الصف وحدد "تغيير حجم العمود" أو "تغيير حجم الصف" لإدخال حجم محدد بالبكسل.
التحجيم التلقائي ليلائم المحتوى: انقر نقرًا مزدوجًا على الخط بين الأعمدة أو الصفوف لتغيير حجمها تلقائيًا بناءً على المحتوى داخل الخلايا.
المشكلات الشائعة وكيفية تجنبها عند زيادة حجم الخلايا في جداول بيانات Google
تغيير الحجم أكثر من اللازم عن غير قصد: قد يؤدي سحب حد العمود/الصف بعيدًا جدًا إلى جعل الخلايا كبيرة جدًا، مما يسبب فراغًا غير مرغوب فيه. الحل: استخدم خيار "تغيير الحجم" لمزيد من التحكم أو انقر نقرًا مزدوجًا للضبط التلقائي.
عدم تغيير حجم الأعمدة/الصفوف معًا: إذا كنت بحاجة إلى زيادة كلٍّ من العرض والارتفاع، فتأكد من تعديل الأعمدة والصفوف معًا. الحل: حدِّد الورقة بأكملها (بالنقر على الزاوية العلوية اليسرى) وقم بتغيير حجم عدة أعمدة أو صفوف في الوقت نفسه.
عدم اتساق الحجم عبر عدة أعمدة/صفوف: قد لا تتغير جميع الأعمدة/الصفوف بالحجم نفسه بشكل متساوٍ. الحل: اضغط مع الاستمرار على "Shift" وحدد عدة أعمدة أو صفوف قبل تغيير الحجم لتطبيق التغيير على الجميع دفعةً واحدة.
الأسئلة الشائعة حول زيادة حجم الخلايا في Google Sheets
كيف أجعل العمود أعرض في Sheets؟
مرّر فوق خط رأس العمود واسحب إلى اليمين لزيادة العرض. أو انقر بزر الماوس الأيمن على العمود واختر "تغيير حجم العمود".كيف أضبط ارتفاع الصف في Sheets؟
مرّر فوق خط رأس الصف، واسحب إلى الأسفل لزيادة الارتفاع، أو انقر بزر الماوس الأيمن واختر "تغيير حجم الصف" للتحكم الدقيق.هل يمكنني تغيير حجم عدة أعمدة أو صفوف دفعة واحدة؟
نعم، حدّد عدة أعمدة/صفوف بالضغط على "Shift" والنقر على الرؤوس، ثم غيّر حجمها في الوقت نفسه بالسحب أو باستخدام خيار "تغيير الحجم".كيف أسجّل الشاشة على Mac؟
لتتمكن من تسجيل الشاشة على جهاز Mac، يمكنك استخدام Trupeer AI. يتيح لك التقاط الشاشة بالكامل ويوفر إمكانات الذكاء الاصطناعي مثل إضافة صور رمزية بالذكاء الاصطناعي، وإضافة تعليق صوتي، وإضافة تكبير وتصغير في الفيديو. ومع ميزة ترجمة الفيديو بالذكاء الاصطناعي من trupeer، يمكنك ترجمة الفيديو إلى أكثر من 30 لغة.كيف أضيف صورة رمزية بالذكاء الاصطناعي إلى تسجيل الشاشة؟
لإضافة صورة رمزية بالذكاء الاصطناعي إلى تسجيل الشاشة، ستحتاج إلى استخدام أداة تسجيل شاشة بالذكاء الاصطناعي. Trupeer AI هي أداة تسجيل شاشة بالذكاء الاصطناعي، وتساعدك على إنشاء فيديوهات بعدة صور رمزية، كما تساعدك أيضًا في إنشاء صورتك الرمزية الخاصة للفيديو.كيف أسجّل الشاشة على Windows؟
لتسجيل الشاشة على Windows، يمكنك استخدام Game Bar المدمجة (Windows + G) أو أداة ذكاء اصطناعي متقدمة مثل Trupeer AI للحصول على ميزات أكثر تقدمًا مثل الصور الرمزية بالذكاء الاصطناعي، والتعليق الصوتي، والترجمة، وغيرها.كيف أضيف تعليقًا صوتيًا إلى فيديو؟
لإضافة تعليق صوتي إلى الفيديوهات، حمّل إضافة trupeer ai لمتصفح Chrome. بعد التسجيل، ارفع الفيديو مع الصوت، واختر التعليق الصوتي المطلوب من trupeer، ثم صدّر الفيديو المعدّل.كيف أقرّب الصورة في تسجيل الشاشة؟
للتكبير أثناء تسجيل الشاشة، استخدم تأثيرات التكبير في Trupeer AI التي تتيح لك التكبير والتصغير في لحظات محددة، مما يعزز التأثير البصري لمحتوى الفيديو الخاص بك.
قراءات مقترحة
كيفية إضافة رمز الروبية في Google Sheets
دروس ذات صلة

