Как отслеживать изменения в Google Docs — простое руководство по совместной работе
Узнайте, как отслеживать правки в Google Docs с помощью режима «Предложение». Отлично подходит для команд, которые вместе просматривают или редактируют документы.
This guide provides a clear and concise process for tracking changes within a Google Docs file.
By following these steps, users can access the version history and monitor modifications effectively.
If you’re collaborating on a document and want to keep an eye on edits, Google Docs makes it simple with Suggesting mode, Google’s version of Microsoft Word’s “Track Changes.” You can also dive into the version history to see how your document has evolved over time.
1. Enable Suggesting Mode
Open your document in Google Docs.
In the upper-right corner, click the pencil icon that says "Editing".
From the dropdown, select "Suggesting".
Now, any edits you make won’t directly change the doc, instead, they’ll appear as suggestions.
2. Make Edits as Suggestions
Once you’re in Suggesting mode:
New text will show up in green (or another color depending on the user).
Deleted text will appear crossed out.
You can also add comments to explain your changes, just click on your suggested edit and leave a note.
3. Accept or Reject Changes
If you’re the document owner (or have editing access), you’ll see a list of suggestions.
Click on each one to accept or reject the edit.
You’ll also get email notifications for suggestions, depending on your settings.
4. Use Version History
Want to see all changes, not just suggestions?
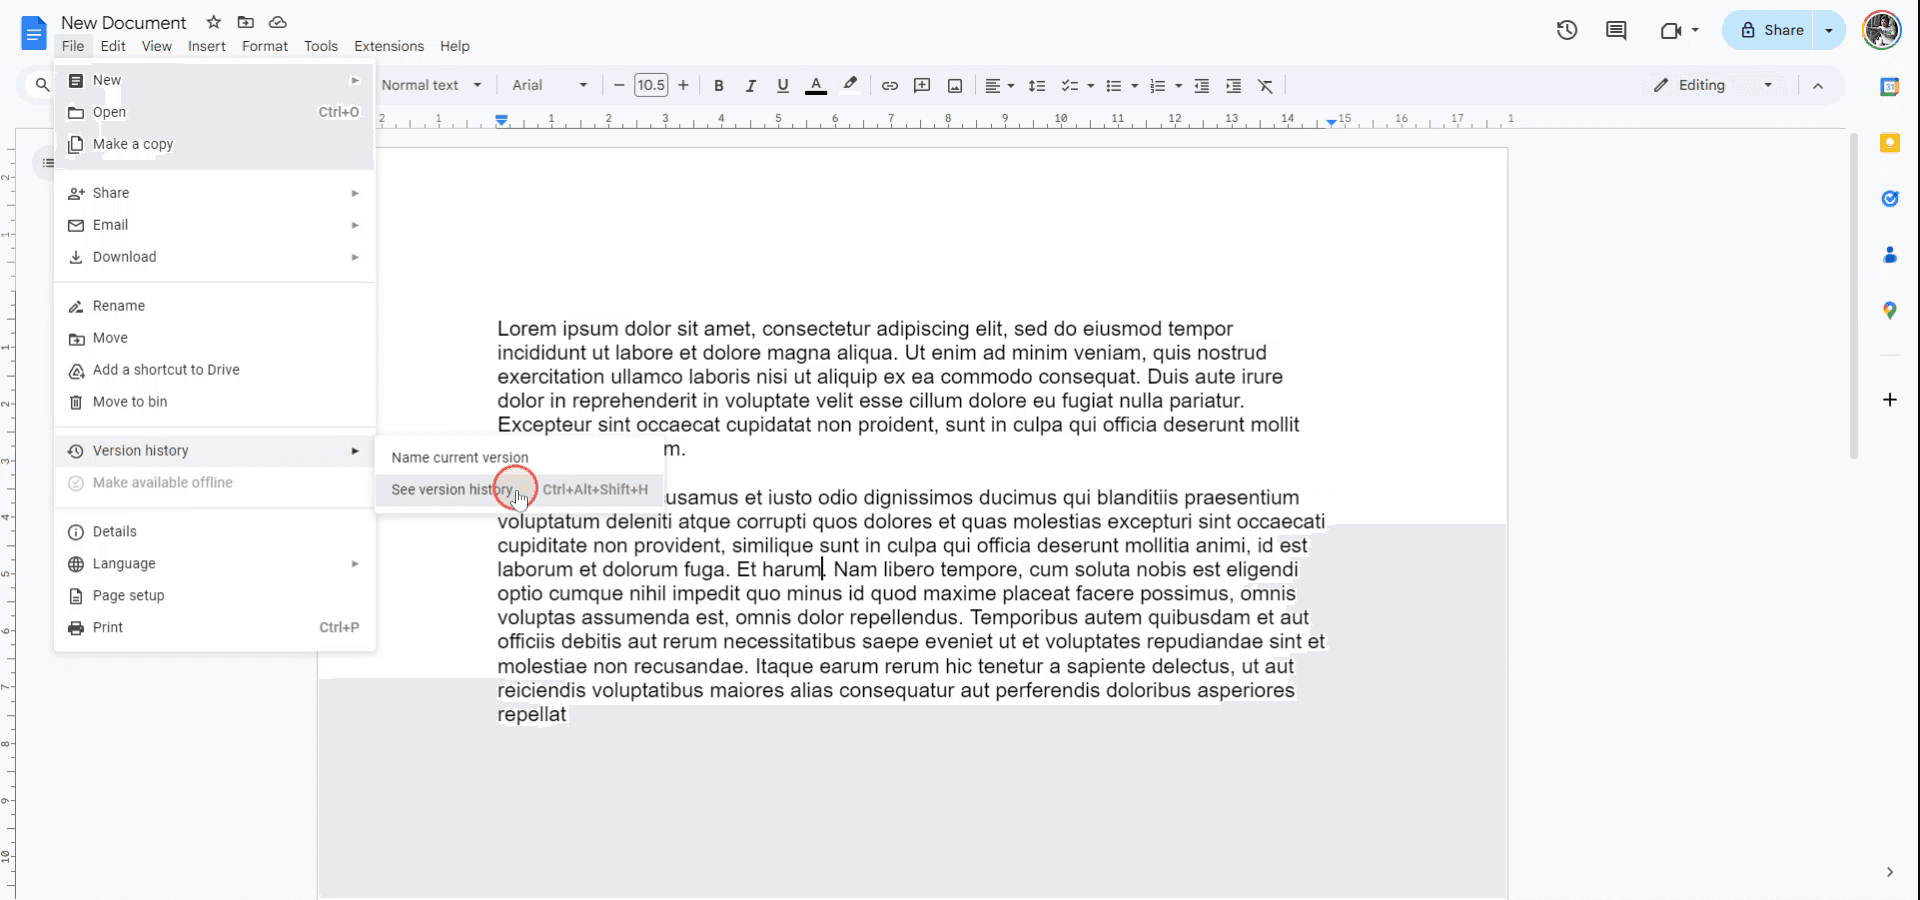
Go to File > Version history > See version history.
You’ll see a list of saved versions with timestamps and contributor names.
Click on any version to preview it—and if needed, you can restore an older version with a click.
5. Compare Two Documents (Optional)
If you're working with two versions of the same doc:
Go to Tools > Compare documents.
Upload the document you want to compare.
Google Docs will highlight the differences in a new file.
Step-by-Step Guide: how to track changes in google docs
Step 1
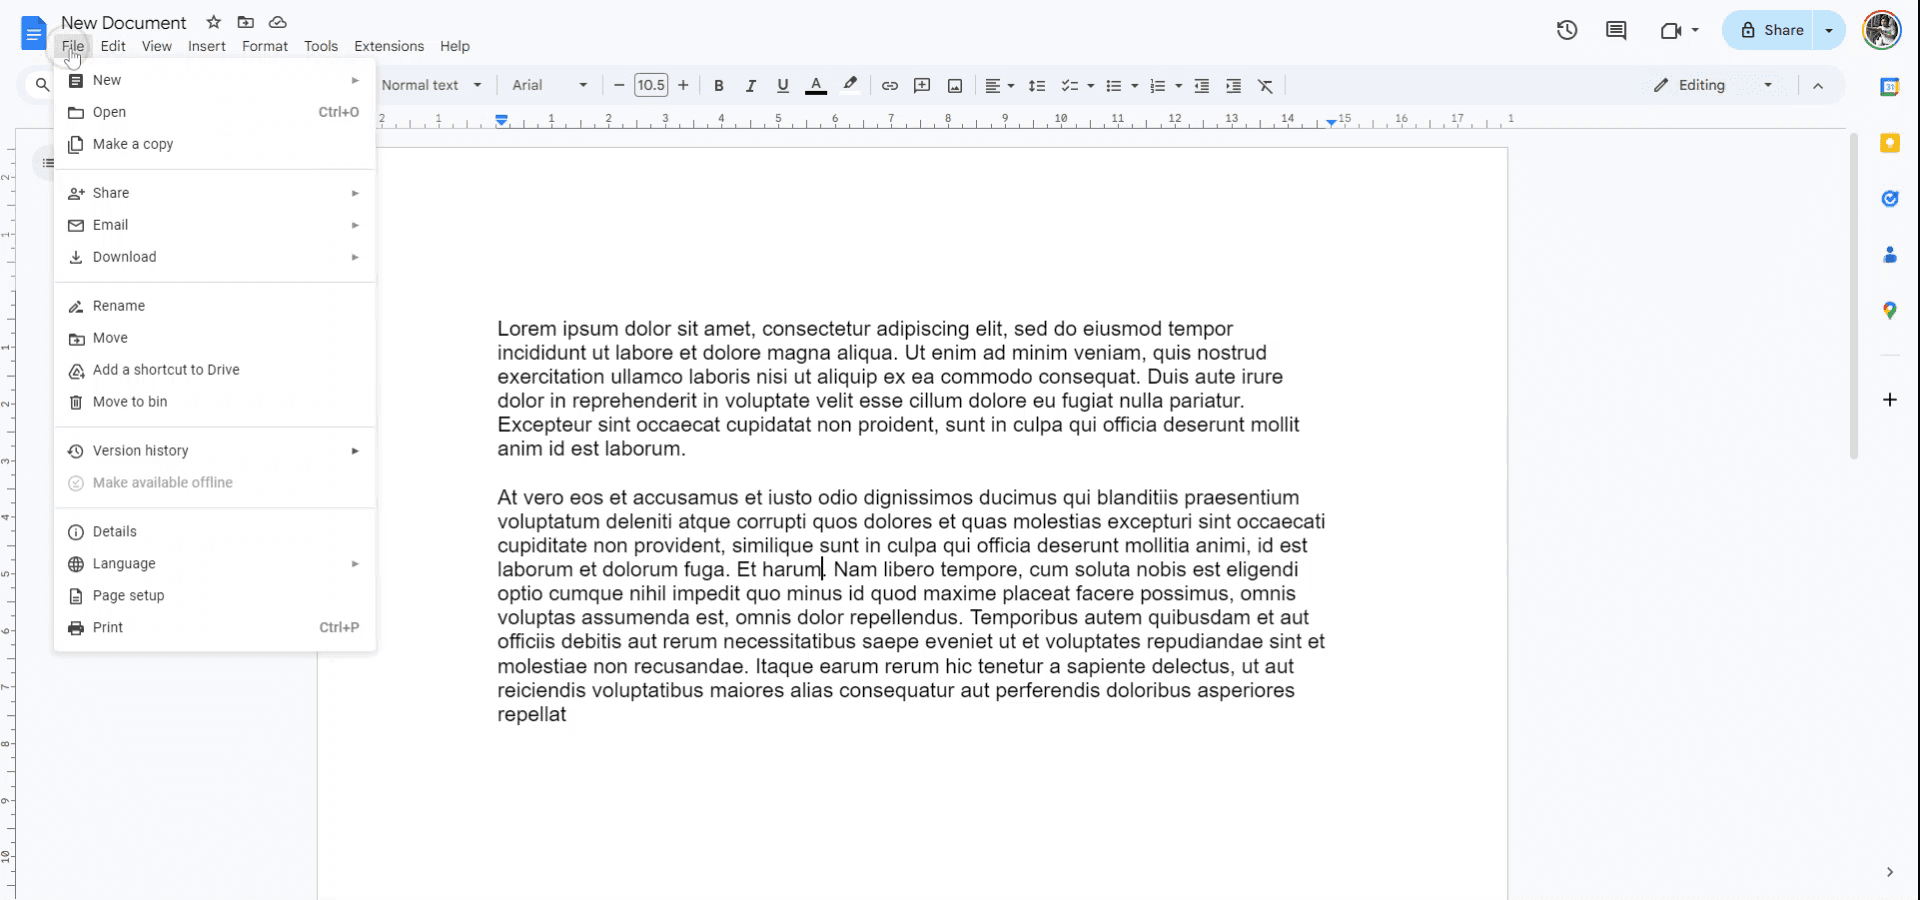
To begin tracking changes in Google Docs, first open the file you want to monitor. Then, navigate to the "File" menu.
Step 2
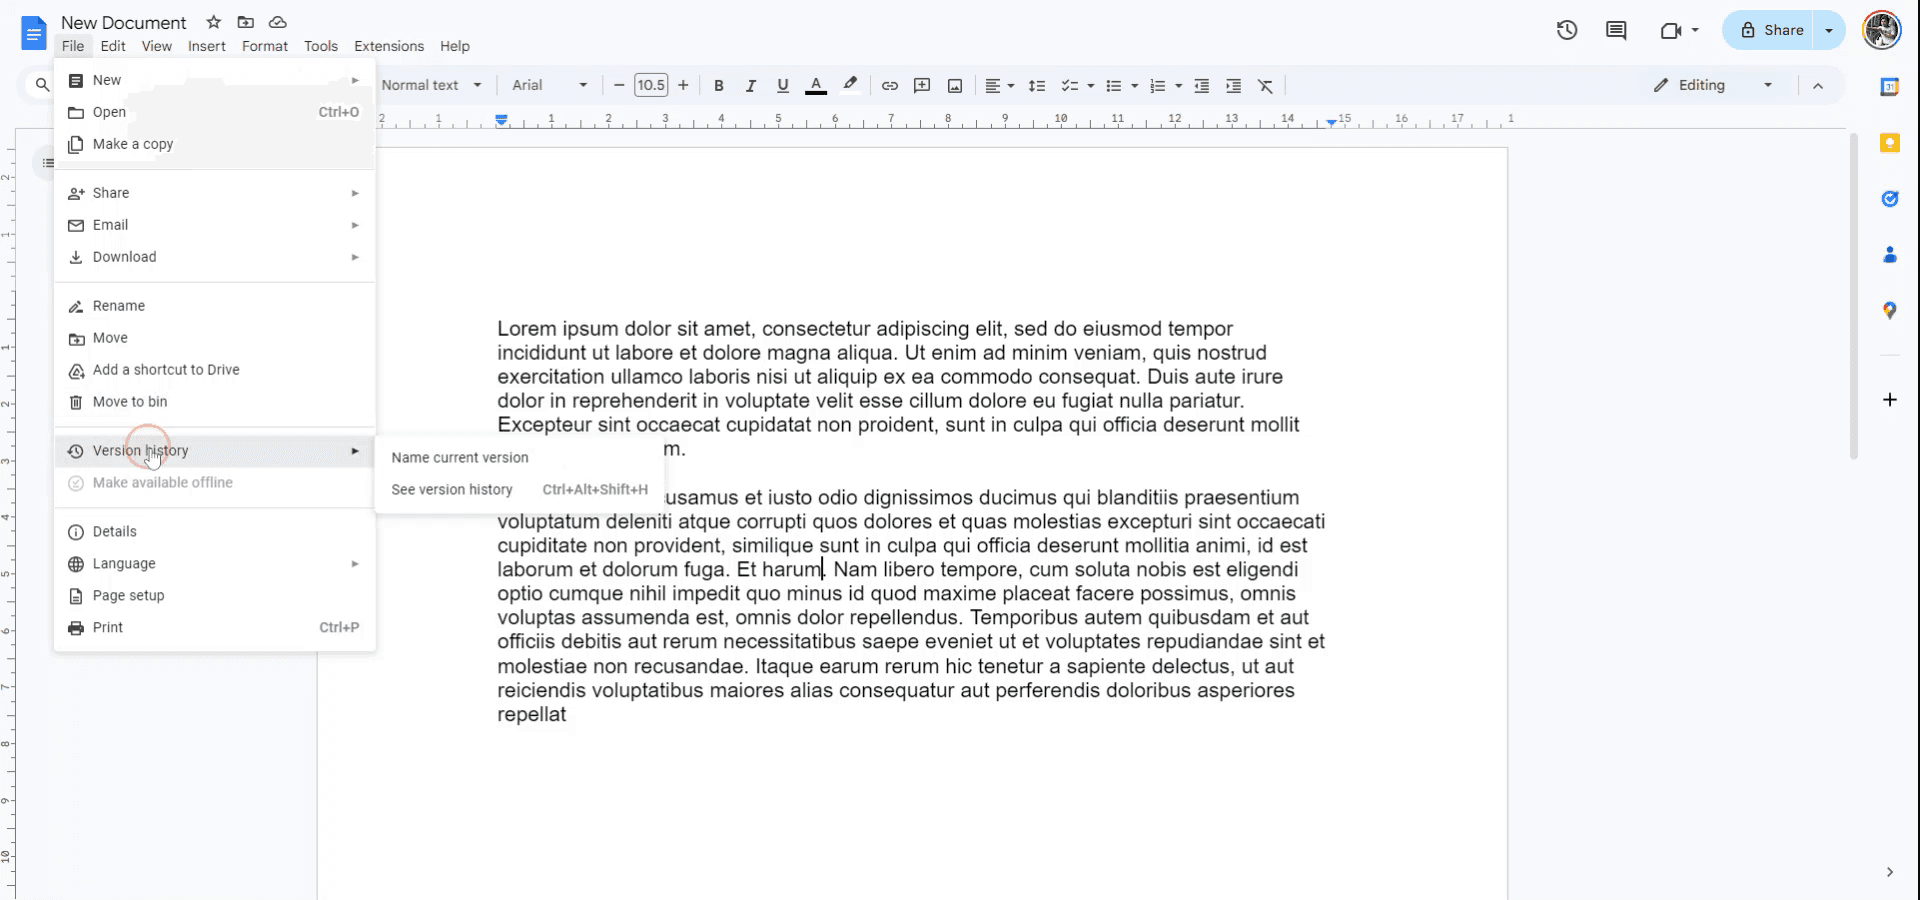
Within the "File" menu, select "Version History."
Step 3
Choose "See version history" from the available options. Here, you will be able to view and track all changes made to the document.
Pro Tips for on how to track changes in google docs
Use "Suggesting" Mode: Switch to Suggesting mode by clicking the pencil icon in the top-right corner. This allows others to make suggestions that you can accept or reject later.
Enable Version History: Use File > Version history > See version history to view and restore previous versions of your document, including who made the changes.
Set Notifications for Comments and Edits: Go to Tools > Notification rules to receive notifications when someone comments or edits the document.
Use Comments for Clarity: Add comments to specific changes or suggestions to clarify or ask questions about the revisions.
Regularly Review Edits: Periodically check the document’s version history and suggestions to ensure all changes are tracked and understood.
Common pitfalls and how to avoid them when tracking changes in google docs
Missing Suggested Changes: Changes made in Editing mode aren’t tracked as suggestions and can’t be reviewed or accepted/rejected.
Fix: Ensure that everyone contributing to the document uses Suggesting mode for their edits.Overlooking Version History: It’s easy to forget to review the version history for older changes.
Fix: Regularly check File > Version history > See version history to stay updated on all changes.Too Many Edits or Suggestions: A large number of edits or suggestions may become overwhelming to review.
Fix: Organize and address changes systematically, or group similar changes together for easier review.Notifications Getting Lost: If you’re part of a large team, notifications might get lost in your inbox.
Fix: Set up filter rules or use a dedicated folder in your email to keep notifications organized.Accidental Overwrites: Edits in Editing mode can overwrite existing content without tracking.
Fix: Encourage team members to use Suggesting mode, or set permissions to Comment or View to avoid accidental overwrites.
Часто задаваемые вопросы о том, как отслеживать изменения в Google Docs
Как отслеживать изменения в Google Docs?
Переключитесь в режим «Предложение» с помощью значка карандаша или проверьте историю версий документа на наличие изменений.В чем разница между режимами «Редактирование» и «Предложение»?
В режиме «Редактирование» изменения применяются к документу напрямую, а в режиме «Предложение» изменения предлагаются и их можно принять или отклонить.Могу ли я увидеть, кто внес изменения в Google Docs?
Да, вы можете просмотреть историю версий — она показывает, кто внес каждое изменение и когда.Как получать уведомления об изменениях в Google Docs?
Настройте уведомления через «Инструменты > Правила уведомлений», чтобы получать оповещения об изменениях или комментариях.Как отменить или принять предложенное изменение?
В режиме «Предложение» вы можете принять или отклонить изменения, нажав на галочку или X рядом с предложением.Как сделать запись экрана на mac?
Чтобы сделать запись экрана на Mac, вы можете использовать Trupeer AI. Он позволяет записывать весь экран и предоставляет возможности ИИ, такие как добавление AI-аватаров, добавление закадрового голоса, добавление масштабирования (приближение и отдаление) в видео. С функцией перевода видео Trupeer на основе ИИ вы можете перевести видео на 30+ языков.Как добавить AI-аватар в запись экрана?
Чтобы добавить AI-аватар в запись экрана, вам нужно использовать инструмент для записи экрана с ИИ. Trupeer AI — это инструмент для записи экрана с ИИ, который помогает создавать видео с несколькими аватарами, а также позволяет создать собственный аватар для видео.Как сделать запись экрана на windows?
Чтобы сделать запись экрана в Windows, вы можете использовать встроенную панель Game Bar (Windows + G) или расширенный инструмент ИИ, например Trupeer AI, для более продвинутых функций, таких как AI-аватары, закадровый голос, перевод и т. д.Как добавить закадровый голос в видео?
Чтобы добавить закадровый голос в видео, скачайте chrome-расширение trupeer ai. После регистрации загрузите видео с голосом, выберите нужный закадровый голос в trupeer и экспортируйте отредактированное видео.Как увеличить масштаб при записи экрана?
Чтобы увеличить масштаб во время записи экрана, используйте эффекты масштабирования в Trupeer AI — они позволяют приближать и отдалять в определенные моменты, усиливая визуальное воздействие вашего видеоконтента.
Рекомендуем к прочтению
Генератор технической документации
Как превратить изображение в раскраску в Canva
Как печатать с двух сторон в Canva
Похожие руководства