
Figmaでバージョン履歴を表示する方法
Figmaでバージョン履歴を表示して、デザインの変更を追跡し、以前のバージョンを復元し、より効果的に共同作業する方法を学びましょう。チームや個人デザイナー向けのクイックガイド
Figmaファイルを開きます: バージョン履歴を確認したい特定のFigmaファイルに移動します。
レイヤーの選択を解除します: キャンバスの空白部分をクリックして、どのレイヤーも選択されていないことを確認し、ファイル名が表示されるようにします。
ドロップダウンメニューにアクセスします: 上部ツールバーのファイル名の横にある矢印をクリックします。
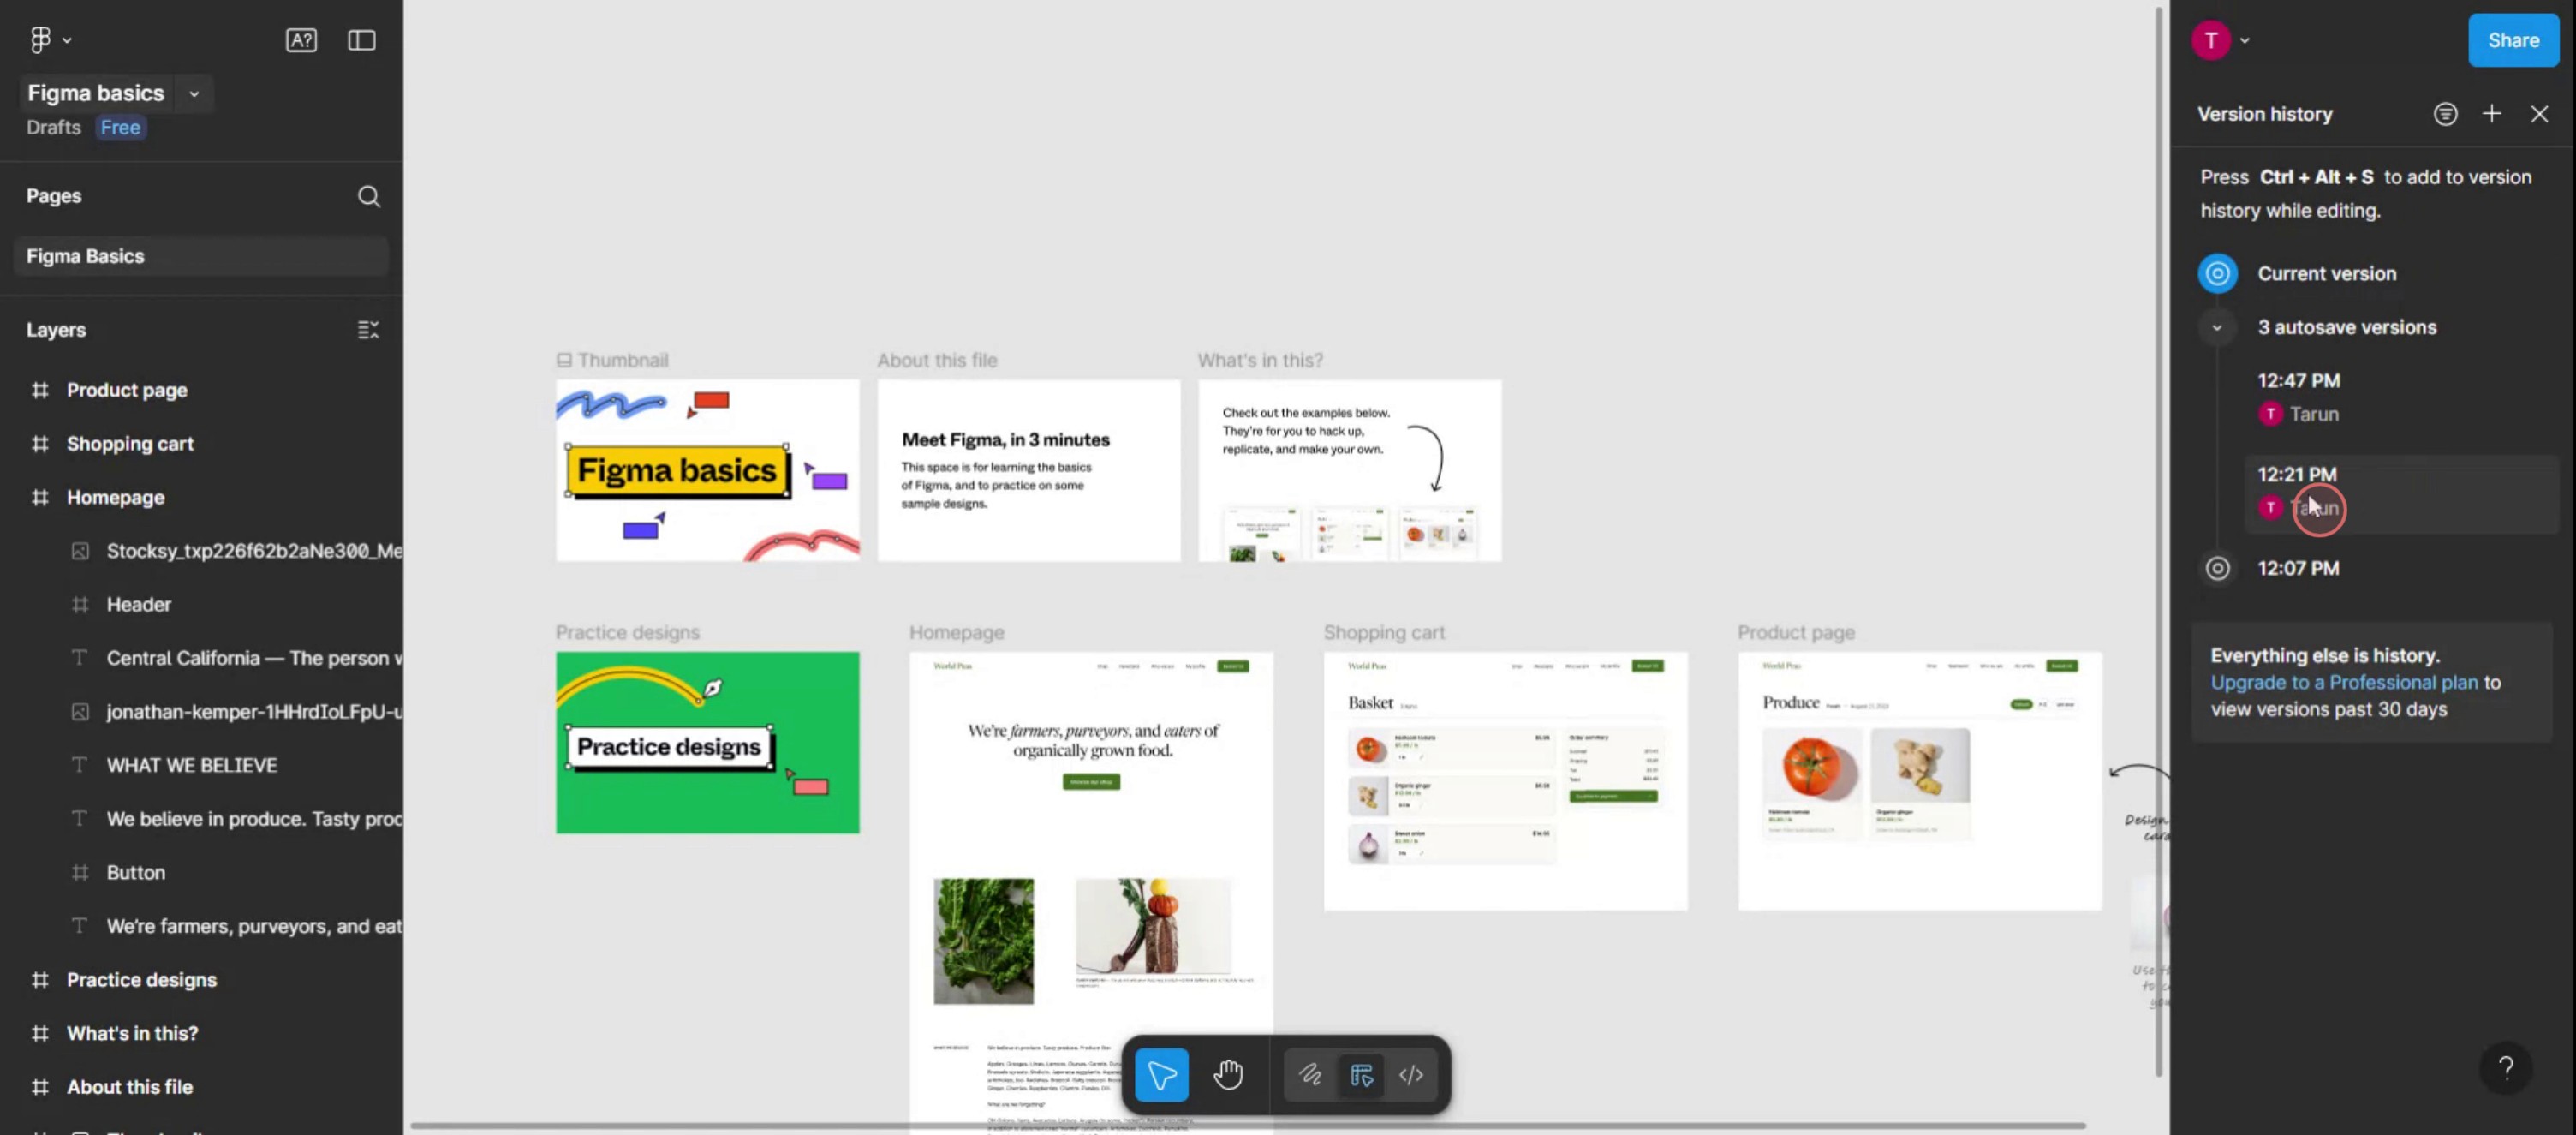
「バージョン履歴を表示」を選択します: ドロップダウンメニューからこのオプションを選択します。
履歴を表示します: The バージョン履歴 パネルが画面右側に表示され、過去のバージョンの一覧が表示されます。
ステップバイステップガイド: Figmaでバージョン履歴を確認する方法
ステップ 1
ファイル名の横にあるドロップダウンメニューを選択します。
ステップ 2
「バージョン履歴を表示」と書かれたオプションを選択します。

ステップ 3
特定のファイルのバージョン履歴が右側に表示されます。
Figmaでバージョン履歴を確認するためのプロのコツ
エディタでファイルを開く
確認したいFigmaファイルに移動し、デザインエディタで開きます。左上のファイル名をクリックする
画面左上で、ファイル名をクリックして、ファイル全体のオプションが表示されるドロップダウンメニューを開きます。「バージョン履歴を表示」を選択する
ドロップダウンから「バージョン履歴を表示」という項目を選びます。これにより、ファイルの過去のバージョンを表示する右側のパネルが開きます。タイムラインを見ていく
タイムラインのスライダーを使うか、個々の項目をクリックして保存されたバージョンを確認します。各バージョンには日付と投稿者名が含まれます。バージョンを復元または複製する
古いバージョンを戻したい場合は、目的のバージョンの横にある3つの点をクリックし、安全のために「バージョンを復元」または「新しいファイルに複製」を選びます。
よくある落とし穴とその回避方法
バージョン履歴が表示されない
以前に編集されたファイルを使用していることを確認してください。バージョン履歴は、変更が行われて保存された場合にのみ表示されます。誤って作業内容を上書きしてしまう
不安な場合は、復元する前に必ずファイルまたはバージョンを複製してください。これにより、最近の変更が失われるのを防げます。表示されるバージョン項目が少ない
無料のFigmaプランでは、基本的なバージョン履歴しか表示されない場合があります。全てのバージョン履歴ログや命名機能を利用するには、有料プランにアップグレードしてください。変更内容を特定できない
重要な更新を行う際は、保存したバージョンに手動で名前を付けて、履歴パネルで重要な節目を特定しやすくしましょう。ライブ表示と履歴表示が混同される
古いバージョンを表示しているときは、読み取り専用モードになっています。バージョン履歴を終了すると、通常の編集画面に戻ります。
Figmaのバージョン履歴に関するよくある質問
Figmaでバージョン履歴にアクセスするにはどうすればよいですか
プロジェクトの左上にあるファイル名をクリックし、「バージョン履歴を表示」を選択すると、以前のファイルバージョンを確認できます。バージョンに手動で名前を付けられますか
はい。バージョン履歴パネルの「バージョンを保存」ボタンをクリックし、後で参照しやすいように任意の名前を付けられます。無料アカウントでもバージョン履歴は利用できますか
はい、ただし制限があります。無料プランでは基本的な履歴のみ表示され、有料プランではバージョン名の設定やより長い履歴の参照などの拡張機能が利用できます。2つのバージョンを並べて比較できますか
いいえ。Figmaでは並べて比較することはできません。差分を確認するにはバージョンを切り替える必要があります。バージョンを復元するとどうなりますか
バージョンを復元すると、現在のファイル状態は古いバージョンに置き換えられます。両方のバージョンを残したい場合は複製しておくとよいでしょう。Macで画面録画する方法は?
Macで画面録画するには、Trupeer AIを使用できます。画面全体をキャプチャでき、AIアバターの追加、ナレーションの追加、動画内のズームイン・ズームアウトなどのAI機能も備えています。trupeerのAI動画翻訳機能を使えば、動画を30以上の言語に翻訳できます。画面録画にAIアバターを追加する方法は?
画面録画にAIアバターを追加するには、AI画面録画ツールを使用する必要があります。Trupeer AIはAI画面録画ツールで、複数のアバターを使った動画の作成を支援し、動画用の自分専用アバターの作成にも役立ちます。Windowsで画面録画する方法は?
Windowsで画面録画するには、組み込みのGame Bar(Windows + G)またはTrupeer AIのような高度なAIツールを使用して、AIアバター、ナレーション、翻訳などのより高度な機能を利用できます。動画にナレーションを追加する方法は?
動画にナレーションを追加するには、trupeer aiのChrome拡張機能をダウンロードします。登録後、音声付きの動画をアップロードし、trupeerで希望のナレーションを選択して、編集済み動画をエクスポートします。画面録画でズームインするにはどうすればよいですか?
画面録画中にズームインするには、Trupeer AIのズーム効果を使用します。これにより、あなたは
おすすめ記事
関連チュートリアル

