
How to Save a Figma File
Learn how to save a Figma file quickly and easily. Follow this step-by-step guide to save your Figma designs locally or to the cloud and ensure your work is always backed up!
This guide provides clear instructions on how to save your design in Figma, ensuring your work is securely stored both locally and in version history.
Follow the steps below to efficiently manage your design files.
Figma primarily works in the cloud, automatically saving your designs as you go. However, you can also manually save a local copy if needed.
1. Saving to the Cloud (Default Behavior)
Figma autosaves your work in real time.
Changes are synced to your Figma account every few seconds.
No manual action is needed to save, just stay logged in and connected to the internet.
2. Saving a Local Copy
To export a .fig file for offline use or sharing:
Open Your File: Make sure the design you want to save is open in the editor.
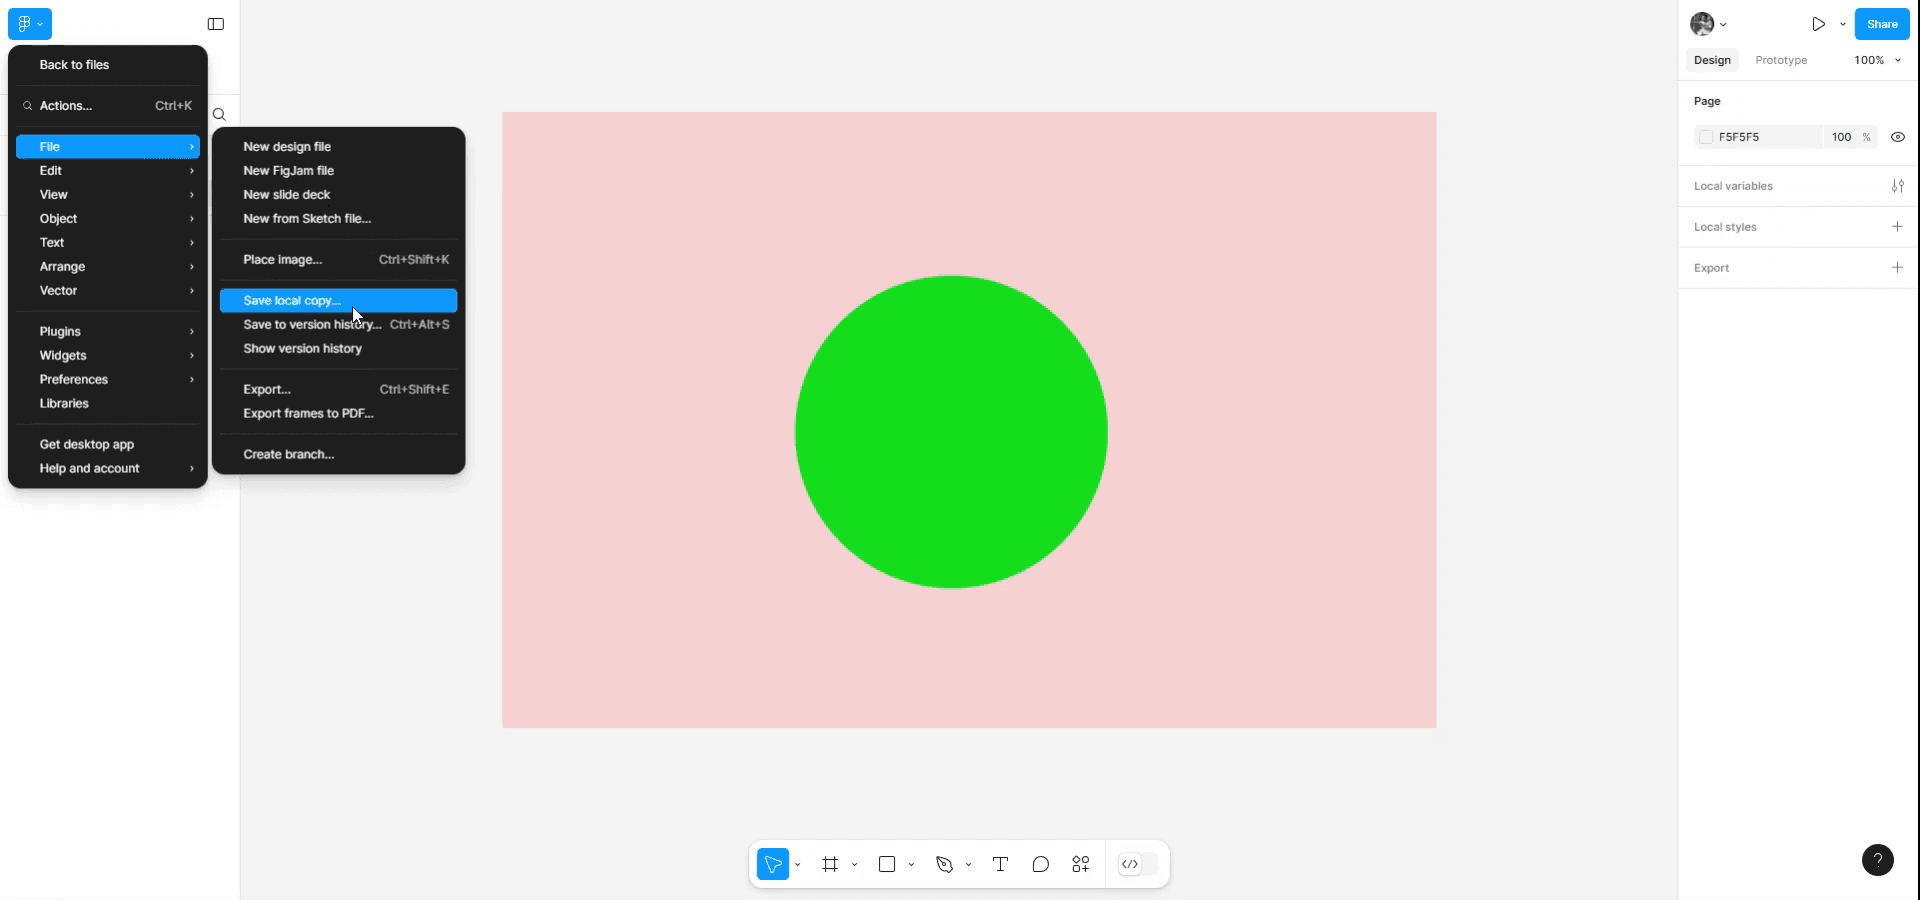
Click the Figma Menu: In the top-left corner, click the Figma icon.
Go to File > Save local copy.
Choose the Destination: Your file browser will open. Select where you'd like to save the
.figfile.Name and Save: Give your file a name and click Save.
Step-by-Step Guide: How To Save Figma File
Method 1
Open the design you wish to save in Figma. Navigate to the main menu, then select 'File' from the submenu. Click on 'Save local' to store your design on your device.
Method 2
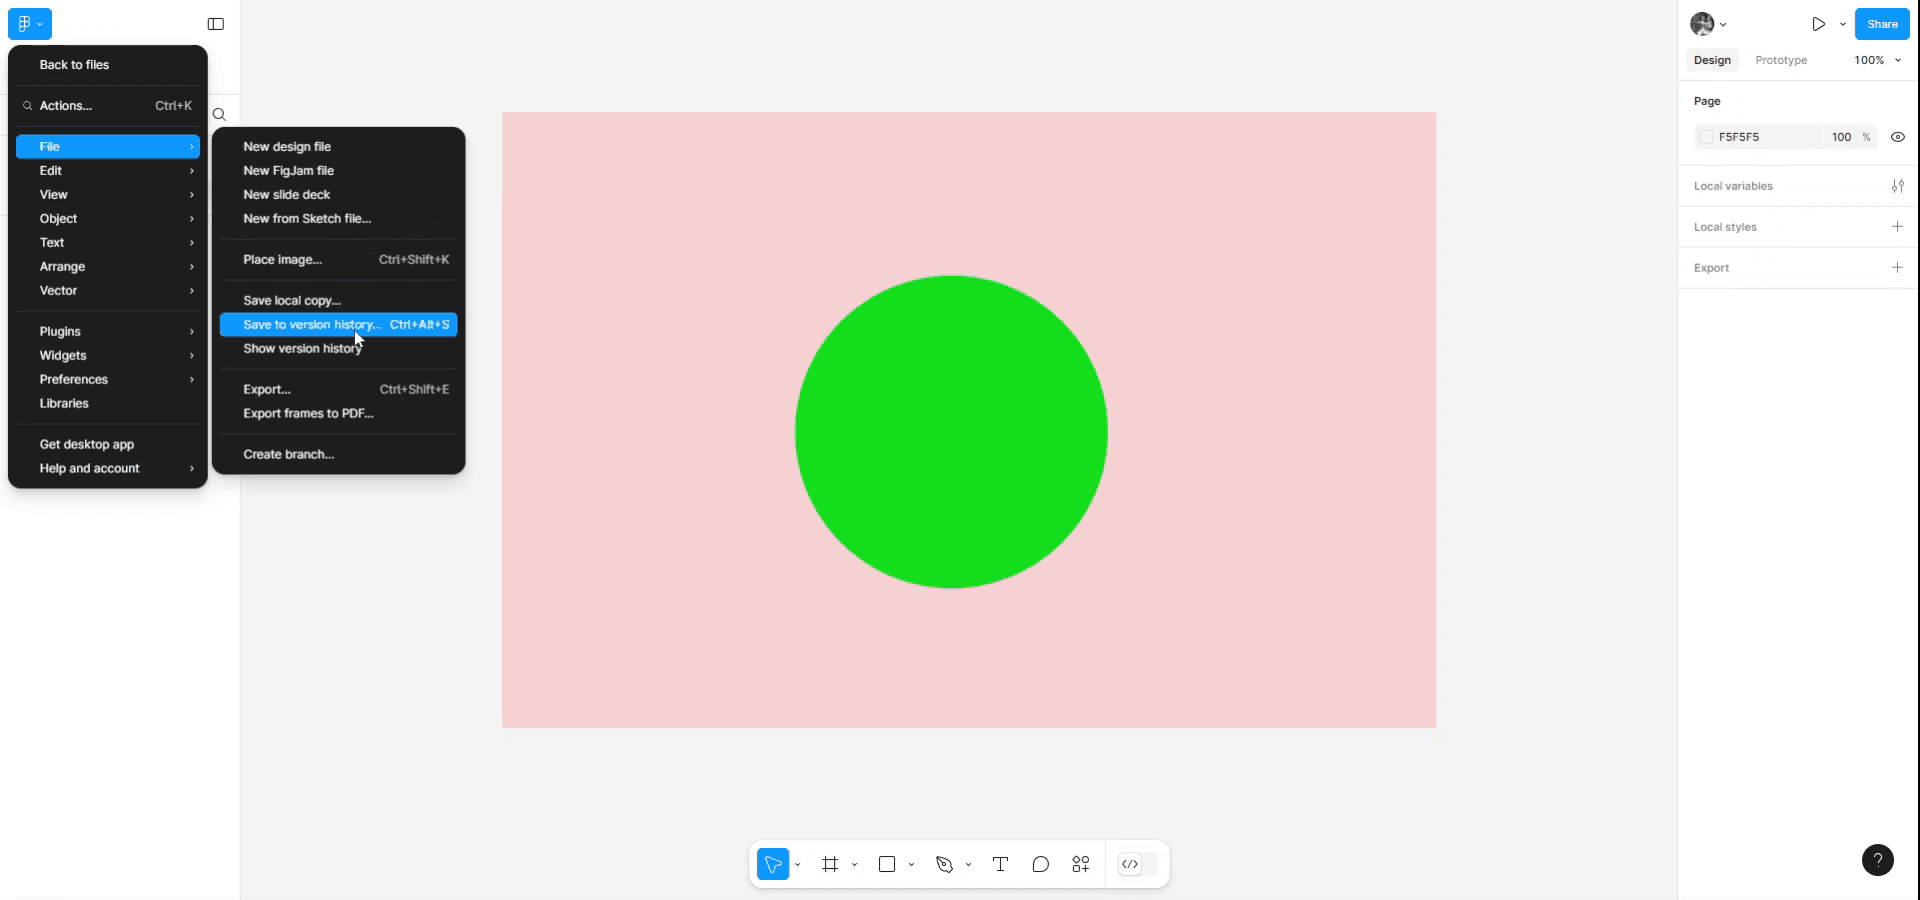
Alternatively, you can save your design to version history by pressing 'Ctrl + Alt + S' or by clicking on the provided option.
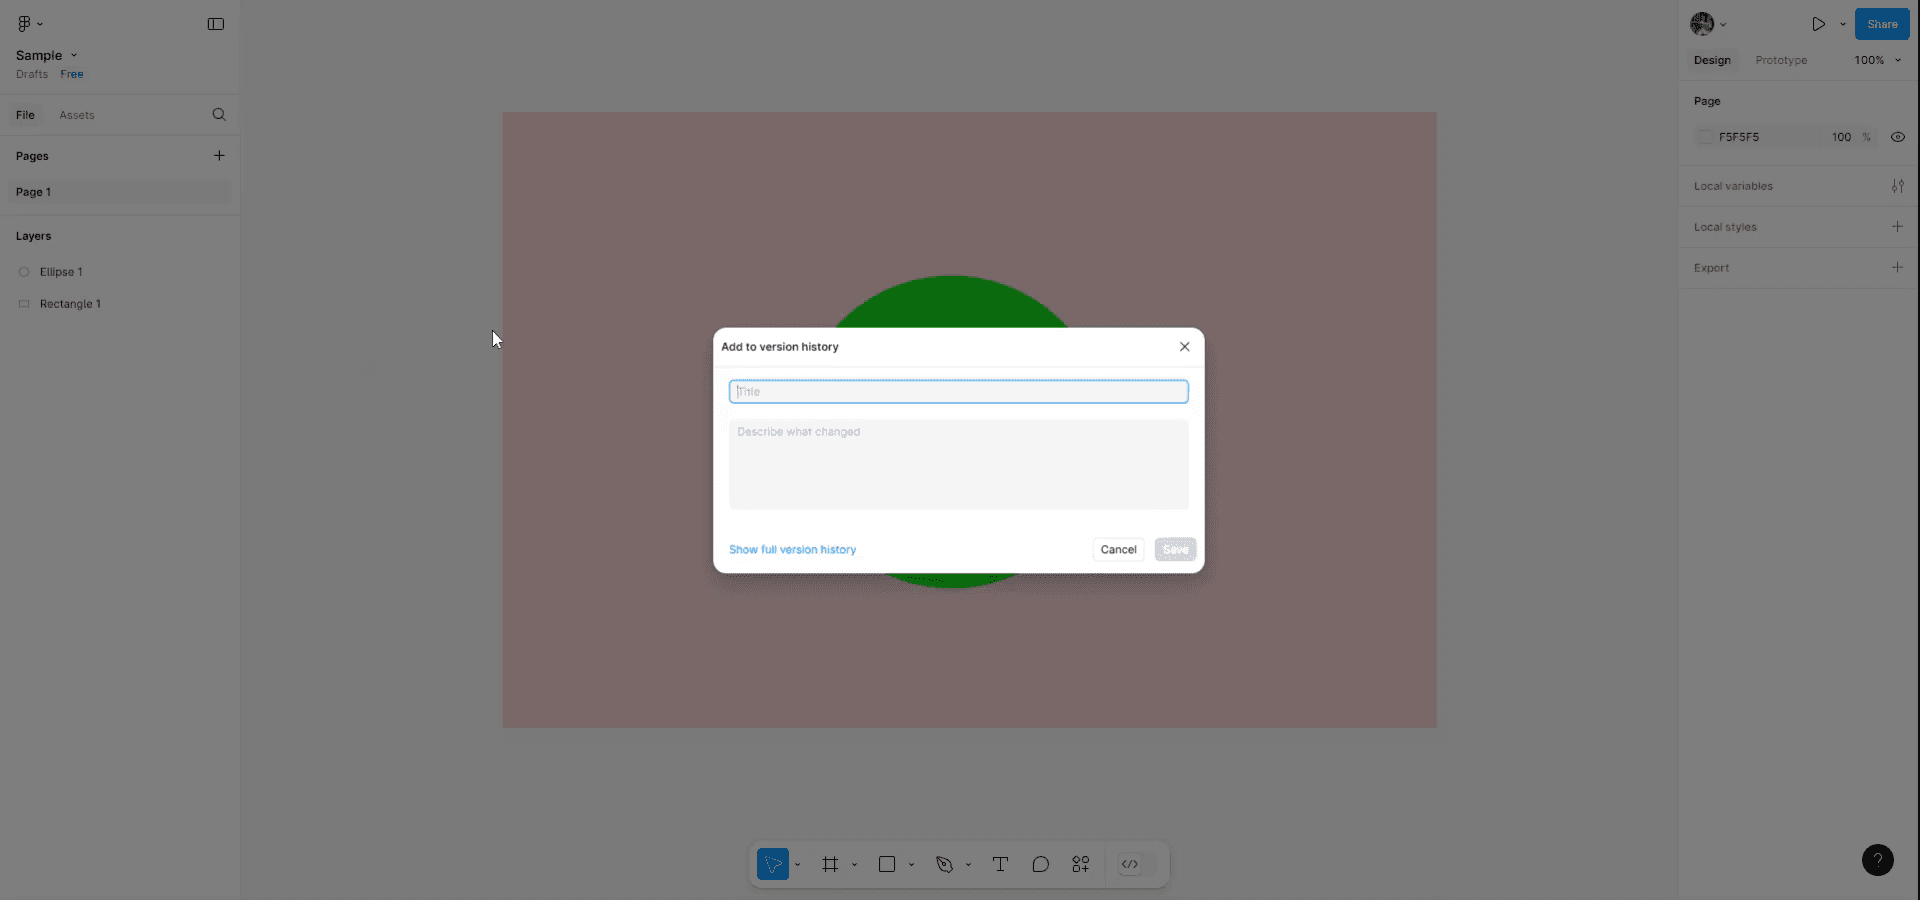
Add your version to another version history, according to your predefined versions. This ensures that all iterations of your design are stored and accessible.
Pro tips on how to save Figma file
1. Use Keyboard Shortcuts for Quick Exports
Instead of manually navigating through menus, use the shortcut Cmd + Shift + E (Mac) or Ctrl + Shift + E (Windows) to open the export panel instantly. This saves time, especially when exporting multiple frames or assets.
2. Export at Multiple Resolutions for Different Devices
When exporting images, you can choose multiple scales (e.g., 1x, 2x, 3x) by adding export settings. This is especially useful for ensuring your designs look sharp on high-resolution screens like Retina displays.
3. Save Version History Before Major Changes
Since Figma automatically saves all changes, it’s a good practice to create a version checkpoint manually before making significant edits. Go to File > Save to Version History and add a description. This helps you revert to a previous version if needed.
Common pitfalls and how to avoid them when saving Figma file
1. Forgetting to Export Specific Frames or Layers
Many users forget to select specific frames or layers before exporting, resulting in empty or incorrect files being saved. Always double-check that the correct frame or layer is selected before clicking the Export button. You can also use the right-hand panel to preview what will be exported.
2. Overwriting Files Without Keeping a Backup
Since Figma auto-saves changes, it's easy to overwrite your designs unintentionally and lose earlier iterations. Use Version History regularly by going to File > Save to Version History. You can label key versions (e.g., "Final Design v1") to ensure you have a backup to revert to if needed.
Common FAQs on how to save Figma file
1. How do I save a Figma file to my computer?
Figma automatically saves your work in the cloud. However, to save a file to your computer, you can export it as a .fig file by going to File > Save local copy. This allows you to save and import it later into Figma.
2. Can I save a Figma file as a PDF or image?
Yes, you can save a Figma file as a PDF or image. Select the frame or design you want to export, go to File > Export, and choose your preferred format (PDF, PNG, JPG, or SVG).
3. Does Figma automatically save my work?
Yes, Figma automatically saves your work in real-time to the cloud. You don’t need to manually save your progress, as it happens automatically after every change.
4. How to screen record on mac?
To screen record on a Mac, you can use Trupeer AI. It allows you to capture the entire screen and provides AI capabilities such as adding AI avatars, add voiceover, add zoom in and out in the video. With trupeer’s AI video translation feature, you can translate the video into 30+ languages.
5. How to add an AI avatar to screen recording?
To add an AI avatar to a screen recording, you'll need to use an AI screen recording tool. Trupeer AI is an AI screen recording tool, which helps you create videos with multiple avatars, also helps you in creating your own avatar for the video.
6. How to screen record on windows?
To screen record on Windows, you can use the built-in Game Bar (Windows + G) or advanced AI tool like Trupeer AI for more advanced features such as AI avatars, voiceover, translation etc.
7. How to add voiceover to video?
To add voiceover to videos, download trupeer ai chrome extension. Once signed up, upload your video with voice, choose the desired voiceover from trupeer and export your edited video.
8. How do I Zoom in on a screen recording?
To zoom in during a screen recording, use the zoom effects in Trupeer AI which allows you to zoom in and out at specific moments, enhancing the visual impact of your video content.
Suggested Reads
Technical Documentation Generator
How to Hide Frame Names in Figma
Related Tutorials

