

GitHub でデフォルトブランチを変更する方法
GitHubリポジトリの既定ブランチを簡単に変更する方法を学びましょう。データを失うことなく新しいメインブランチを設定できるよう、このステップごとのガイドに従ってください。
ステップバイステップガイド: GitHubでデフォルトブランチを変更する方法
手順 1
リポジトリに移動し、リポジトリ上部の「Settings」タブをクリックします。

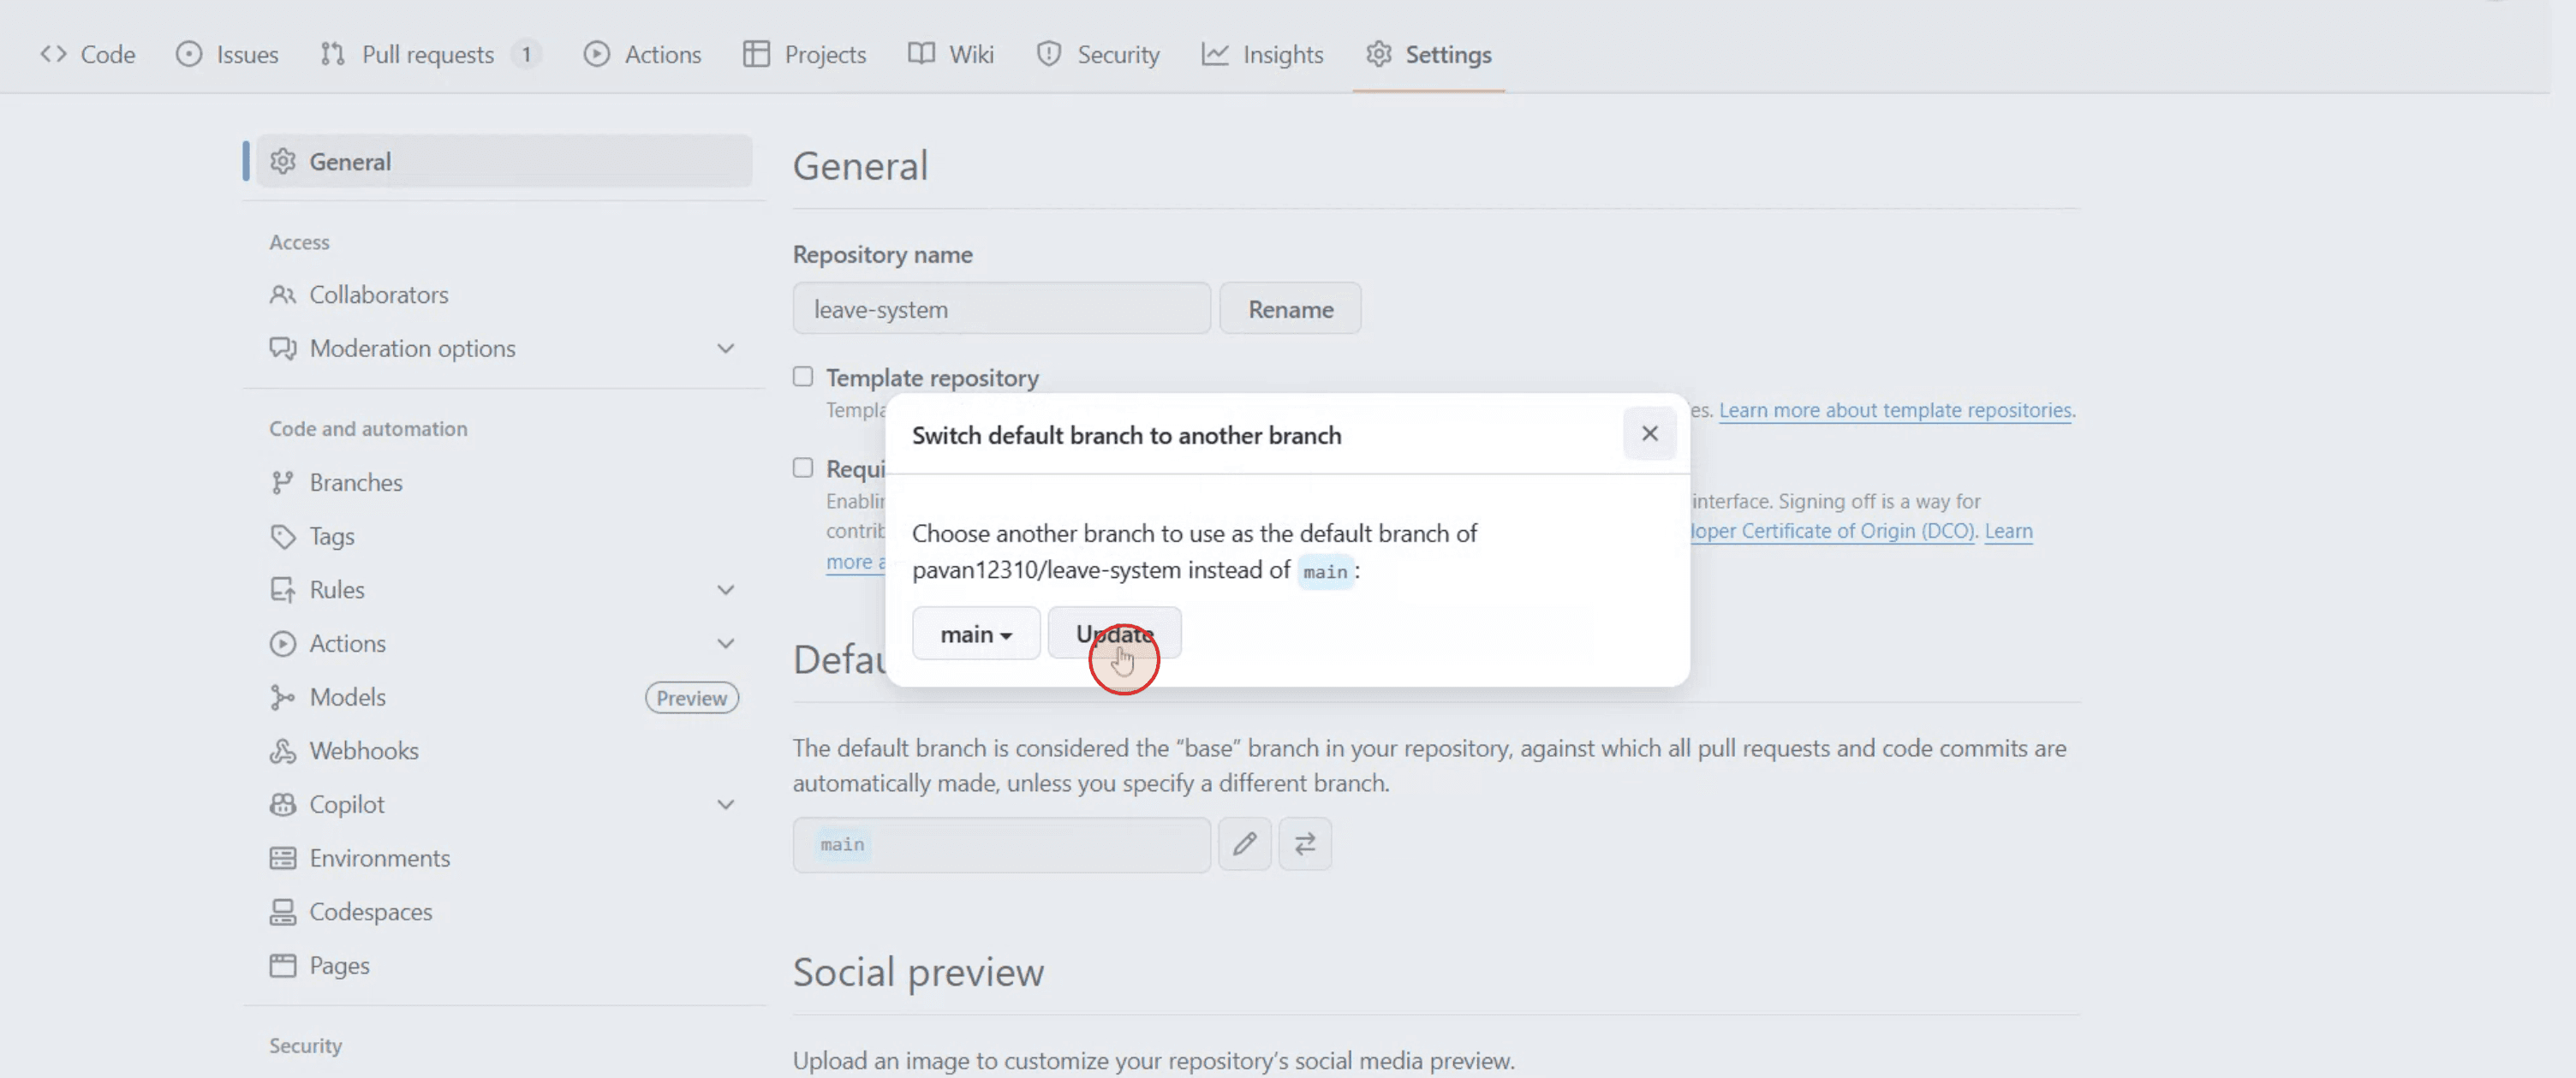
手順 2
「Default branch」セクションで、別のブランチに切り替えるためのボタンをクリックします。

手順 3
変更を確認するには「Update」をクリックします。
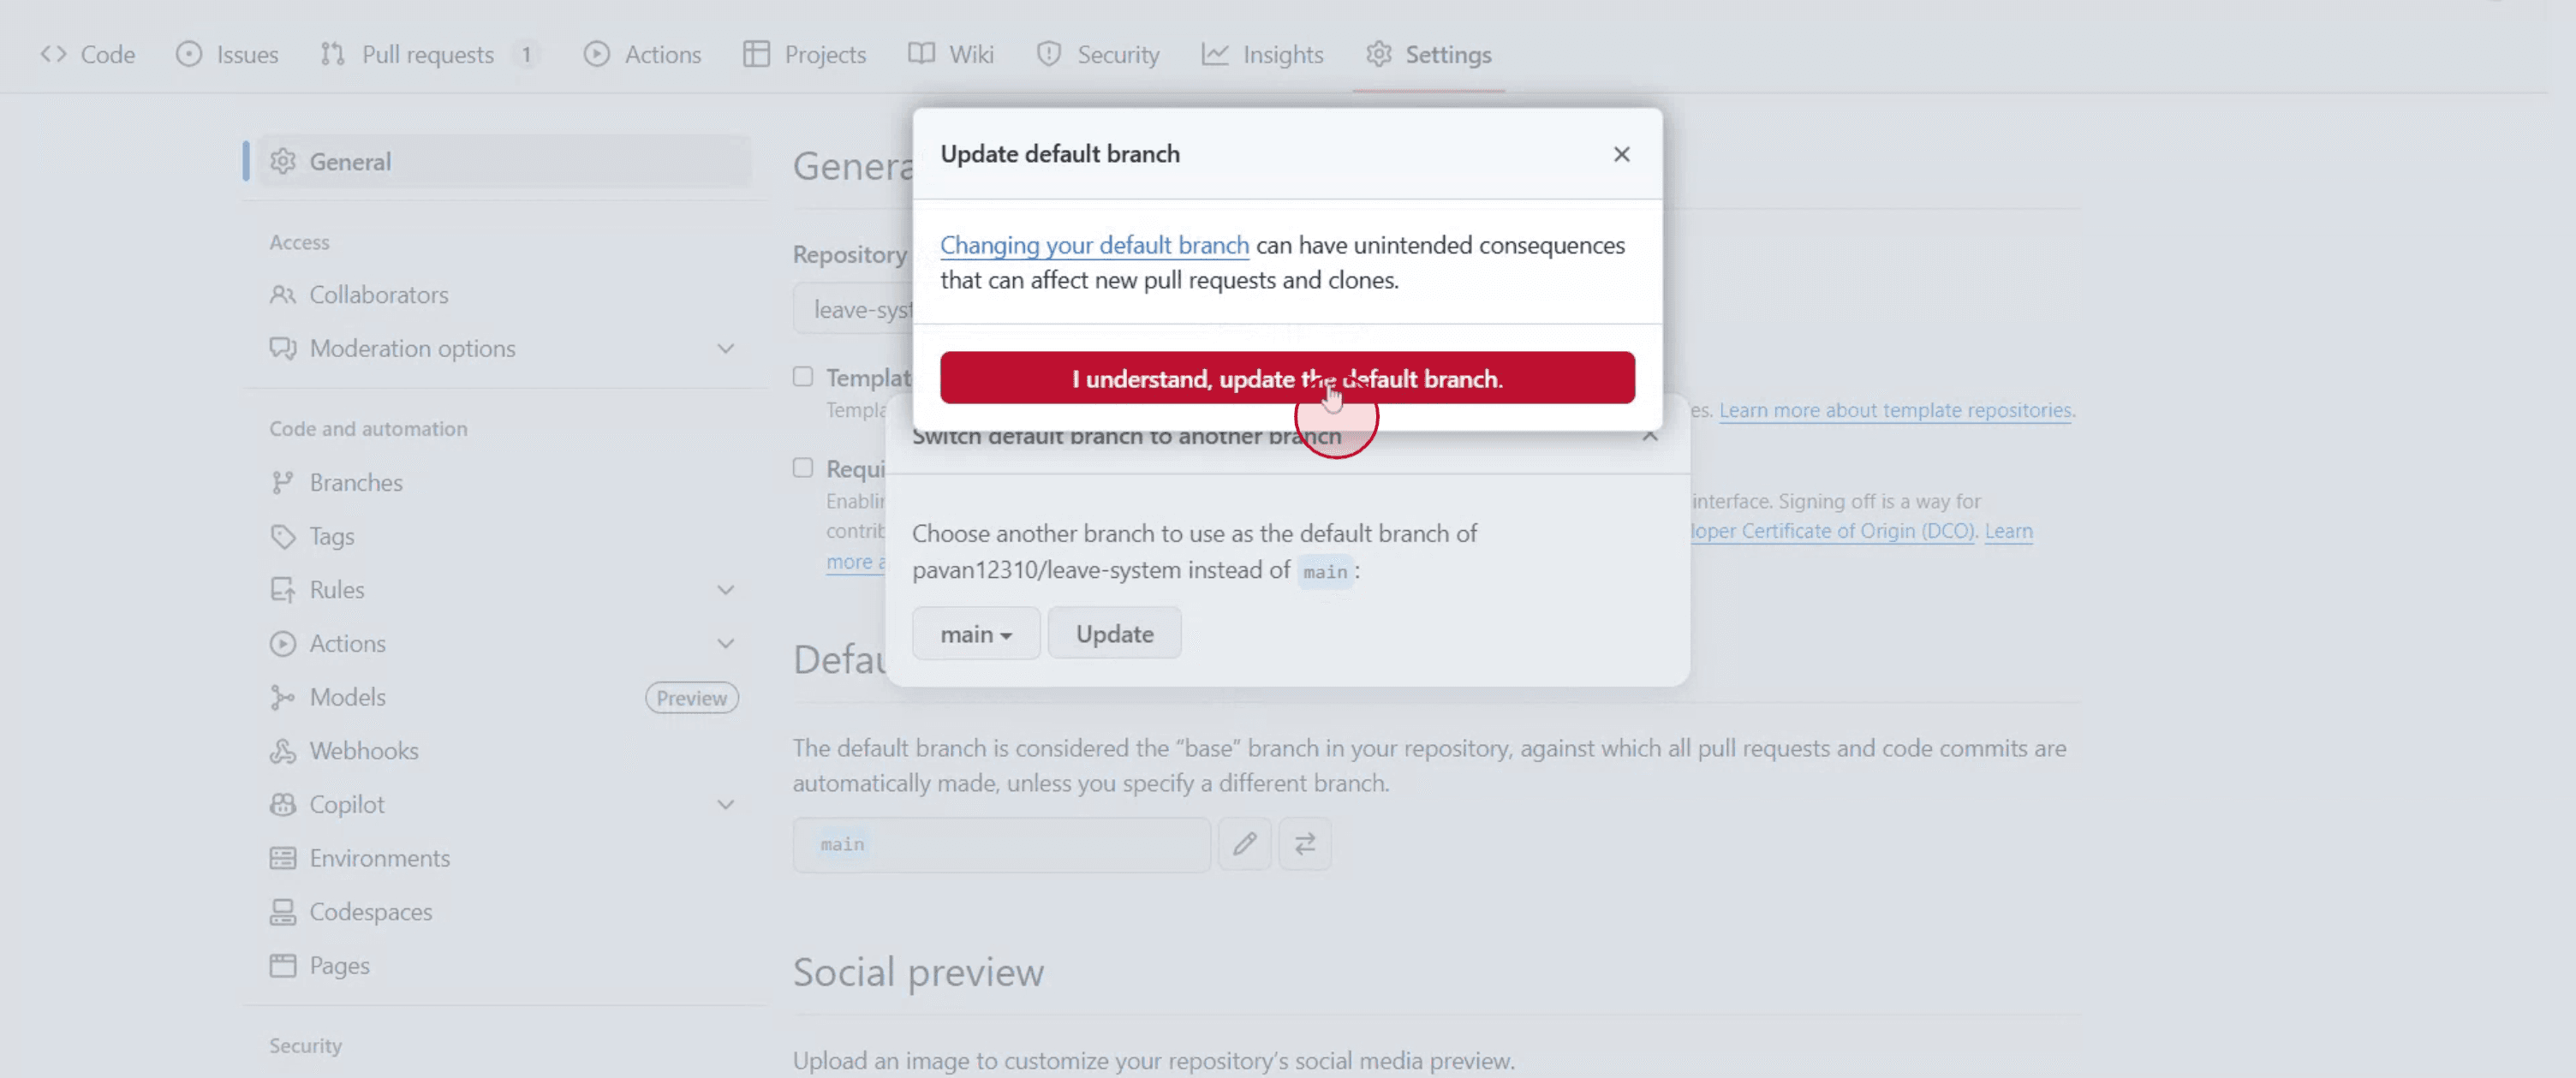
手順 4
「I understand, update the default branch」をクリックして操作を確定します。
GitHub でデフォルトブランチを変更するためのプロのヒント
GitHub にログインする
github.com にアクセスし、アカウントにログインします。リポジトリへ移動する
デフォルトブランチを変更したいリポジトリを開きます。「Settings」タブをクリックする
リポジトリ上部のメニューで「Settings」をクリックします。表示されない場合は、管理者権限がない可能性があります。「Branches」セクションへ移動する
左側のサイドバーで、「Code and automation」カテゴリ内の「Branches」をクリックします。デフォルトブランチを変更する
「Default branch」セクションで、現在のデフォルトブランチの横にある鉛筆(編集)アイコンをクリックします。新しいブランチを選択する
ドロップダウンメニューから、新しいデフォルトとして設定したいブランチを選択します。変更を確認する
新しいブランチを選択したら、「Update」をクリックし、ポップアップダイアログで選択を確認します。
よくある落とし穴とその回避方法
ブランチがまだ作成されていない
ブランチは、すでに存在している場合にのみデフォルトに設定できます。必要であれば、先に新しいブランチを作成してください。権限の問題
リポジトリの管理者権限を持つユーザーだけがデフォルトブランチを変更できます。プルリクエストとワークフローに影響が出る可能性がある
デフォルトブランチを変更すると、進行中のプルリクエストや CI/CD パイプラインに影響する可能性があります。必要に応じてそれらの設定を更新してください。古いデフォルトブランチを誤って削除してしまう
他のツールや共同作業者のクローン内の参照をすべて更新するまで、古いデフォルトブランチを削除しないでください。共同作業者の混乱
誤解や誤ったブランチへのプッシュを防ぐため、チームに変更を知らせてください。
GitHubでデフォルトブランチを変更することに関するよくある質問
GitHubでデフォルトブランチを変更するには?
リポジトリのSettings > Branchesに移動し、編集アイコンをクリックして、新しいブランチを選択し、確認します。後でデフォルトブランチを元に戻せますか?
はい、同じ方法でいつでも再度切り替えられます。デフォルトブランチを変更すると古いブランチは削除されますか?
いいえ、手動で削除しない限り古いブランチはそのまま残ります。既存のプルリクエストは引き続き機能しますか?
プルリクエストは自動的には移動しません。必要に応じて、手動でrebaseするか、対象を変更する必要があります。GitHubモバイルアプリからこれを行えますか?
いいえ、デフォルトブランチの変更はGitHubのWebインターフェースでのみ利用できます。Macで画面収録するには?
Macで画面収録するには、Trupeer AIを使用できます。画面全体をキャプチャでき、AIアバターの追加、ナレーションの追加、動画内の拡大・縮小などのAI機能を提供します。TrupeerのAI動画翻訳機能を使えば、動画を30以上の言語に翻訳できます。画面収録にAIアバターを追加するには?
画面収録にAIアバターを追加するには、AI画面収録ツールを使用する必要があります。Trupeer AIはAI画面収録ツールで、複数のアバターを使った動画の作成を支援し、動画用の自分専用アバターの作成も手助けします。Windowsで画面収録するには?
Windowsで画面収録するには、組み込みのGame Bar(Windows + G)を使うか、AIアバター、ナレーション、翻訳などのより高度な機能を備えたTrupeer AIのような高度なAIツールを使用できます。動画にナレーションを追加するには?
動画にナレーションを追加するには、trupeer aiのChrome拡張機能をダウンロードしてください。登録後、音声付きの動画をアップロードし、trupeerから希望のナレーションを選択して、編集済み動画を書き出します。画面収録でズームインするには?
画面収録中にズームインするには、Trupeer AIのズーム効果を使用します。これにより、特定のタイミングで拡大・縮小でき、動画コンテンツの視覚的なインパクトを高められます。
関連してよく検索される質問
関連チュートリアル

