
How to Create a Table in Google Sheets – Step-by-Step Guide
Want to organize data efficiently in Google Sheets? Learn how to create a structured table with headers, formatting, and filters.
This document provides a straightforward process for creating a table within Google sheet.
Follow these steps to seamlessly organize your data into a well-structured table.
Creating a table in Google Sheets helps you organize, format, and analyze your data more easily. Whether you're starting with blank cells or formatting existing data, here's how to get started:
1. Open Your Spreadsheet
Go to Google Sheets and open the file where you'd like to insert a table.
2. Select the Data
With existing data: Highlight the cells you want to convert into a table.
Starting from scratch: Select a blank range where your table will go, choose the number of rows and columns you'll need.
3. Insert the Table
Click “Insert” from the top menu.
Then choose “Table” to generate a table layout (note: this feature may be more template-like depending on your account setup).
Alternative Method:
There’s no native "Format as Table" like in Excel, but you can manually format cells using borders, background colors, and filters for similar functionality.
4. Add Headers (Optional but Recommended)
If your table includes headers (like "Name", "Date", "Amount"), make sure they're in the first row.
You can then freeze the top row (View > Freeze > 1 row) so headers stay visible as you scroll.
5. Customize Your Table
Use the Borders button in the toolbar to add lines between cells.
Apply fill colors to alternate rows for better readability.
Click Format > Conditional formatting to add color rules based on your data.
6. Name Your Table (Optional)
While Google Sheets doesn’t officially name tables like Excel, you can name the range:
Select your table > right-click > “Define named range”.
Give it a unique name for easy reference in formulas.
7. Use Table Features
Sort and filter: Highlight your table and click the filter icon (funnel) to add dropdown filters.
Resize columns and rows: Hover over the edge of a column/row and drag to resize.
Add rows/columns: Right-click on a row or column label and choose Insert.
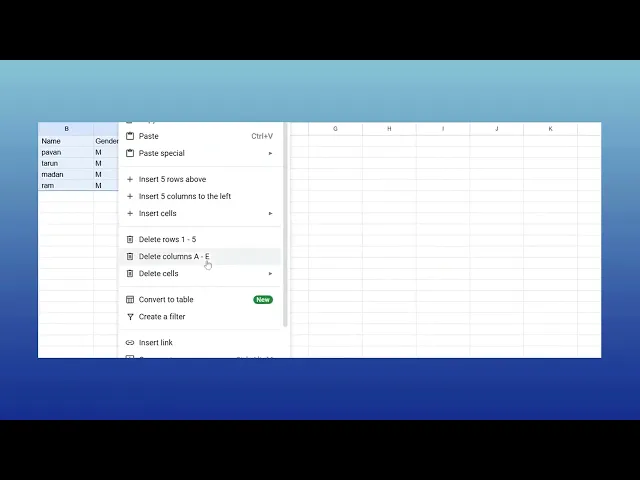
Step-by-Step Guide: How to create a table in Sheets
Step 1
To begin, open your Google Spreadsheet. Select the dataset that you wish to organize into a table.

Step 2
Right-click and Click on "Convert to table".

Step 3
After clicking, its automatically convert data in to Table.

Pro-tips for creating a table in Google Sheets
Use headers in the first row and bold them to make your table easier to read.
Apply borders using the toolbar to visually separate table cells.
Use the format as table option by applying alternating colors for better readability.
Common pitfalls & how to avoid them while creating a table in Google Sheets
Forgetting to freeze the header row can make it difficult to track column names, go to view > freeze > 1 row.
Not sorting or filtering data properly, use the data > create a filter option to enable sorting.
Using merged cells incorrectly can cause formatting issues, avoid merging unless necessary.
Common FAQs for creating a table in Google Sheets
How do I format a table in Google Sheets?
Use the alternating colors option under the format menu and apply bold text to headers.Can I add a filter to my table?
Yes, select your data and click data > create a filter to enable sorting and filtering.How do I make my table automatically update with new data?
Use dynamic ranges with functions like array formula or named ranges to include new data automatically.How to screen record on mac?
To screen record on a Mac, you can use Trupeer AI. It allows you to capture the entire screen and provides AI capabilities such as adding AI avatars, add voiceover, add zoom in and out in the video. With trupeer’s AI video translation feature, you can translate the video into 30+ languages.How to add an AI avatar to screen recording?
To add an AI avatar to a screen recording, you'll need to use an AI screen recording tool. Trupeer AI is an AI screen recording tool, which helps you create videos with multiple avatars, also helps you in creating your own avatar for the video.How to screen record on windows?
To screen record on Windows, you can use the built-in Game Bar (Windows + G) or advanced AI tool like Trupeer AI for more advanced features such as AI avatars, voiceover, translation etc.
How to add voiceover to video?
To add voiceover to videos, download trupeer ai chrome extension. Once signed up, upload your video with voice, choose the desired voiceover from trupeer and export your edited video.How do I Zoom in on a screen recording?
To zoom in during a screen recording, use the zoom effects in Trupeer AI which allows you to zoom in and out at specific moments, enhancing the visual impact of your video content.
Suggested Reads
Technical Documentation Generator
How to Turn an Image into a Coloring Page in Canva
How to Print Double Sided on Canva
Related Tutorials

