
Hoe maak je een GIF in Figma
Wil je geanimeerde GIF's maken in Figma? Volg deze stapsgewijze handleiding om je eigen GIF's te ontwerpen, animeren en exporteren met Figma en tools van derden.
1. Installeer de plugin:
Open Figma en ga naar "Plugins" > "Beheer plug-ins".
Zoek en installeer "Export to GIF/Video" of "Animated GIF Maker".
Je kunt ook plugins vinden en installeren via de Figma-communitywebsite.
2. Selecteer je frames:
Maak de frames die je wilt animeren en rangschik ze in de volgorde waarin ze in de GIF moeten verschijnen.
Selecteer alle frames die je in de GIF wilt opnemen.
3. Configureer GIF-instellingen:
Open de plugin die je hebt geïnstalleerd.
Kies het GIF-formaat, indien beschikbaar.
Stel de framesnelheid in (hoe snel de animatie wordt afgespeeld).
Kies de gewenste afmetingen voor je GIF.
Bepaal of je wilt dat de GIF in een lus afspeelt of slechts één keer.
Sommige plugins bieden mogelijk extra functies, zoals het toevoegen van een transparante achtergrond.
4. Exporteer de GIF:
Als je tevreden bent met de instellingen, klik je op de knop "Exporteren" of "Genereer GIF".
De plugin maakt het GIF-bestand aan en laat je het downloaden naar je computer.
Stapsgewijze handleiding: Hoe maak je een GIF in Figma
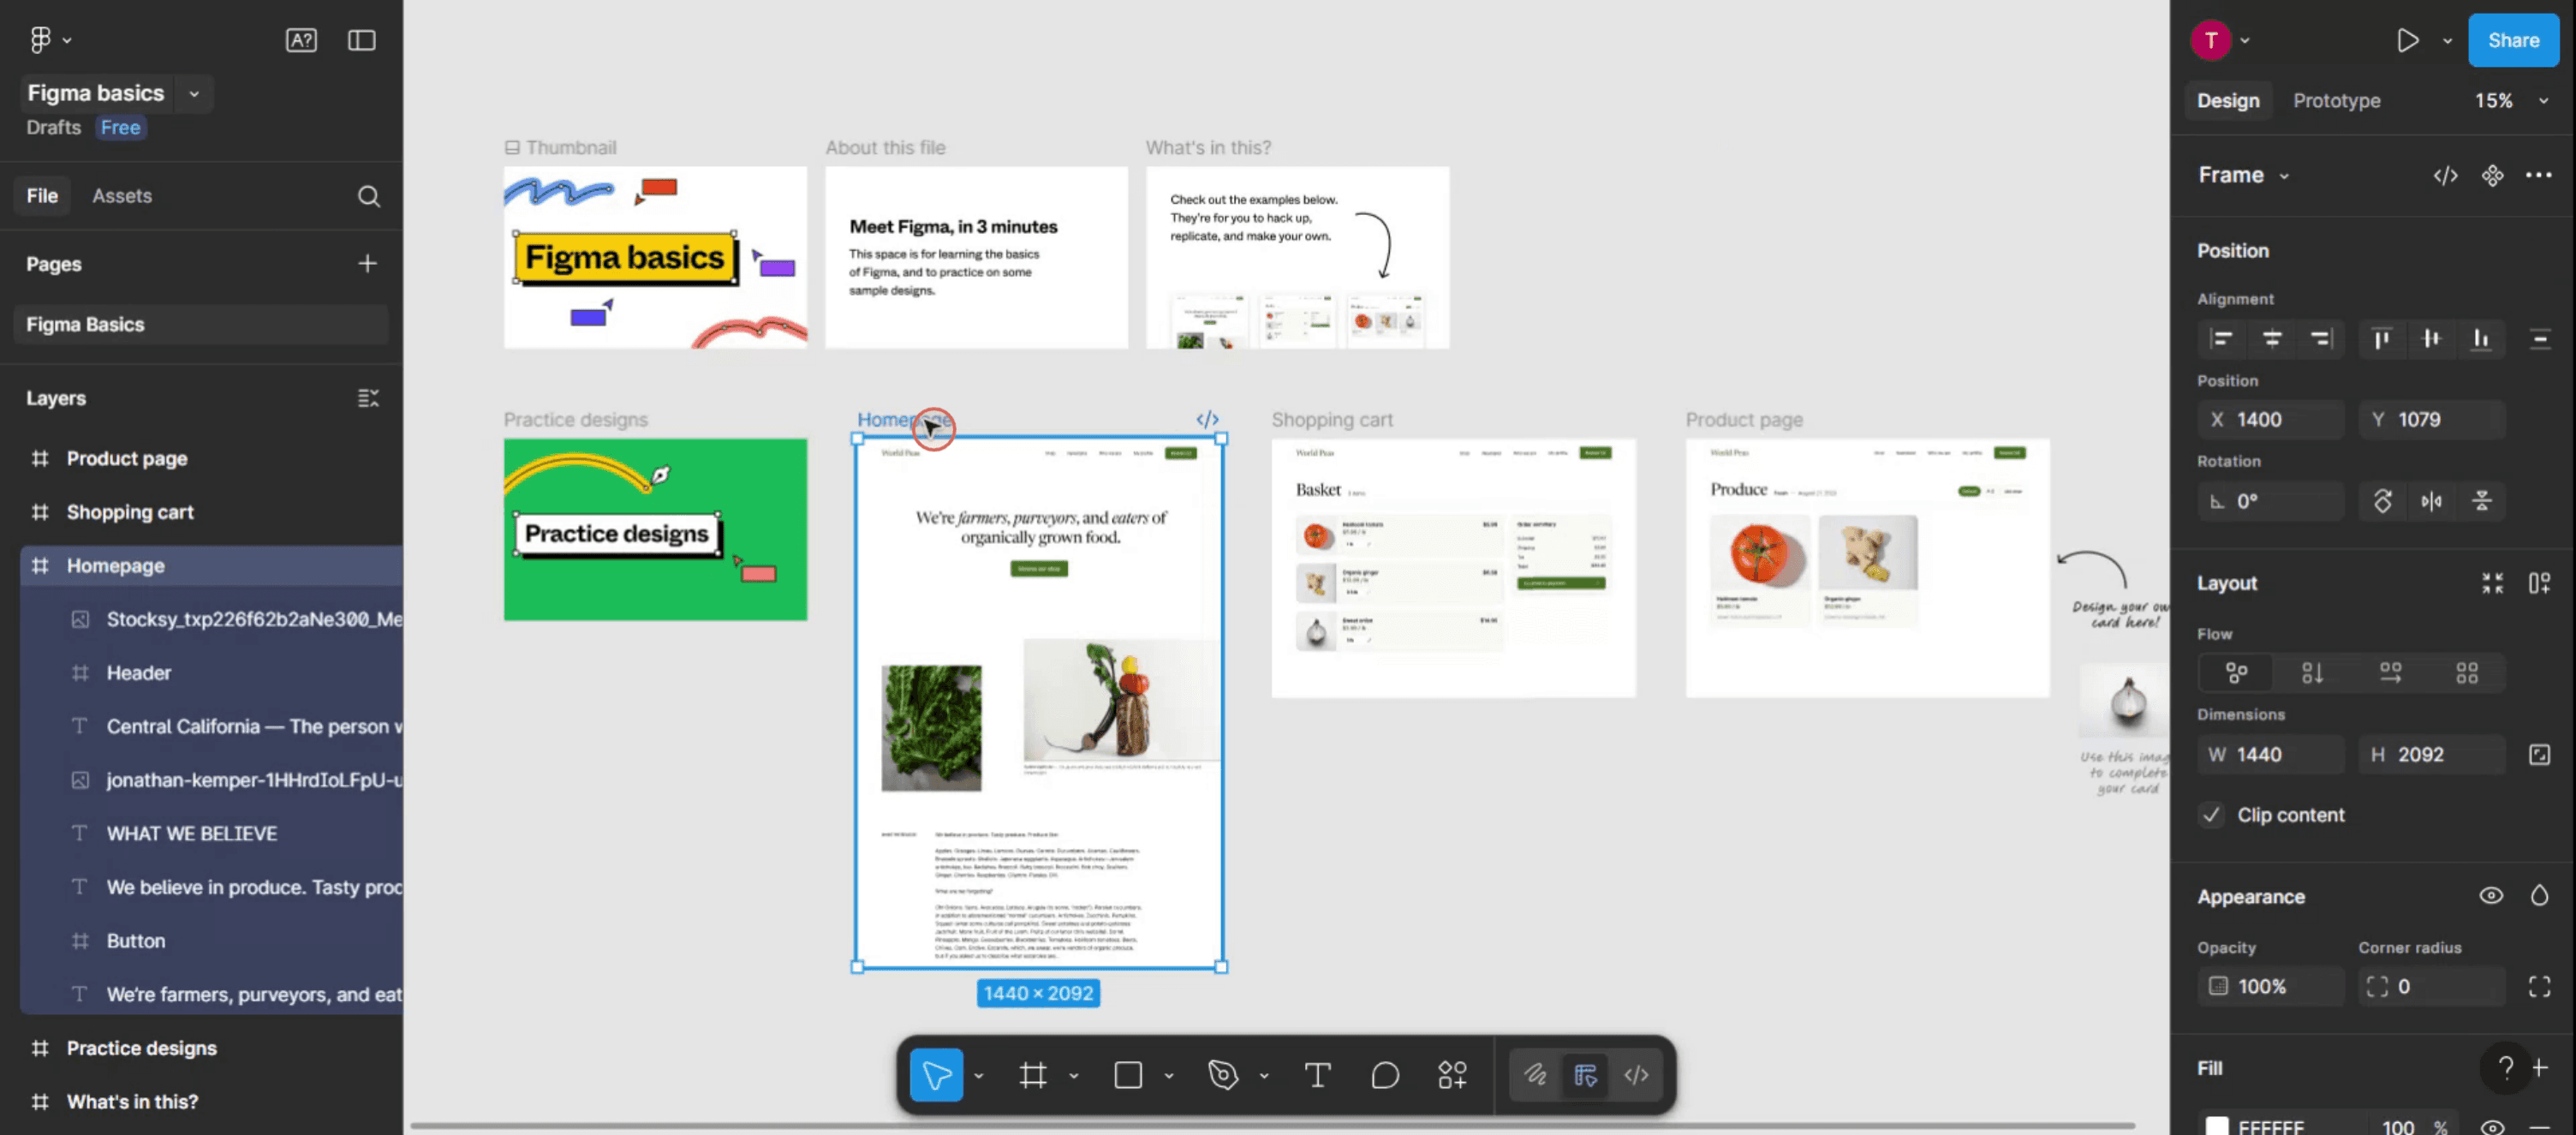
Stap 1
Kies de template die je wilt omzetten in een geanimeerde GIF.
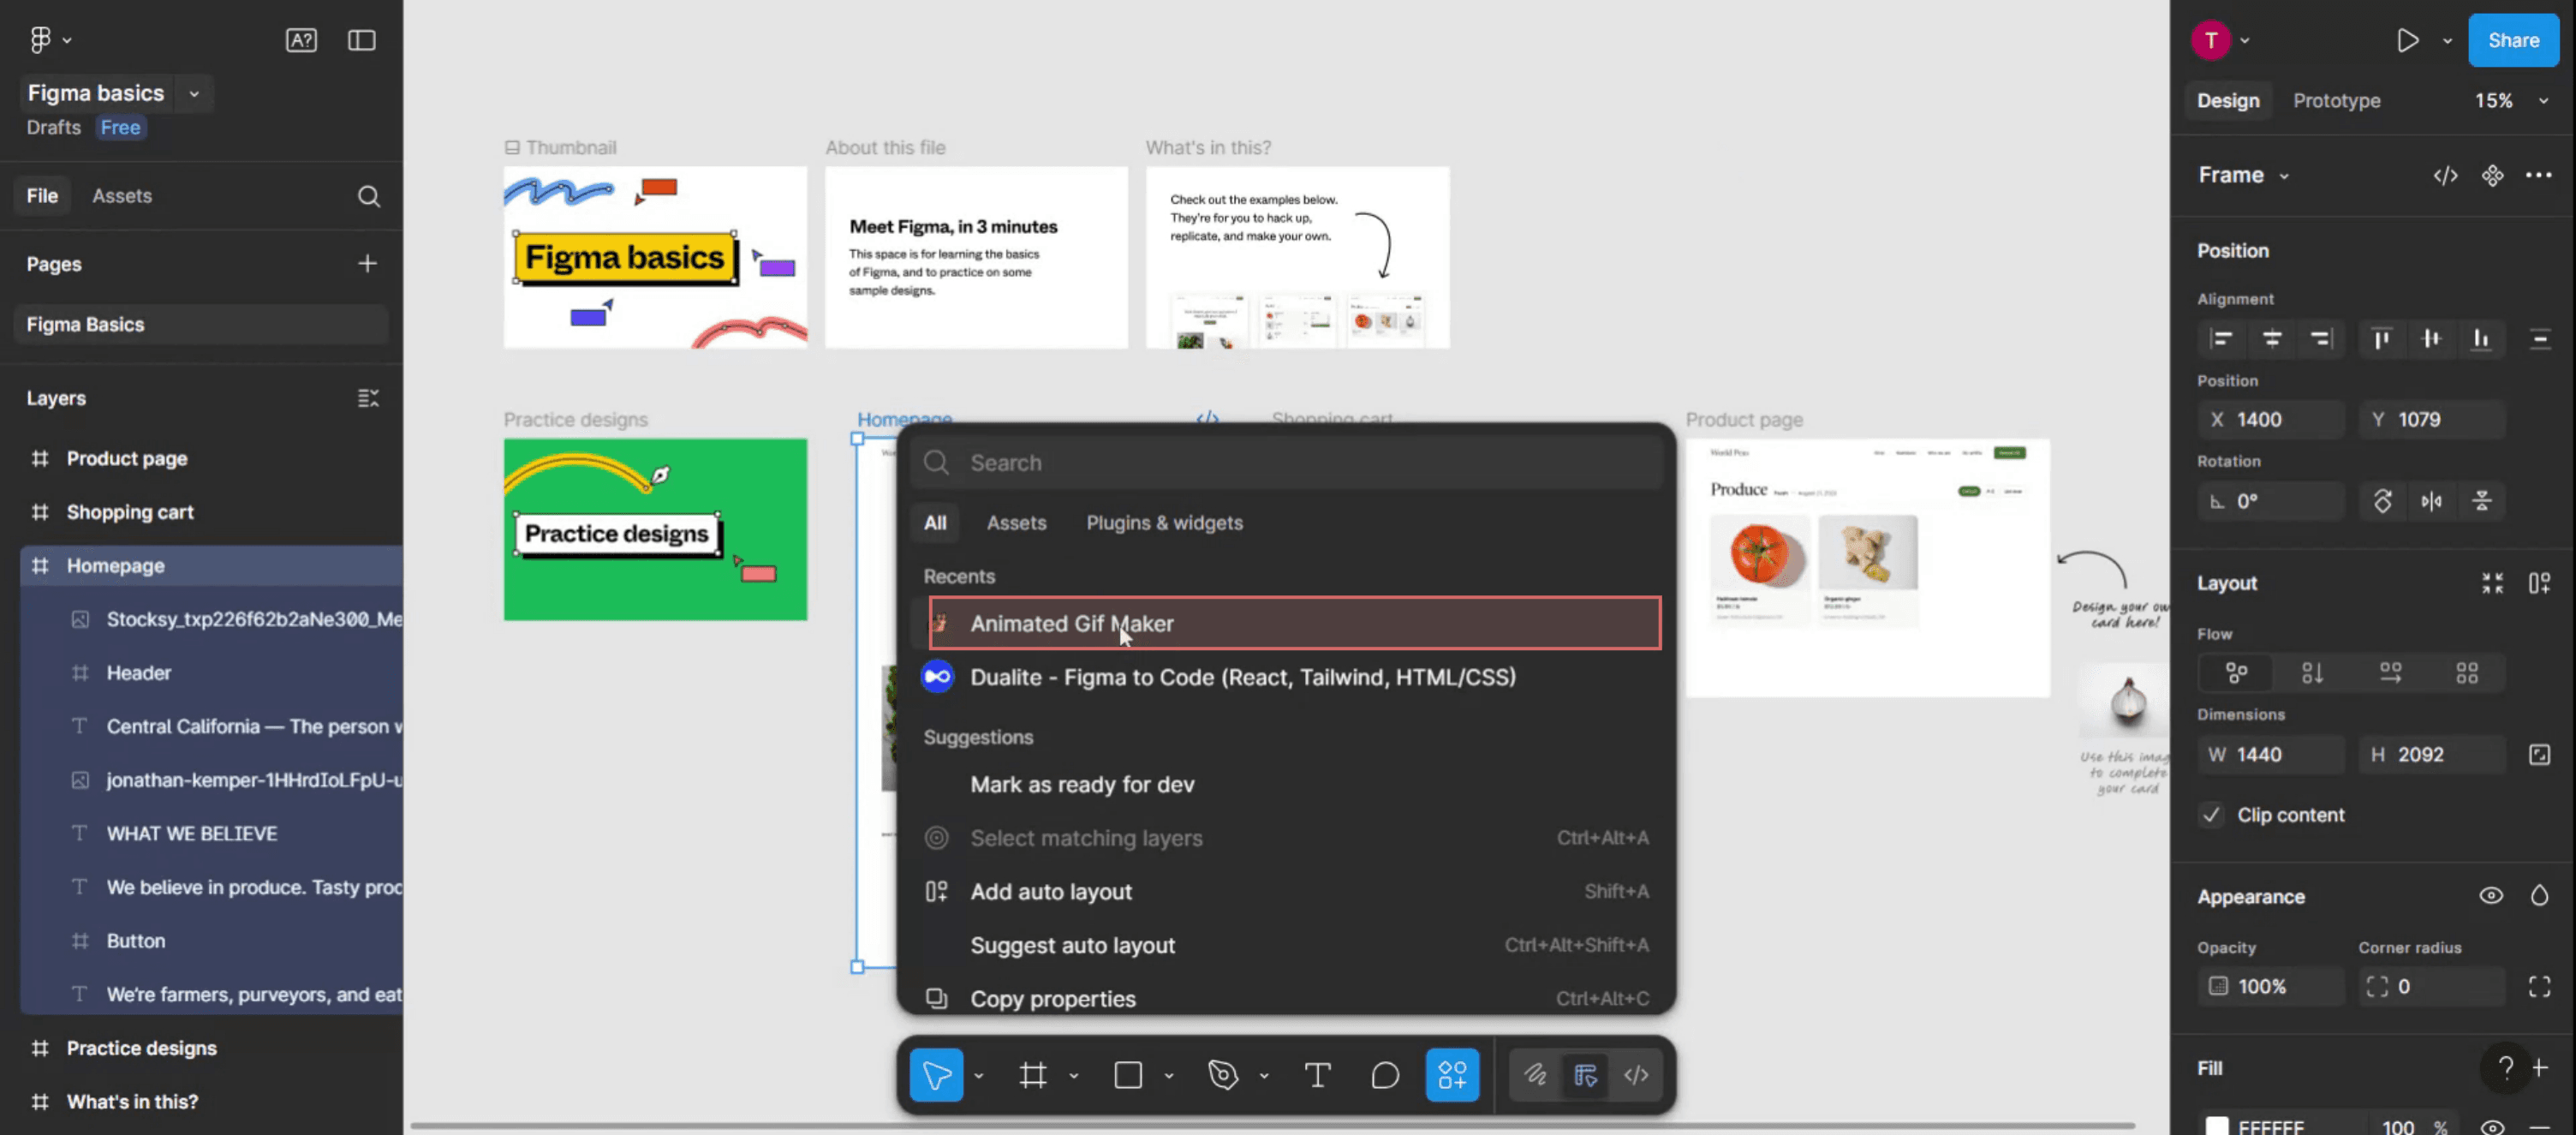
Stap 2
Klik vervolgens in Figma op het menu Acties.

Stap 3
Zoek in de zoekbalk naar de plugin "animated GIF maker".
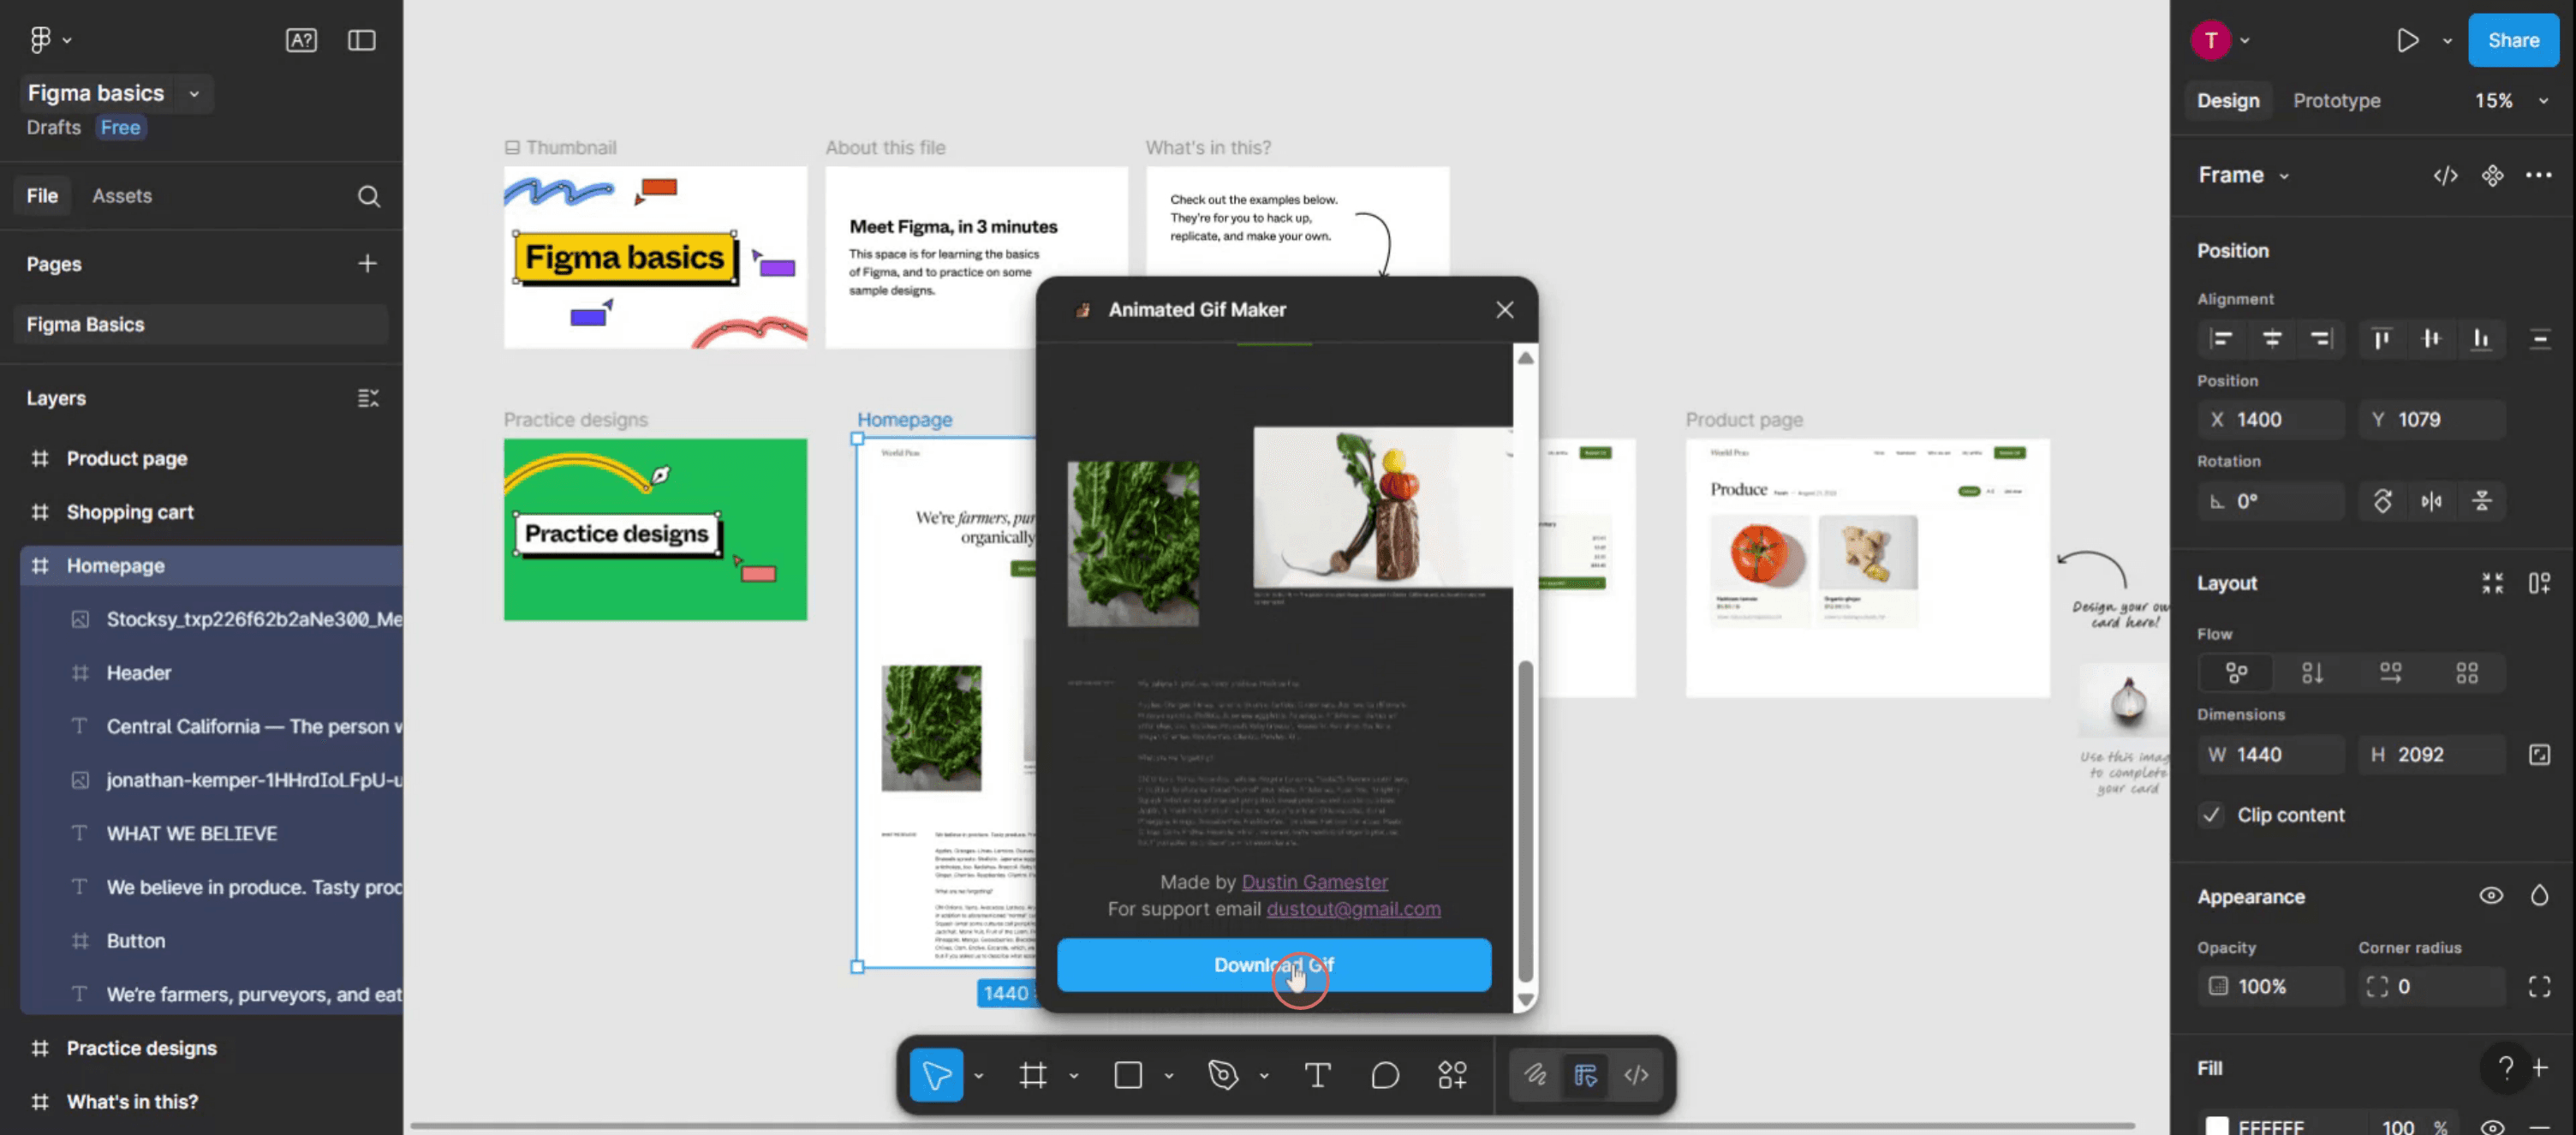
Stap 4
Vervolgens verschijnt er een pop-upvenster waarin je de GIF-instellingen kunt aanpassen,
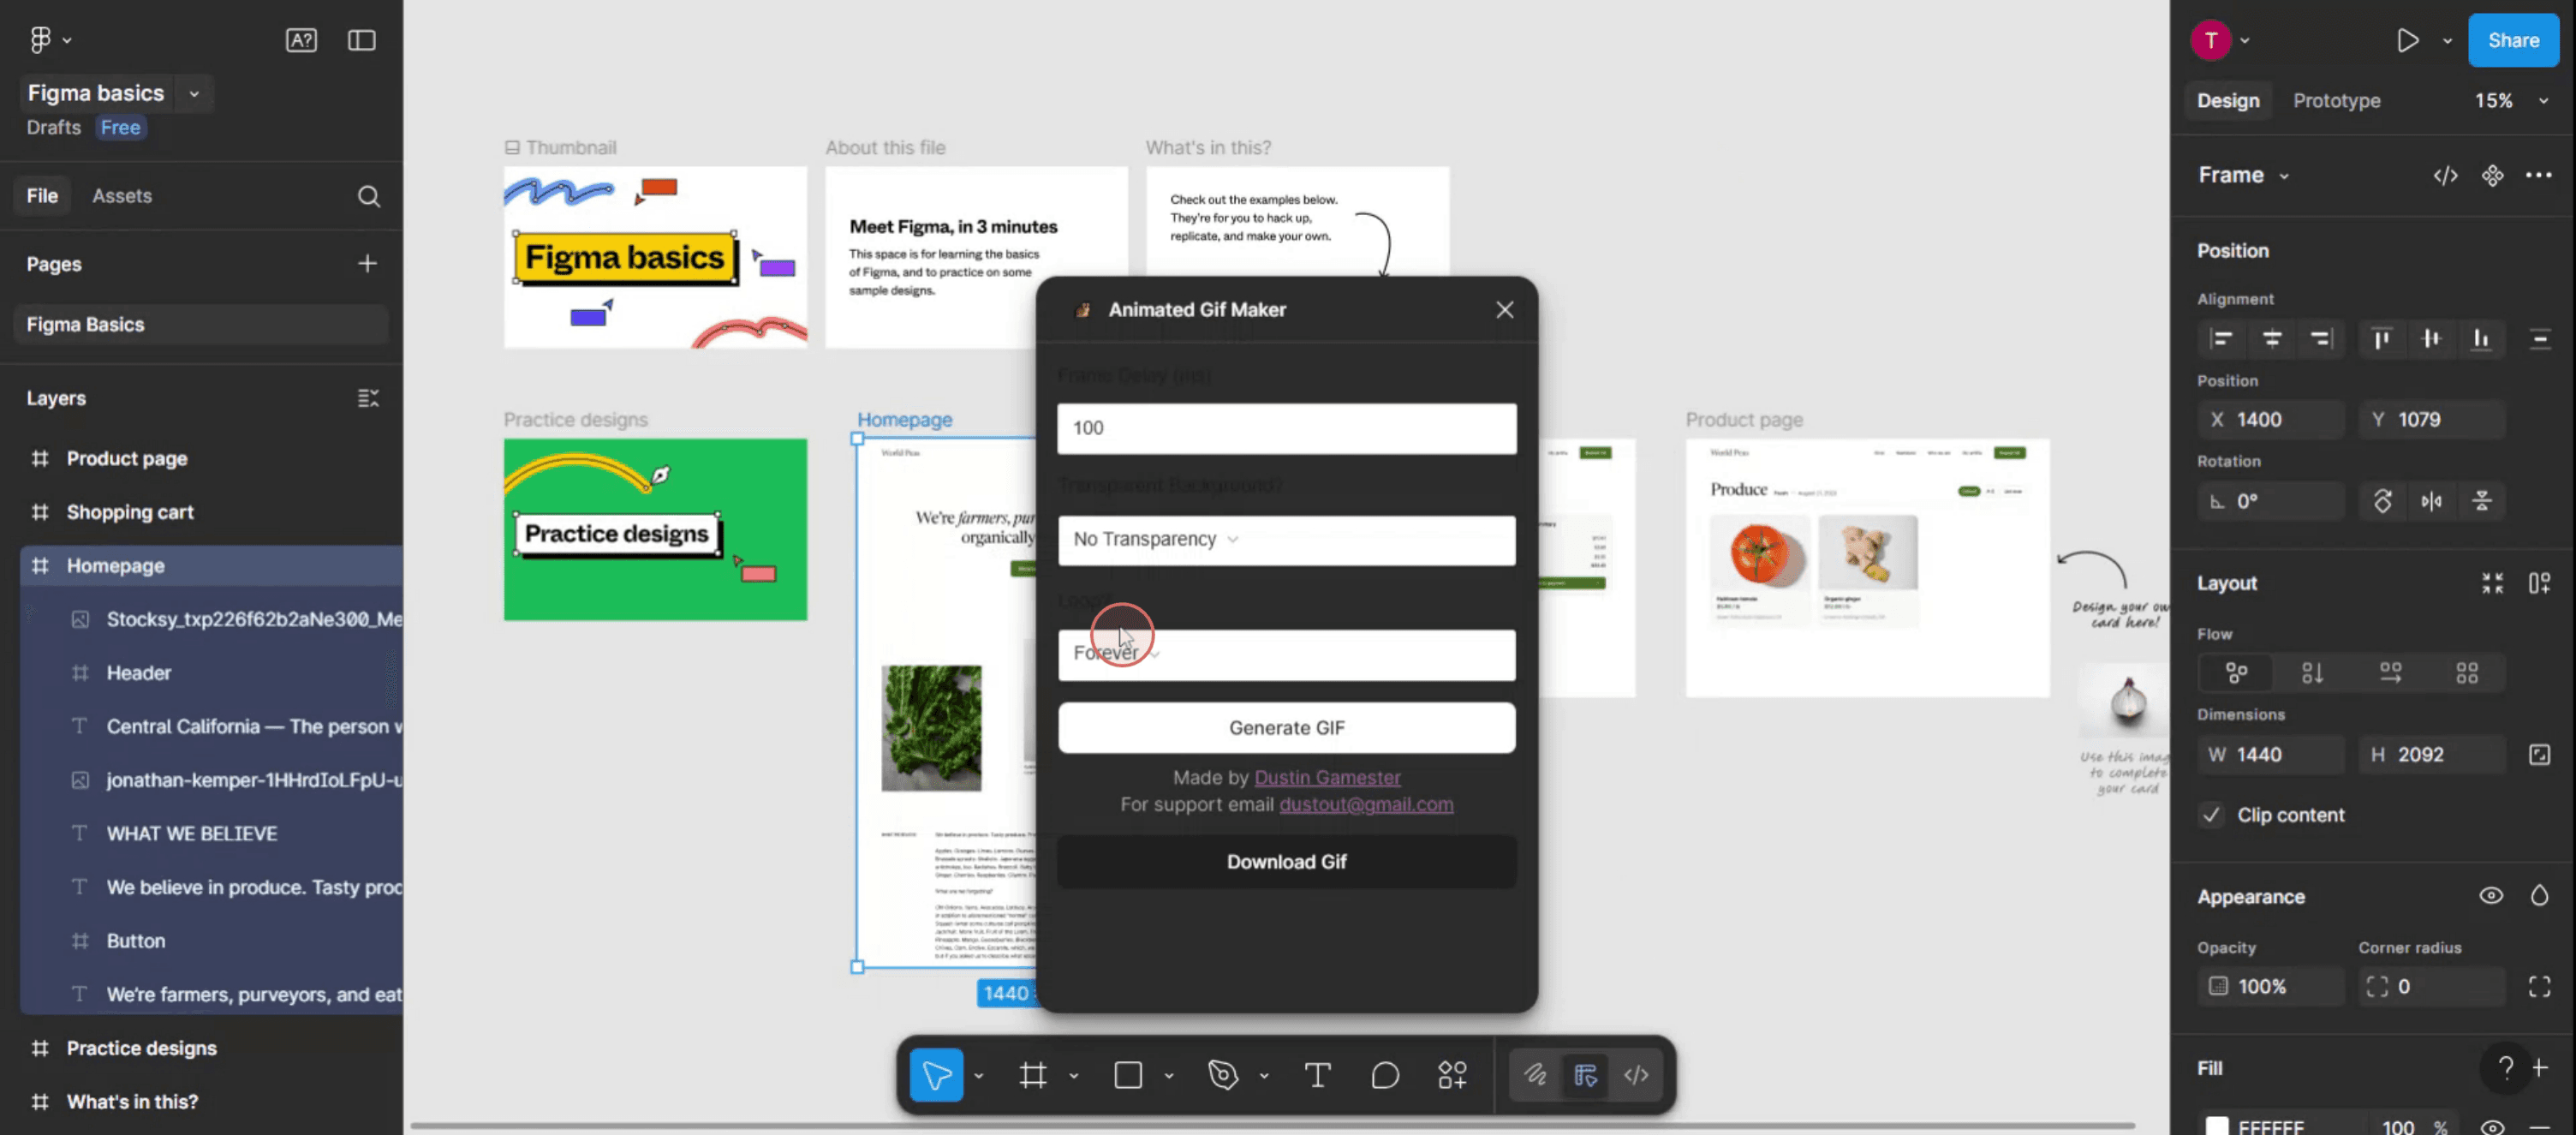
Stap 5
Klik op GIF downloaden om je creatie op te slaan.
Pro-tips voor het maken van een GIF in Figma
Ontwerp je frames in Figma
Maak de reeks frames die je wilt animeren door artboards (frames) te dupliceren en in elk ervan wijzigingen aan te brengen om beweging of transformatie weer te geven.Geef frames opeenvolgend een naam
Geef elk frame duidelijk in volgorde een label (zoals Frame 1, Frame 2, enz.) zodat je ze later tijdens het exportproces makkelijker kunt herkennen.Exporteer frames als PNG's
Selecteer elk frame, klik op de Export-optie in het paneel rechtsonder en exporteer ze als PNG-bestanden. Houd de grootte en schaal voor alle frames consistent.Gebruik een externe GIF-maker
Open een GIF-creatietool zoals ezgif.com, Photoshop of een andere online GIF-maker. Upload al je geëxporteerde PNG's in de juiste volgorde.Stel de frameduur en looping in
Pas de vertraging tussen frames aan en schakel looping in om je GIF continu af te spelen.Exporteer de uiteindelijke GIF
Zodra je instellingen zijn afgerond, exporteer en download je het GIF-bestand. Je kunt het nu gebruiken in je presentaties, websites of UI-voorbeelden.
Veelvoorkomende valkuilen en hoe je ze kunt vermijden
Niet-uitgelijnde frames
Zorg ervoor dat alle elementen in elk frame consistent zijn uitgelijnd om schokkerige of trillende GIF's te voorkomen.Naamgevingsconventies overslaan
Als je frames niet opeenvolgend zijn benoemd, kan het lastig zijn om de volgorde te behouden tijdens het uploaden naar een GIF-maker.Exporteren in verschillende groottes
Controleer altijd of elk frame dezelfde resolutie en schaal heeft om een vloeiende animatie te garanderen.Uitvoer van lage kwaliteit
Kies bij het gebruik van online GIF-makers een tool die hoge resolutie-uitvoer ondersteunt om pixelvorming te voorkomen.Te groot bestand
Als je GIF te groot wordt, verminder dan het aantal frames of comprimeer de afbeeldingen iets voordat je ze uploadt.
Veelgestelde vragen over het maken van GIF's in Figma
Kan ik een GIF rechtstreeks vanuit Figma exporteren?
Nee, Figma heeft geen ingebouwde exportoptie voor GIF's. Je moet frames exporteren en een extern hulpmiddel gebruiken.Wat is het beste formaat om frames uit Figma te exporteren?
PNG heeft de voorkeur vanwege de kwaliteit en ondersteuning voor transparantie.Welke externe tools kan ik gebruiken om GIF's te maken van Figma-ontwerpen?
Populaire tools zijn onder andere ezgif.com, Adobe Photoshop en Giphy.Hoeveel frames moet ik gebruiken voor een vloeiende GIF?
Meestal zijn 10–20 frames voldoende voor korte animaties. Meer frames zorgen voor vloeiendere beweging, maar ook voor grotere bestandsgroottes.Kan ik de snelheid van de animatie aanpassen?
Ja, met de meeste GIF-tools kun je vertragingstijden tussen frames instellen om de afspeelsnelheid aan te passen.Hoe neem ik het scherm op op een Mac?
Om het scherm op te nemen op een Mac, kun je Trupeer AI gebruiken. Hiermee kun je het volledige scherm vastleggen en krijg je AI-mogelijkheden zoals het toevoegen van AI-avatars, voice-over toevoegen en in- en uitzoomen in de video. Met de AI-videotranslatiefunctie van Trupeer kun je de video vertalen naar meer dan 30 talen.Hoe voeg ik een AI-avatar toe aan een schermopname?
Om een AI-avatar toe te voegen aan een schermopname, moet je een AI-schermopnametool gebruiken. Trupeer AI is een AI-schermopnametool die je helpt video's met meerdere avatars te maken en je ook helpt om je eigen avatar voor de video te maken.Hoe neem ik het scherm op in Windows?
Om het scherm op te nemen in Windows, kun je de ingebouwde Game Bar (Windows + G) gebruiken of een geavanceerde AI-tool zoals Trupeer AI voor uitgebreidere functies zoals AI-avatars, voice-over, vertaling enz.Hoe voeg ik voice-over toe aan een video?
Om voice-over aan video's toe te voegen, download je de Trupeer AI Chrome-extensie. Nadat je je hebt aangemeld, upload je je video met audio, kies je de gewenste voice-over van Trupeer en exporteer je je bewerkte video.Hoe zoom ik in op een schermopname?
Om tijdens een schermopname in te zoomen, gebruik je de zoomeffecten in Trupeer AI, waarmee je op specifieke momenten kunt in- en uitzoomen en zo de visuele impact van je videocontent vergroot.
Mensen vragen ook
Generator voor technische documentatie
Hoe verberg je framenaam in Figma
Hoe sla je een Figma-bestand op
Hoe maak je een raster in Figma
Gerelateerde tutorials

