
Come sfocare su Canva
Scopri come sfocare immagini, sfondi o elementi specifici in Canva. Guida passo passo all’uso dell’effetto sfocatura per creare design creativi e professionali.
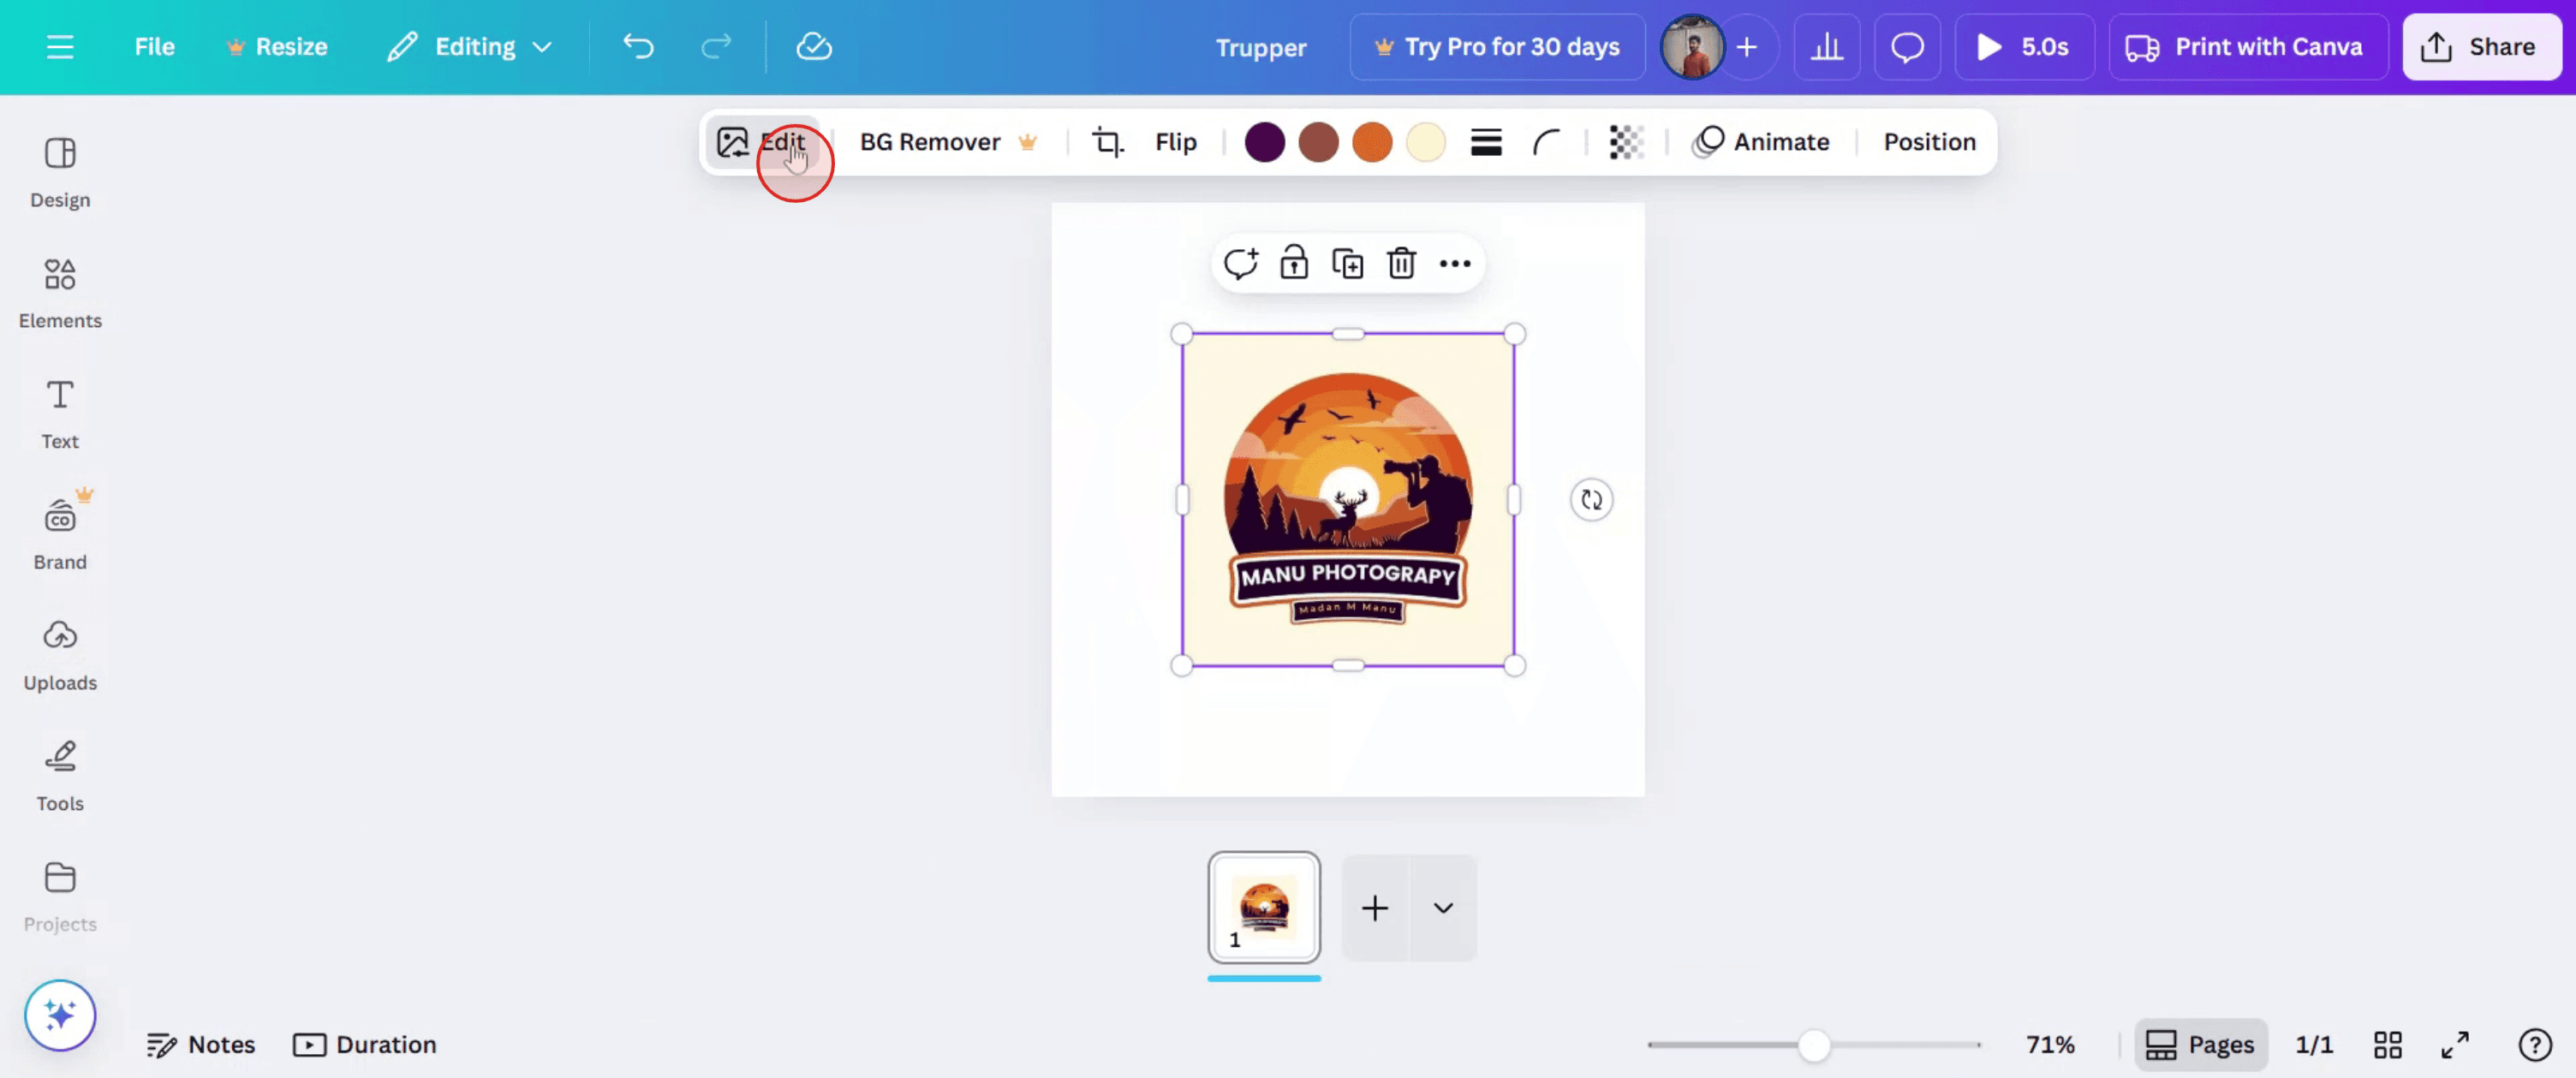
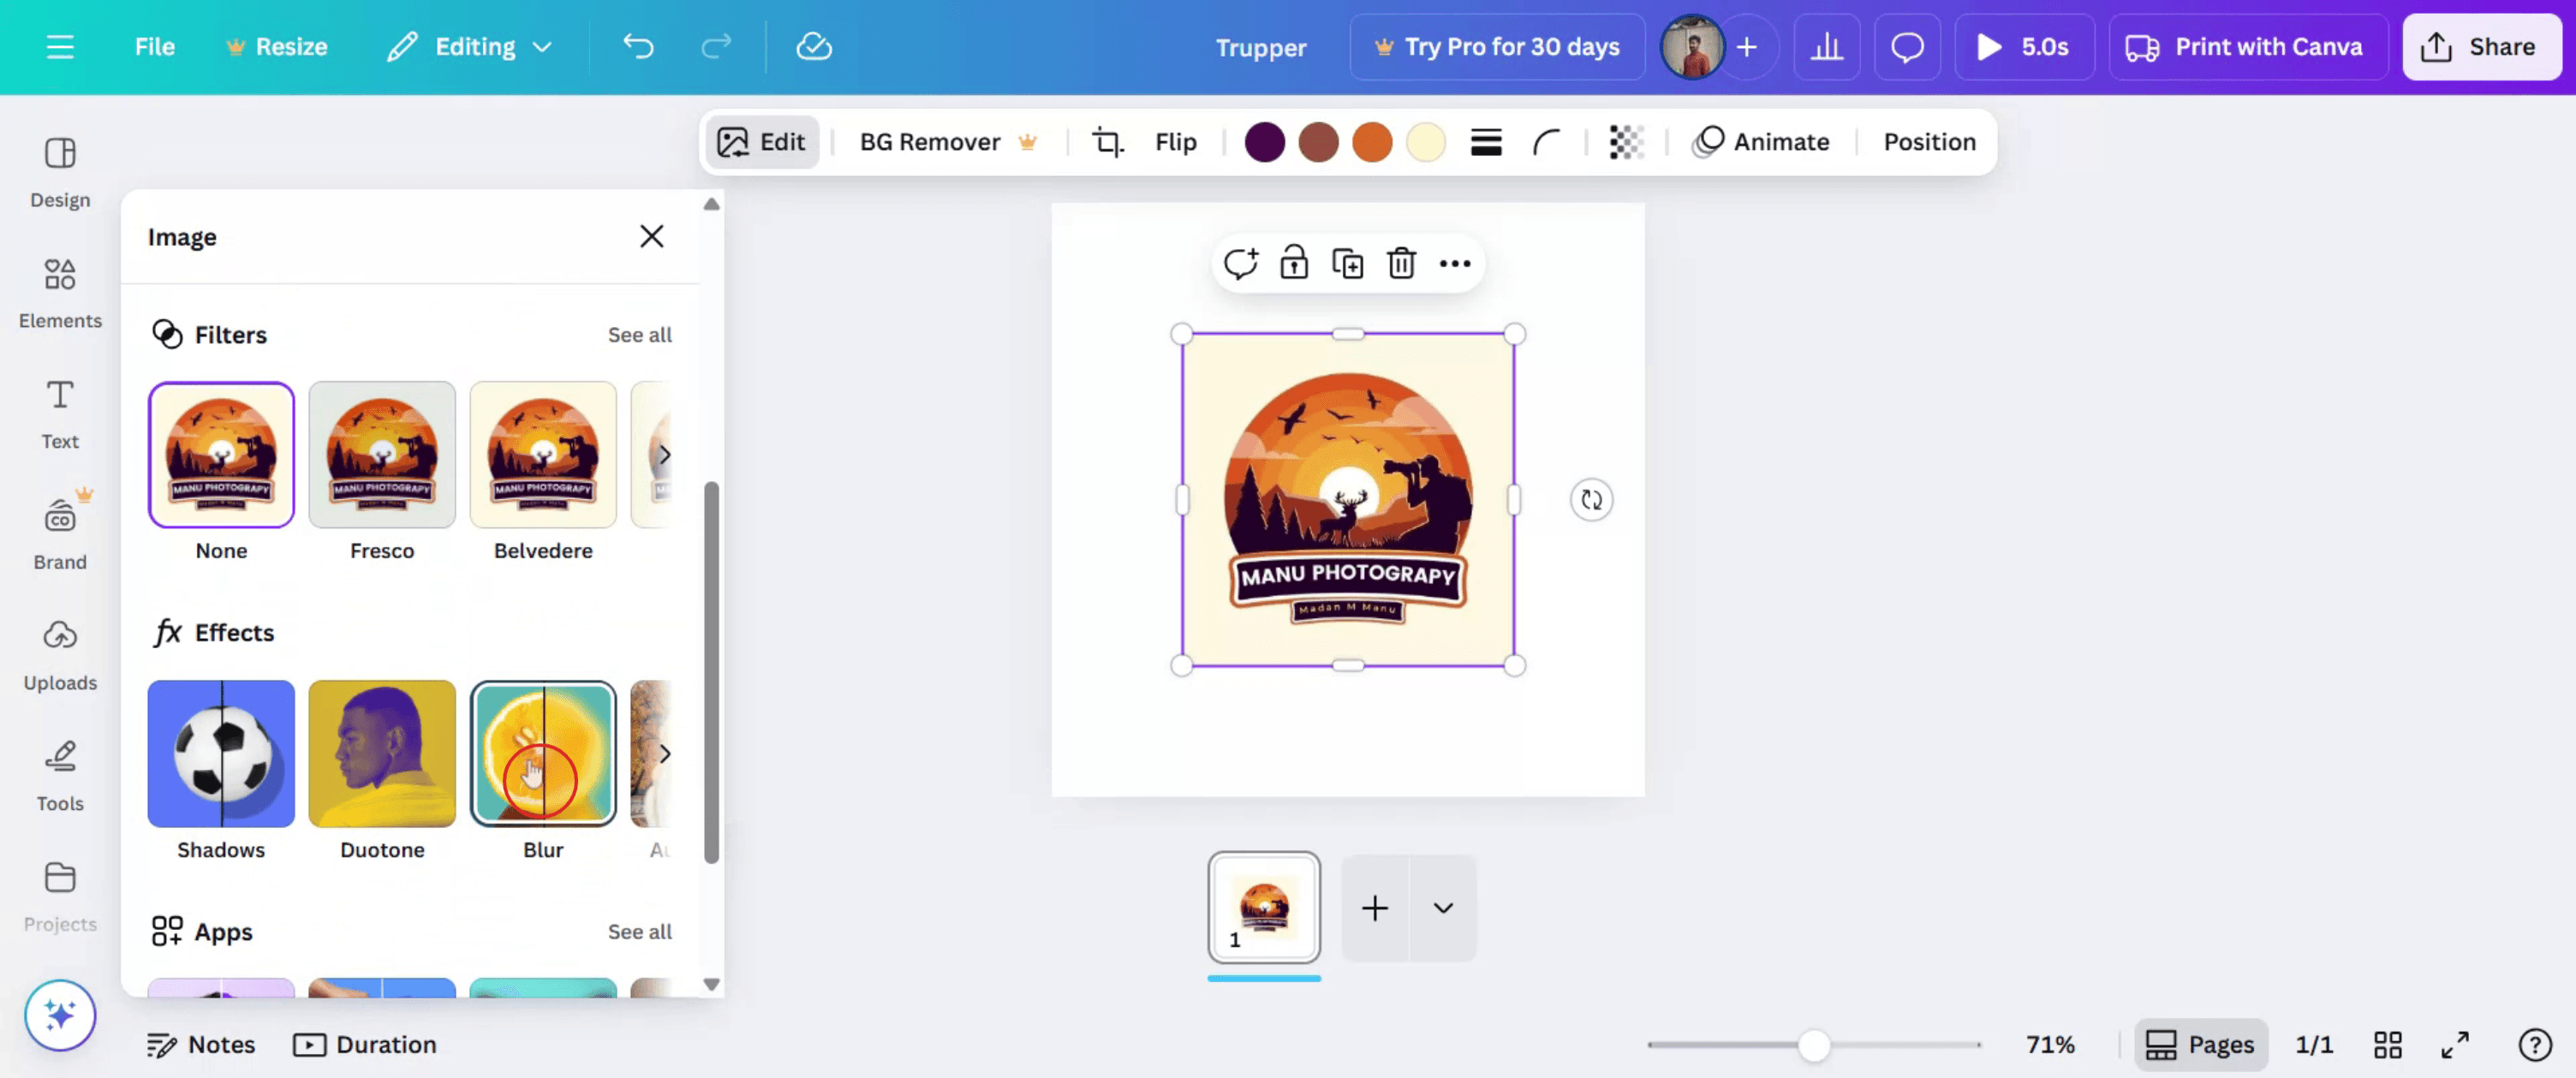
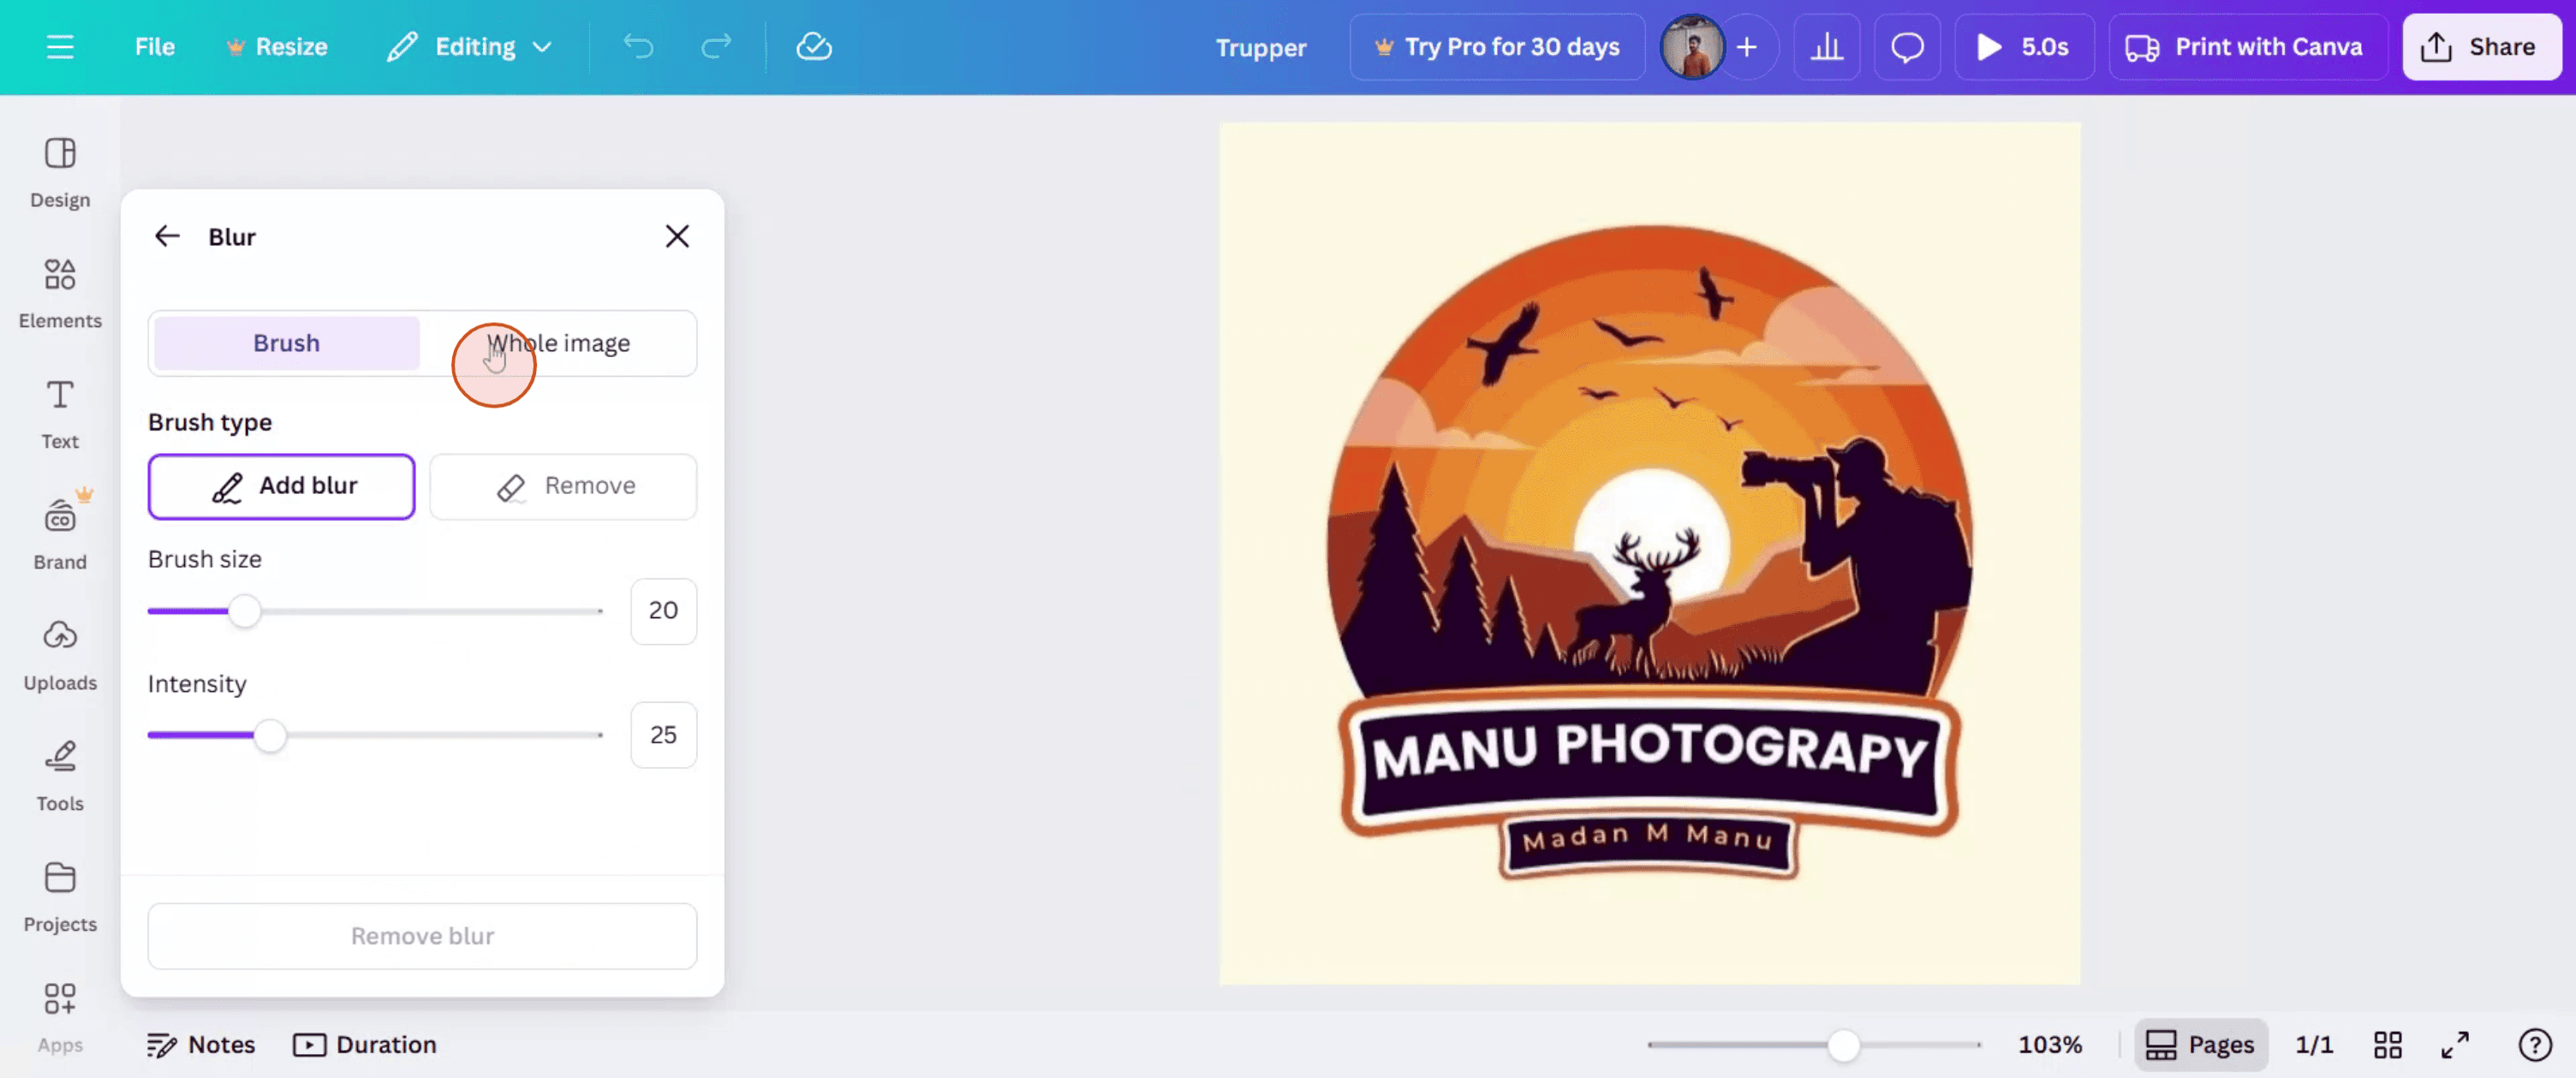
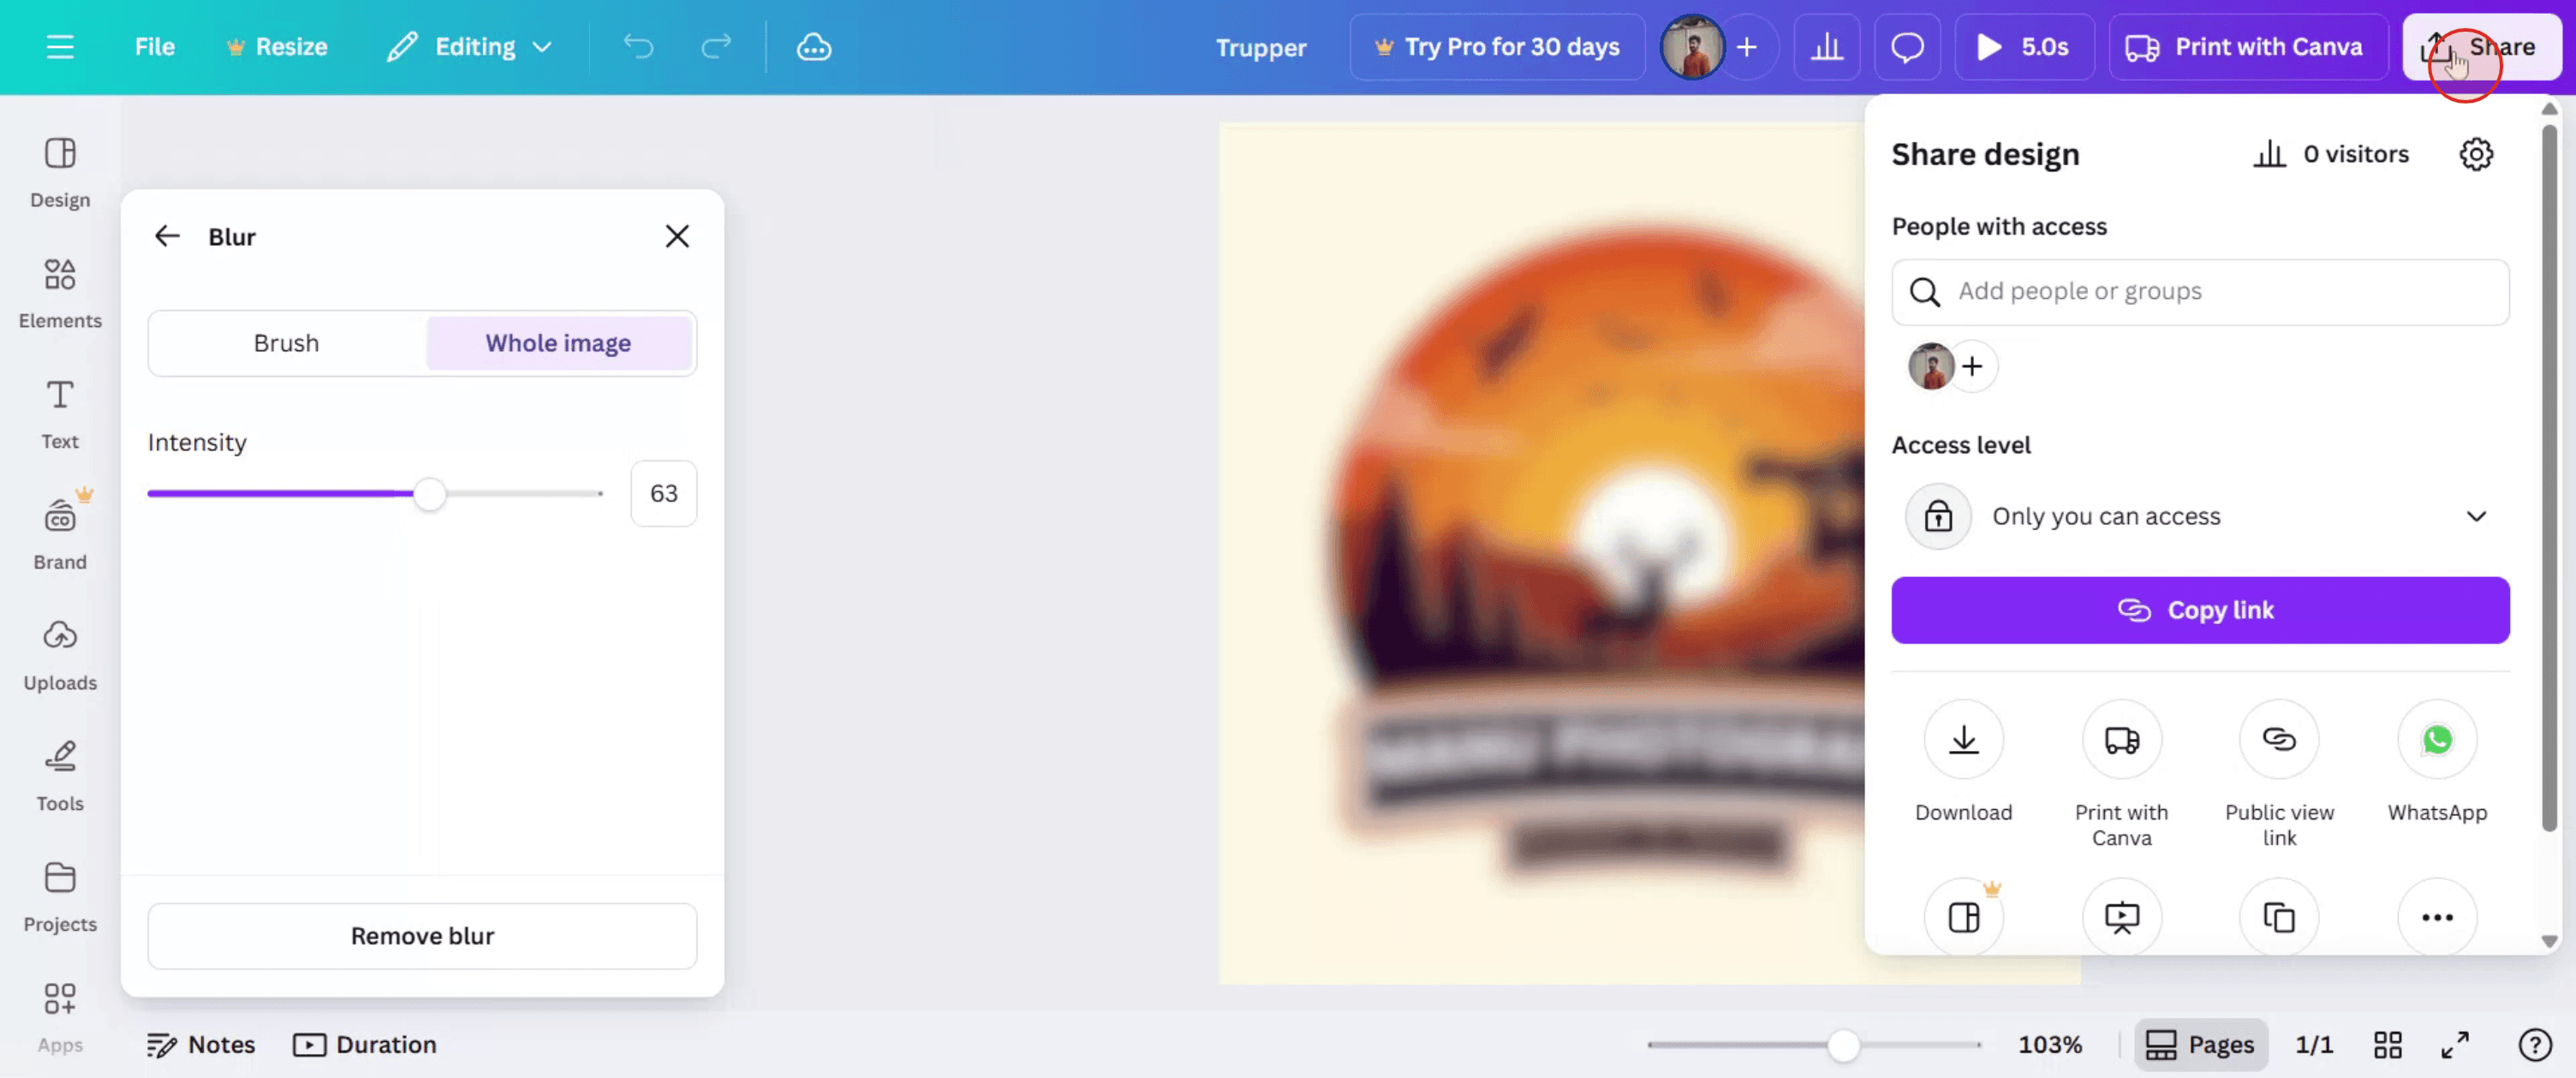
Per sfocare un'immagine in Canva, seleziona l'immagine, fai clic su "Modifica immagine", poi su "Regola" e usa il cursore Sfoca per controllare l'intensità. Per una sfocatura selettiva, usa lo strumento Pennello all'interno dell'effetto Sfoca per individuare aree specifiche. Puoi anche sfocare gli sfondi dei video usando le funzionalità "Modifica foto" e "Messa a fuoco automatica" oppure regolando la nitidezza nella scheda "Regola".
Ecco una spiegazione più dettagliata:
Sfocare un'intera immagine:
Seleziona l'immagine: fai clic sull'immagine che vuoi sfocare nel tuo progetto Canva.
Accedi all'editor: fai clic sul pulsante "Modifica immagine" nella barra degli strumenti in alto.
Regola la sfocatura: vai alla sezione "Regola" e usa il cursore della sfocatura per controllarne l'intensità.
Scarica: una volta soddisfatto, scarica il tuo progetto.
Sfocare aree specifiche:
Seleziona l'immagine: fai clic sull'immagine che vuoi sfocare.
Accedi all'editor: fai clic sul pulsante "Modifica immagine".
Applica l'effetto sfocatura: nel pannello sinistro, vai alla sezione "Effetti fx" e trova l'effetto Sfoca.
Usa il pennello: seleziona lo strumento pennello e regola la dimensione e l'intensità del pennello secondo necessità.
Individua le aree: fai clic e trascina il pennello sulle aree che vuoi sfocare.
Regola l'intensità: usa il cursore dell'intensità per controllare l'effetto di sfocatura.
Guida passo passo: come sfocare in Canva
Passaggio 1
Inizia accedendo alla sezione di caricamento in Canva e fai clic per avviare il processo.

Passaggio 2
Dopo aver selezionato l'immagine, fai clic su di essa e poi scegli l'opzione "Modifica".
Passaggio 3
Nel menu di modifica, individua e seleziona l'opzione "Sfoca".
Passaggio 4
Troverai due scelte, che ti permettono di sfocare parti specifiche dell'immagine. Inoltre, hai la possibilità di sfocare l'intera immagine.
Passaggio 5
Qui puoi regolare l'intensità dell'effetto di sfocatura applicato all'intera immagine.

Passaggio 6
Una volta soddisfatto delle modifiche, fai clic su "Condividi" per distribuire la tua immagine modificata.
Consigli professionali per sfocare in Canva
Apri il tuo progetto in Canva
Accedi a Canva e apri il progetto in cui vuoi applicare un effetto sfocatura.Seleziona l'immagine o l'elemento da sfocare
Fai clic sulla foto, sullo sfondo o sull'elemento grafico che vuoi sfocare.Fai clic sul pulsante “Modifica immagine”
Con l'elemento selezionato, fai clic sull'opzione “Modifica immagine” nella barra degli strumenti in alto.Scegli lo strumento Sfocatura
Scorri tra gli effetti disponibili e seleziona lo strumento “Sfocatura” in Regola o Effetti.Regola l'intensità della sfocatura
Usa il cursore della sfocatura per aumentare o diminuire il livello di sfocatura. Spostalo verso destra per un effetto di sfocatura più intenso.Applica e controlla la sfocatura
Dopo aver regolato, fai clic fuori dall'immagine per applicare l'effetto. Visualizza l'anteprima del progetto per assicurarti che la sfocatura sia come desideri.
Errori comuni e come evitarli
Lo strumento Sfocatura non è visibile
Assicurati che sia selezionata l'immagine corretta. Se lo strumento continua a non apparire, verifica di utilizzare un formato immagine supportato.Sfocare l'area sbagliata
Canva sfoca l'intero elemento selezionato. Per sfocare solo una parte dell'immagine, duplica l'immagine e maschera la sezione che vuoi interessare.L'immagine diventa poco chiara
Non sfocare eccessivamente, se non necessario. Applica un effetto delicato per mantenere riconoscibili gli elementi visivi importanti.Cercare di sfocare direttamente il testo
Gli elementi di testo non possono essere sfocati. Se necessario, converti il testo in un'immagine scaricandolo e ricaricandolo.Opzioni di sfocatura limitate nella versione gratuita
Alcuni filtri di sfocatura avanzati potrebbero essere disponibili solo in Canva Pro. Usa lo strumento di sfocatura di base se utilizzi la versione gratuita.
Domande frequenti comuni sulla sfocatura in Canva
Come faccio a sfocare un'immagine in Canva
Seleziona l'immagine, fai clic su Modifica immagine, scegli lo strumento Sfocatura e regola il cursore per applicare l'effetto.Posso sfocare una parte di un'immagine
Non direttamente. Per sfocare solo una parte di un'immagine, usa forme o maschere sopra aree specifiche oppure modifica esternamente e ricarica il file.Posso sfocare le immagini di sfondo
Sì, le immagini di sfondo possono essere selezionate e sfocate proprio come qualsiasi altra foto o grafica.L'effetto sfocatura è disponibile per gli utenti gratuiti
Sì, lo strumento di sfocatura di base è disponibile nella versione gratuita, ma le funzionalità avanzate potrebbero richiedere Canva Pro.Posso rimuovere la sfocatura dopo averla applicata
Sì, basta riselezionare l'immagine, tornare al pannello Modifica immagine e reimpostare o regolare il livello di sfocatura.Come registrare lo schermo su Mac?
Per registrare lo schermo su un Mac, puoi usare Trupeer AI. Ti consente di acquisire l'intero schermo e offre funzionalità di IA come l'aggiunta di avatar IA, l'aggiunta di voiceover, lo zoom avanti e indietro nel video. Con la funzione di traduzione video con IA di trupeer, puoi tradurre il video in oltre 30 lingue.Come aggiungere un avatar IA a una registrazione dello schermo?
Per aggiungere un avatar IA a una registrazione dello schermo, dovrai utilizzare uno strumento di registrazione dello schermo con IA. Trupeer AI è uno strumento di registrazione dello schermo con IA, che ti aiuta a creare video con più avatar e ti aiuta anche a creare il tuo avatar per il video.Come registrare lo schermo su Windows?
Per registrare lo schermo su Windows, puoi usare la Game Bar integrata (Windows + G) oppure uno strumento IA avanzato come Trupeer AI per funzionalità più avanzate come avatar IA, voiceover, traduzione, ecc.Come aggiungere un voiceover a un video?
Per aggiungere un voiceover ai video, scarica l'estensione Chrome di trupeer ai. Dopo aver effettuato l'iscrizione, carica il tuo video con voce, scegli il voiceover desiderato da trupeer ed esporta il video modificato.Come faccio a ingrandire in una registrazione dello schermo?
Per ingrandire durante una registrazione dello schermo, usa gli effetti di zoom in Trupeer AI, che ti consentono di ingrandire e ridurre in momenti specifici, migliorando l'impatto visivo del contenuto del tuo video.
Letture suggerite
Generatore di documentazione tecnica
Come creare un diario in Canva
Come stampare fronte e retro in Canva
Come allungare il testo in Canva
Tutorial correlati

