

Comment créer un diagramme circulaire dans Figma
Vous voulez visualiser des données dans Figma ? Apprenez à créer un diagramme circulaire à l’aide de formes, d’angles et de plugins. Un guide simple pour créer des visuels épurés et fondés sur les données.
Voici une explication plus détaillée :
1. Créez une ellipse : sélectionnez l’outil ellipse et dessinez un cercle. Vous pouvez maintenir Maj en faisant glisser pour vous assurer qu’il s’agit d’un cercle parfait. cercle parfait.
2. Accédez aux options d’arc : survolez le cercle et vous verrez apparaître un point. Cliquez et faites glisser ce point pour afficher les commandes d’arc.
3. Ajustez la portée et le point de départ : les commandes d’arc vous permettent d’ajuster le "sweep" (taille de la tranche) et le "start" (angle de départ) de l’arc.
4. Créez des parts : dupliquez l’arc initial (part) pour créer des parts supplémentaires pour votre diagramme circulaire. Ajustez les angles de sweep et de start pour chaque duplication afin d’obtenir les proportions souhaitées.
5. Coloriez les parts : remplissez chaque part d’une couleur distincte pour les différencier. Vous pouvez également ajouter des étiquettes à chaque part à l’aide de l’outil texte.
6. Organisez et peaufinez : disposez les parts et les étiquettes selon vos besoins. Vous pouvez grouper les éléments pour garder le graphique bien organisé.
Guide étape par étape : comment créer un diagramme circulaire dans Figma
Étape 1
Cliquez sur la section 'Actions'.

Étape 2
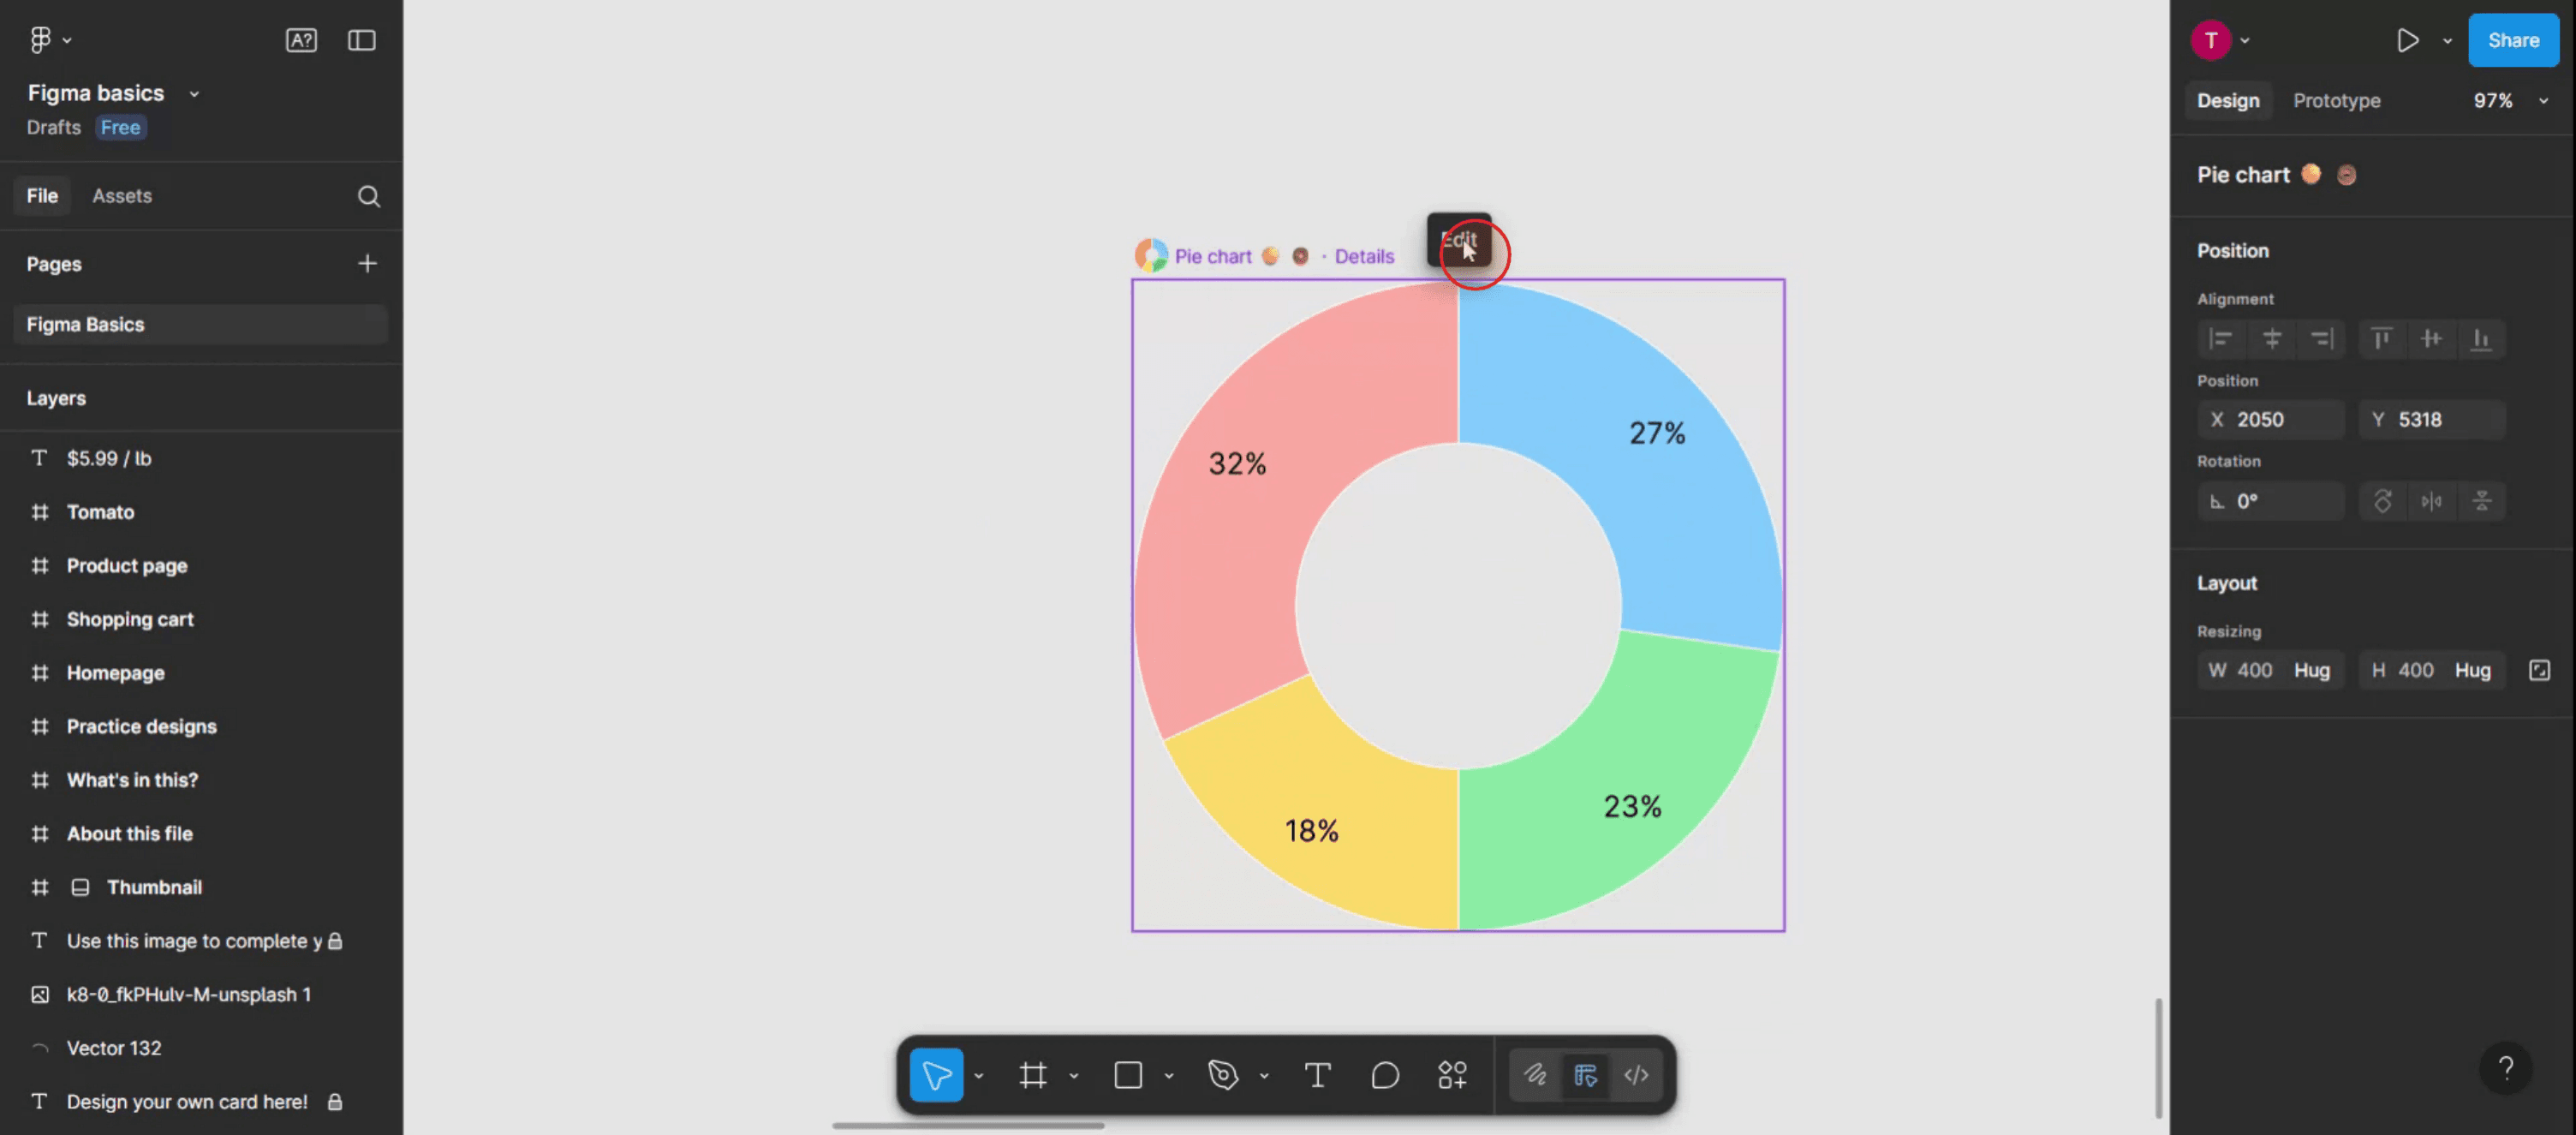
Lorsque l’option diagramme circulaire apparaît, cliquez simplement dessus pour la sélectionner.

Étape 3
Le diagramme circulaire s’affichera maintenant à l’écran. De plus, vous remarquerez une option 'Modifier' ; cliquez dessus pour continuer.
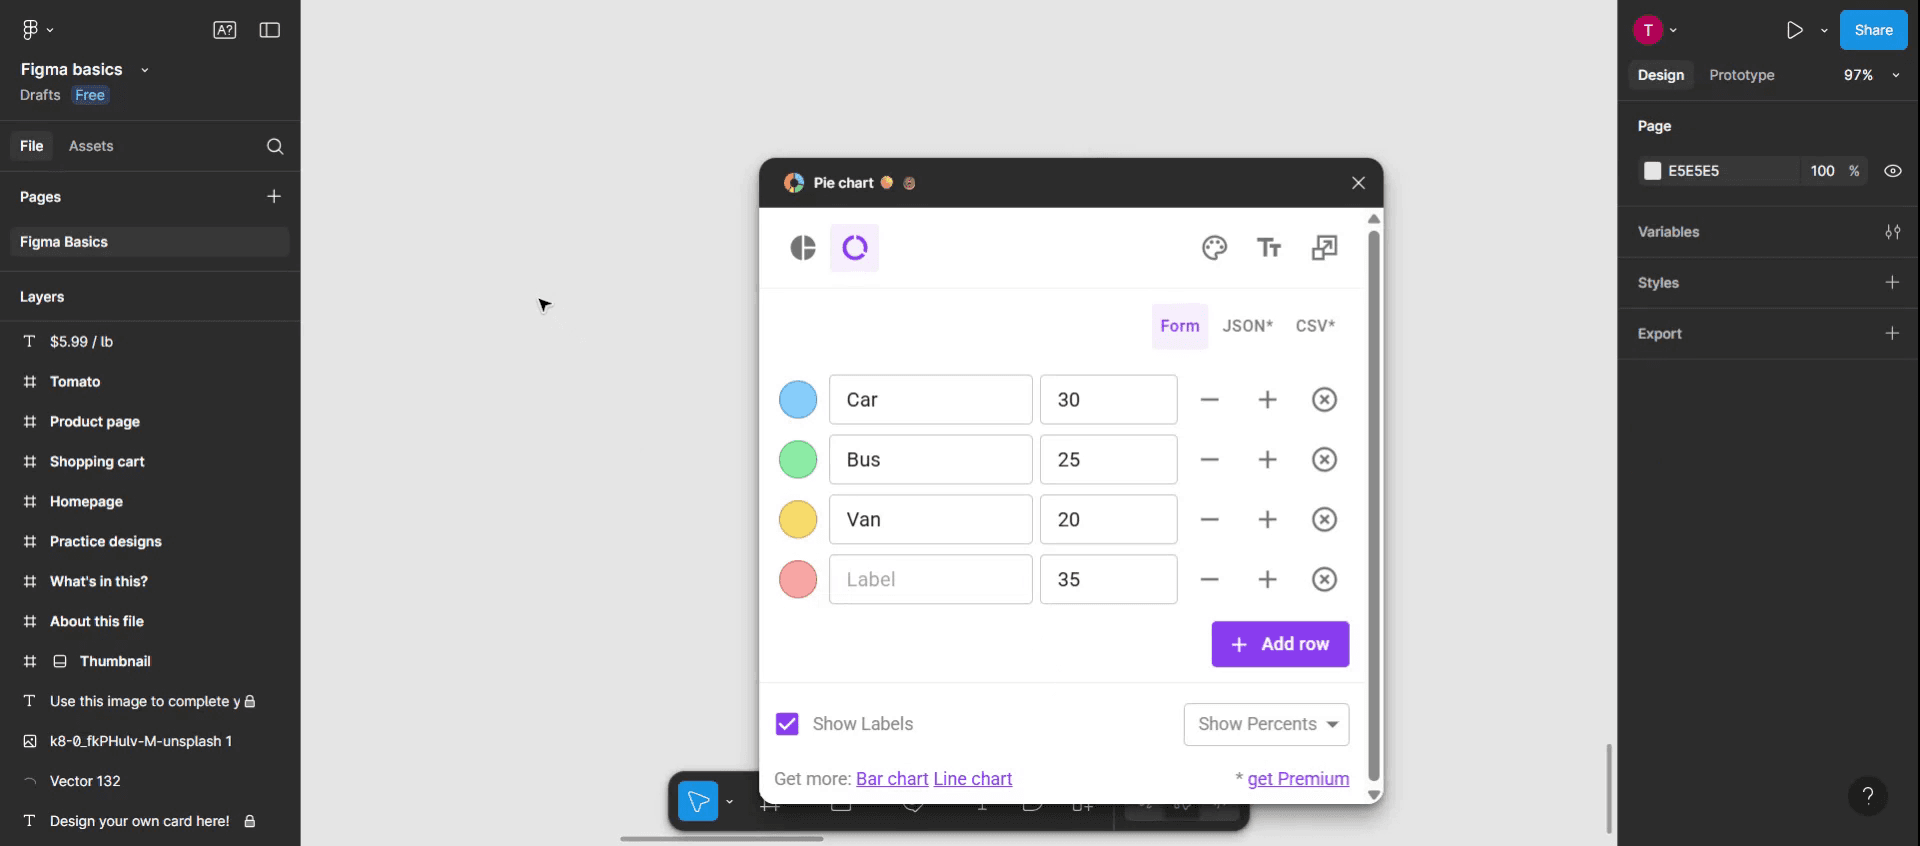
Étape 4
À cette étape, personnalisez le diagramme circulaire selon vos besoins spécifiques. Saisissez les étiquettes souhaitées et, une fois terminé,
Étape 5
Appuyez n’importe où sur l’écran pour quitter le mode d’édition.

Étape 6
Vos modifications seront appliquées au diagramme circulaire.

Conseils de pro pour créer un diagramme circulaire dans Figma
Utilisez l'outil Ellipse pour dessiner la base
Sélectionnez l'outil Ellipse (O), puis cliquez et faites glisser sur le canevas tout en maintenant Maj enfoncée pour dessiner un cercle parfait. Cela servira de base complète à votre diagramme circulaire.Convertissez le cercle en arc
Une fois le cercle sélectionné, allez dans le panneau des propriétés et ajustez les paramètres "Arc". Activez-le en modifiant les angles "Début" et "Fin" pour créer un effet de secteur.Dupliquez pour créer plusieurs segments
Pour obtenir plus de parts, dupliquez le cercle (Ctrl/Cmd + D), puis ajustez les angles de chaque arc pour représenter différentes valeurs de données. Utilisez des couleurs différentes pour chaque part.Utilisez les mathématiques pour diviser le diagramme
Si vos données sont en pourcentage, multipliez 360 (degrés dans un cercle) par le pourcentage pour obtenir l'angle de chaque part. Par exemple, 25 % = 90°.Codez par couleur pour plus de clarté
Utilisez l'outil de remplissage pour attribuer des couleurs distinctes à chaque part. Cela améliore la lisibilité et l'attrait visuel.
Erreurs courantes et comment les éviter
Arcs non alignés correctement
Assurez-vous que chaque segment d'arc commence là où le précédent se termine afin d'éviter les espaces ou les chevauchements. Saisissez manuellement les angles de début et de fin pour plus de précision.Ne plus savoir où en sont les angles
Étiquetez vos calques avec les degrés des parts ou des libellés de données afin de savoir quel segment représente quoi.Libellés de texte mal alignés
Utilisez les repères intelligents ou centrez manuellement le texte sur chaque part pour conserver une apparence nette et professionnelle.Des parts qui se recouvrent
Faites attention à l'ordre des calques lorsque vous ajoutez des parts. Placez les parts au premier plan ou à l'arrière-plan selon les besoins pour éviter de masquer d'autres éléments.Proportions inexactes
Vérifiez deux fois vos calculs lorsque vous convertissez des pourcentages en angles afin d'assurer une représentation précise des données.
FAQ courantes sur les diagrammes circulaires dans Figma
Puis-je créer un diagramme circulaire dans Figma sans plugins ?
Oui, vous pouvez utiliser l’outil Ellipse et les réglages d’arc pour créer manuellement des diagrammes circulaires sans aucun plugin.Existe-t-il un plugin pour créer des diagrammes circulaires dans Figma ?
Oui, des plugins comme « Chart » ou « Pie Chart Maker » sont disponibles pour automatiser le processus à partir de données.Comment créer une part exacte de 25 % ?
Multipliez 360 par 0,25 (25 %), ce qui donne 90 degrés. Réglez l’angle de l’arc sur 90° pour obtenir une part parfaite de 25 %.Puis-je animer des diagrammes circulaires dans Figma ?
Bien que Figma prenne en charge de simples animations de prototype, les animations complexes basées sur des données doivent être créées en dehors de Figma.Puis-je exporter des diagrammes circulaires depuis Figma ?
Oui, sélectionnez le diagramme circulaire, allez dans le panneau d’exportation, choisissez le format souhaité (PNG, SVG, PDF), puis cliquez sur Exporter.Comment enregistrer l’écran sur Mac ?
Pour enregistrer l’écran sur un Mac, vous pouvez utiliser Trupeer AI. Il vous permet de capturer tout l’écran et offre des fonctionnalités d’IA telles que l’ajout d’avatars IA, l’ajout d’une voix off, et l’ajout de zoom avant et arrière dans la vidéo. Grâce à la fonctionnalité de traduction vidéo par IA de Trupeer, vous pouvez traduire la vidéo dans plus de 30 langues.Comment ajouter un avatar IA à un enregistrement d’écran ?
Pour ajouter un avatar IA à un enregistrement d’écran, vous devrez utiliser un outil d’enregistrement d’écran IA. Trupeer AI est un outil d’enregistrement d’écran IA qui vous aide à créer des vidéos avec plusieurs avatars et vous aide aussi à créer votre propre avatar pour la vidéo.Comment enregistrer l’écran sur Windows ?
Pour enregistrer l’écran sur Windows, vous pouvez utiliser la Game Bar intégrée (Windows + G) ou un outil d’IA avancé comme Trupeer AI pour des fonctionnalités plus avancées telles que des avatars IA, une voix off, la traduction, etc.Comment ajouter une voix off à une vidéo ?
Pour ajouter une voix off aux vidéos, téléchargez l’extension Chrome Trupeer AI. Une fois inscrit, importez votre vidéo avec voix, choisissez la voix off souhaitée dans Trupeer, puis exportez votre vidéo modifiée.Comment zoomer dans un enregistrement d’écran ?
Pour zoomer pendant un enregistrement d’écran, utilisez les effets de zoom dans Trupeer AI, qui vous permettent de zoomer avant et arrière à des moments précis, améliorant ainsi l’impact visuel de votre contenu vidéo.
Lectures suggérées
Générateur de documentation technique
Logiciel de base de connaissances
Comment masquer les noms des frames dans Figma
Comment enregistrer un fichier Figma
Comment créer une grille dans Figma
Tutoriels associés

