
Canvaでフレームを作成する方法 – 簡単デザインのヒント
写真、図形、またはクリエイティブなレイアウトを使ってデザインを引き立てるために、Canvaでフレームを追加し、カスタマイズする方法を学びましょう。
この文書では、Canvaでフレームを作る方法について詳しい手順を説明します。
各手順を注意深く進め、追加の参考として提供された画像も参照してください。
Canvaのフレームを使うと、画像や動画をあらかじめ形作られた境界内にきれいに配置できます。クリエイティブなデザイン、コラージュ、またはプロフェッショナルなレイアウトに最適です。フレームを使えば、コンテンツを円、文字、電話、さらにはユニークな形に切り抜くこともできます。
ステップごとのガイド:
デザインを開くか新規作成する
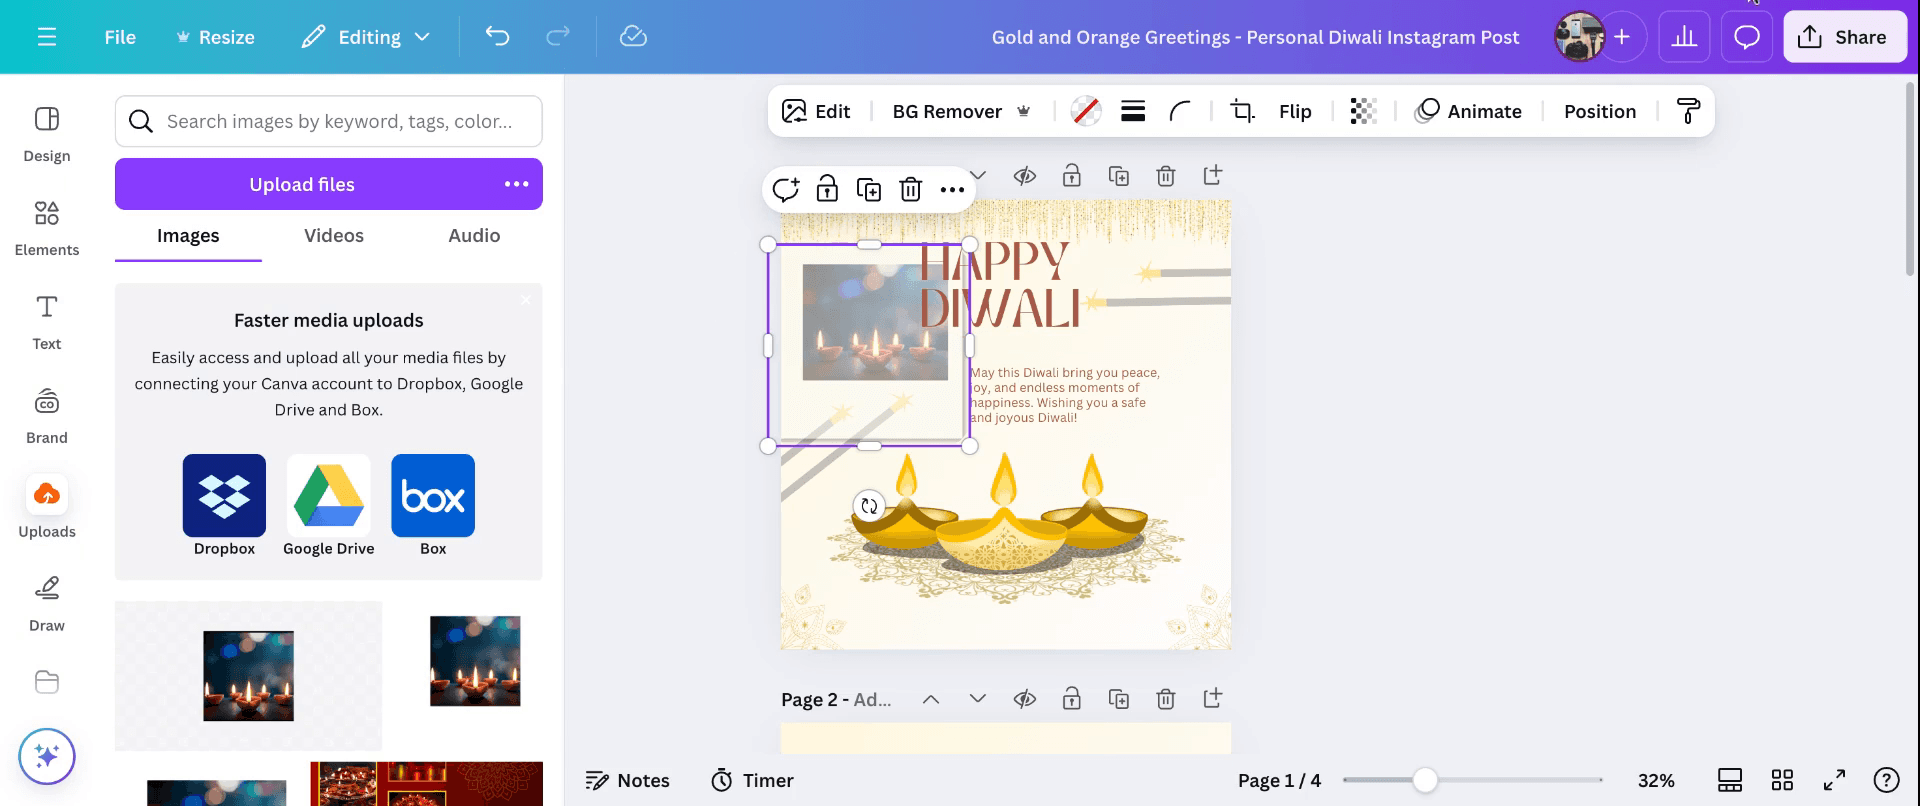
Canvaを起動し、既存のプロジェクトを開くか、お好みのサイズで新しいデザインを作成します。「要素」タブへ移動する
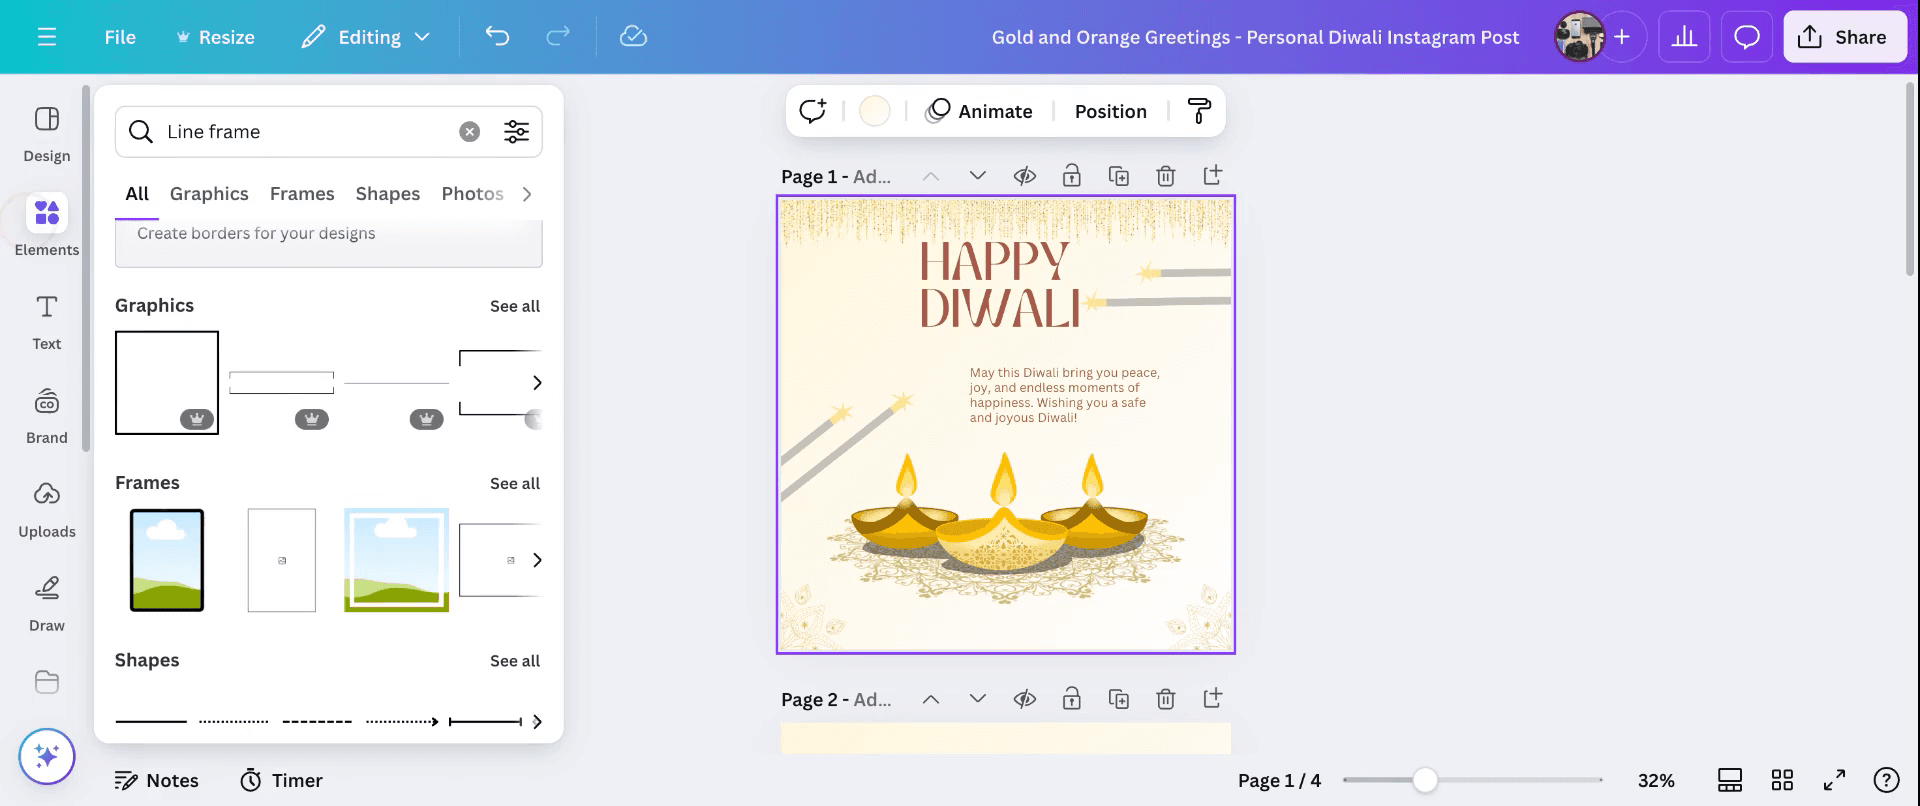
左側のサイドバーで「要素」をクリックして、Canvaのデザインツールを探します。フレームを検索する
要素パネル上部の検索バーに「フレーム」と入力します。
Canvaには、基本的な長方形からクリエイティブなシルエットまで、さまざまなフレームの形が表示されます。フレームを選ぶ
利用可能なオプションを閲覧し、使いたいフレームをクリックします。
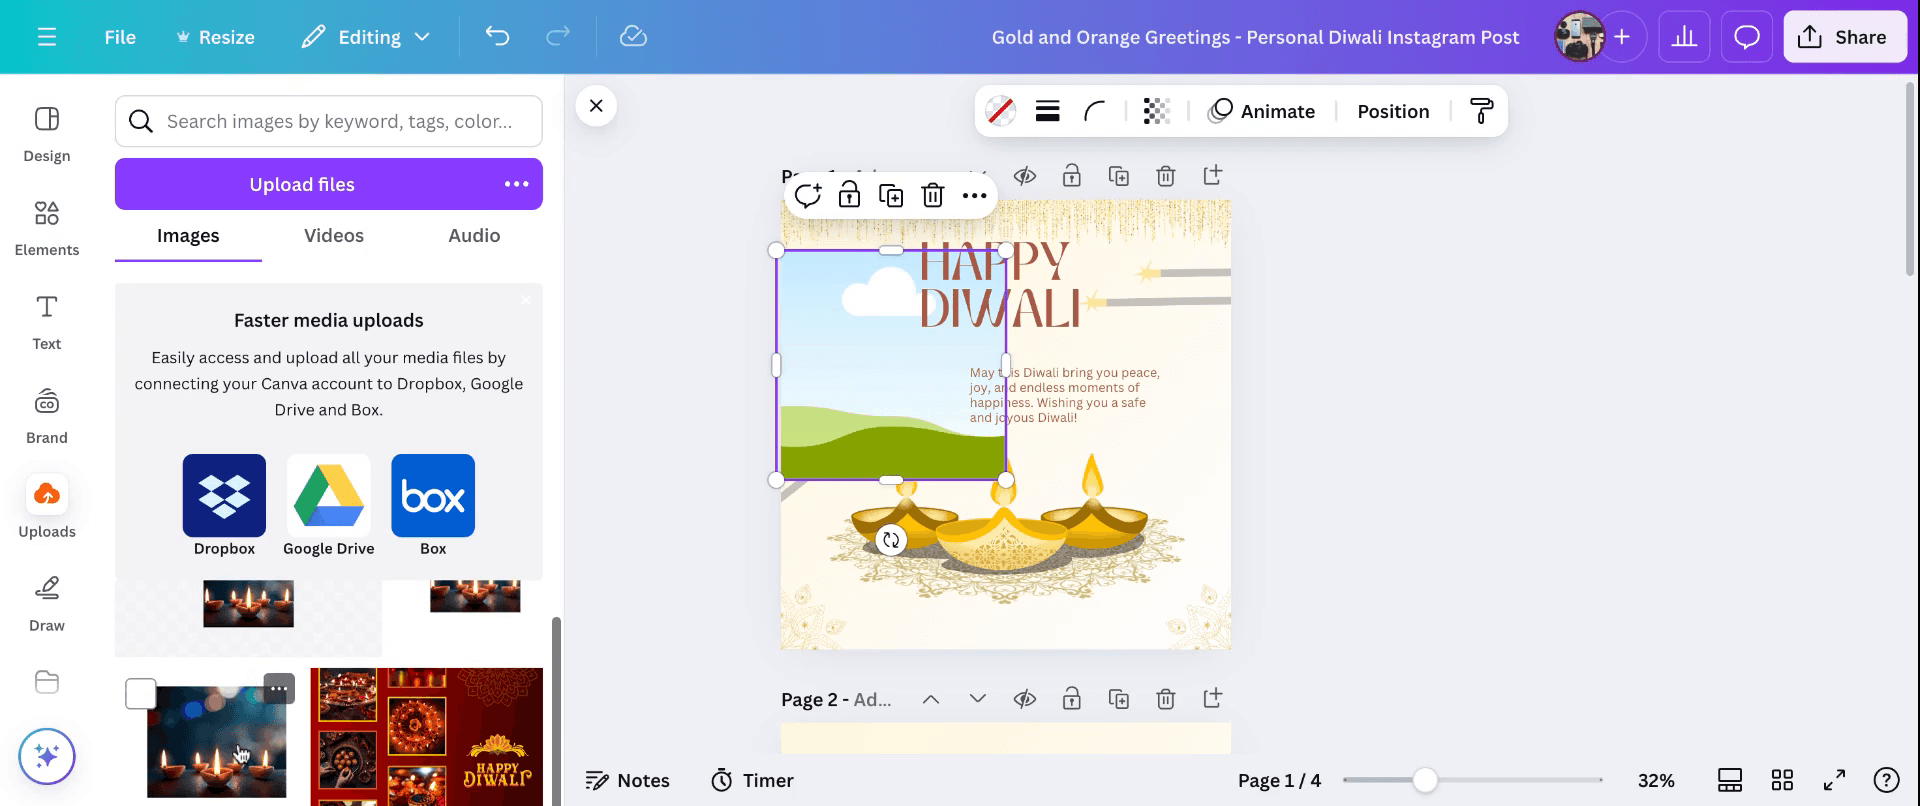
フレームは自動的にキャンバスに追加されます。メディアをドラッグ&ドロップする
フレームを使うには、「アップロード」タブまたは「写真」タブから写真、動画、グラフィックをドラッグして、フレームの中にドロップするだけです。
Canvaが自動的に要素を形に合わせて切り抜き、収めます。サイズ変更と位置調整
フレームをクリックして、サイズを変更したり、キャンバス内で移動したりします。
フレーム内をダブルクリックして、フレーム内の位置を調整したり、内容を拡大・縮小したりします。
デザインをカスタマイズする
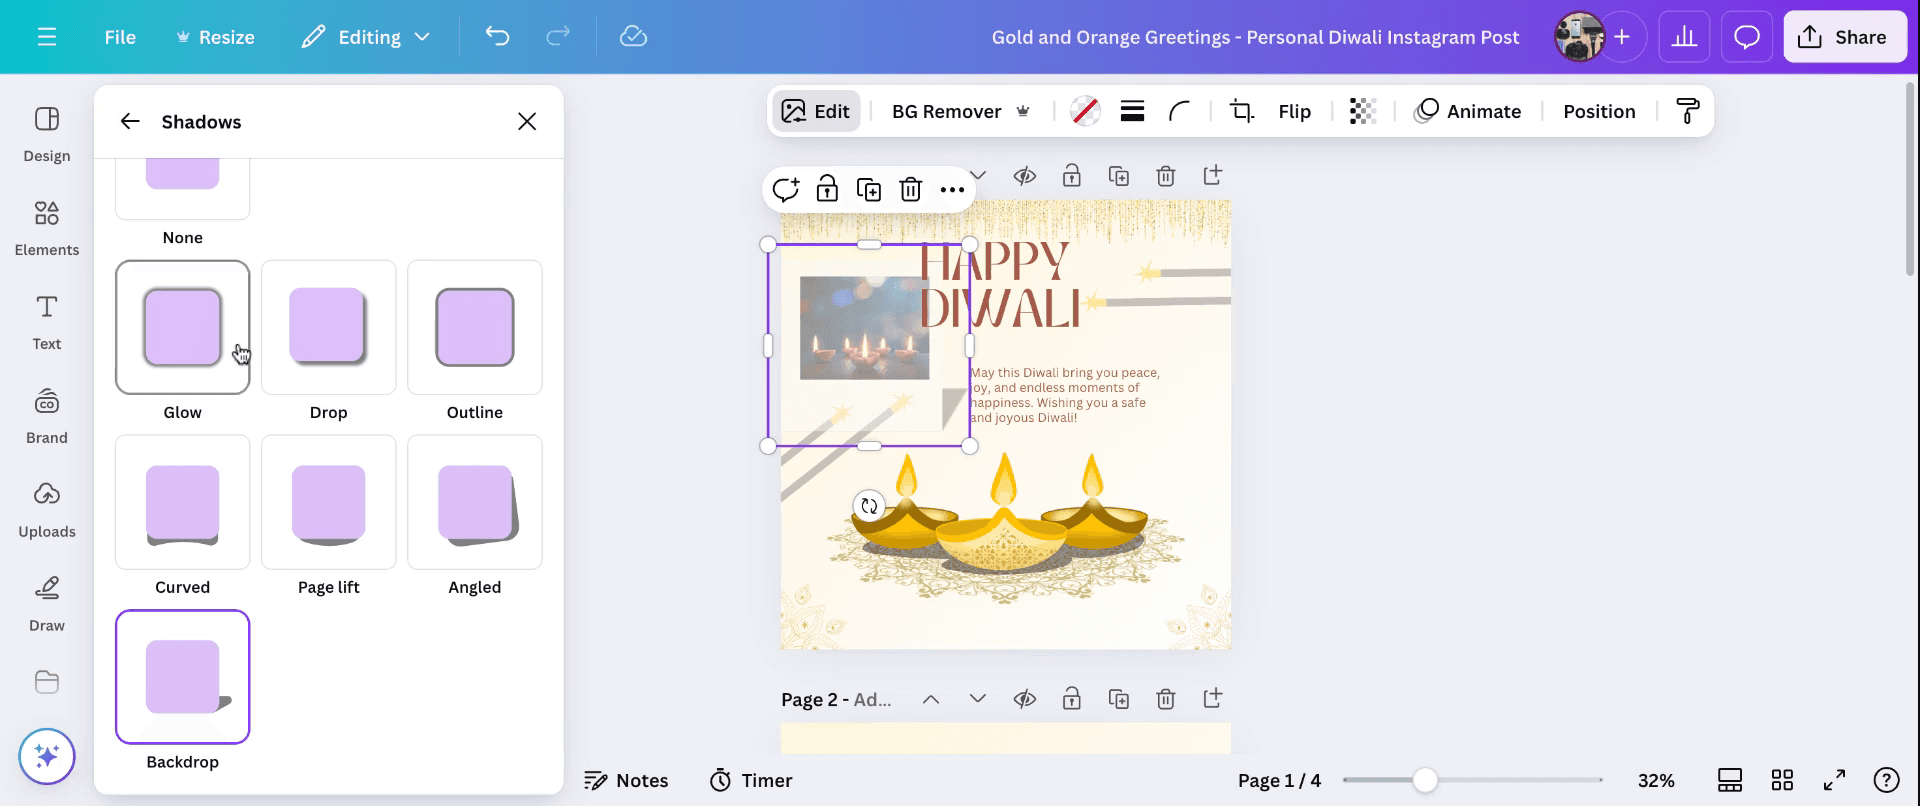
画像を引き立てるために、フィルター、影、その他の効果を追加します。
複数のフレームを重ねて、コラージュ風のレイアウトにすることもできます。
保存して共有する
フレームを使ったデザインに満足したら、ダウンロードするか、Canvaの共有ツールで直接共有します。
ステップごとのガイド:Canvaでフレームを作る方法
ステップ 1
Canvaアカウントを開き、新しいデザインを作成します。
フレームにアクセスする:左側のサイドバーで「要素」タブに移動します。
下にスクロールして「フレーム」セクションを開くか、検索バーで「フレーム」を検索します。
ステップ 2
画像を挿入する:UploadsまたはPhotosタブから画像をフレームに直接ドラッグ&ドロップします。画像は自動的にフレームの形に収まります。
その他の要素を追加する:テキスト、アイコン、グラフィックもフレームに追加できます。フレーム内にドラッグするだけで、フレームの形に合わせて切り抜かれます。
ステップ 3
フレームを選択し、上部ツールバーの「カラー」タイルをクリックして色を変更したり、枠線を追加したりします。
効果を追加する:フレームが選択されているときに、上部ツールバーの「エフェクト」をクリックすると、影や光彩などの効果を適用できます。
ステップ 4
これで、デザインに複数のフレームを追加し、創造的に配置して、コラージュ効果やより複雑なレイアウトを作成できます。
Canvaでフレームを作成するためのプロのコツ
フレームライブラリにアクセスする: 左側サイドバーの「Elements」タブに移動します。下にスクロールして「Frames」セクションを見つけると、さまざまな形やサイズの事前デザイン済みフレームが用意されています。
フレームを選択する: 利用可能なフレームを見て、デザインの目的に最も合うものをクリックします。するとキャンバスに追加されます。
フレームをカスタマイズする: 必要に応じてフレームのサイズと位置を調整します。角をドラッグして大きさを変更し、キャンバス上で移動して適切な場所に配置できます。
フレームにコンテンツを追加する: フレームに画像や動画を挿入するには、「Uploads」タブに移動し、目的のファイルを選択してフレームの上にドラッグします。コンテンツは自動的にフレームの境界内に収まります。
フレーム内のコンテンツを調整する: 挿入したコンテンツをダブルクリックして、フレーム内での位置やズームレベルを調整します。これにより、画像や動画の特定の部分に焦点を当てることができます。
よくある落とし穴とその回避方法
コンテンツの配置ミス: コンテンツをフレームの外にドラッグすると、正しく収まりません。コンテンツがきちんとフレーム内に収まるよう、直接フレーム上にドロップしてください。
画像の歪み: フレームを不均等に引き伸ばすと、挿入したコンテンツが歪むことがあります。コンテンツの比率を保つため、フレームの縦横比を維持してください。
デザインを詰め込みすぎる: フレームや要素を追加しすぎると、デザインがごちゃつきます。重要なコンテンツを強調し、見やすいレイアウトを保つために、フレームを戦略的に使いましょう。
配置の整列を無視する: フレームの位置がずれていると、デザインの視覚的な流れが乱れることがあります。Canvaの整列ガイドを活用して、要素が正しく揃うようにしましょう。
レイヤーを活用しない: レイヤーを調整せずにフレームを重ねると、コンテンツが隠れてしまうことがあります。「Position」ツールを使ってレイヤーを適切に配置してください。
Canvaでフレームを作成する際のよくある質問
Canvaでカスタムフレームを作成できますか?
Canvaではさまざまな既成のフレームが用意されていますが、完全にカスタムのフレームを直接作成することはサポートされていません。ただし、図形や要素を使って自分でフレームをデザインしたり、外部ツールでカスタムフレームを作成してCanvaにアップロードしたりできます。デザインにフレームを追加するにはどうすればよいですか?
「Elements」タブを開き、「Frames」を選択して、好きなものを選びます。それをキャンバスにドラッグすると、デザインに追加できます。Canvaで動画にフレームを使えますか?
はい、Canvaのフレームは画像と動画の両方に使用できます。動画をフレームにドラッグするだけで、フレームの形に合わせて自動的に調整されます。フレーム内のコンテンツを調整するにはどうすればよいですか?
フレーム内のコンテンツをクリックして選択します。次に、ツールバーのオプションを使って、位置、ズームレベルを調整したり、フィルターを適用したりします。Canvaでフレームを使用する際の制限はありますか?
フレームは主に特定の縦横比向けに設計されています。フレームの縦横比に合わないコンテンツで使用すると、トリミングや引き伸ばしが発生する場合があります。フレームの想定用途に合ったコンテンツを使うことをおすすめします。Macで画面収録する方法は?
Macで画面収録するには、Trupeer AIを使用できます。画面全体をキャプチャできるほか、AIアバターの追加、ナレーションの追加、動画内での拡大・縮小などのAI機能も提供します。trupeerのAI動画翻訳機能を使えば、30以上の言語に翻訳できます。画面収録にAIアバターを追加するには?
画面収録にAIアバターを追加するには、AI画面録画ツールを使用する必要があります。Trupeer AIはAI画面録画ツールで、複数のアバターを使った動画作成を支援し、さらに動画用の独自アバターの作成もサポートします。Windowsで画面収録する方法は?
Windowsで画面収録するには、標準搭載のGame Bar(Windows + G)を使うか、AIアバター、ナレーション、翻訳などのより高度な機能を備えたTrupeer AIのような高度なAIツールを使用できます。動画にナレーションを追加するには?
動画にナレーションを追加するには、trupeer aiのChrome拡張機能をダウンロードします。サインアップ後、音声付きの動画をアップロードし、trupeerから希望のナレーションを選択して、編集した動画を書き出します。画面収録で拡大するにはどうすればよいですか?
画面収録中に拡大するには、Trupeer AIのズーム効果を使用します。これにより、特定の瞬間に拡大・縮小でき、動画コンテンツの視覚的なインパクトを高められます。
他の人はこちらも質問
関連チュートリアル

