
Canvaで図形を挿入する方法 – 簡単なデザインのヒント
Canvaで図形を追加してカスタマイズし、デザインをより魅力的にする方法を学びましょう。円、四角形、矢印などを挿入する簡単な手順をご紹介します。
このドキュメントでは、GIMP アプリケーション内で図形を挿入し、カスタマイズする方法を詳しく解説します。
この手順では、デザインのニーズに合わせて図形を効果的に選択、調整、操作する方法を説明します。
Canva で図形を追加するのは簡単で、デザインのレイアウトを強化するのに役立ちます。方法は次のとおりです:
ステップバイステップガイド:
デザインを開く:
Canva で新しいデザインを開始するか、既存のデザインを開きます。
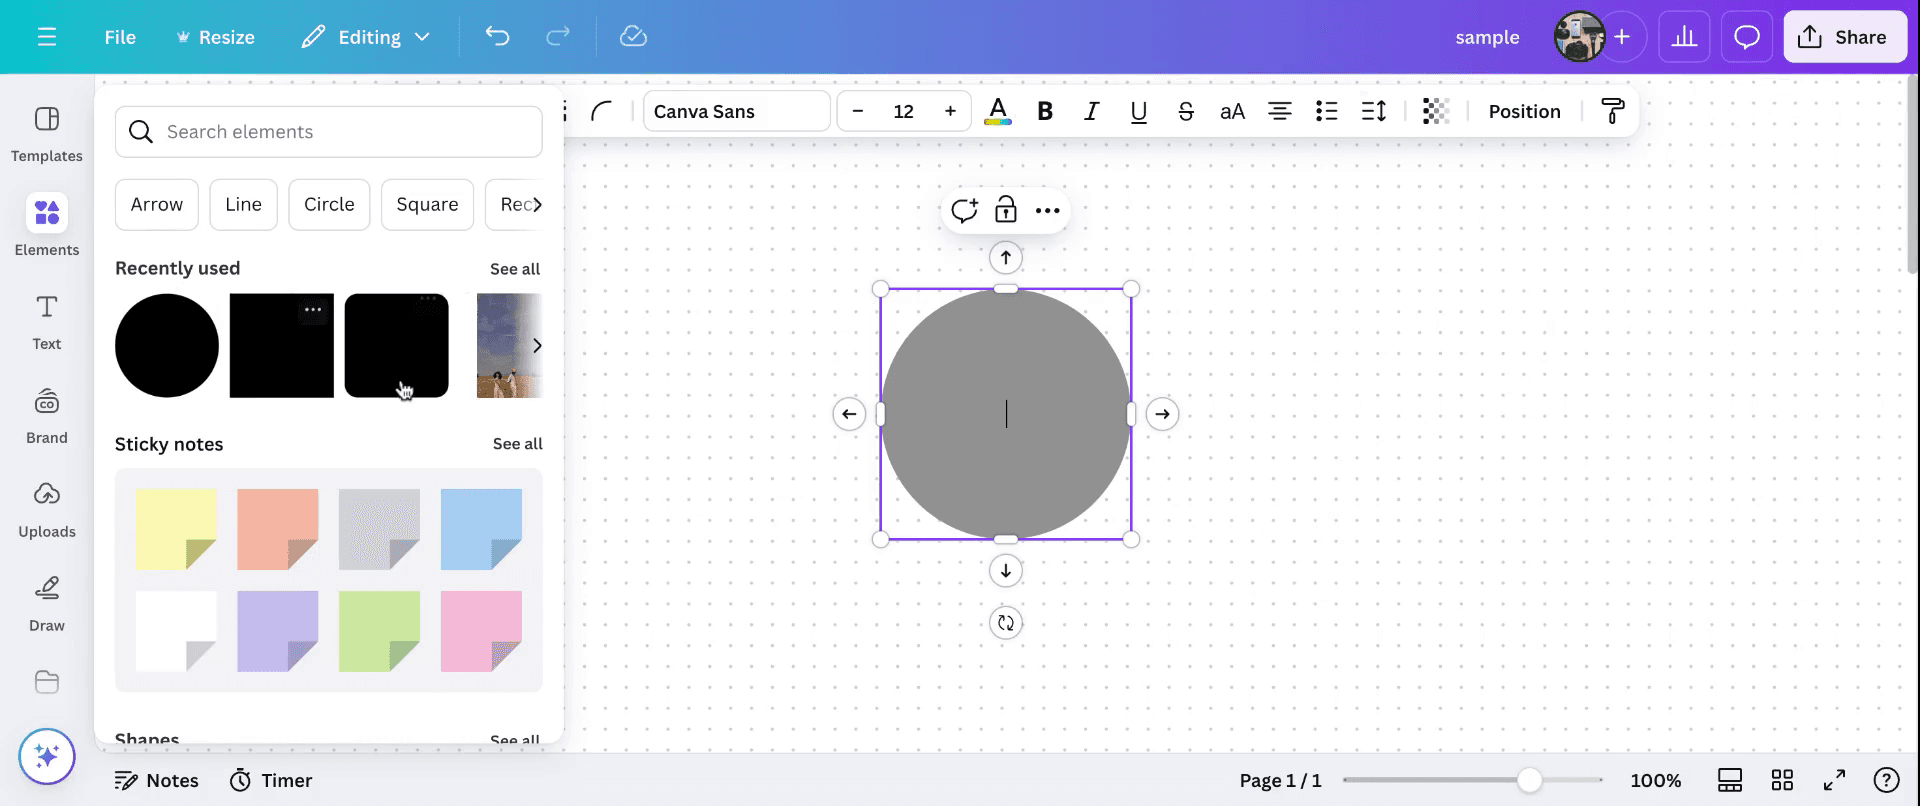
「Elements」タブに移動する:
左側のツールバーで、Elements をクリックします。
「Lines & Shapes」を選択する:
スクロールして Lines & Shapes セクションまで移動するか、検索バーに特定の図形(例: "circle"、"arrow"、"heart")を入力します。
図形を挿入する:
図形をクリックして、使用したいものを選びます。キャンバスに表示されます。
図形をカスタマイズする:
次のことができます:
角をドラッグしてサイズを変更します。
回転ハンドルを使って回転します。
上部ツールバーを使って、色、枠線の太さ、透明度、レイヤーを変更できます。
Canva で図形を挿入する方法: ステップバイステップガイド
ステップ 1
このチュートリアルでは、Canva で図形を挿入する方法を学びます。まず、「Elements」セクションに移動し、作業したい図形を選択します。図形を選択したら、さまざまなツールを使ってカスタマイズできます。これにより、色などの図形の属性を調整できます。
ステップ 2
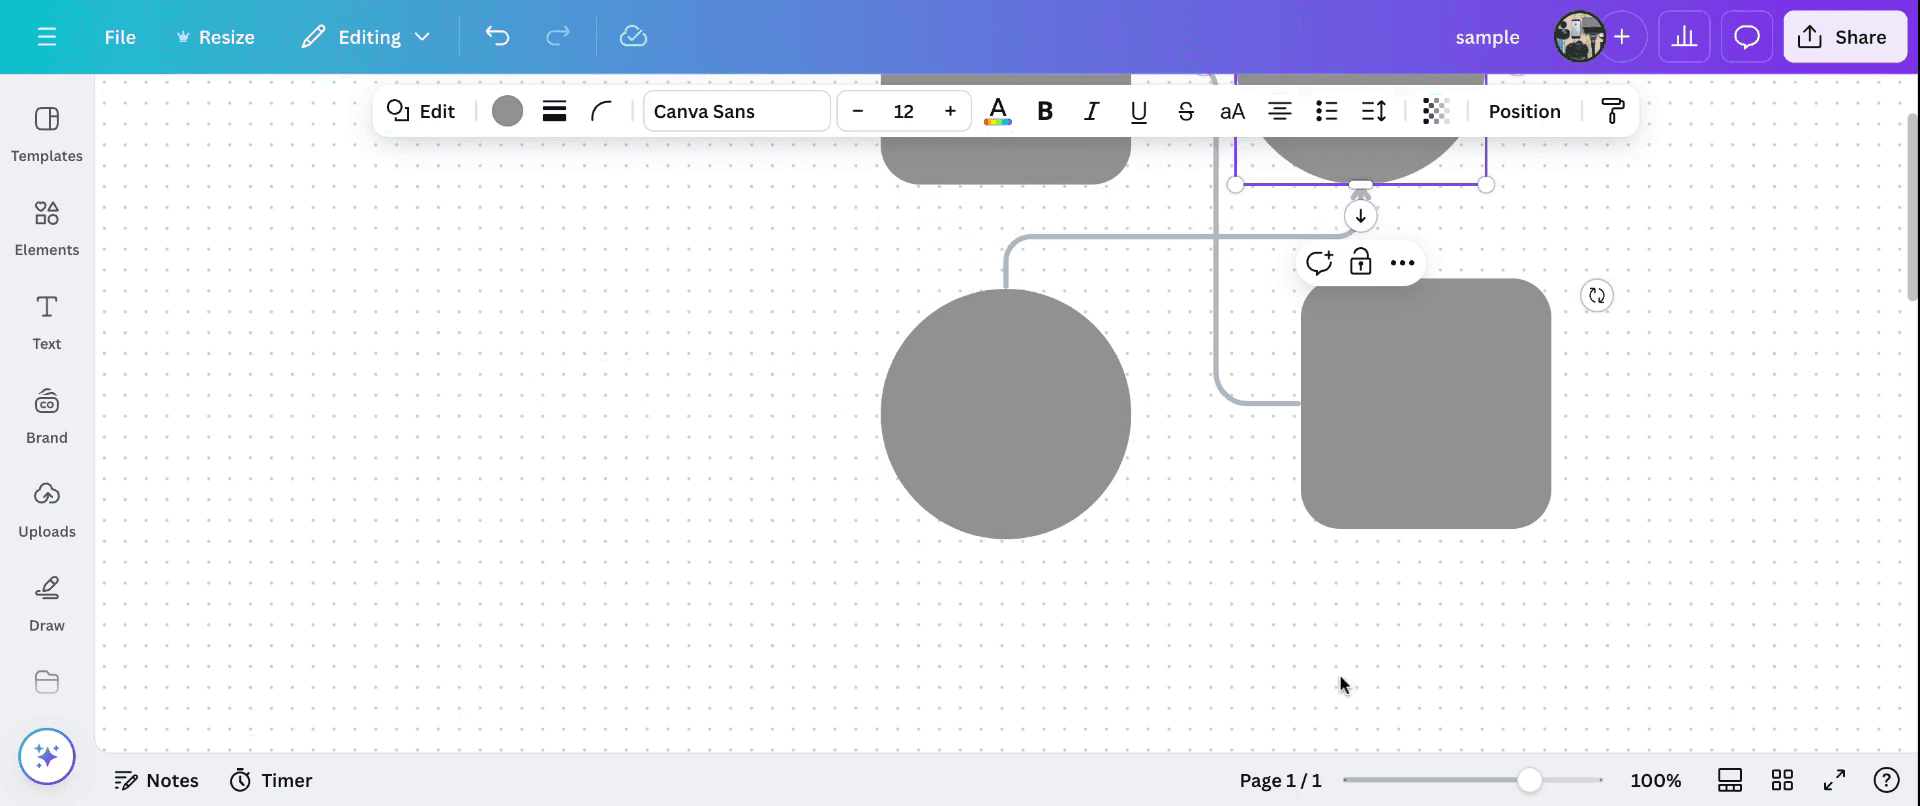
図形を選択した後、追加の図形を挿入したり、ドラッグしてサイズを変更したり、レイアウトを変更したりできます。
ステップ 3
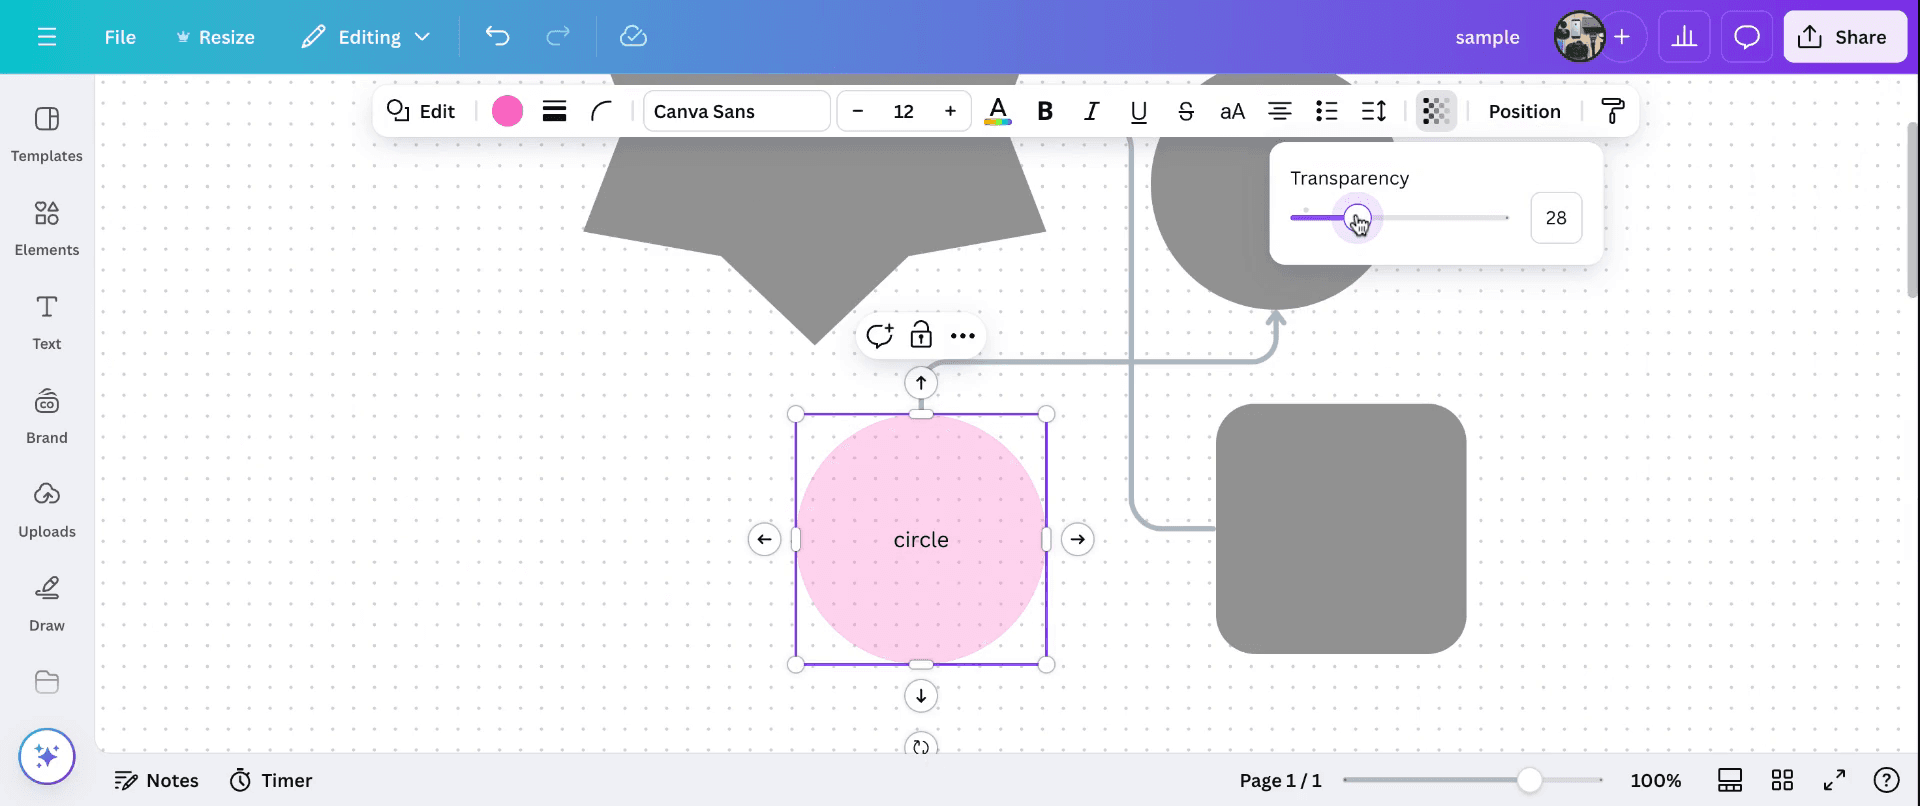
さらに、図形の中にテキストを追加し、透明度を調整してデザイン要件に合わせることもできます。これが Canva で図形を挿入する方法であり、複雑で個性的なデザインを作成できます。
Canvaで図形をうまく挿入するためのプロのコツ
「要素」タブを使う: 「要素」セクションに移動し、「図形」を選択すると、円、四角形、三角形、カスタム図形など、さまざまなオプションを見つけられます。
図形をカスタマイズする: デザインに追加したら、図形のサイズ変更、回転、色の変更ができ、デザインのスタイルやテーマに合わせられます。
図形を重ねて配置する: 「位置」ツールを使って図形を重ねたり、互いの上に配置したり、特定の順序で並べたりして、より複雑なデザインを作成できます。
透明度を調整する: 図形の透明度を調整して、やわらかなオーバーレイや半透明の背景のような効果を作れます。
カスタムデザインのために図形を組み合わせる: 複数の図形を組み合わせて、独自のカスタムデザインを作成できます。「グループ」オプションを使うと、複数の図形をまとめて、一度に調整できます。
Canvaで図形を挿入する際のよくある落とし穴とその回避方法
図形が意図せず重なってしまう: デザインに複数の要素を追加すると、図形が不自然に重なることがあります。
対処法: 「位置」ツールを使って図形を整列・均等配置し、意図せず重ならないようにします。図形がゆがむ: 図形のサイズを不均等に変更すると、比率がゆがむことがあります。
対処法: サイズ変更中に Shift キーを押し続けると、図形本来の比率を保てます。図形の色が背景と合わない: 図形の色が背景に対して十分に目立たないことがあります。
対処法: 背景と調和する、または対比のある色を選んで見やすさを保ちます。透明度を調整して、デザインのバランスを整えることもできます。図形が正しく整列していない: 揃っていないと、デザインが不格好または不均一に見えることがあります。
対処法: Canvaの「グリッドにスナップ」や整列ツールを使って、図形が正しく揃うようにします。図形を使いすぎてデザインが窮屈になる: 図形を増やしすぎると、デザインがごちゃごちゃして散らかった印象になります。
対処法: 必要な図形だけを使ってデザインをすっきり保ち、図形同士に十分な間隔を確保して視覚的なごちゃつきを避けます。
Canvaで図形を挿入する際によくある質問
Canvaに図形を挿入するにはどうすればよいですか?
[要素]タブに移動し、[図形]を選択して、デザインに追加したい図形を選びます。次に、それをデザインスペースへドラッグします。Canvaで図形の色をカスタマイズできますか?
はい。図形を追加した後、それをクリックしてカラーパレットから色を選ぶか、デザインに合わせてカスタムカラーを追加できます。図形のサイズ変更や回転はできますか?
はい。図形の角をドラッグしてサイズを変更したり、図形の上部にある回転ハンドルをクリックして回転させたりできます。複数の図形を重ねるにはどうすればよいですか?
図形を重ねるには、図形を選択し、[位置]ボタンを使って前面または背面に移動し、図形を上下に重ねられるようにします。複数の図形を1つのデザインにまとめられますか?
はい、図形をグループ化することでまとめられます。複数の図形を選択し、右クリックして[グループ化]を選ぶと、1つの要素としてまとめられ、簡単に調整できます。このチュートリアルをご覧いただきありがとうございます。Macで画面録画するには?
Macで画面録画するには、Trupeer AIを使用できます。画面全体をキャプチャでき、AIアバターの追加、音声ナレーションの追加、動画内でのズームイン・ズームアウトの追加などのAI機能を備えています。TrupeerのAI動画翻訳機能を使えば、動画を30以上の言語に翻訳できます。画面録画にAIアバターを追加するにはどうすればよいですか?
画面録画にAIアバターを追加するには、AI画面録画ツール。を使用する必要があります。Trupeer AIはAI画面録画ツールであり、複数のアバターを使った動画の作成を支援し、動画用の自分自身のアバター作成にも役立ちます。Windowsで画面録画するには?
Windowsで画面録画するには、内蔵のGame Bar(Windows + G)または、AIアバター、音声ナレーション、翻訳などのより高度な機能を備えたTrupeer AIのような高度なAIツールを使用できます。動画に音声ナレーションを追加するには?
動画に音声ナレーションを追加するには、trupeer aiのChrome拡張機能をダウンロードします。サインアップ後、音声付きの動画をアップロードし、trupeerから希望の音声ナレーションを選択して、編集した動画をエクスポートします。画面録画中にズームインするにはどうすればよいですか?
画面録画中にズームインするには、Trupeer AIのズーム効果を使用します。これにより、特定の瞬間にズームインおよびズームアウトでき、動画コンテンツの視覚的なインパクトを高められます。
おすすめの読み物
関連チュートリアル

