
Canvaで動画から写真を取り出す方法
フレームをキャプチャして画像として書き出すことで、Canvaで動画から写真を取り出す方法を学びましょう。この簡単なチュートリアルに従って、Trupeerでわかりやすいビジュアルガイドを作成できます。
このガイドでは、Canva内で動画から静止画像をキャプチャする方法を詳しく解説します。
以下の手順に従って、動画プロジェクトから目的の写真を効率よく抽出しましょう。
Canvaで動画から写真をキャプチャするには、動画をアップロードし、目的のフレームを表示する位置に合わせてから、デザインを画像ファイル(PNGまたはJPEG)としてダウンロードします。Canvaには専用の「フレーム抽出」機能はありませんが、この方法を使えば静止画像を効果的に取り出せます。
手順ガイド:
1. 動画をアップロードする:
Canvaのプロジェクトを開き、使用したい動画をアップロードします。キャンバスへドラッグ&ドロップしてください。
2. フレームを設定する:
動画タイムライン上の再生ヘッド(スクラバー)を、キャプチャしたいフレームまで移動させます。必要に応じて、動画のサイズと位置をキャンバス上で調整します。
3. フレームを画像としてダウンロードする:
右上の「共有」をクリックします。
「ダウンロード」を選択します。
ファイル形式としてPNGまたはJPEGを選びます。
「ページを選択」の下で、現在のページのみを選択します。
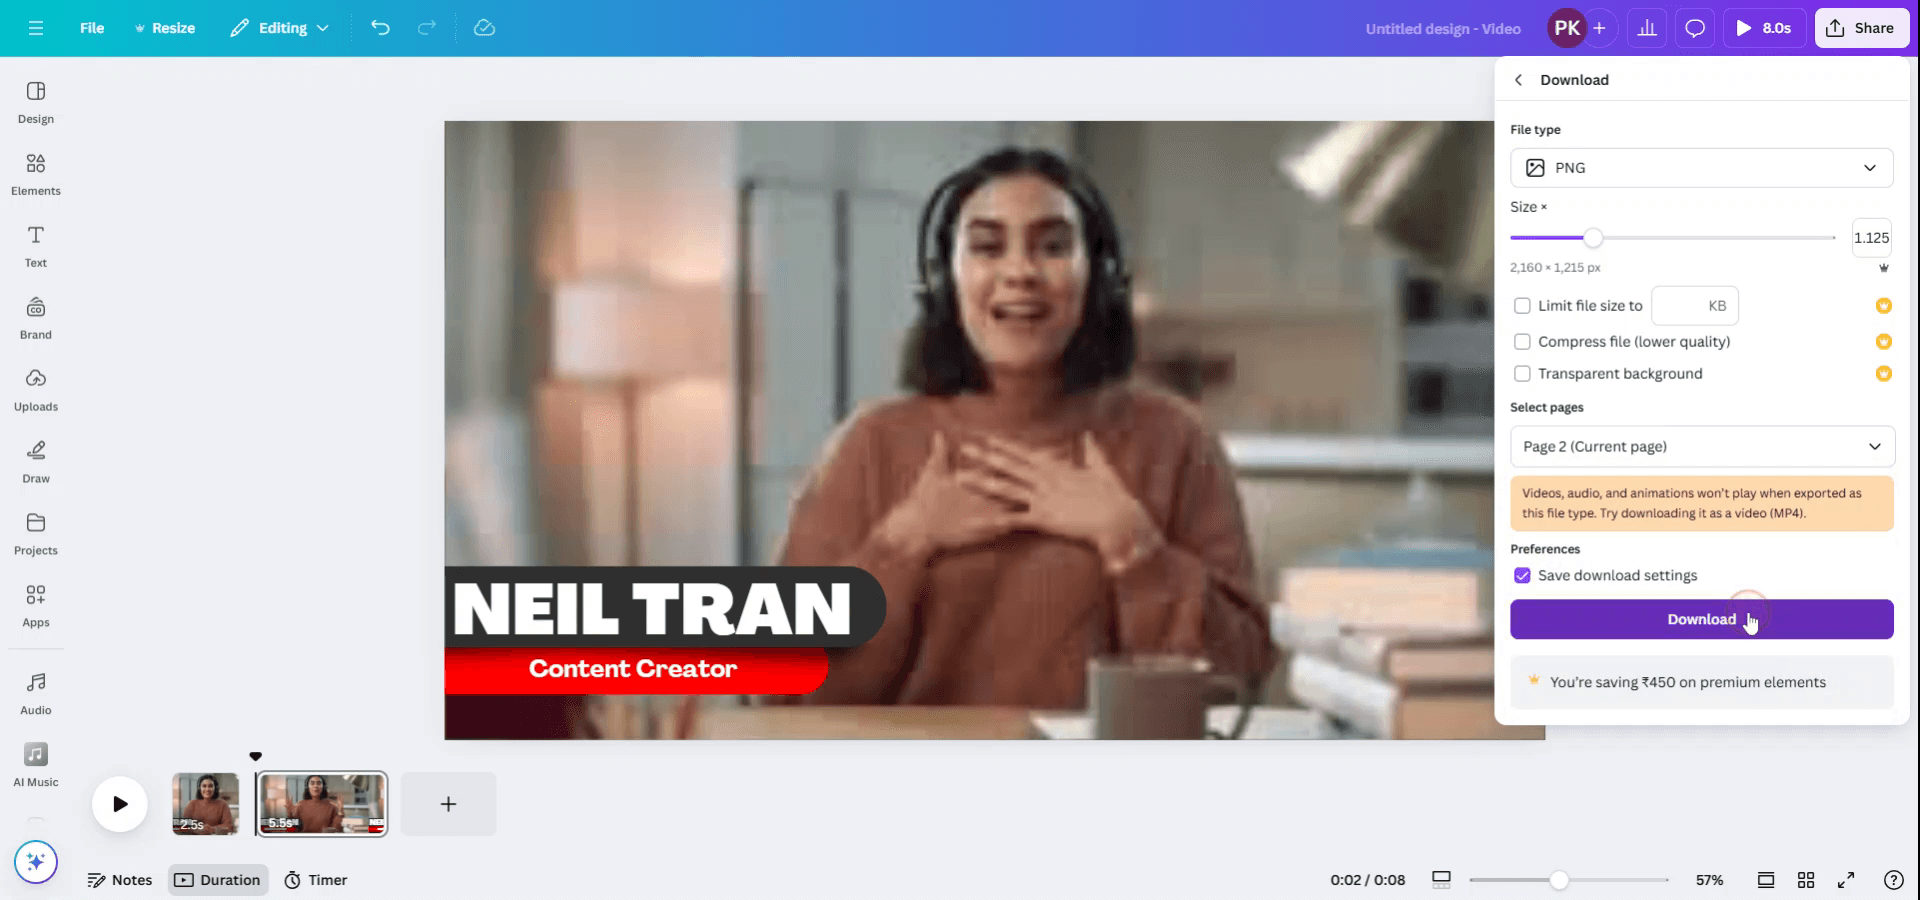
手順ガイド:Canvaで動画から写真を抽出する方法
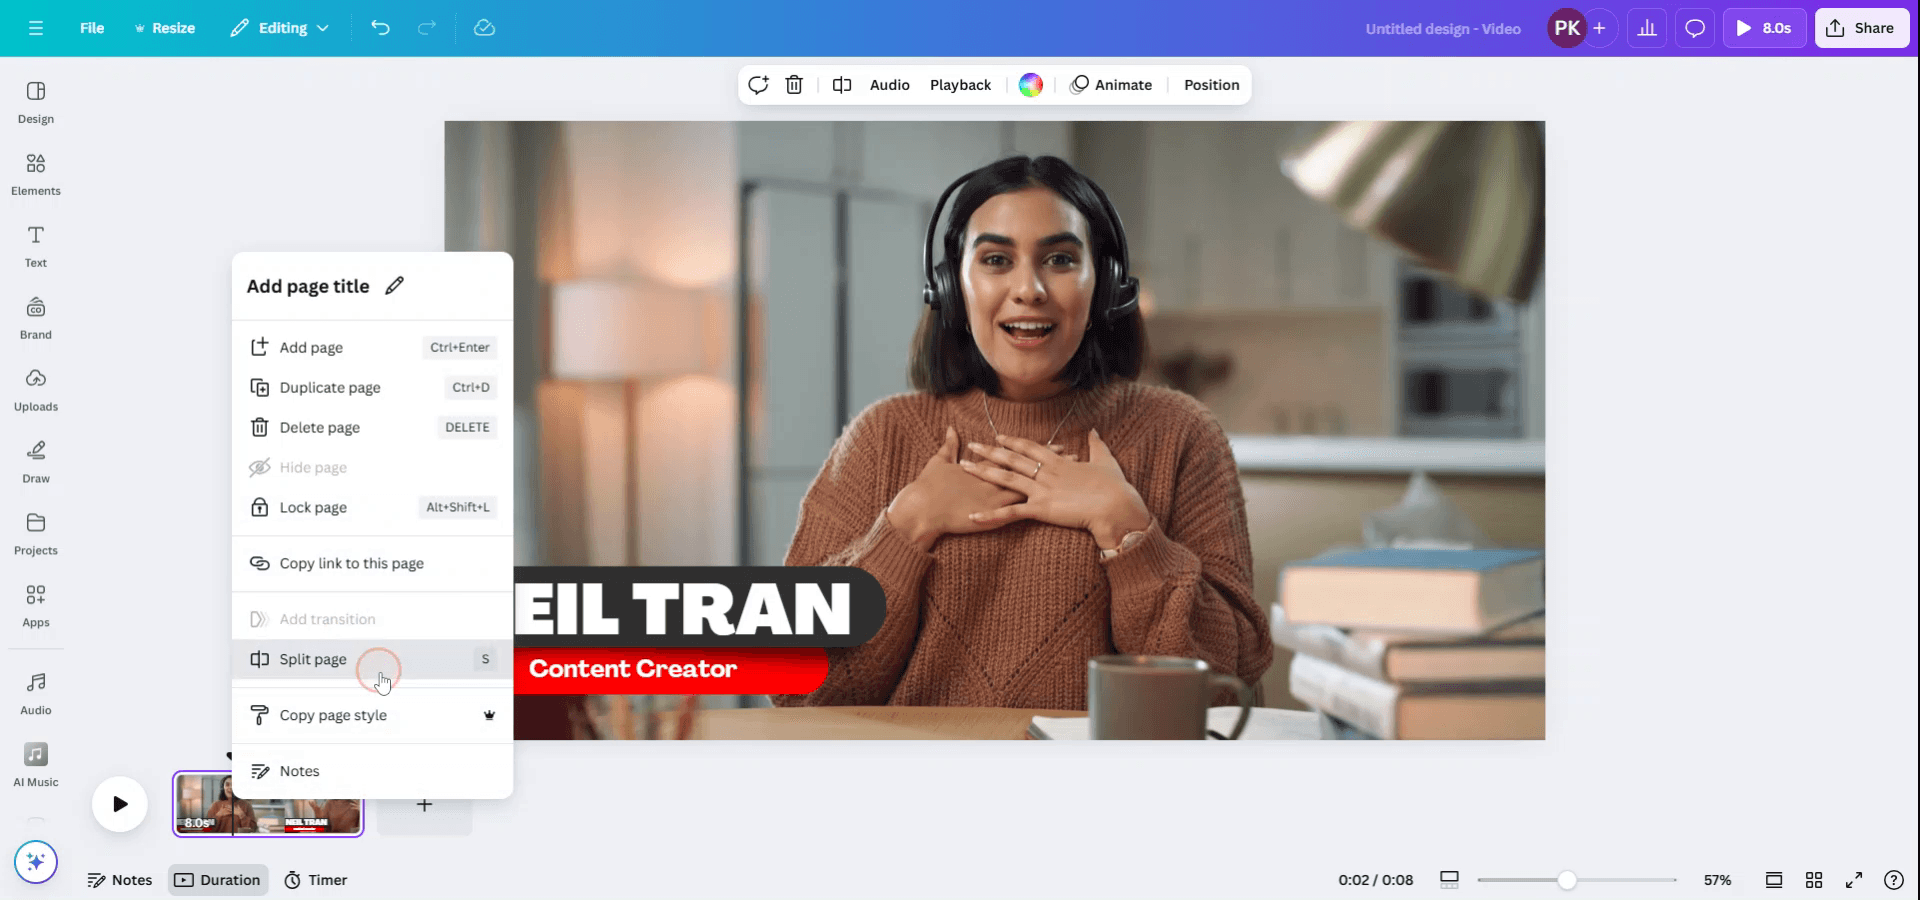
手順1
Canvaで動画から写真をキャプチャするには、動画が含まれている既存のデザインを開きます。動画の下にある再生時間タイマーを使って再生し、キャプチャしたい瞬間で正確に停止させます。

手順2
キャプチャしたい正確なフレームが見つかったら、動画を分割するために「S」をクリックします。あるいは、動画を右クリックして「ページを分割」を選び、フレームを切り出します。
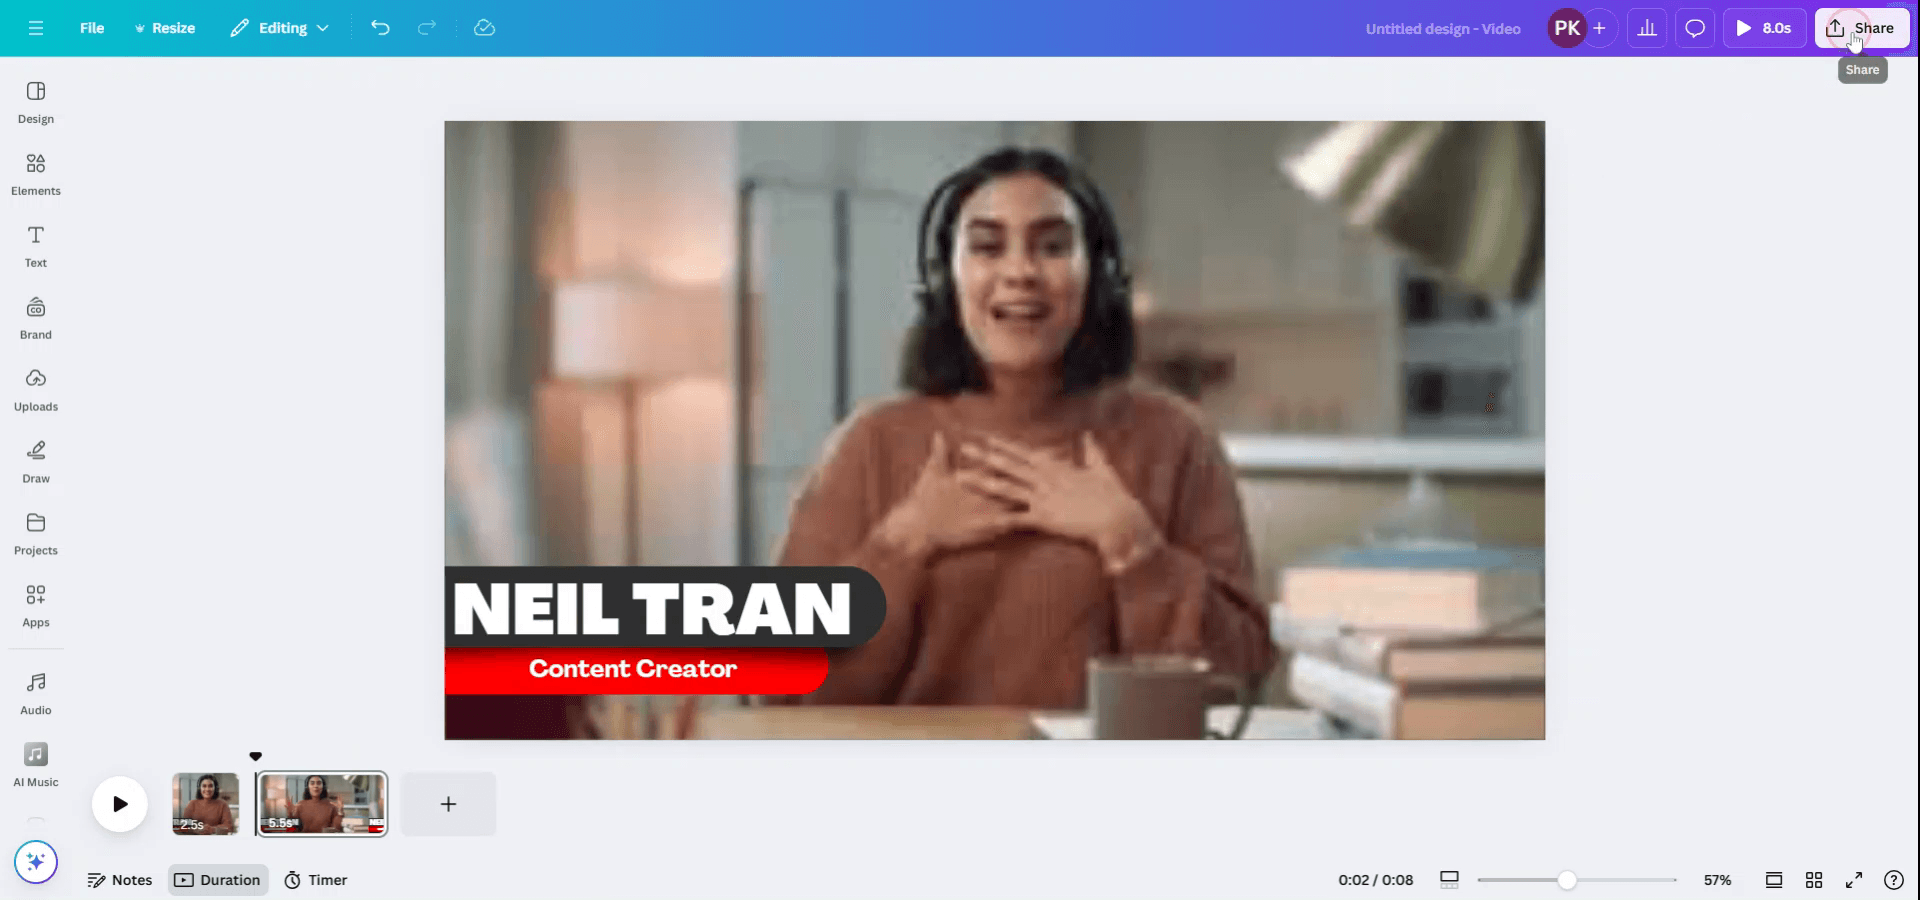
手順3
選択したフレームは、2ページ目などの新しいページに表示されます。このフレームを写真としてダウンロードするには、「共有」ボタンをクリックし、ドロップダウンメニューから「ダウンロード」を選択します。
手順4
ファイル形式をPNGに設定し、必要に応じてサイズを調整します。
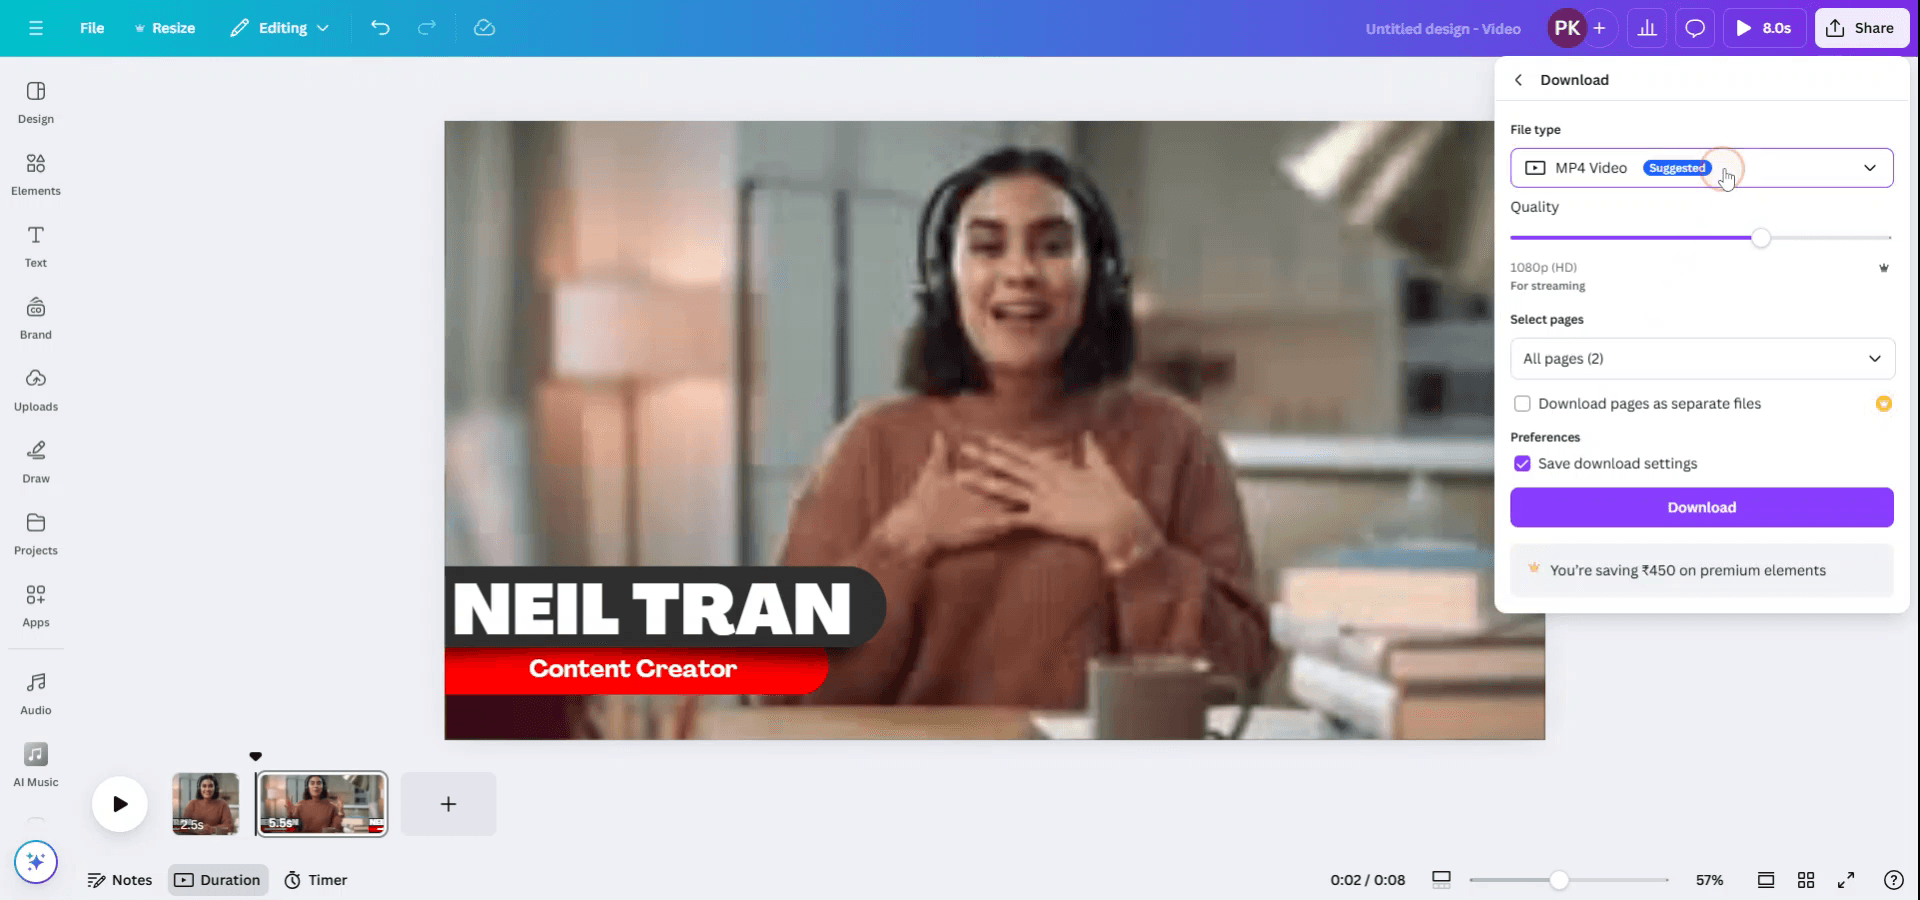
手順5
続行する前に、目的の写真が配置されている正しいページ(2ページ目)を選択していることを確認してください。

手順6
すべての設定を確認したら、「完了」をクリックし、次に「ダウンロード」をクリックして写真をデバイスに保存します。
Canva で動画から写真を切り出すためのプロのコツ
目的のフレームで一時停止する: 動画を再生し、画像として取り込みたいちょうどそのフレームで一時停止します。
スクリーンショットを撮る: パソコンやデバイスのスクリーンショット機能(例: Windows の Snipping Tool、Mac の Command+Shift+4)を使って、そのフレームをキャプチャします。
スクリーンショットを Canva にアップロードする: スクリーンショットを撮ったら、ドラッグ&ドロップするか「アップロード」タブを使って Canva にアップロードします。
動画編集ツールを使う: Canva では動画のトリミングや分割ができます。スクリーンショットを撮る前に、この機能を使って写真にしたい動画の部分に絞り込みましょう。
Canva の画像エディターで仕上げる: 画像をアップロードしたら、Canva の画像エディターで明るさやコントラストを調整し、フィルターを適用してプロっぽく仕上げましょう。
Canva で動画から写真を切り出す際によくある落とし穴とその回避方法
低画質のスクリーンショット: 低解像度の動画をスクリーンショットすると、画像の品質が低くなる場合があります。
対処法: 画像の鮮明さを保つため、スクリーンショットを撮る前に動画が高解像度であることを確認してください。フレーム内の不要な要素: ときどき、動画の他の部分がキャプチャしたいフレームに映り込むことがあります。
対処法: Canva で動画を一時停止する前にトリミングして目的のフレームだけを切り出すか、画像を取得した後にクロップツールを使います。画像サイズを調整しない: スクリーンショットをアップロードした後、デザインに合わせてサイズを調整し忘れることがあります。
対処法: Canva のサイズ変更オプションを使って、レイアウトにぴったり合うように画像を調整しましょう。アスペクト比の崩れ: 画像のサイズを変更すると、元のアスペクト比が崩れることがあります。
対処法: 画像の比率を正しく保つには、サイズ変更中に「Shift」キーを押し続けてください。ファイル形式の制限: スクリーンショットが常に Canva に最適な形式とは限りません。
対処法: Canva にアップロードする前に、スクリーンショットを一般的な画像形式(PNG または JPG)で保存してください。
Canvaで動画から写真を取り出す際によくある質問
Canvaで動画から写真を直接抽出できますか?
いいえ、Canvaには動画から写真を抽出するための組み込み機能はありません。まずスクリーンショットでフレームをキャプチャする必要があります。Canvaにアップロードできる動画形式は何ですか?
CanvaはMP4、MOV、その他の一般的な動画形式のアップロードに対応しています。動画からキャプチャした後に写真を編集できますか?
はい、Canvaにアップロードした後、プラットフォームの編集ツールを使って画像を補正・調整できます。動画から高品質の写真を抽出するより良い方法はありますか?
より高画質の画像が必要な場合は、Canvaにアップロードする前に専用の動画→画像変換ソフトの使用を検討してください。動画のフレームを商用目的で使用できますか?
動画コンテンツを使用する適切な権利を持っていることを確認してください。Canvaは商用利用権付きのストック動画や写真を提供していますが、個人の動画には許可やライセンスが必要になる場合があります。Macで画面録画する方法は?
Macで画面録画するには、Trupeer AIを使用できます。画面全体をキャプチャでき、AIアバターの追加、音声ナレーションの追加、動画の拡大・縮小などのAI機能を利用できます。TrupeerのAI動画翻訳機能を使えば、動画を30以上の言語に翻訳できます。画面録画にAIアバターを追加する方法は?
画面録画にAIアバターを追加するには、AI画面録画ツールを使用する必要があります。Trupeer AIはAI画面録画ツールで、複数のアバターを使った動画の作成を支援し、動画用の独自アバターの作成もサポートします。Windowsで画面録画する方法は?
Windowsで画面録画するには、内蔵のGame Bar(Windows + G)や、AIアバター、音声ナレーション、翻訳などのより高度な機能を備えたTrupeer AIのような高度なAIツールを使用できます。動画に音声ナレーションを追加する方法は?
動画に音声ナレーションを追加するには、trupeer aiのChrome拡張機能をダウンロードします。サインアップ後、音声付きの動画をアップロードし、trupeerから希望の音声ナレーションを選択して、編集した動画を書き出します。画面録画をズームインするには?
画面録画中にズームインするには、Trupeer AIのズーム効果を使用します。これにより特定の場面で拡大・縮小でき、動画コンテンツの視覚的なインパクトを高められます。
関連する質問
関連チュートリアル

