
Canvaで不透明度を変更する方法
Canvaで要素の不透明度を変更して、透明感のある効果を作る方法を学びましょう。テキスト、画像、図形の透明度を調整するためのステップごとのガイドです
Canva で要素の不透明度または透明度を調整するには、要素を選択し、透明度アイコン(市松模様または薄くなった四角形)を見つけ、スライダーを使用して透明度レベルを調整します。入力欄に特定の数値(0-100)を入力することもできます。
詳細な手順:
1. 要素を選択する: 透明にしたい Canva デザイン内の特定の画像、テキストボックス、図形、またはその他の要素をクリックします。
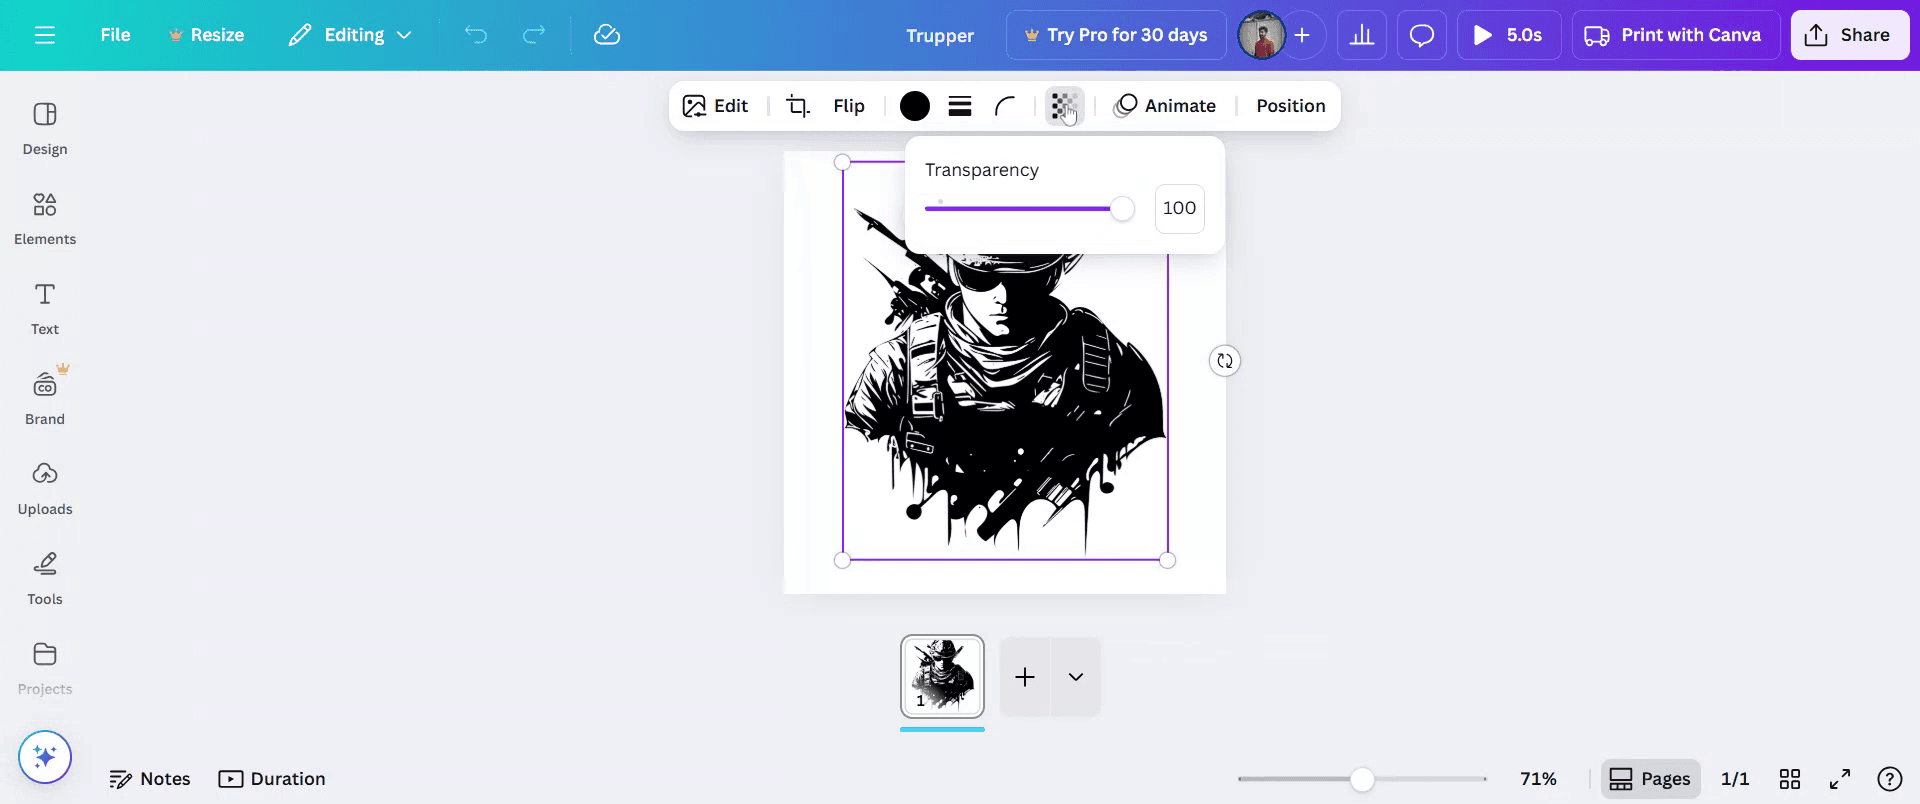
2. 透明度ツールにアクセスする: 市松模様または薄くなった四角形のように見える透明度アイコンを見つけます。このアイコンは通常、Canva エディターの上部ツールバーにあります。
3. スライダーを調整する: 選択するとスライダーが表示されます。スライダーを左にドラッグすると不透明度が下がり(要素がより透明になります)、右にドラッグすると不透明度が上がります(要素がより不透明になります)。また、スライダー横の入力欄に特定のパーセンテージ(0-100)を入力することもできます。
4. 変更をプレビューする: スライダーを調整すると、デザインキャンバス上で要素の透明度がリアルタイムで更新されます。
5. デザインを確定する: 選択した要素またはオブジェクトの外側をクリックして選択を解除し、不透明度の調整を確定します。
ステップバイステップガイド: Canva で不透明度を変更する方法
ステップ 1
Canva 内の、編集したい既存のプロジェクトをまず選択します。

ステップ 2
次に、プロジェクト内で変更したい特定の要素をクリックします。

ステップ 3
[透明度]オプションをクリックし、好みに合わせて透明度レベルを調整します。
ステップ 4
変更に満足したら、[共有]をクリックしてプロジェクトを配布します。

Canvaで不透明度を変更するためのプロのヒント
Canvaでデザインを開く
Canvaにログインし、不透明度を調整したい要素があるデザインを開きます。編集したい要素を選択する
透明度を変更したい画像、テキストボックス、図形、またはグラフィックをクリックします。不透明度アイコンをクリックする
ツールバーの右上を見て、透明度を表す市松模様のアイコンをクリックします。不透明度スライダーを調整する
スライダーを使って不透明度のレベルを変更します。左に動かすと不透明度が下がり、右に動かすと100パーセントまで上がります。プレビューして微調整する
調整後の不透明度がどのように見えるか、デザインを確認します。バランスと見やすさのために、必要に応じてさらに変更してください。
よくある落とし穴とその回避方法
不透明度アイコンが表示されない
要素が選択されていることを確認してください。透明度アイコンは、編集可能なオブジェクトがアクティブなときにのみ表示されます。背景に不透明度が適用されない
背景の不透明度を変更するには、背景の上に図形またはレイヤーを追加し、その透明度を調整してください。テキストを個別に調整するのを忘れる
グループ化された項目を編集している場合は、テキストと図形を1つずつ調整する必要があることを忘れないでください。不透明度が低すぎて要素が見えにくくなる
特にテキストやロゴのような重要な要素では、可読性を保つため、不透明度を下げすぎないようにしてください。ダウンロード時に不透明度が反映されない
透明効果は、PDFやJPG形式では見え方が異なる場合があります。不透明度を使ったデザインをダウンロードする際は、より良い結果のためにPNGを使用してください。
Canvaで透明度を変更する際によくある質問
Canvaで要素の透明度を調整するには
要素を選択し、ツールバーの透明度アイコンをクリックして、スライダーを希望のレベルまで動かします。複数のアイテムの透明度を一度に変更できますか
はい、複数の要素を選択して、まとめて透明度を調整できます。透明度はテキストや画像にも使えますか
はい、テキスト、画像、図形、その他のデザイン要素の透明度を変更できます。透明度を任意の割合で設定できますか
はい、スライダーを使うか、0〜100の数値を手動で入力して、細かく調整できます。Canvaの無料版でも透明度は使えますか
はい、透明度のコントロールは無料ユーザーとProユーザーの両方で利用できます。Macで画面録画するには?
Macで画面録画するには、Trupeer AIを使えます。画面全体をキャプチャでき、AIアバターの追加、ナレーションの追加、動画内のズームイン・ズームアウトなどのAI機能も利用できます。trupeerのAI動画翻訳機能を使えば、動画を30以上の言語に翻訳できます。AIアバターを画面録画に追加するにはどうすればよいですか?
画面録画にAIアバターを追加するには、AI画面録画ツール。を使う必要があります。Trupeer AIはAI画面録画ツールで、複数のアバターを使った動画作成を支援し、動画用の自分のアバター作成もサポートします。Windowsで画面録画するには?
Windowsで画面録画するには、標準搭載のGame Bar(Windows + G)や、AIアバター、ナレーション、翻訳などの高度な機能を備えたTrupeer AIのような高度なAIツールを使えます。動画にナレーションを追加するには?
動画にナレーションを追加するには、trupeer aiのChrome拡張機能をダウンロードします。登録後、音声付きの動画をアップロードし、trupeerから希望のナレーションを選んで、編集した動画を書き出します。画面録画でズームインするには?
画面録画中にズームインするには、Trupeer AIのズーム効果を使います。これにより、特定のタイミングでズームイン・ズームアウトでき、動画コンテンツの視覚的な印象を高められます。
おすすめ記事
関連チュートリアル

