
Come estrarre una foto da un video in Canva
Scopri come estrarre una foto da un video in Canva catturando un fotogramma ed esportandolo come immagine. Segui questo semplice tutorial e crea guide visive chiare con Trupeer.
Questa guida offre una panoramica completa su come acquisire un'immagine fissa da un video all'interno di Canva.
Segui i passaggi seguenti per estrarre in modo efficiente la foto desiderata dal tuo progetto video.
Per catturare una foto da un video in Canva, carica il video, posizionalo per visualizzare il fotogramma desiderato e poi scarica il design come file immagine (PNG o JPEG). Sebbene Canva non abbia una funzione dedicata di "estrazione fotogramma", questa soluzione alternativa ti consente efficacemente di estrarre un'immagine fissa.
Guida passo passo:
1. Carica il tuo video:
Apri il tuo progetto Canva e carica il video che desideri usare. Trascinalo sulla tua tela.
2. Imposta il fotogramma:
Sposta la testina di riproduzione (lo scrubber) nella timeline del video fino al fotogramma che desideri catturare. Ridimensiona e posiziona il video sulla tela secondo necessità.
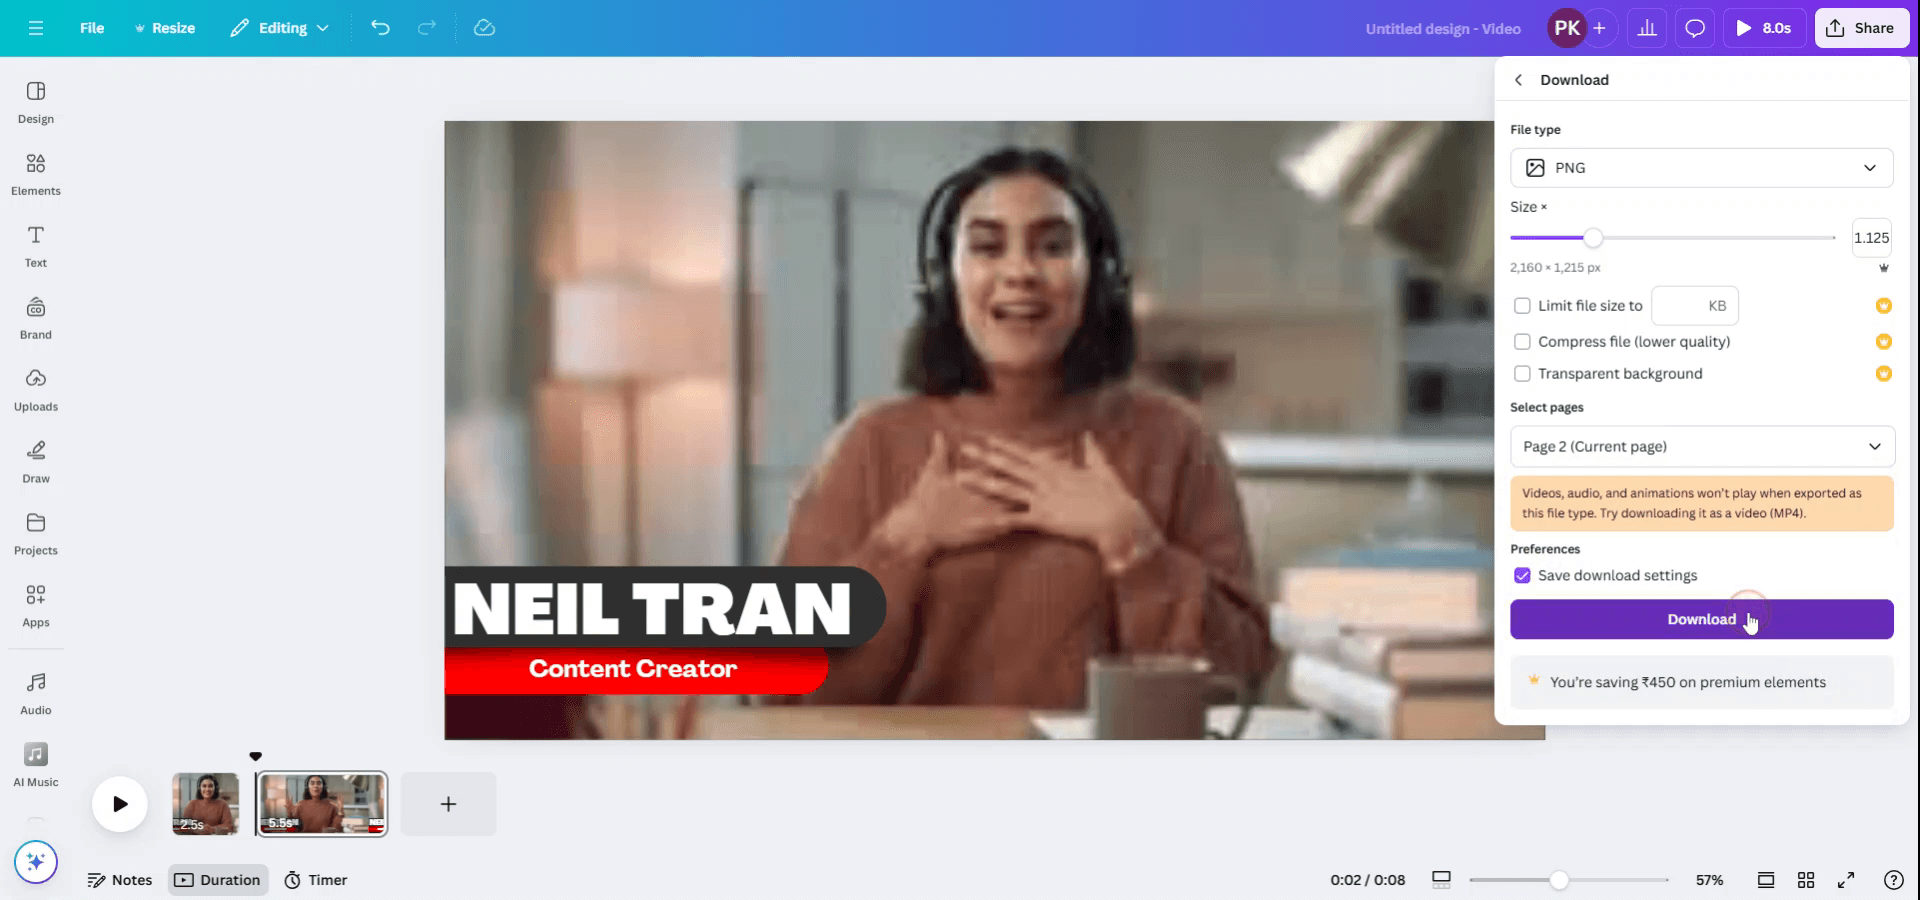
3. Scarica il fotogramma come immagine:
Fai clic su "Condividi" nell'angolo in alto a destra.
Seleziona "Scarica".
Scegli PNG o JPEG come tipo di file.
In "Seleziona pagine", scegli solo la pagina corrente.
Guida passo passo: come estrarre una foto da un video in canva
Passaggio 1
Per iniziare a catturare una foto da un video in Canva, apri un progetto esistente che contiene il video. Utilizza il timer della durata situato sotto il video per riprodurre e fermarti con precisione nel momento che desideri catturare.

Passaggio 2
Una volta identificato il fotogramma esatto che desideri catturare, fai clic su "S" per dividere il video. In alternativa, fai clic con il tasto destro sul video e scegli "Dividi pagina" per isolare il fotogramma.
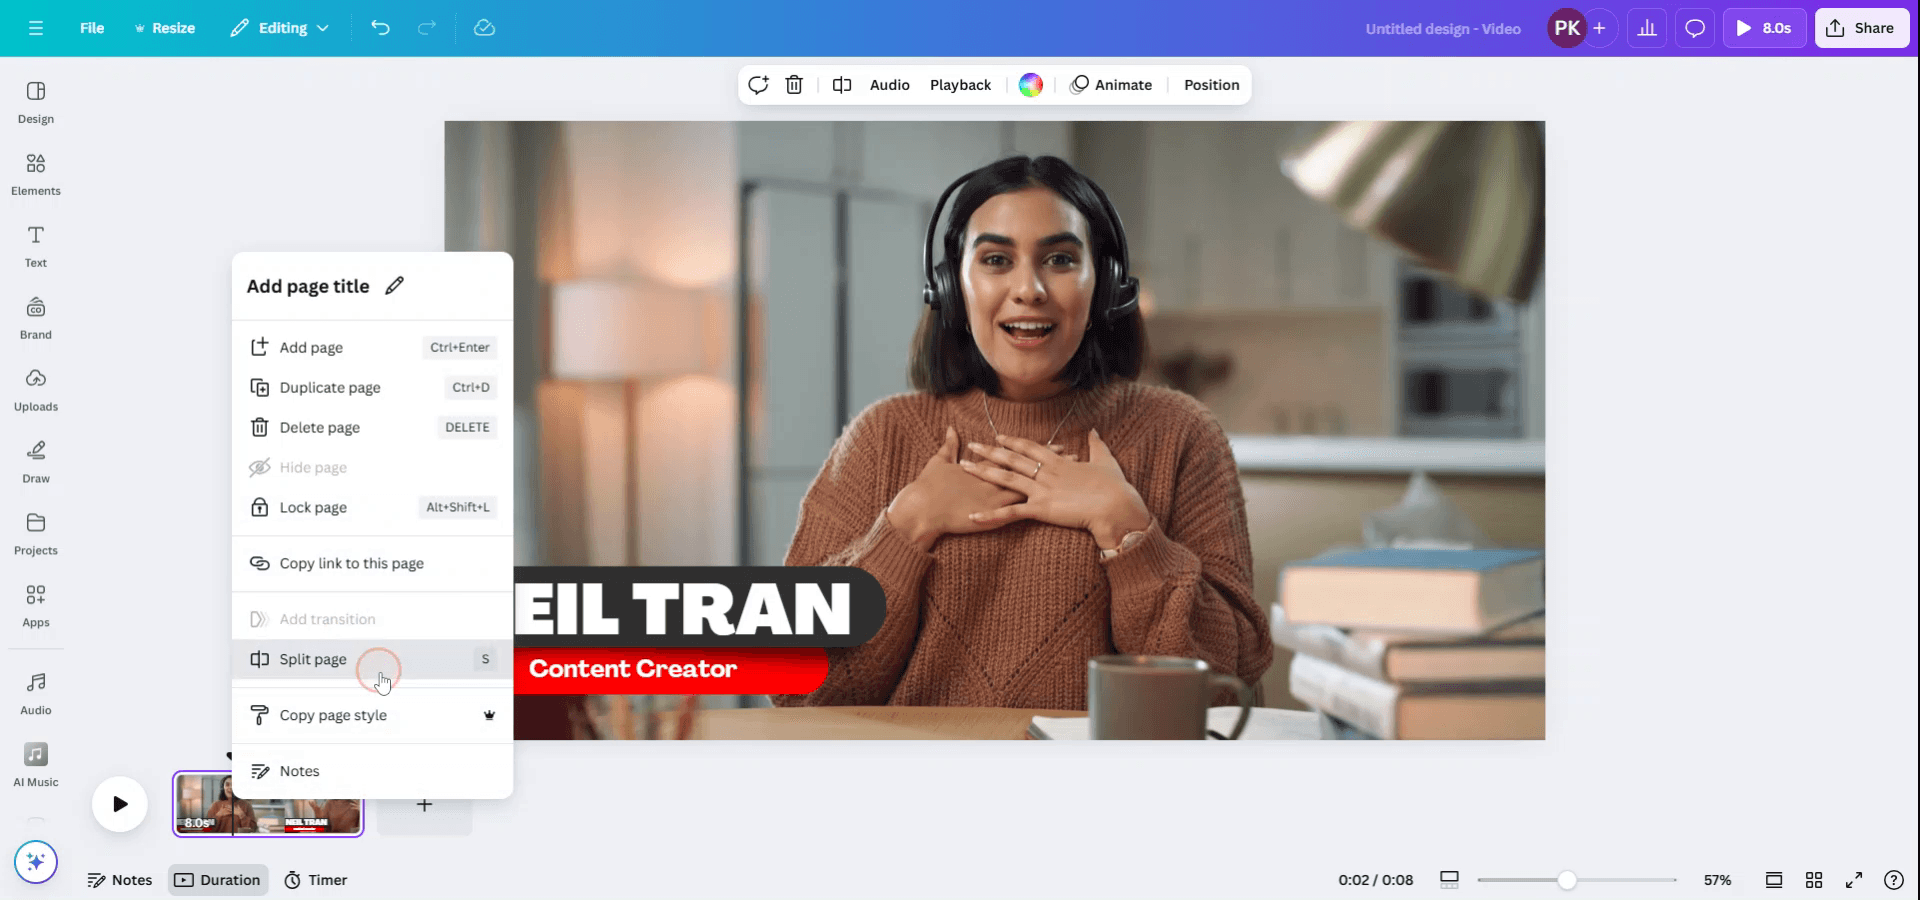
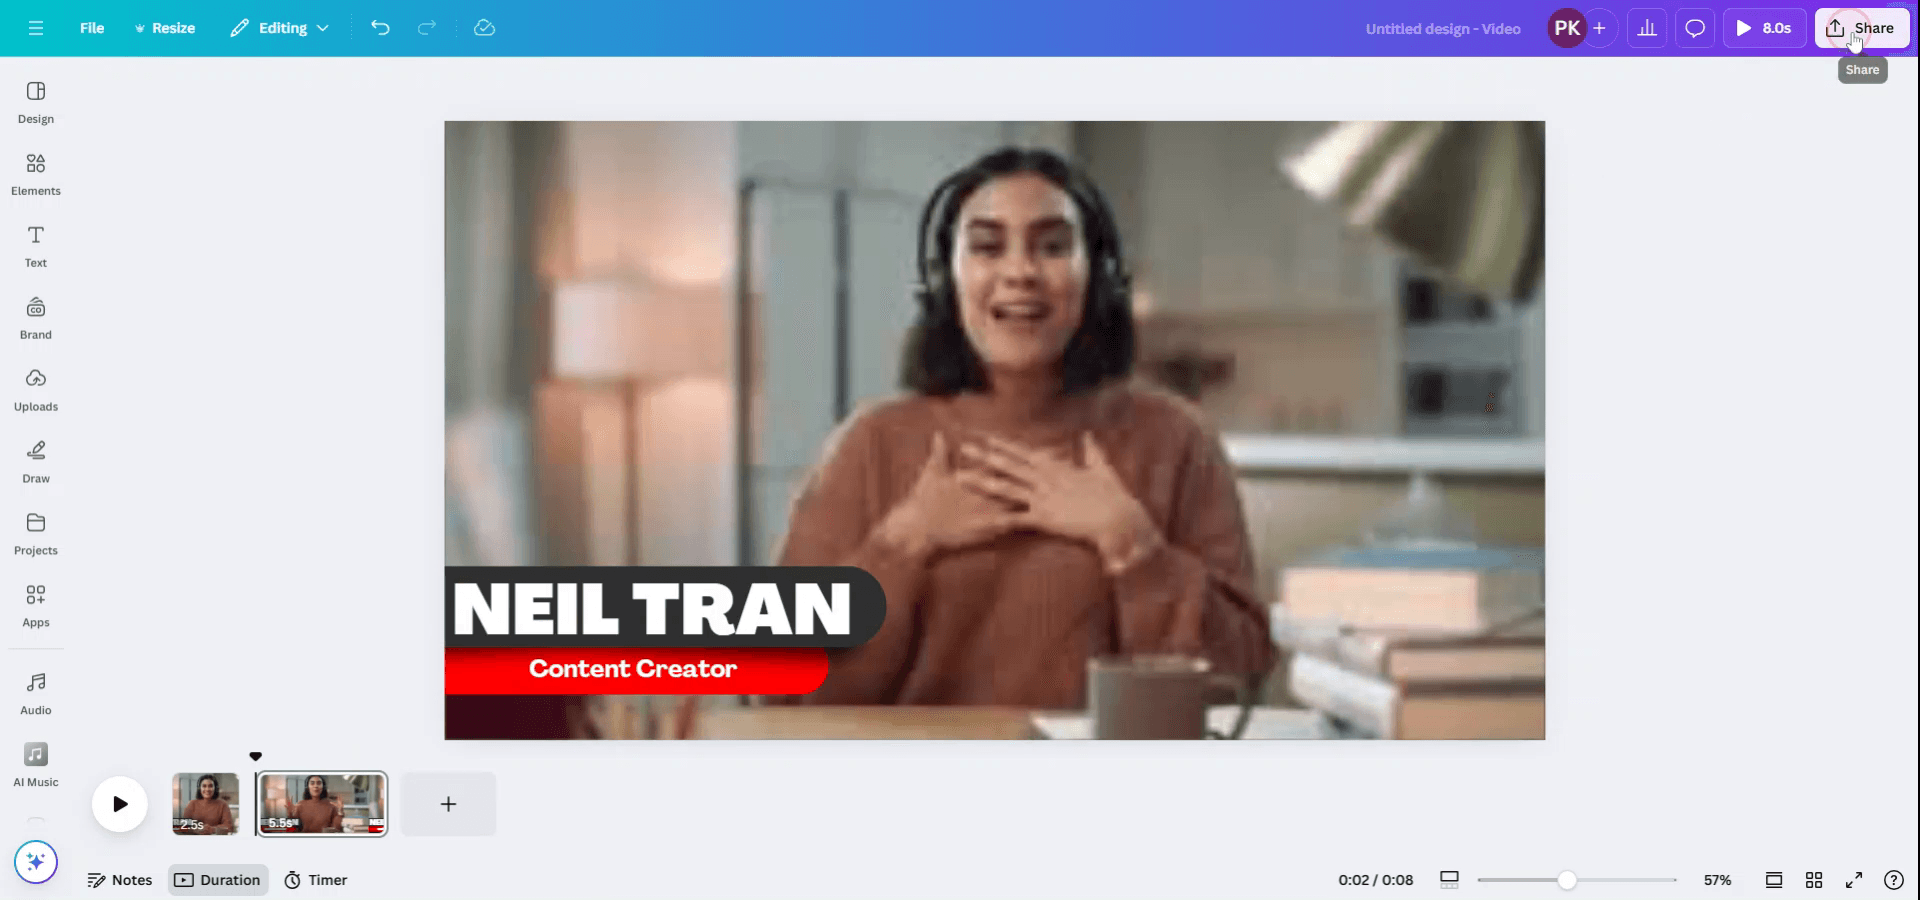
Passaggio 3
Il fotogramma scelto apparirà ora in una nuova pagina, ad esempio Pagina 2. Per scaricare questo fotogramma come foto, fai clic sul pulsante "Condividi" e seleziona "Scarica" dal menu a discesa.
Passaggio 4
Imposta il tipo di file su PNG, regola la dimensione secondo necessità.
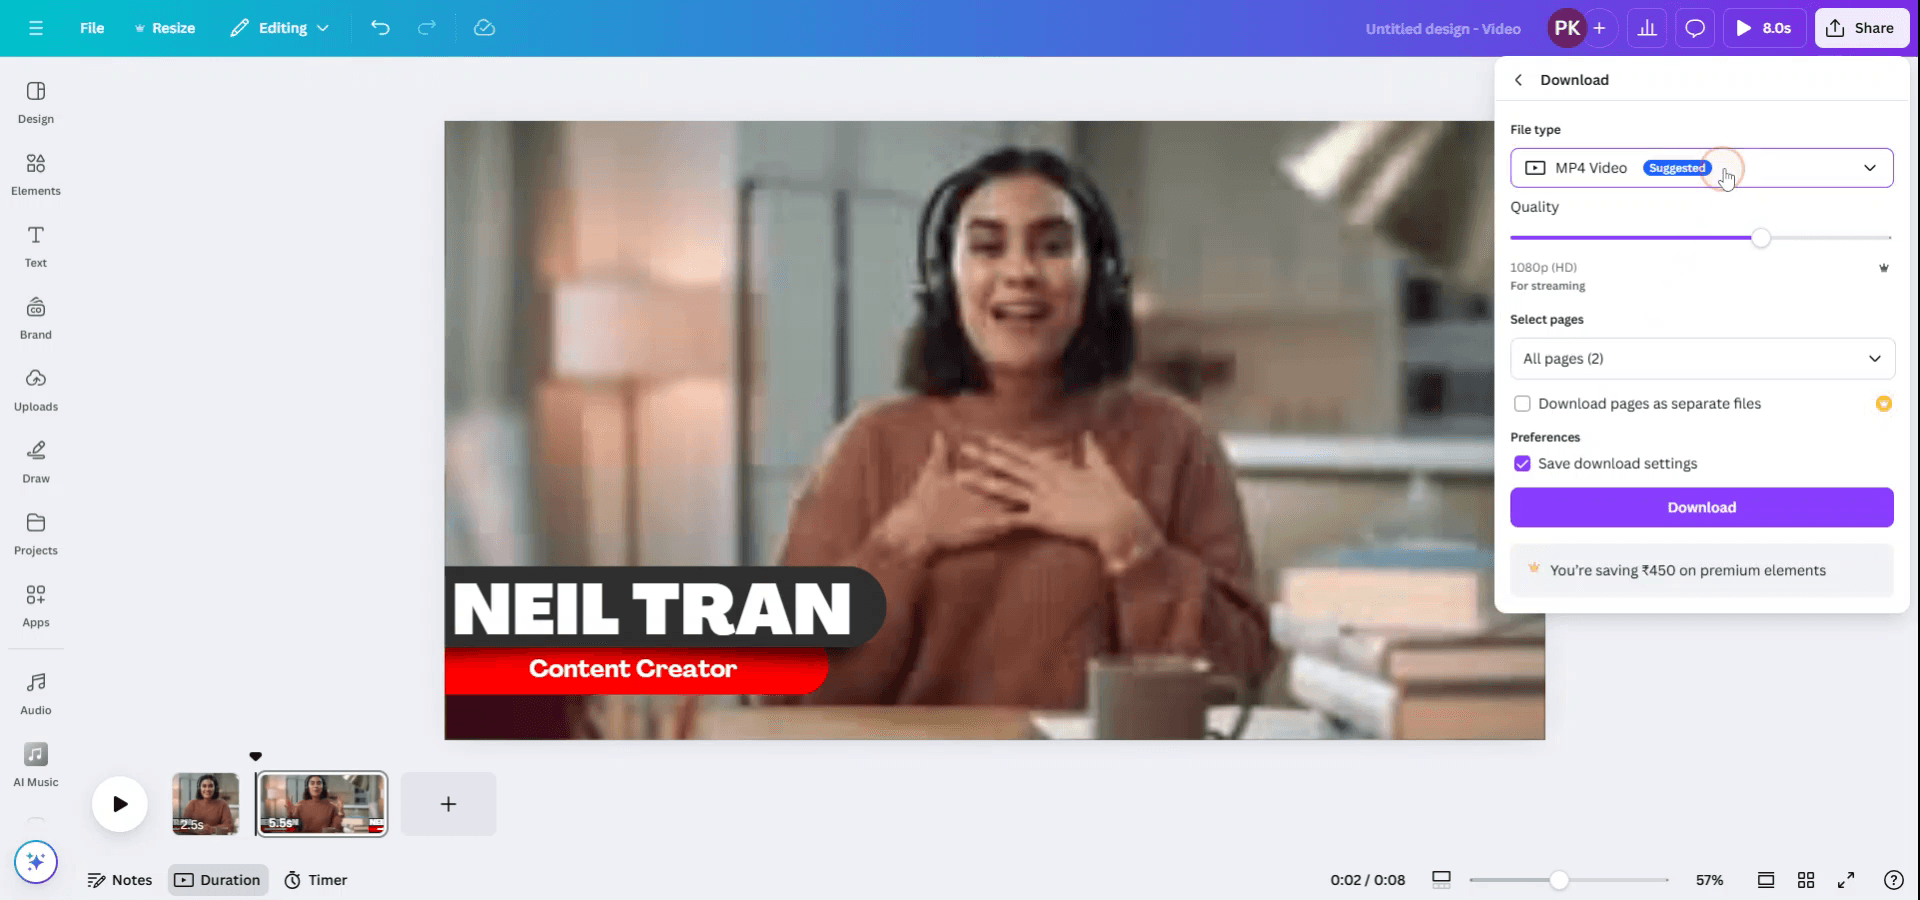
Passaggio 5
Assicurati di aver selezionato la pagina corretta (Pagina 2) in cui si trova la foto desiderata prima di procedere.

Passaggio 6
Una volta confermate tutte le impostazioni, fai clic su "Fine" e poi su "Scarica" per salvare la foto sul tuo dispositivo.
Consigli professionali per ottenere una foto da un video in Canva
Metti in pausa nel fotogramma desiderato: riproduci il video e mettilo in pausa esattamente nel fotogramma che vuoi catturare come immagine.
Fai uno screenshot: usa la funzione di screenshot del computer o del dispositivo (ad es. Strumento di cattura su Windows, Command+Shift+4 su Mac) per catturare il fotogramma.
Carica lo screenshot su Canva: dopo aver catturato lo screenshot, caricalo su Canva trascinandolo e rilasciandolo oppure usando la scheda "Caricamenti".
Usa lo strumento di modifica video: Canva ti consente di ritagliare e dividere i video. Usa questa funzione per concentrarti sulla parte del video da cui vuoi ottenere una foto prima di fare lo screenshot.
Usa l'editor immagini di Canva per miglioramenti: una volta caricata l'immagine, usa l'editor immagini di Canva per regolare luminosità, contrasto e applicare filtri per un tocco professionale.
Problemi comuni e come evitarli quando si ottiene una foto da un video in Canva
Screenshot di bassa qualità: se fai uno screenshot di un video a bassa risoluzione, la qualità dell'immagine potrebbe essere scarsa.
Correzione: assicurati che il video sia ad alta risoluzione prima di catturare uno screenshot per mantenere la chiarezza dell'immagine.Elementi indesiderati nel fotogramma: a volte, altre parti del video possono comparire nel fotogramma che vuoi catturare.
Correzione: ritaglia il video in Canva prima di metterlo in pausa per isolare il fotogramma desiderato oppure usa gli strumenti di ritaglio dopo aver catturato l'immagine.Non regolare le dimensioni dell'immagine: dopo aver caricato lo screenshot, potresti dimenticare di ridimensionarlo per adattarlo al tuo progetto.
Correzione: usa le opzioni di ridimensionamento di Canva per adattare perfettamente l'immagine al tuo layout.Perdita delle proporzioni: ridimensionare l'immagine potrebbe deformare le proporzioni originali.
Correzione: tieni premuto il tasto "Shift" mentre ridimensioni per mantenere le proporzioni corrette dell'immagine.Limitazioni del formato file: gli screenshot potrebbero non essere sempre nel formato migliore per Canva.
Correzione: salva gli screenshot in formati immagine comuni (PNG o JPG) prima di caricarli su Canva.
FAQ comuni per ottenere una foto da un video in Canva
Posso estrarre direttamente una foto da un video in Canva?
No, Canva non ha una funzione integrata per estrarre foto dai video. Devi prima catturare il fotogramma tramite uno screenshot.Quali formati video posso caricare su Canva?
Canva supporta il caricamento di video in MP4, MOV e altri formati video comuni.Posso modificare la foto dopo averla catturata da un video?
Sì, una volta caricata su Canva, puoi usare gli strumenti di modifica della piattaforma per migliorarla o regolarla.C'è un modo migliore per estrarre foto di alta qualità da un video?
Se hai bisogno di un'immagine di qualità superiore, valuta l'uso di un software dedicato da video a immagine prima di caricarla su Canva.Posso usare il fotogramma di un video per scopi commerciali?
Assicurati di avere i diritti appropriati per usare il contenuto video. Canva offre video e foto stock con diritti di utilizzo commerciale, ma i video personali potrebbero richiedere autorizzazione o licenza.Come registrare lo schermo su Mac?
Per registrare lo schermo su un Mac, puoi usare Trupeer AI. Ti consente di catturare l'intero schermo e offre funzionalità di AI come aggiungere avatar AI, aggiungere una voce fuori campo, aggiungere zoom avanti e indietro nel video. Con la funzione di traduzione video AI di trupeer, puoi tradurre il video in oltre 30 lingue.Come aggiungere un avatar AI alla registrazione dello schermo?
Per aggiungere un avatar AI a una registrazione dello schermo, dovrai usare uno strumento di registrazione dello schermo con AI. Trupeer AI è uno strumento di registrazione dello schermo con AI, che ti aiuta a creare video con più avatar e ti aiuta anche a creare il tuo avatar per il video.Come registrare lo schermo su Windows?
Per registrare lo schermo su Windows, puoi usare la Game Bar integrata (Windows + G) oppure uno strumento AI avanzato come Trupeer AI per funzionalità più avanzate come avatar AI, voce fuori campo, traduzione, ecc.Come aggiungere una voce fuori campo al video?
Per aggiungere una voce fuori campo ai video, scarica l'estensione Chrome di trupeer ai. Una volta registrato, carica il tuo video con voce, scegli la voce fuori campo desiderata da trupeer ed esporta il video modificato.Come posso ingrandire durante una registrazione dello schermo?
Per ingrandire durante una registrazione dello schermo, usa gli effetti di zoom in Trupeer AI, che ti consentono di ingrandire e ridurre in momenti specifici, migliorando l'impatto visivo dei contenuti video.
Le persone chiedono anche
Generatore di documentazione tecnica
Come trasformare un'immagine in una pagina da colorare in Canva
Come stampare fronte e retro su Canva
Come allungare il testo in Canva
Tutorial correlati

