

Comment passer un dépôt GitHub de privé à public
Apprenez à faire passer un dépôt GitHub de privé à public à l’aide des paramètres du dépôt. Suivez ce tutoriel étape par étape et créez des guides pour développeurs avec Trupeer.
Pour changer un dépôt GitHub de privé à public, suivez ces étapes :
Accédez au dépôt : Rendez-vous sur le dépôt privé que vous souhaitez rendre public sur GitHub.
Accédez aux paramètres : Cliquez sur l’onglet "Paramètres" situé en haut de la page du dépôt.
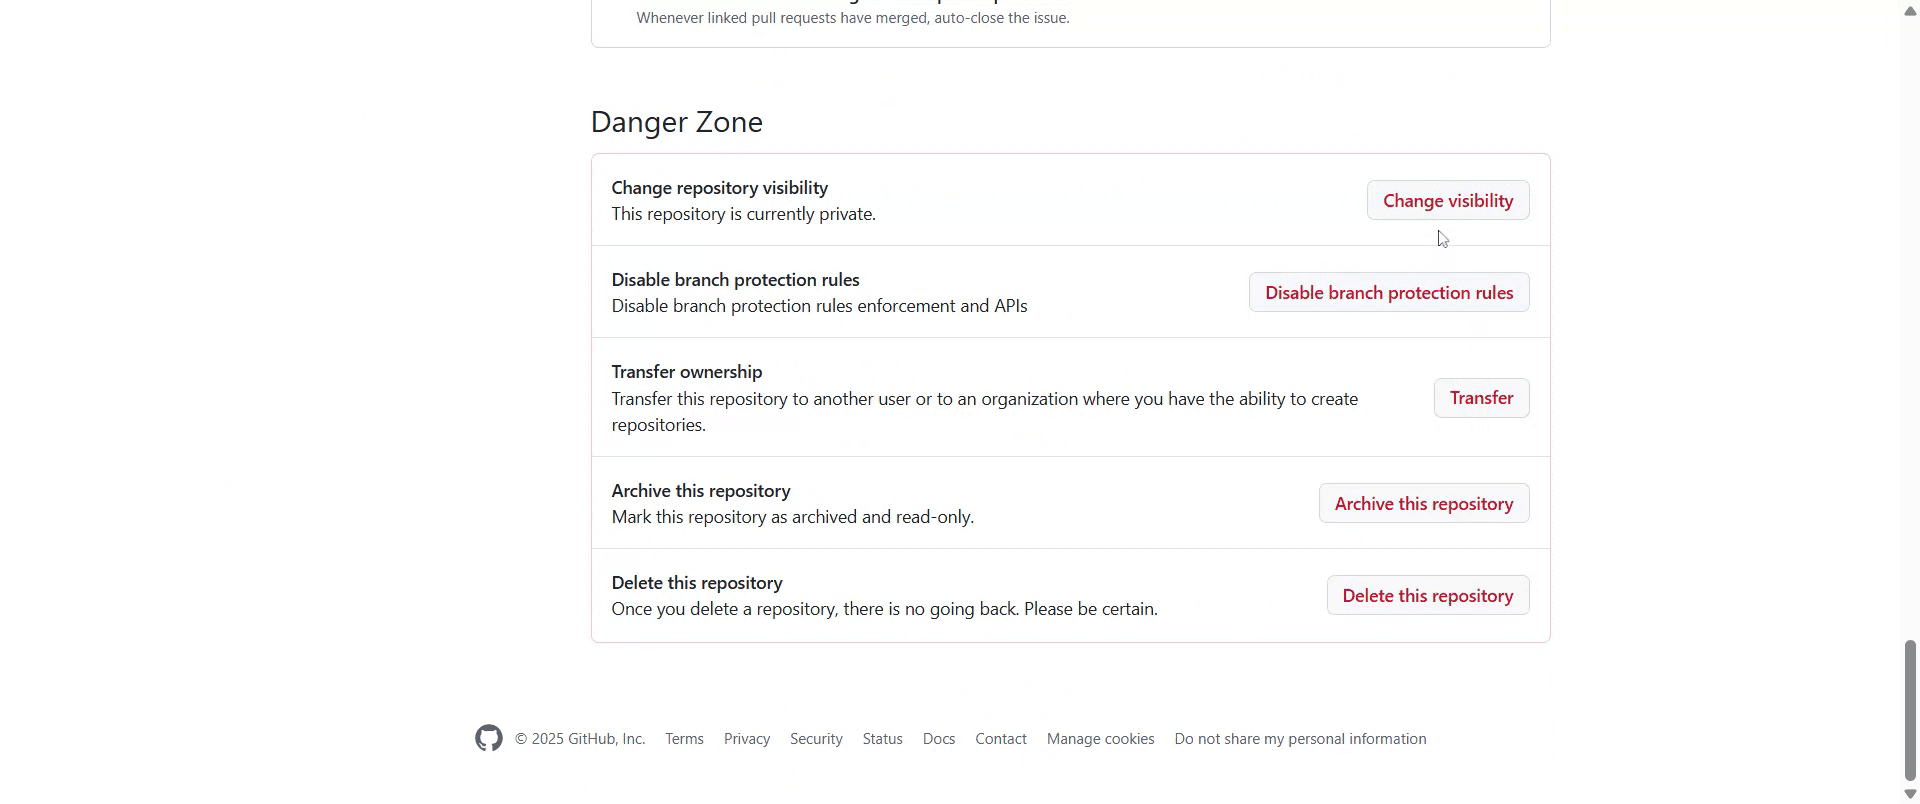
Repérez la zone dangereuse : Faites défiler la page des paramètres jusqu’à trouver la section "Zone dangereuse".
Modifiez la visibilité : Dans la "Zone dangereuse", trouvez l’option "Modifier la visibilité du dépôt" et cliquez sur le bouton "Modifier la visibilité" à côté.
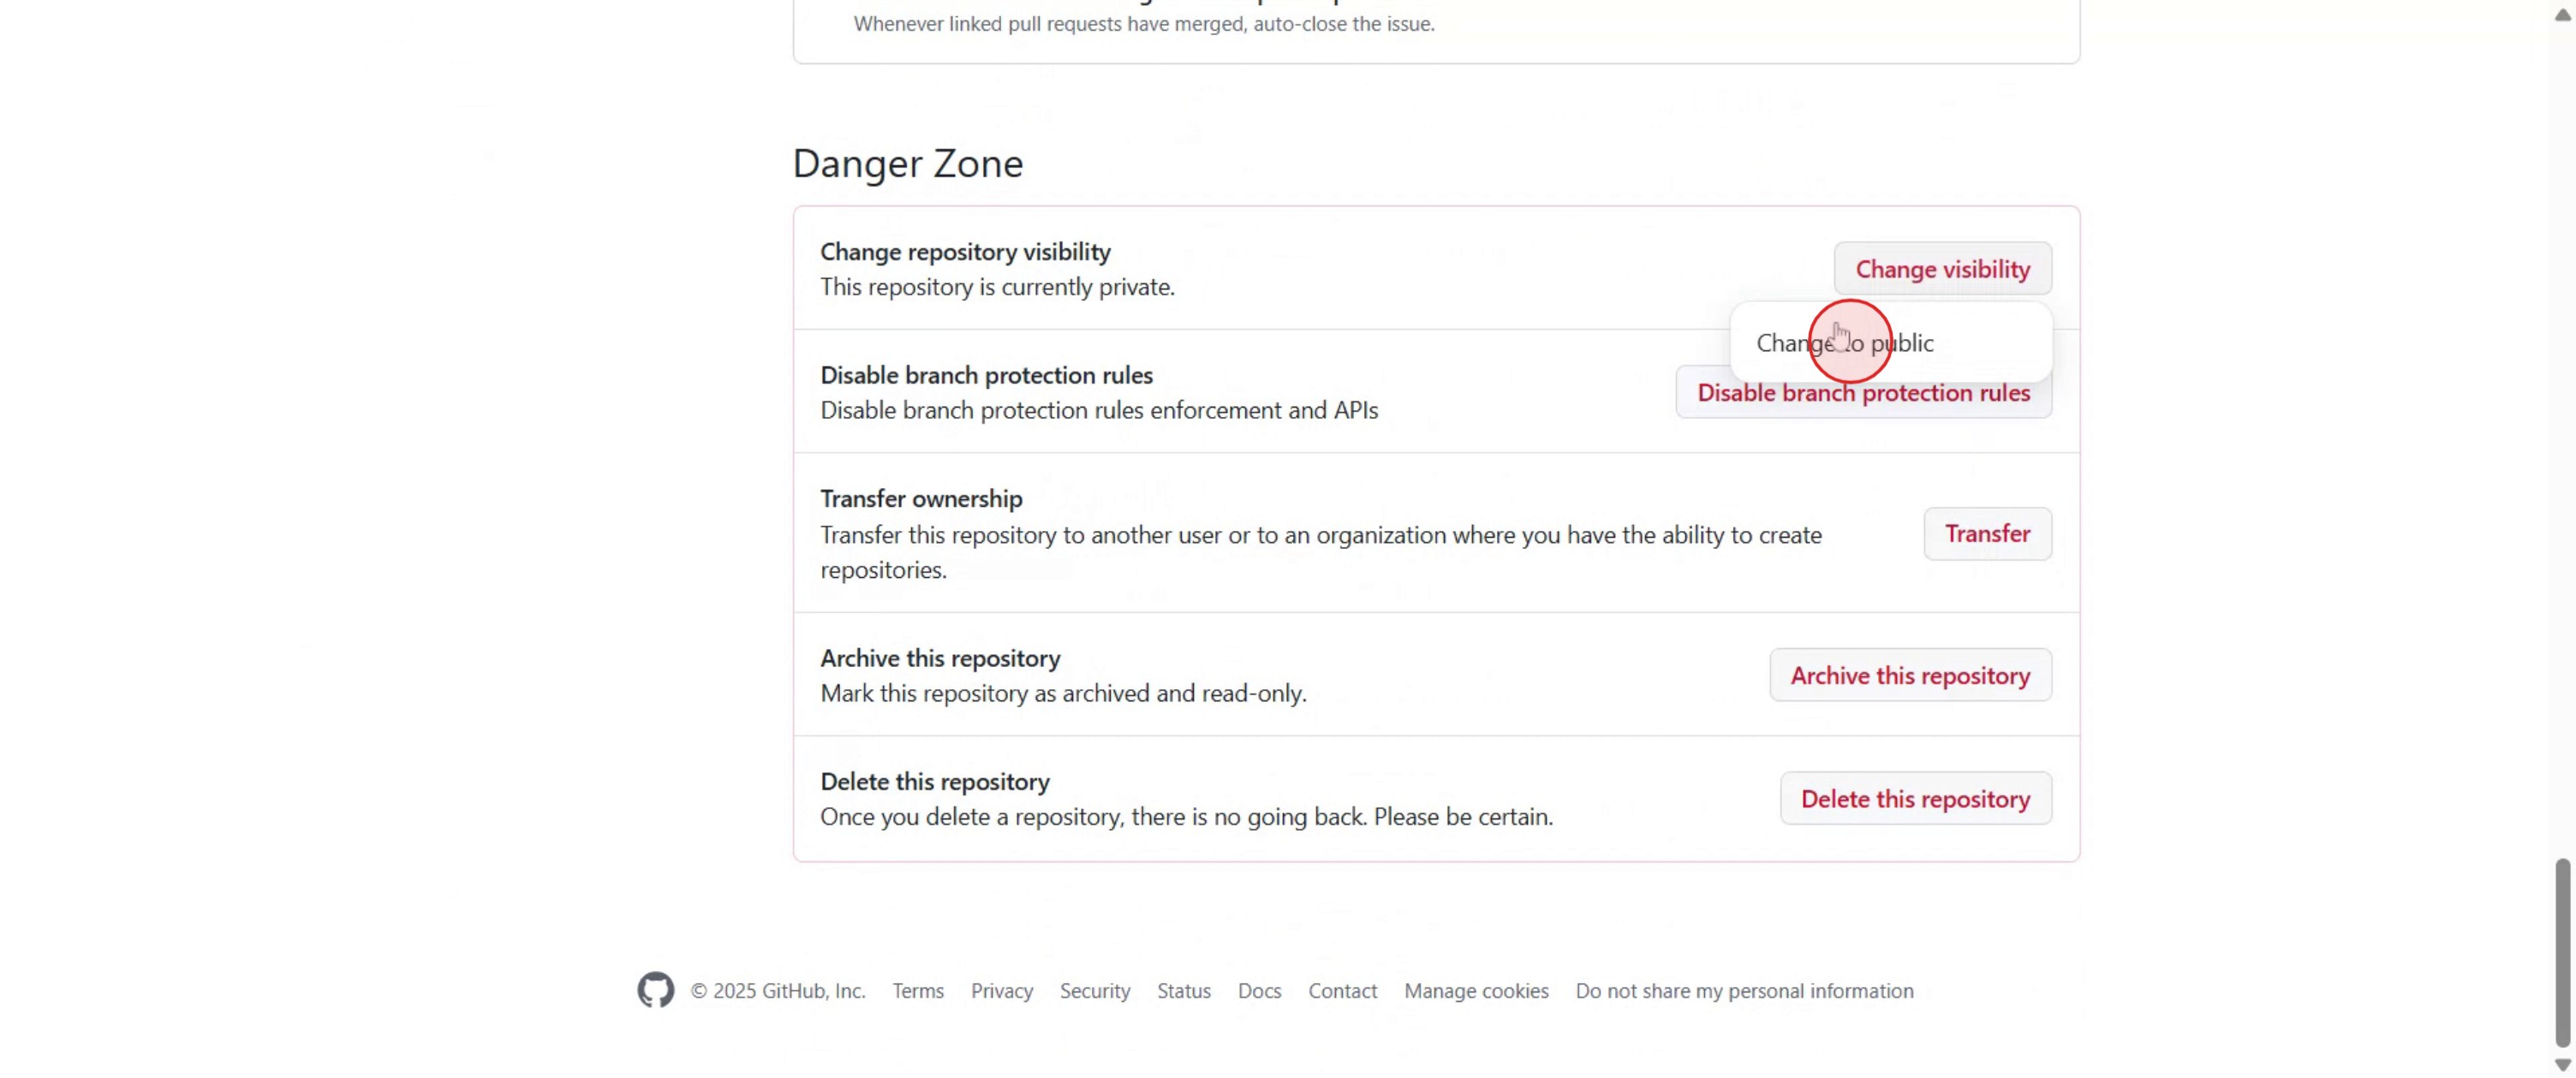
Sélectionnez Public : Une fenêtre contextuelle apparaîtra. Sélectionnez "Passer en public" parmi les options proposées.
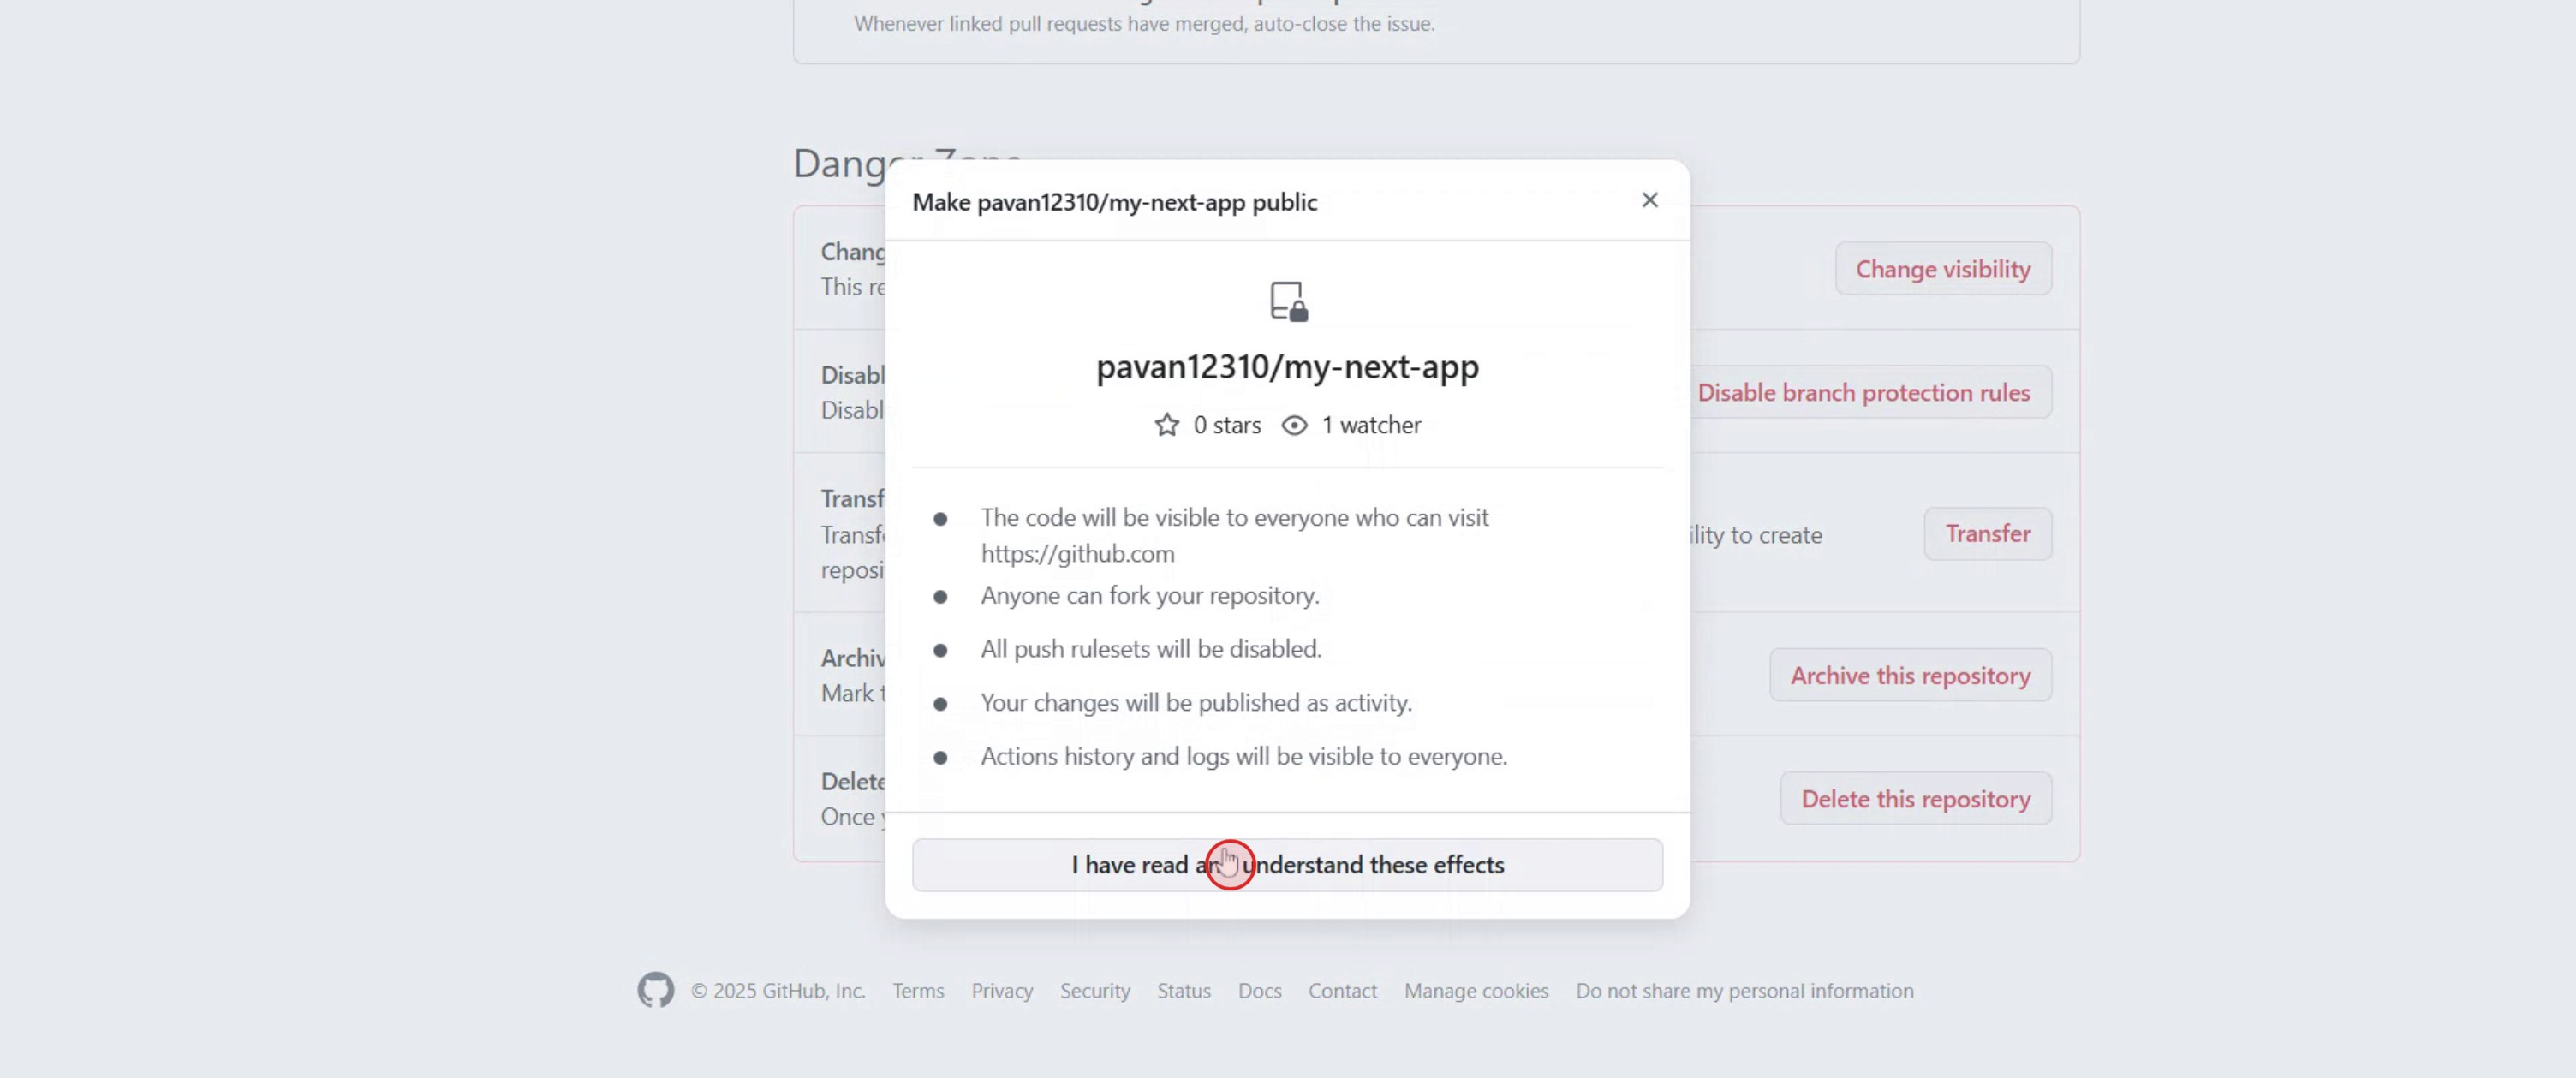
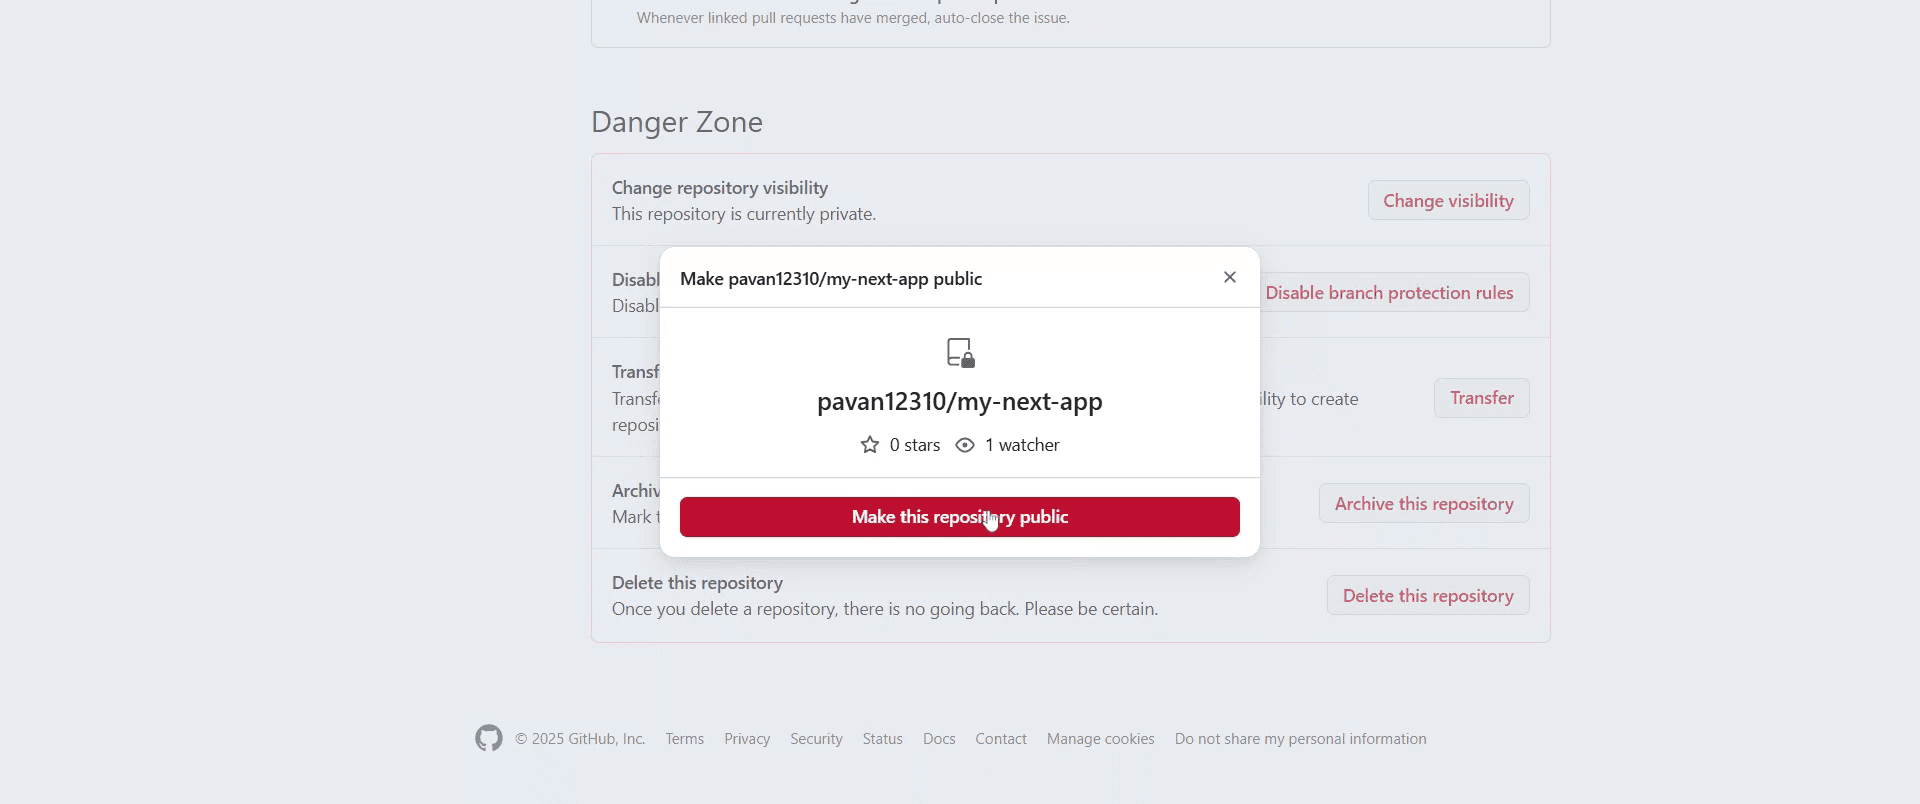
Confirmez l’action : GitHub vous demandera de confirmer votre décision. Lisez le message de confirmation et cliquez sur le bouton "Je comprends, rendre ce dépôt public" pour continuer.
Après confirmation, la visibilité de votre dépôt sera mise à jour et il deviendra accessible publiquement.
Guide étape par étape : comment changer un dépôt GitHub de privé à public
Étape 1
Accédez au dépôt privé que vous souhaitez modifier.

Étape 2
Cliquez sur l’onglet 'Paramètres', situé en haut à droite de la page du dépôt.

Étape 3
Faites défiler jusqu’à la section 'Zone dangereuse' en bas de la page des paramètres.
Étape 4
Cliquez sur le bouton 'Modifier la visibilité du dépôt' et sélectionnez 'Passer en public'.
Étape 5
Une fenêtre contextuelle s’affichera pour demander une confirmation, puis cliquez sur le bouton 'Je veux rendre ce dépôt public'.

Étape 6
Cliquez sur le bouton 'J’ai lu et compris ces effets'.
Étape 7
Cliquez sur 'Rendre ce dépôt public'.
Étape 8
Une fois le dépôt public, tout le code et les données qu’il contient seront visibles par n’importe qui sur GitHub.

Conseils de pro pour faire passer un dépôt GitHub de privé à public
Auditez les données sensibles avant de le rendre public
Passez en revue l’ensemble du dépôt à la recherche de clés API, de variables d’environnement, de jetons d’accès, de fichiers.envet de documentation interne avant de modifier sa visibilité.Vérifiez l’historique des commits, pas seulement les fichiers actuels
Même si des données sensibles sont supprimées de la dernière version, elles peuvent encore exister dans les commits précédents. Utilisez des outils d’historique Git ou les alertes de détection de secrets de GitHub.Mettez à jour le README pour les utilisateurs publics
Réécrivez les notes internes en une documentation claire qui explique l’objectif du projet, les étapes d’installation et l’utilisation pour les contributeurs externes.Ajoutez une licence avant de le rendre public
Sans licence, les autres ne peuvent techniquement pas utiliser votre code légalement. Choisissez une licence open source appropriée comme MIT, Apache 2.0 ou GPL.Passez en revue les collaborateurs et les autorisations du dépôt
Assurez-vous que tous les collaborateurs conviennent à un projet public et supprimez toute personne qui ne devrait pas conserver un accès continu.Activez les fonctionnalités de sécurité de GitHub
Activez les alertes Dependabot, l’analyse de code et la détection de secrets pour protéger le dépôt une fois qu’il devient public.Créez un
.gitignores’il est absent
Empêchez les futurs commits accidentels de fichiers sensibles ou inutiles en configurant correctement.gitignore.
Pièges courants lors du passage d’un dépôt GitHub de privé à public
Exposer accidentellement des identifiants
C’est l’erreur la plus courante et la plus grave. Une fois public, les données peuvent être indexées, clonées et mises en cache très rapidement.Penser que les fichiers supprimés ont disparu pour toujours
Les fichiers supprimés peuvent encore exister dans l’historique Git, sauf s’ils sont correctement supprimés à l’aide d’outils de réécriture de l’historique.Oublier les services liés
Les pipelines CI/CD, les fournisseurs cloud et les intégrations tierces peuvent encore faire référence au dépôt une fois qu’il est rendu public.Aucune licence incluse
Un dépôt public sans licence crée une ambiguïté juridique et limite l’adoption.Une documentation insuffisante pour les nouveaux utilisateurs
Des README réservés à un usage interne déconcertent les utilisateurs externes et réduisent l’engagement ou les contributions.Ignorer les paramètres des issues et des discussions
Laisser les issues activées sans modération peut entraîner du spam ou des demandes ingérables.Modifier la visibilité sans alignement des parties prenantes
Pour les dépôts d’équipe ou d’entreprise, les passer en public sans approbation peut entraîner des problèmes de conformité ou de politique.
FAQ courantes : changer un dépôt GitHub de privé à public
1. Puis-je changer gratuitement un dépôt GitHub de privé à public ?
Oui. GitHub autorise les changements de visibilité de privé à public sur les offres gratuites et payantes.
2. Mon historique de commits restera-t-il intact ?
Oui. Tous les commits, branches et tags restent inchangés lorsque vous modifiez la visibilité du dépôt.
3. Puis-je remettre un dépôt public en privé ?
Oui, vous pouvez le repasser en privé à tout moment, mais les données déjà clonées ou mises en cache publiquement ne peuvent pas être annulées.
4. Les dépôts publics apparaîtront-ils dans les moteurs de recherche ?
Oui. Les dépôts publics peuvent être indexés par les moteurs de recherche et découverts par n'importe qui.
5. Les forks et les étoiles sont-ils affectés ?
Les étoiles restent intactes. Le fork devient possible une fois que le dépôt est public.
6. Les collaborateurs sont-ils notifiés lorsque la visibilité change ?
GitHub n'envoie pas toujours de notifications explicites, il est donc préférable d'informer les collaborateurs manuellement.
7. Est-il prudent de rendre public un projet d'entreprise ?
Seulement si vous avez examiné en détail la licence, la conformité, la propriété intellectuelle et les données sensibles.
Les internautes demandent aussi
Générateur de documentation technique
Logiciel de base de connaissances
Comment jouer à des jeux GitHub
Comment partager un dépôt GitHub via un lien
Comment partager votre profil GitHub
Tutoriels associés

