
如何保存 Figma 文件
了解如何快速轻松地保存 Figma 文件。按照这份分步指南,将你的 Figma 设计保存到本地或云端,并确保你的工作始终有备份!
本指南提供了关于如何在 Figma 中保存设计的清晰说明,确保您的工作安全地存储在本地和版本历史中。
请按照以下步骤高效管理您的设计文件。
Figma 主要在云端运行,会在您编辑时自动保存您的设计。不过,您也可以在需要时手动保存本地副本。
1. 保存到云端(默认行为)
Figma 会自动保存 您的工作,且是实时进行的。
更改会每隔几秒同步到您的 Figma 账户。
无需手动操作即可保存,只需保持登录并连接到互联网。
2. 保存本地副本
要导出用于离线使用或共享的 .fig 文件:
打开您的文件:确保您要保存的设计已在编辑器中打开。
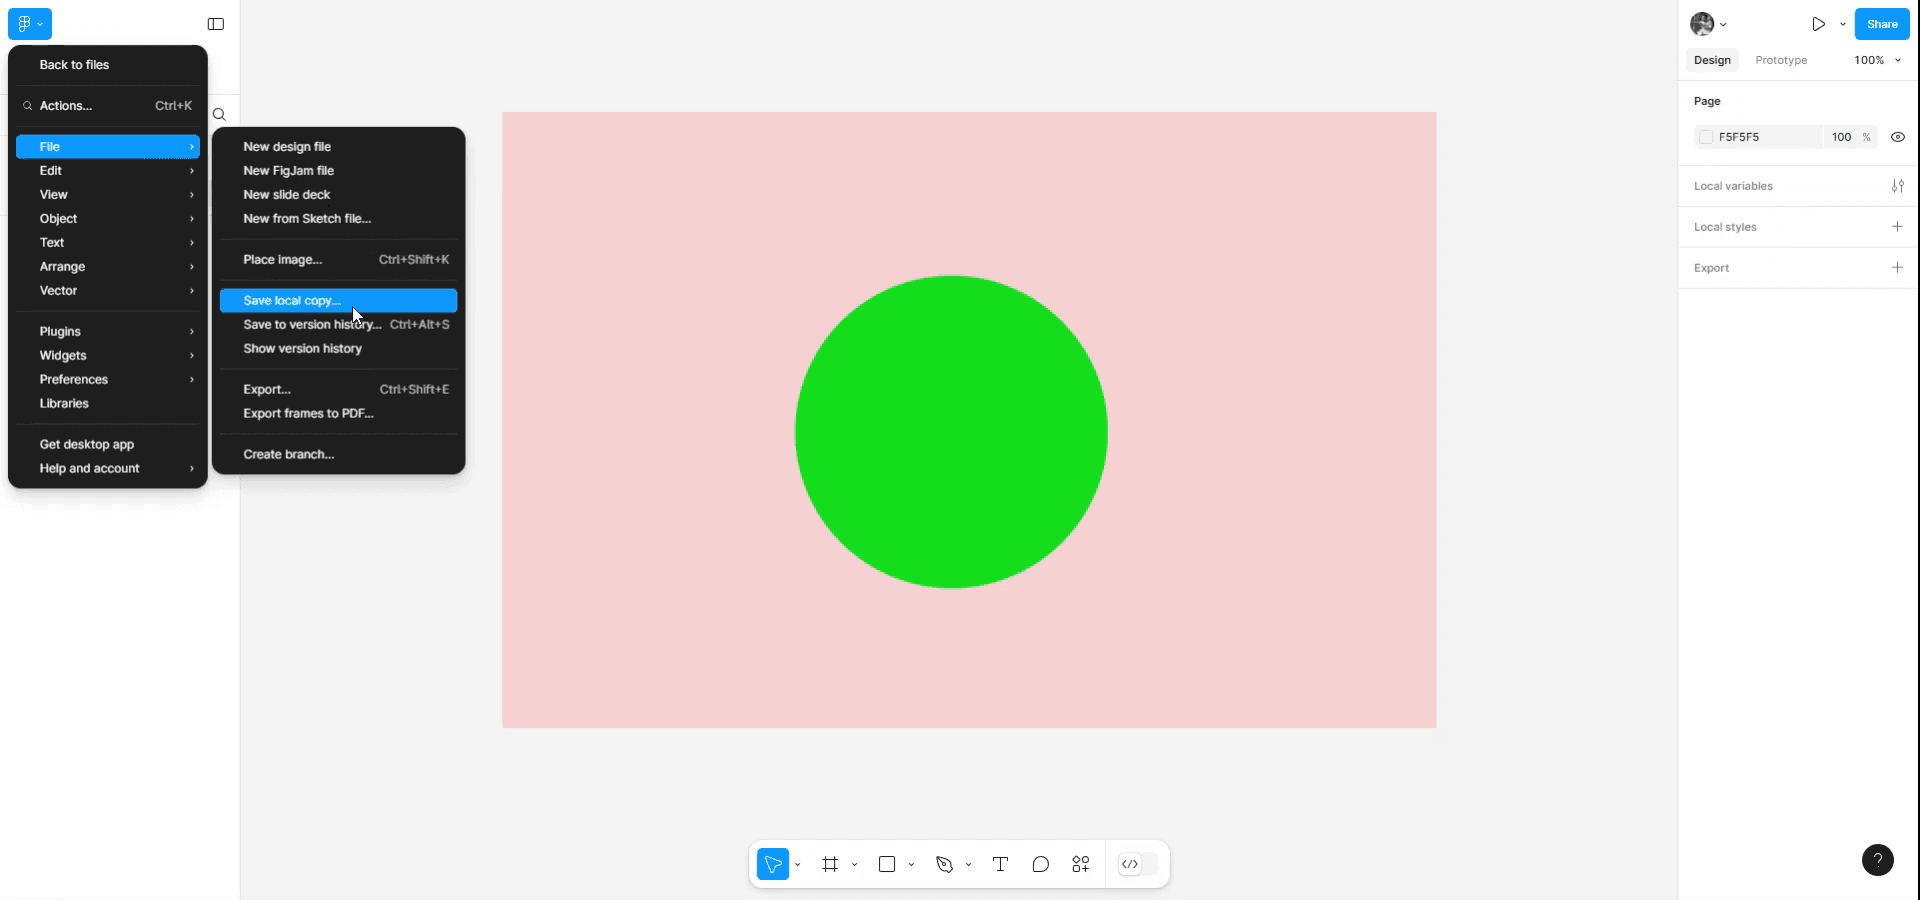
点击 Figma 菜单:在左上角点击 Figma 图标。
转到 文件 > 保存本地副本。
选择保存位置:您的文件浏览器将打开。选择您希望保存
.fig文件的位置。命名并保存:为您的文件命名,然后点击 保存。
分步指南:如何保存 Figma 文件
方法 1
在 Figma 中打开您想要保存的设计。进入主菜单,然后从子菜单中选择“文件”。点击“保存本地”即可将设计存储到您的设备上。
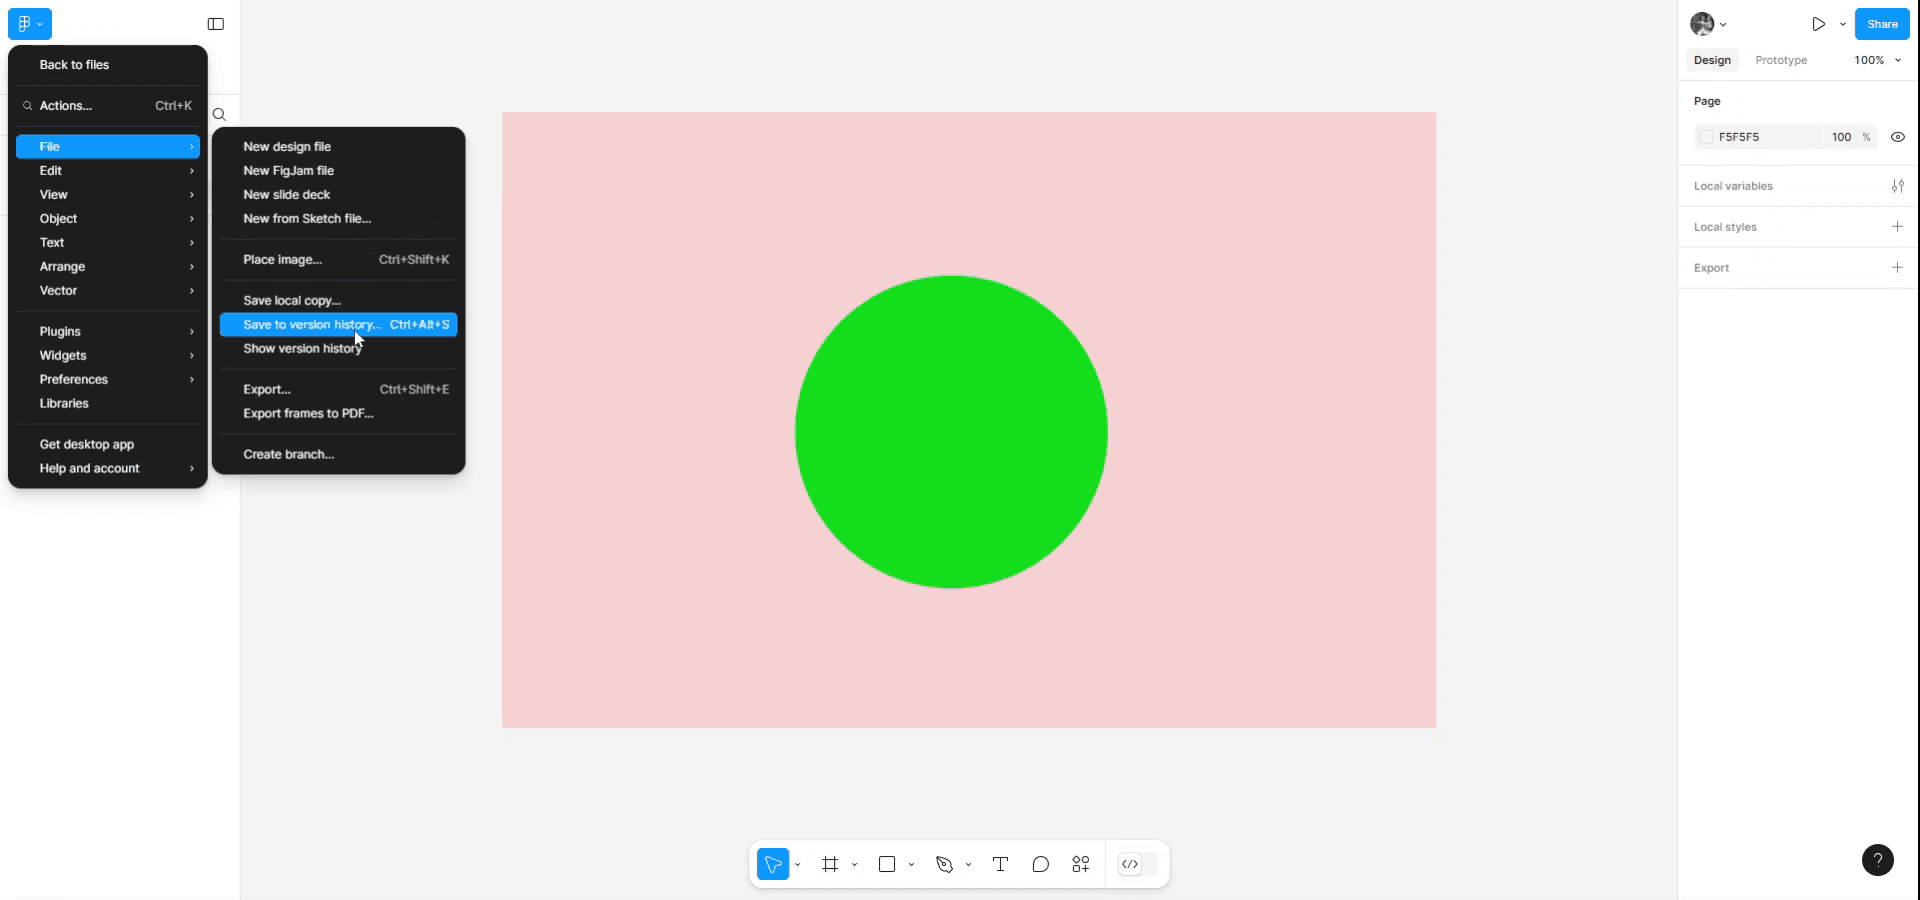
方法 2
或者,您也可以通过按下“Ctrl + Alt + S”或点击所提供的选项来将设计保存到版本历史中。
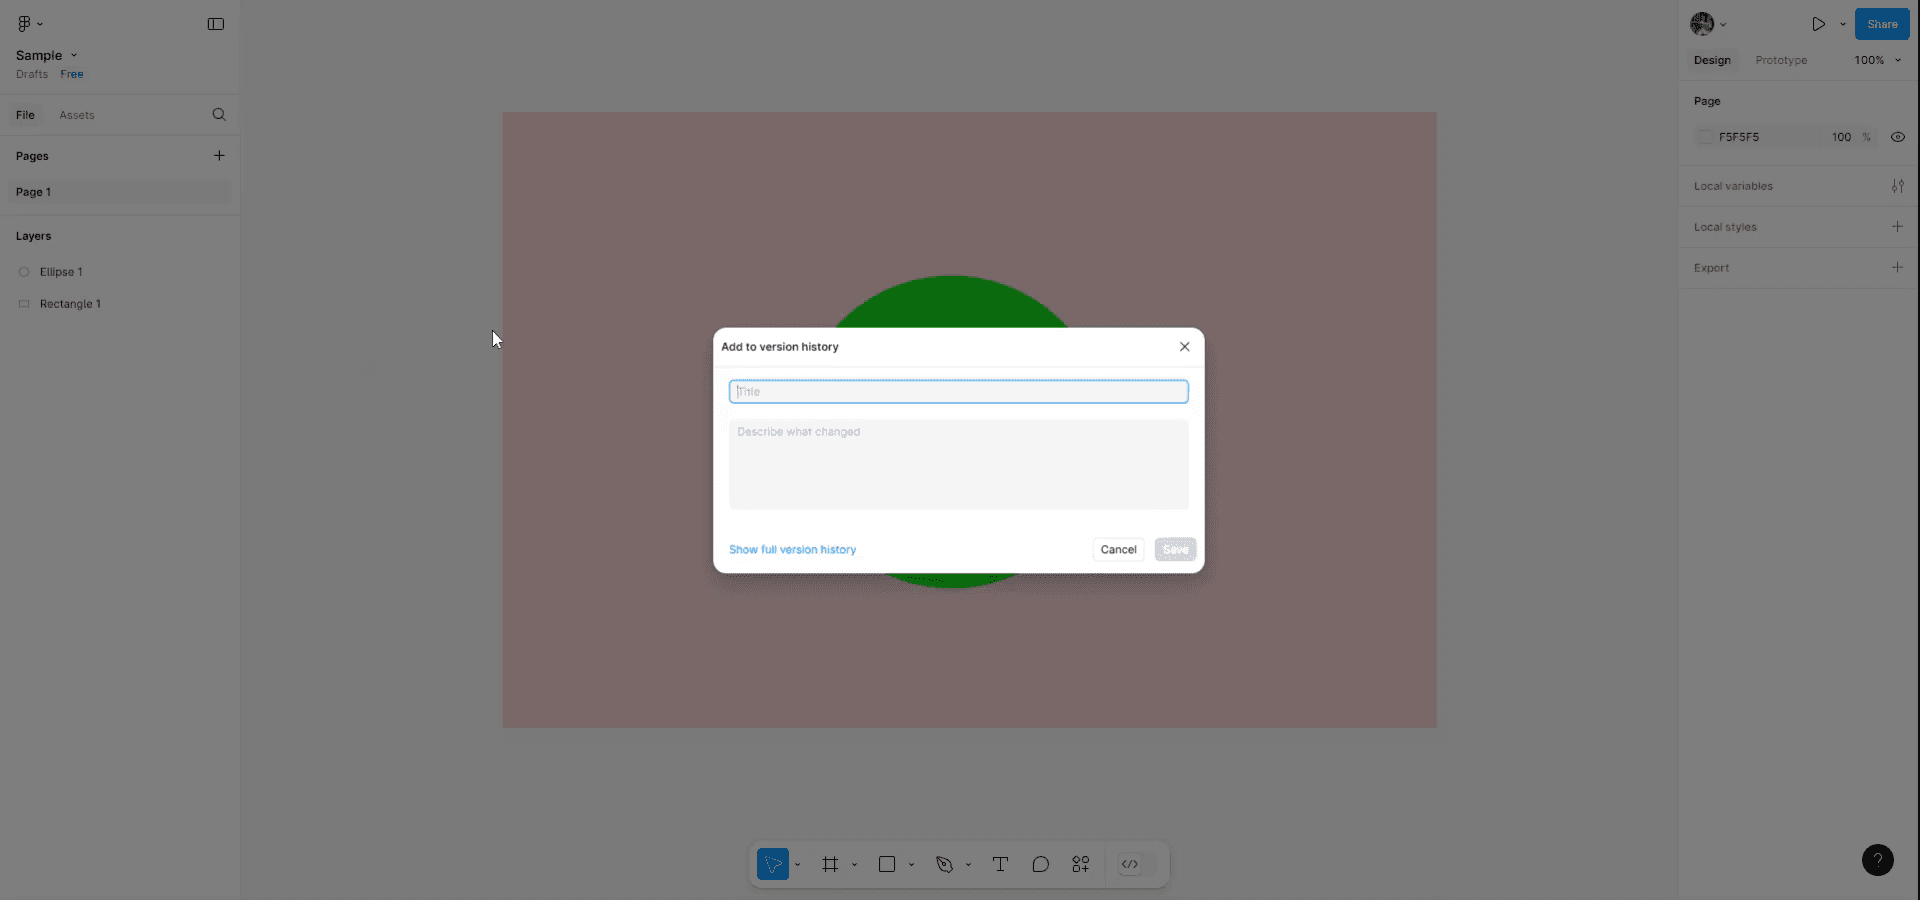
根据您预定义的版本,将您的版本添加到另一个版本历史中。这可确保您的设计所有迭代都被存储并可访问。
保存 Figma 文件的专业技巧
1. 使用键盘快捷键快速导出
不要手动在菜单中逐步查找,使用快捷键 Cmd + Shift + E(Mac)或 Ctrl + Shift + E(Windows)即可立即打开导出面板。这样可以节省时间,尤其是在导出多个画框或资源时。
2. 为不同设备导出多种分辨率
导出图像时,你可以通过添加导出设置来选择多种缩放比例(例如 1x、2x、3x)。这对于确保你的设计在 Retina 等高分辨率屏幕上看起来清晰锐利尤其有用。
3. 在进行重大更改前保存版本历史
由于 Figma 会自动保存所有更改,因此在进行重要编辑之前,手动创建一个版本检查点是一个好习惯。前往 File > Save to Version History 并添加描述。这样在需要时,你可以轻松恢复到之前的版本。
保存 Figma 文件时的常见陷阱及其避免方法
1. 忘记导出特定画框或图层
许多用户在导出前忘记选择特定的画框或图层,导致保存的文件为空或不正确。在点击导出按钮之前,一定要仔细检查是否已选中正确的画框或图层。你也可以使用右侧面板预览将要导出的内容。
2. 未保留备份就覆盖文件
由于 Figma 会自动保存更改,很容易无意中覆盖你的设计并丢失早期版本。通过前往 File > Save to Version History 定期使用版本历史。你可以为关键版本添加标签(例如“Final Design v1”),以确保你有可恢复的备份,在需要时可以回退。
关于如何保存 Figma 文件的常见问答
1. 如何将 Figma 文件保存到我的电脑?
Figma 会自动将你的作品保存到云端。不过,要将文件保存到电脑上,你可以通过选择 File > Save local copy 将其导出为 .fig 文件。这样你就可以保存并在以后导入 Figma。
2. 我可以将 Figma 文件保存为 PDF 或图片吗?
可以,你可以将 Figma 文件保存为 PDF 或图片。选择要导出的画框或设计,转到 File > Export,并选择你喜欢的格式(PDF、PNG、JPG 或 SVG)。
3. Figma 会自动保存我的作品吗?
是的,Figma 会实时将你的作品自动保存到云端。你无需手动保存进度,因为每次更改后都会自动完成。
4. 如何在 mac 上录屏?
要在 Mac 上录屏,你可以使用 Trupeer AI。它支持捕获整个屏幕,并提供诸如添加 AI 头像、添加配音、在视频中放大和缩小等 AI 功能。借助 trupeer 的 AI 视频翻译功能,你可以将视频翻译成 30 多种语言。
5. 如何向屏幕录制中添加 AI 头像?
要向屏幕录制中添加 AI 头像,你需要使用一款 AI 屏幕录制工具。Trupeer AI 是一款 AI 屏幕录制工具,它可以帮助你创建带有多个头像的视频,也能帮助你为视频创建自己的头像。
6. 如何在 windows 上录屏?
要在 Windows 上录屏,你可以使用内置的 Game Bar(Windows + G),或者使用像 Trupeer AI 这样的高级 AI 工具,以获得诸如 AI 头像、配音、翻译等更高级的功能。
7. 如何为视频添加配音?
要为视频添加配音,请下载 trupeer ai chrome 扩展程序。注册后,上传你带有声音的视频,选择 trupeer 提供的所需配音,然后导出编辑后的视频。
8. 如何在录屏中放大?
在屏幕录制过程中,要进行放大,请使用 Trupeer AI 中的缩放效果,它允许你在特定时刻放大和缩小,从而增强视频内容的视觉效果。

