
如何从 Figma 导出 SVG 文件
了解如何精准地从 Figma 导出 SVG 文件。按照这个简单指南下载矢量资源,用于网页、设计或开发项目。
详细步骤:
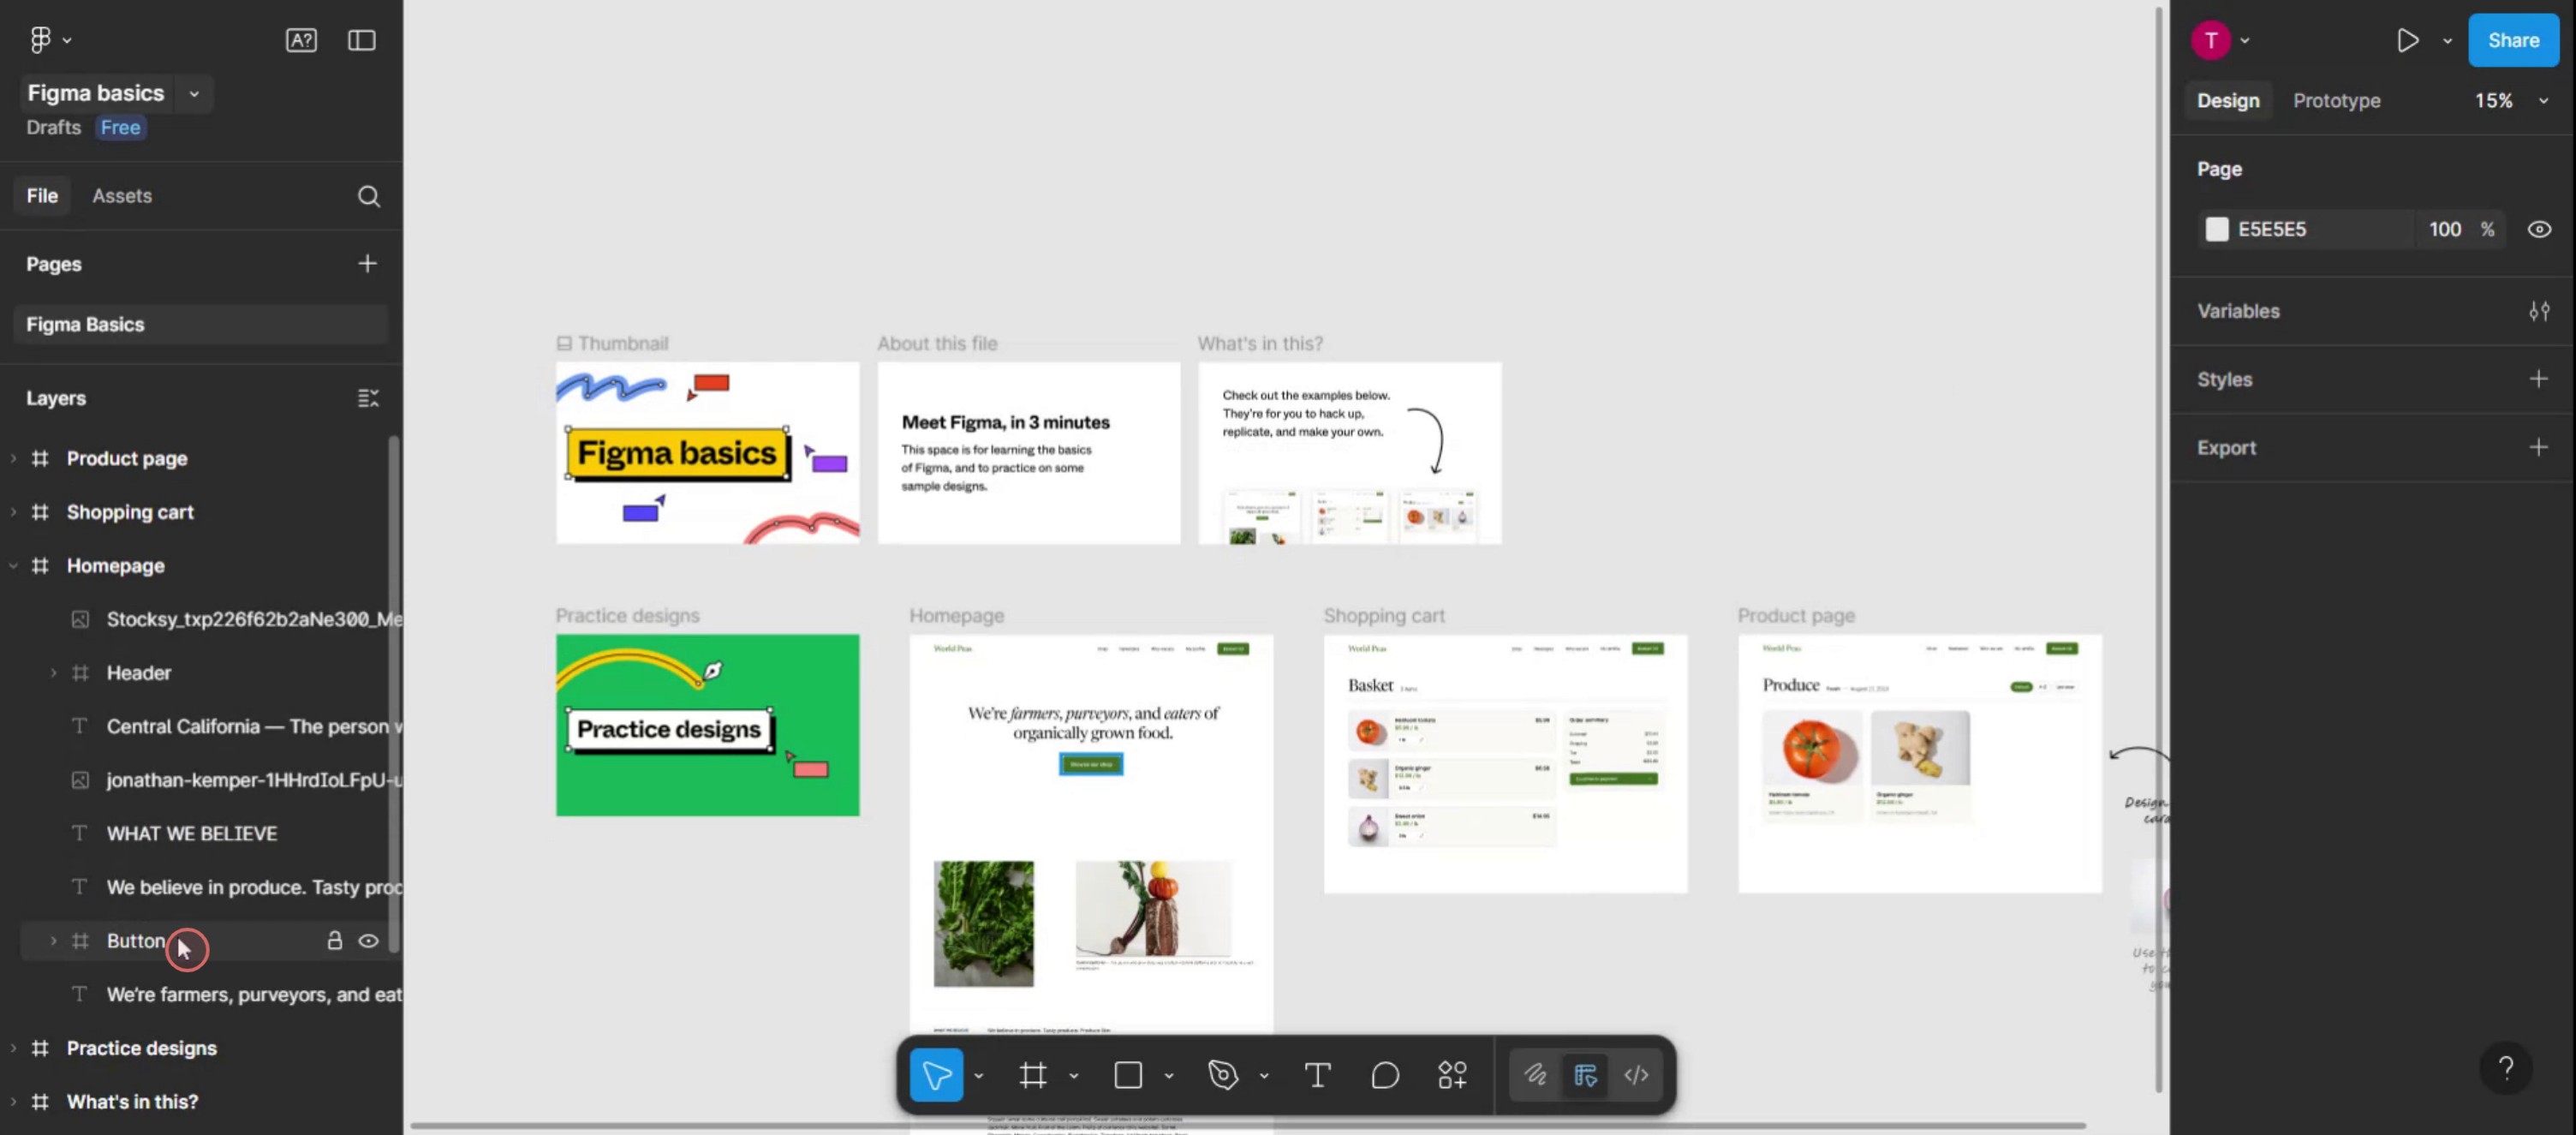
1. 选择元素:选择您想要导出为 SVG 的特定画框、组或单个对象。
2. 找到导出部分:在 Figma 界面右侧边栏中找到“导出”部分。
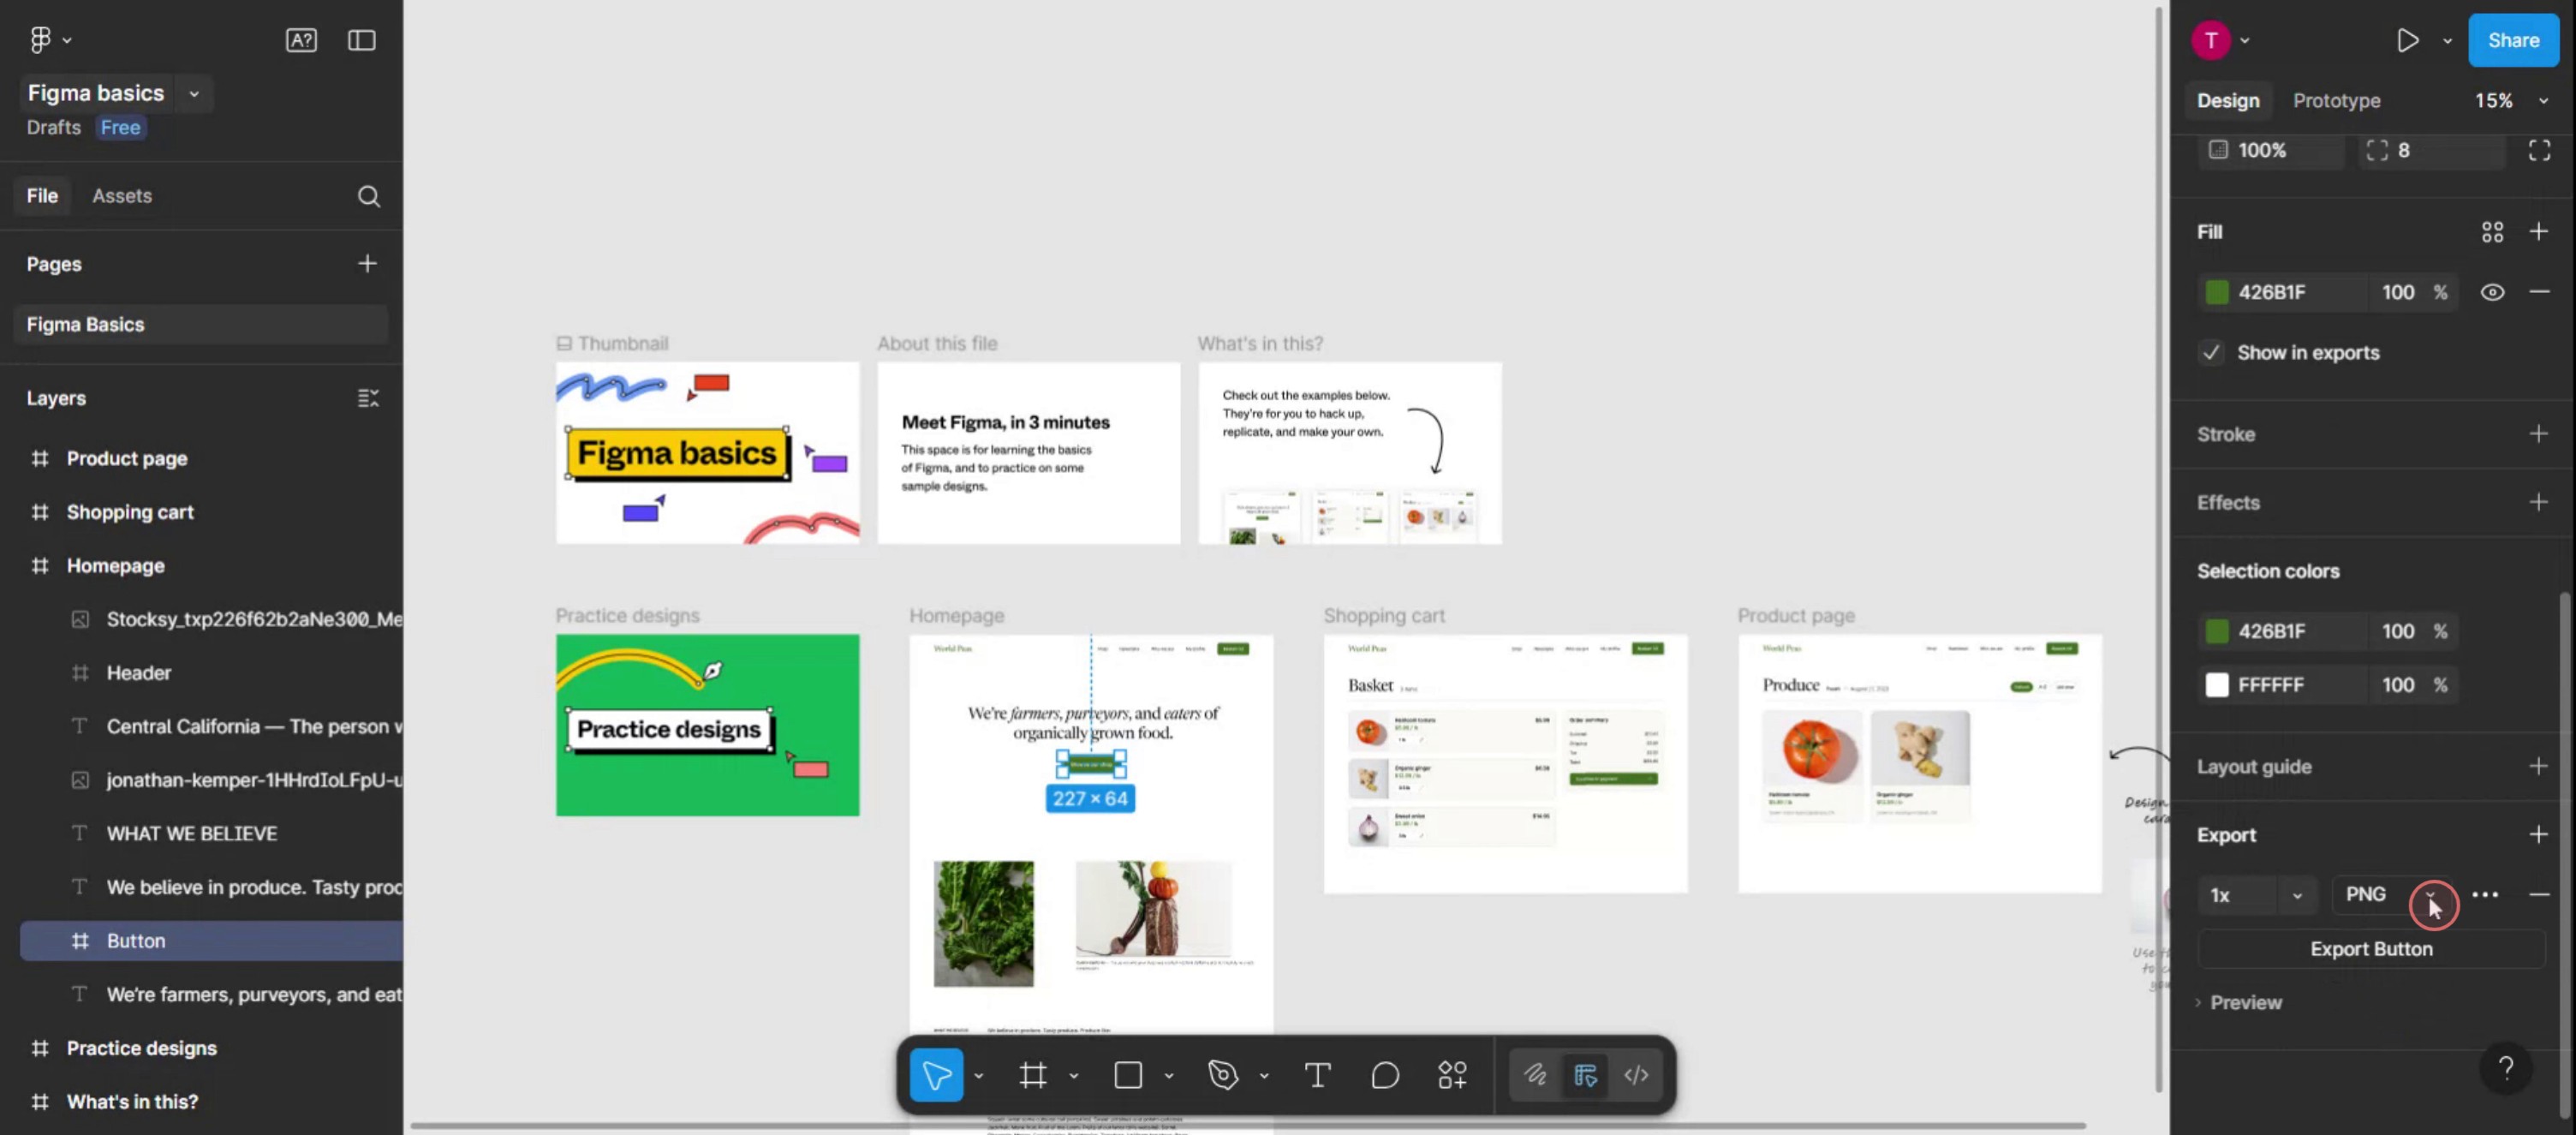
3. 选择格式:点击“导出”旁边的“+”按钮以添加导出设置。然后,从格式下拉菜单中选择“SVG”。
4. 导出文件:点击“导出”按钮,并选择在您的电脑上保存 SVG 文件的位置。
分步指南:如何从 Figma 导出 SVG 文件
第 1 步
选择您希望转换为 SVG 文件的特定图层。
第 2 步
点击加号图标继续。

第 3 步
点击此下拉菜单,
第 4 步
为您的文件选择 SVG 格式。

从 Figma 导出 SVG 文件的专业技巧
选择对象或画板
点击你想导出为 SVG 的具体对象、图标或画板。确保只选中了所需的元素。转到右侧边栏的导出部分
在右侧边栏中向下滚动,找到“导出”部分。如果它处于折叠状态,可能需要展开。点击“+”图标添加导出设置
点击导出标签旁边的“+”,为所选对象或画板启用导出选项。从格式下拉菜单中选择“SVG”
在导出格式下拉菜单中,从可用格式列表(PNG、JPG、PDF、SVG 等)里选择“SVG”。点击“导出”按钮
选择 SVG 后,点击“导出 [图层名称]”按钮。Figma 将生成并把 SVG 文件下载到你的电脑。
常见问题及避免方法
导出的 SVG 无法正常工作
如果 SVG 包含模糊或不受支持的字体等效果,可能无法正确渲染。导出前请简化设计。文件导出为 PNG 或其他格式
务必仔细确认在格式下拉菜单中已选择“SVG”。默认情况下,它可能显示为 PNG。导出中包含了不需要的元素
确保你只选择想要导出的内容。使用组或画板来隔离导出目标。导出的 SVG 质量下降
由于 SVG 基于矢量,质量问题较少,但请使用扁平化矢量,并避免在文件中使用复杂的栅格图像。SVG 文件大小过大
清理未使用的图层和路径。如有必要,将文本转换为轮廓,以减小文件大小。
关于从 Figma 导出 SVG 的常见问题
如何在 Figma 中导出 SVG 文件?
选择对象或框架,转到右侧边栏,添加导出设置,选择 SVG 作为格式,然后点击导出。我可以一次导出多个 SVG 吗?
可以,先选择多个框架或组件,并为每个对象应用导出设置,然后一次性全部导出。我的文本在 SVG 中仍然可以编辑吗?
默认情况下可以。如果你想确保兼容性,请在导出前将文本转换为轮廓。使用 SVG 相比 PNG 有什么好处?
SVG 文件可缩放、体积轻,并且在任何分辨率下都能保持质量。它们非常适合图标和 UI 资源。我可以在网站中使用导出的 SVG 吗?
可以,Figma 导出的 SVG 已可直接用于网页,可直接嵌入 HTML,或用作图像资源。如何在 mac 上录屏?
要 在 Mac 上录屏,你可以使用 Trupeer AI。它可以让你捕捉整个屏幕,并提供 AI 功能,例如添加 AI 虚拟形象、配音,以及在视频中放大和缩小。借助 trupeer 的 AI 视频翻译功能,你可以将视频翻译成 30+ 种语言。如何向录屏添加 AI 虚拟形象?
要向录屏添加 AI 虚拟形象,你需要使用一个 AI 录屏工具。 Trupeer AI 是一款 AI 录屏工具,可帮助你创建带有多个虚拟形象的视频,也帮助你为视频创建自己的虚拟形象。如何在 windows 上录屏?
要在 Windows 上录屏,你可以使用内置的 Game Bar(Windows + G),或者使用像 Trupeer AI 这样的高级 AI 工具,以获得 AI 虚拟形象、配音、翻译等更高级的功能。如何为视频添加配音?
要为视频添加配音,请下载 trupeer ai Chrome 扩展。注册后,上传带有声音的视频,从 trupeer 中选择所需的配音,然后导出你编辑后的视频。如何在录屏中放大?
在录屏过程中放大时,请使用 Trupeer AI 中的缩放效果,它允许你在特定时刻放大和缩小,从而增强视频内容的视觉冲击力。

