
كيفية مسح سجل ChatGPT
اكتشف كيف يمكنك مسح سجل محادثات ChatGPT بسهولة. دليل خطوة بخطوة لحذف الدردشات وإدارة بياناتك على كلٍ من سطح المكتب والجوال.
لحذف سجل ChatGPT الخاص بك، انتقل إلى إعدادات ChatGPT، وابحث عن قسم "Data Controls" أو "General"، ثم اختر خيار حذف جميع الدردشات أو مسح سجل محادثاتك. سيؤدي ذلك إلى إزالة سجل محادثاتك من واجهة ChatGPT .
إليك دليلًا خطوة بخطوة:
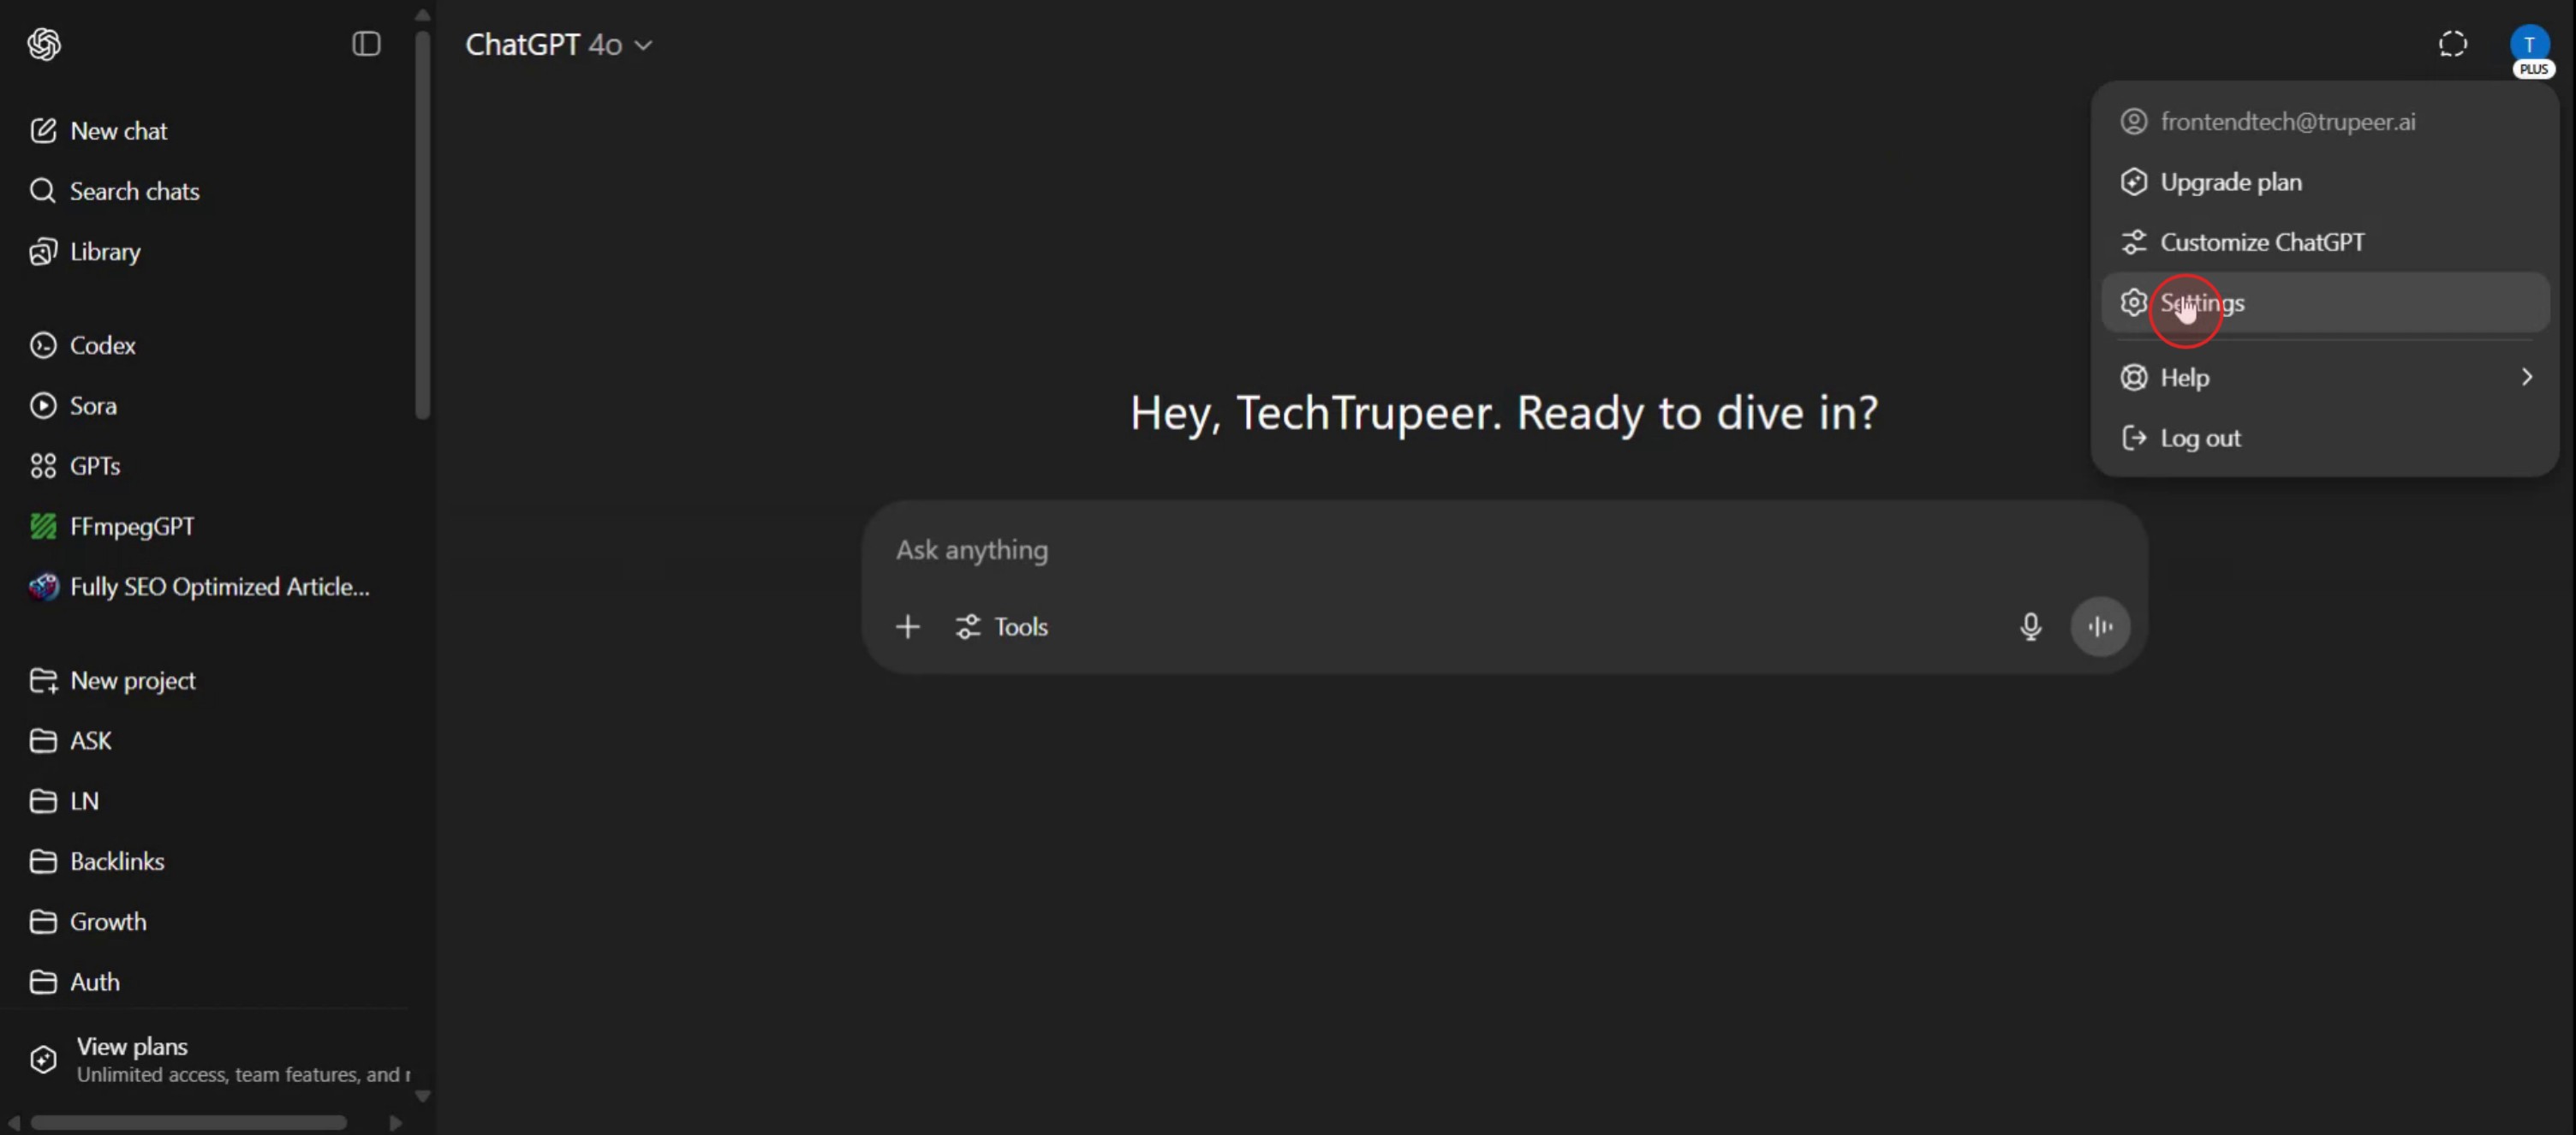
1. الوصول إلى إعدادات ChatGPT:
افتح موقع ChatGPT (chatgpt.com) أو تطبيق الهاتف المحمول. سجّل الدخول إلى حسابك. حدد موقع قائمة الإعدادات. في الموقع الإلكتروني، يتم الوصول إليها عادةً عبر أيقونة الملف الشخصي في أعلى اليمين (أو أسفل اليسار في ChatGPT 4). في تطبيق الهاتف المحمول، تكون عادةً أيقونة القائمة (غالبًا ثلاثة خطوط) في أعلى اليسار.
2. ابحث عن خيار الحذف:
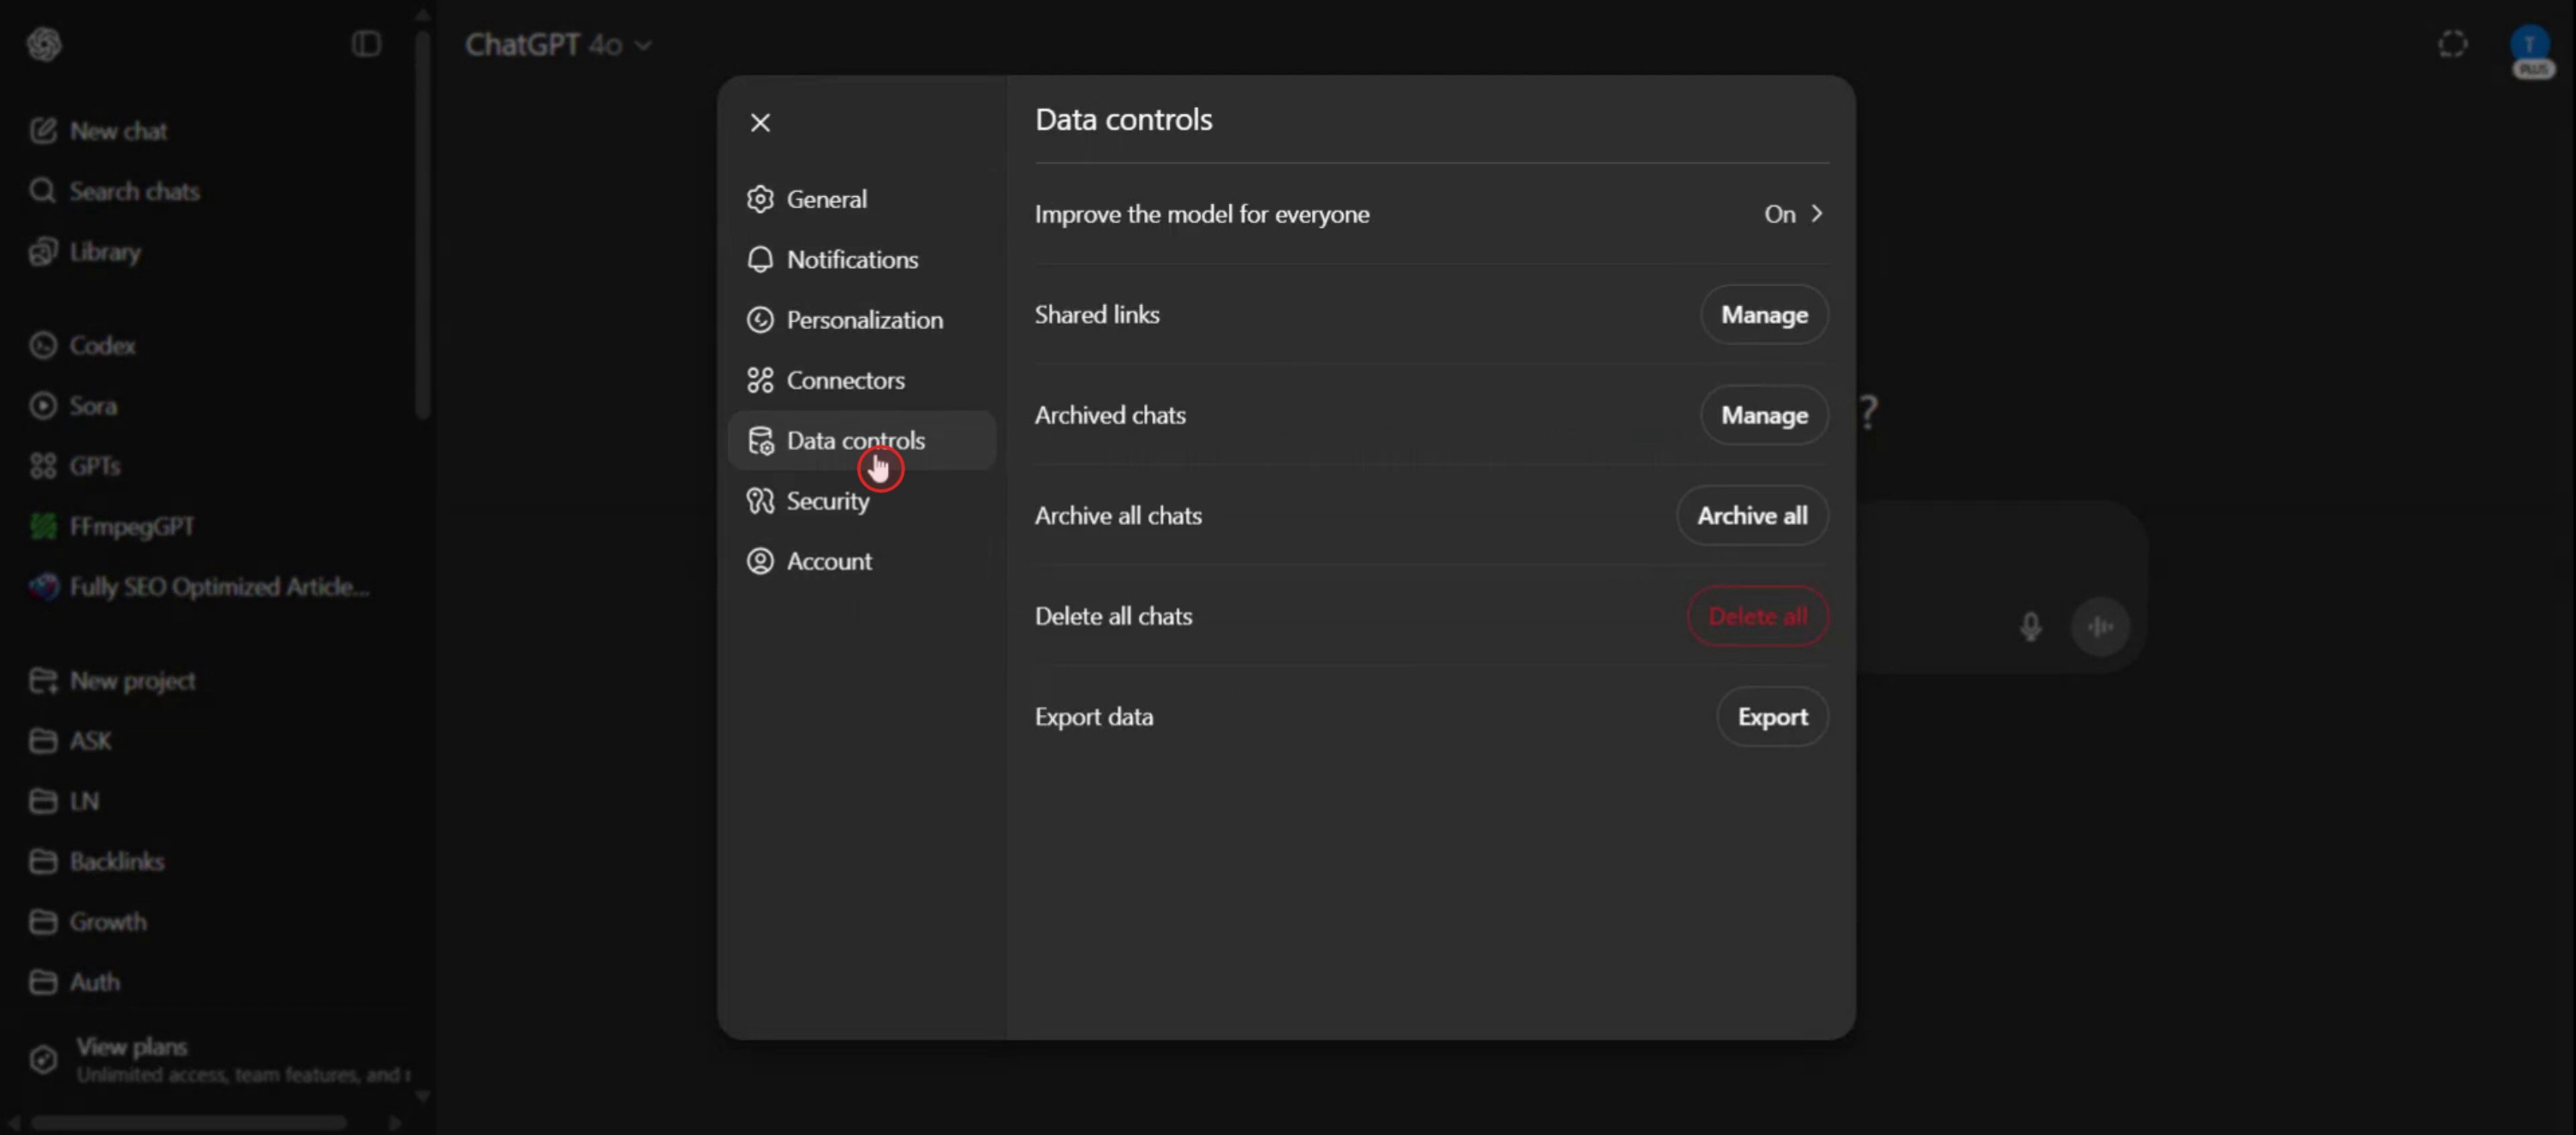
ضمن الإعدادات، ابحث عن قسم بعنوان "Data Controls" أو "General".ابحث عن خيار حذف جميع الدردشات أو مسح سجل الدردشة.
3. تأكيد الحذف:
من المحتمل أن يُطلب منك تأكيد اختيارك، لأن هذا الإجراء عادةً لا يمكن التراجع عنه.أكّد الحذف لمسح سجل ChatGPT الخاص بك.
دليل خطوة بخطوة: كيفية مسح سجل ChatGPT
الخطوة 1
للبدء، انتقل إلى خيار الملف الشخصي الخاص بك.

الخطوة 2
ثم اختر علامة التبويب الإعدادات،
الخطوة 3
انقر على خيار "Data Controls" لإظهار ميزة "Delete All Chats".
الخطوة 4
أخيرًا، اختر خيار "Delete" لمسح سجل ChatGPT بنجاح.

نصائح احترافية لمسح سجل ChatGPT
سجّل الدخول إلى ChatGPT
انتقل إلى chat.openai.com وسجّل الدخول إلى حسابك.افتح قائمة الشريط الجانبي
على الجانب الأيسر من الشاشة، ستجد شريطًا جانبيًا يحتوي على محادثاتك السابقة والخيارات المتاحة.انقر على النقاط الثلاث أو اسمك
في الزاوية السفلية اليسرى، انقر على قائمة النقاط الثلاث أو اسم ملفك الشخصي لفتح المزيد من الإعدادات.اختر «الإعدادات»
من القائمة المنبثقة، اختر خيار «الإعدادات» لفتح لوحة الإعدادات.انتقل إلى «عناصر التحكم بالبيانات»
داخل الإعدادات، انقر على تبويب «عناصر التحكم بالبيانات» للعثور على خيارات السجل والذاكرة.انقر على «مسح جميع المحادثات»
ضمن سجل المحادثات، انقر على «مسح جميع المحادثات» لحذف كل محادثاتك السابقة.أكّد الإجراء
ستظهر نافذة تأكيد. انقر على «تأكيد» أو «نعم» لإكمال العملية.
المشكلات الشائعة وكيفية تجنبها
ما زالت المحادثات تظهر بعد الحذف
حدّث الصفحة بعد مسح السجل للتأكد من إزالة جميع المحادثات من الشريط الجانبي.الحذف دون نسخ المعلومات المهمة احتياطيًا
بعد الحذف، لا يمكن استعادة المحادثات. انسخ واحفظ أي ردود مهمة قبل المسح.محاولة حذف محادثة واحدة في كل مرة
رغم أنه يمكنك حذف المحادثات الفردية عن طريق تمرير المؤشر والنقر على أيقونة سلة المهملات، فإن «مسح جميع المحادثات» يزيل كل شيء دفعة واحدة.الخلط بين السجل والذاكرة
مسح سجل المحادثات يحذف المحادثات. تعطيل الذاكرة يؤثر فقط على كيفية تذكّر ChatGPT لتفاصيل المستخدم لأغراض التخصيص.خيار السجل غير ظاهر
إذا كان الشريط الجانبي مخفيًا، فقم بتوسيعه باستخدام السهم الموجود على الحافة اليسرى من الشاشة لرؤية قائمة محادثاتك.
الأسئلة الشائعة حول مسح سجل محادثات ChatGPT
كيف أحذف كل سجل المحادثات الخاص بي في ChatGPT؟
افتح الإعدادات، وانتقل إلى عناصر التحكم في البيانات، ثم انقر على «مسح كل الدردشات».هل يمكنني حذف محادثات فردية فقط؟
نعم، مرّر مؤشر الفأرة فوق أي محادثة في الشريط الجانبي وانقر على أيقونة سلة المهملات لحذف تلك المحادثة فقط.هل يؤدي مسح السجل أيضًا إلى إعادة تعيين ذاكرة ChatGPT؟
لا، مسح السجل يحذف المحادثات المرئية فقط. يجب إدارة إعدادات الذاكرة بشكل منفصل.هل يمكنني استعادة المحادثات المحذوفة في ChatGPT؟
لا، بمجرد حذف المحادثة لا يمكن استعادتها. تأكد من حفظ المحتوى المهم أولًا.هل يؤدي مسح السجل إلى تحسين الأداء؟
لا يؤثر مسح السجل على الأداء، لكنه قد يساعد في ترتيب مساحة العمل وإزالة الفوضى منها.كيف أسجل الشاشة على الماك؟
لـ تسجيل الشاشة على جهاز Mac، يمكنك استخدام Trupeer AI. فهو يتيح لك التقاط الشاشة بالكامل ويوفّر إمكانات ذكاء اصطناعي مثل إضافة صور رمزية للذكاء الاصطناعي، وإضافة تعليق صوتي، وإضافة التكبير والتصغير في الفيديو. وبفضل ميزة ترجمة الفيديو بالذكاء الاصطناعي من Trupeer، يمكنك ترجمة الفيديو إلى أكثر من 30 لغة.كيف أضيف صورة رمزية للذكاء الاصطناعي إلى تسجيل الشاشة؟
لإضافة صورة رمزية للذكاء الاصطناعي إلى تسجيل شاشة، ستحتاج إلى استخدام أداة تسجيل شاشة بالذكاء الاصطناعي. Trupeer AI هي أداة تسجيل شاشة بالذكاء الاصطناعي، تساعدك على إنشاء مقاطع فيديو بعدة صور رمزية، كما تساعدك على إنشاء صورتك الرمزية الخاصة بالفيديو.كيف أسجل الشاشة على ويندوز؟
لتسجيل الشاشة على Windows، يمكنك استخدام شريط الألعاب المدمج (Windows + G) أو أداة ذكاء اصطناعي متقدمة مثل Trupeer AI للحصول على ميزات أكثر تقدمًا مثل الصور الرمزية للذكاء الاصطناعي، والتعليق الصوتي، والترجمة، إلخ.كيف أضيف تعليقًا صوتيًا إلى الفيديو؟
لإضافة تعليق صوتي إلى مقاطع الفيديو، حمّل إضافة كروم من trupeer ai. بعد التسجيل، ارفع الفيديو الخاص بك مع الصوت، واختر التعليق الصوتي المطلوب من Trupeer ثم صدّر الفيديو المعدّل.كيف أعمل تكبيرًا في تسجيل الشاشة؟
للتكبير أثناء تسجيل الشاشة، استخدم تأثيرات التكبير في Trupeer AI التي تتيح لك التكبير والتصغير في لحظات محددة، مما يعزز التأثير البصري لمحتوى الفيديو الخاص بك.
قراءات مقترحة
كيفية مشاركة مستودع GitHub عبر رابط
دروس ذات صلة

