Tutorials

كيفية تغيير الشفافية في كانفا

تعلم كيفية تغيير شفافية العناصر في Canva لإنشاء تأثيرات شفافة. دليل خطوة بخطوة لضبط الشفافية في النصوص والصور والأشكال.
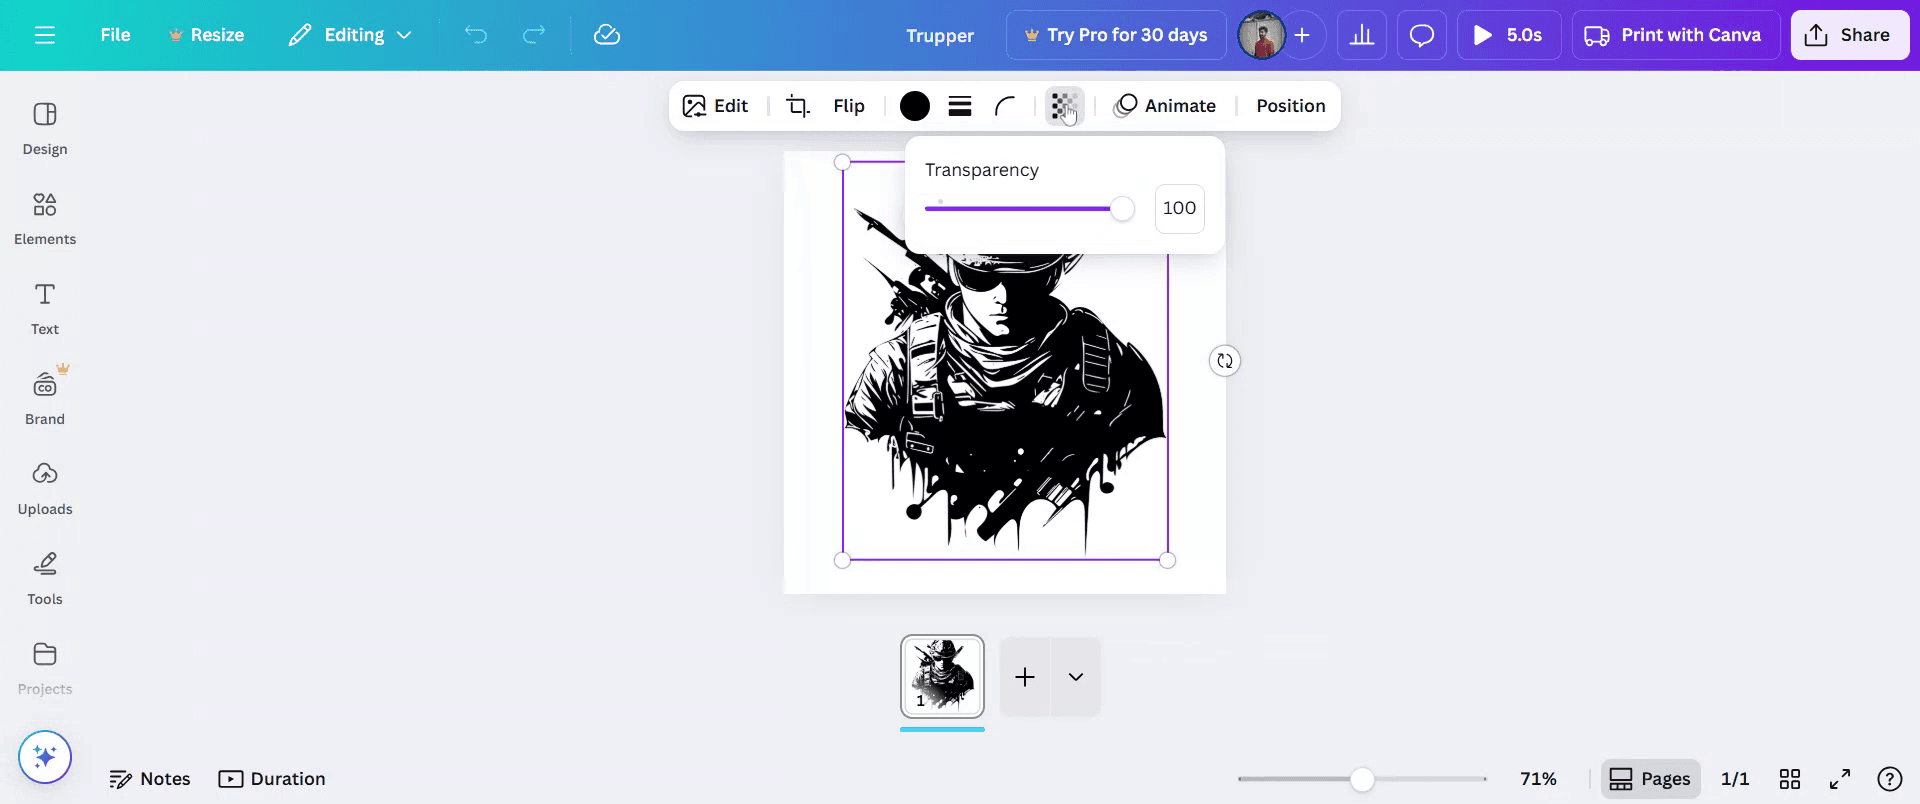
لتعديل الشفافية أو الشفافية لعُنصر في Canva، حدد العنصر، وابحث عن أيقونة الشفافية (مربعات الشطرنج أو المربع المتلاشي)، واستخدم شريط التمرير لضبط مستوى الشفافية. يمكنك أيضًا إدخال قيمة عددية معينة (0-100) في حقل الإدخال. 

خطوات مفصلة:

1. اختر العنصر: انقر على الصورة المحددة أو مربع النص أو الشكل أو أي عنصر آخر داخل تصميمك في Canva الذي تريد جعله شفافًا. 
2. الوصول إلى أداة الشفافية: ابحث عن أيقونة الشفافية، والتي تشبه مربعات الشطرنج أو المربع المتلاشي. عادةً ما توجد هذه الأيقونة في شريط الأدوات العلوي لمحرر Canva. 
3. ضبط شريط التمرير: بمجرد تحديده، سيظهر شريط تمرير. اسحب شريط التمرير إلى اليسار لتقليل الشفافية (مما يجعل العنصر أكثر شفافية) أو إلى اليمين لزيادة الشفافية (مما يجعل العنصر أقل شفافية). يمكنك أيضًا كتابة نسبة مئوية معينة (0-100) في حقل الإدخال بجوار شريط التمرير. 
4. معاينة التغييرات: حيث ستظهر تحديثات شفافية العنصر في الوقت الحقيقي على لوح التصميم الخاص بك أثناء ضبط شريط التمرير. 
5. إنهاء التصميم الخاص بك: انقر في أي مكان خارج العنصر المحدد أو الكائن لإلغاء تحديده وإنهاء تعديل الشفافية. 

دليل خطوة بخطوة: كيفية تغيير الشفافية في Canva

الخطوة 1

ابدأ باختيار مشروع موجود داخل Canva ترغب في تحريره.

Begin by selecting an existing project within Canva that you want to edit.

الخطوة 2

بعد ذلك، انقر على العنصر المحدد داخل المشروع الذي ترغب في تغييره.

الخطوة 3

انقر على خيار 'الشفافية' واضبط مستوى الشفافية وفقًا لرغبتك.

الخطوة 4

بمجرد أن تشعر بالرضا عن التغييرات، انقر على 'مشاركة' لتوزيع مشروعك.

نصائح احترافية لتغيير الشفافية في Canva

  1. افتح تصميمك في Canva
    قم بتسجيل الدخول إلى Canva وافتح التصميم الذي ترغب في تعديل شفافية عنصر فيه.

  2. حدد العنصر الذي تريد تعديله
    انقر على الصورة أو مربع النص أو الشكل أو الرسوم البيانية التي ترغب في تغيير شفافيتها.

  3. انقر على أيقونة الشفافية
    ابحث في الزاوية العلوية اليمنى من شريط الأدوات وانقر على الأيقونة المتقطعة التي تمثل الشفافية.

  4. ضبط شريط الشفافية
    استخدم شريط التمرير لتغيير مستوى الشفافية. انزلق إلى اليسار لتقليل الشفافية وإلى اليمين لزيادتها حتى 100 بالمئة.

  5. معاينة وتنقيح
    قم بمراجعة تصميمك لترى كيف تبدو الشفافية المعدلة. قم بإجراء تغييرات إضافية إذا لزم الأمر لتحقيق التوازن والوضوح.

الأخطاء الشائعة وكيفية تجنبها

  1. رمز الشفافية غير مرئي
    تأكد من أنك قد حددت عنصرًا. تظهر أيقونة الشفافية فقط عندما يكون كائن قابل للتحرير نشطًا.

  2. عدم تطبيق الشفافية على الخلفية
    لتغيير شفافية الخلفية، أضف شكلاً أو طبقة فوق الخلفية واضبط شفافيتها بدلاً من ذلك.

  3. نسيان ضبط النص بشكل منفصل
    إذا كنت تعدل عناصر مجمعة، تذكر أن النص والأشكال قد يحتاجان إلى التعديل واحدًا تلو الآخر.

  4. خفض الشفافية يجعل العناصر صعبة الرؤية
    تجنب ضبط الشفافية منخفضة جدًا، خاصةً للعناصر الرئيسية مثل النصوص أو الشعارات، للحفاظ على مقروئية الوثائق.

  5. الشفافية لا تنتقل في التنزيلات
    قد تبدو تأثيرات الشفافية مختلفة في تنسيقات PDF أو JPG. استخدم PNG للحصول على نتائج أفضل عند تنزيل التصاميم ذات الشفافية.

الأسئلة المتكررة حول تغيير الشفافية في Canva

  1. كيف يمكنني ضبط الشفافية لعنصر في Canva
    حدد العنصر، انقر على أيقونة الشفافية في شريط الأدوات، وحرك شريط التمرير إلى المستوى الذي تريده.

  2. هل يمكنني تغيير الشفافية لعدة عناصر دفعة واحدة
    نعم، يمكنك اختيار عناصر متعددة وضبط الشفافية معًا.

  3. هل تعمل الشفافية على النصوص والصور
    نعم، يمكنك تغيير شفافيات النصوص والصور والأشكال وغيرها من عناصر التصميم.

  4. هل يمكنني تعيين نسبة شفافية مخصصة
    نعم، يمكنك استخدام شريط التمرير أو إدخال رقم يدويًا من 0 إلى 100 للتحكم الدقيق.

  5. هل الشفافية متاحة في النسخة المجانية من Canva
    نعم، تتوفر أدوات الشفافية لكل من المستخدمين المجانيين والمستخدمين المحترفين.

  6. كيف يمكنني تسجيل الشاشة على ماك؟ 
    لتتسجيل الشاشة على ماك، يمكنك استخدام Trupeer AI. يسمح لك بالتقاط الشاشة بالكامل ويوفر ميزات الذكاء الاصطناعي مثل إضافة شخصيات ذكاء اصطناعي، إضافة صوت، إضافة تقريب وتبعيد في الفيديو. مع ميزة ترجمة الفيديو من Trupeer AI، يمكنك ترجمة الفيديو إلى أكثر من 30 لغة. 

  7. كيف يمكنني إضافة شخصية ذكاء اصطناعي إلى تسجيل الشاشة؟
    لإضافة شخصية ذكاء اصطناعي إلى تسجيل الشاشة، ستحتاج إلى استخدامأداة تسجيل الشاشة بالذكاء الاصطناعي. يعتبر Trupeer AI أداة تسجيل الشاشة بالذكاء الاصطناعي، والتي تساعدك في إنشاء مقاطع فيديو باستخدام شخصيات متعددة، بالإضافة إلى مساعدتك في إنشاء شخصيتك الخاصة للفيديو.

  8. كيف يمكنني تسجيل الشاشة على ويندوز؟
    لتسجيل الشاشة على ويندوز، يمكنك استخدام شريط الألعاب المدمج (Windows + G) أو أداة ذكاء اصطناعي متقدمة مثل Trupeer AI للحصول على ميزات متقدمة مثل شخصيات الذكاء الاصطناعي، التعليق الصوتي، والترجمة، إلخ.

  9. كيف أضيف تعليق صوتي إلى فيديو؟
    لـإضافة تعليق صوتي إلى الفيديوهات، قم بتنزيل ملحق Trupeer AI لمتصفح كروم. بمجرد التسجيل، قم بتحميل الفيديو مع الصوت، اختر التعليق الصوتي المطلوب من Trupeer، وصدر الفيديو الخاص بك بعد التعديل. 

  10. كيف يمكنني التكبير في تسجيل الشاشة؟
    لتكبير الصورة أثناء تسجيل الشاشة، استخدم تأثيرات التكبير في Trupeer AI والتي تتيح لك التكبير والتصغير في لحظات محددة، مما يعزز التأثير البصري لمحتوى الفيديو الخاص بك.

Start creating videos with our AI Video + Doc generator

Start creating videos with our AI Video + Doc generator

Start creating videos with our AI Video + Doc generator

To adjust the opacity or transparency of an element in Canva, select the element, locate the transparency icon (checkerboard or faded square), and use the slider to adjust the transparency level. You can also enter a specific numerical value (0-100) in the input field. 

Detailed Steps:

1. Select the Element: Click on the specific image, text box, shape, or other element within your Canva design that you want to make transparent. 
2. Access the Transparency Tool: Locate the transparency icon, which looks like a checkerboard or a faded square. This icon is usually found in the top toolbar of the Canva editor. 
3. Adjust the Slider: Once selected, a slider will appear. Drag the slider to the left to decrease the opacity (making the element more transparent) or to the right to increase the opacity (making the element less transparent). You can also type a specific percentage (0-100) into the input field next to the slider. 
4. Preview the Changes: As you adjust the slider, you'll see the element's transparency update in real-time on your design canvas. 
5. Finalize Your Design: Click anywhere outside the selected element or object to deselect it and finalize the opacity adjustment. 

Step-by-Step-Guide: How to Change Opacity in Canva

Step 1

Begin by selecting an existing project within Canva that you want to edit.

Begin by selecting an existing project within Canva that you want to edit.

Step 2

Next, click on the specific element within the project that you wish to alter.

Step 3

Click on the 'Transparency' option and adjust the transparency level to your liking.

Step 4

Once you are satisfied with the changes, click 'Share' to distribute your project.

Start creating videos with our AI Video + Doc generator for free

Start creating videos with our AI Video + Doc generator for free

Start creating videos with our AI Video + Doc generator for free

Pro Tips for Changing Opacity in Canva

  1. Open Your Design in Canva
    Log in to Canva and open the design where you want to adjust the opacity of an element.

  2. Select the Element You Want to Edit
    Click on the image, text box, shape, or graphic whose transparency you want to change.

  3. Click on the Opacity Icon
    Look at the top-right of the toolbar and click on the checkered icon that represents transparency.

  4. Adjust the Opacity Slider
    Use the slider to change the opacity level. Slide left to decrease opacity and right to increase it up to 100 percent.

  5. Preview and Fine-Tune
    Review your design to see how the adjusted opacity looks. Make further changes if needed for balance and clarity.

Common Pitfalls and How to Avoid Them

  1. Opacity Icon Not Visible
    Make sure you have an element selected. The transparency icon only appears when an editable object is active.

  2. Opacity Not Applying to Background
    To change background opacity, add a shape or layer over the background and adjust its transparency instead.

  3. Forgetting to Adjust Text Separately
    If you’re editing grouped items, remember that text and shapes may need to be adjusted one by one.

  4. Low Opacity Making Elements Hard to See
    Avoid setting opacity too low, especially for key elements like text or logos, to maintain readability.

  5. Opacity Doesn’t Carry Over in Downloads
    Transparency effects may look different in PDF or JPG formats. Use PNG for better results when downloading designs with opacity.

Common FAQs About Changing Opacity in Canva

  1. How do I adjust the opacity of an element in Canva
    Select the element, click the transparency icon in the toolbar, and move the slider to your desired level.

  2. Can I change opacity for multiple items at once
    Yes, you can select multiple elements and adjust the transparency together.

  3. Does opacity work on text and images
    Yes, you can change the opacity of text, images, shapes, and other design elements.

  4. Can I set a custom opacity percentage
    Yes, you can use the slider or manually input a number from 0 to 100 for precise control.

  5. Is opacity available in the free version of Canva
    Yes, opacity controls are available for both free and Pro users.

  6. How to screen record on mac? 
    To screen record on a Mac, you can use Trupeer AI. It allows you to capture the entire screen and provides AI capabilities such as adding AI avatars, add voiceover, add zoom in and out in the video. With trupeer’s AI video translation feature, you can translate the video into 30+ languages. 

  7. How to add an AI avatar to screen recording?
    To add an AI avatar to a screen recording, you'll need to use an AI screen recording tool. Trupeer AI is an AI screen recording tool, which helps you create videos with multiple avatars, also helps you in creating your own avatar for the video.

  8. How to screen record on windows?
    To screen record on Windows, you can use the built-in Game Bar (Windows + G) or advanced AI tool like Trupeer AI for more advanced features such as AI avatars, voiceover, translation etc.

  9. How to add voiceover to video?
    To add voiceover to videos, download trupeer ai chrome extension. Once signed up, upload your video with voice, choose the desired voiceover from trupeer and export your edited video. 

  10. How do I Zoom in on a screen recording?
    To zoom in during a screen recording, use the zoom effects in Trupeer AI which allows you to zoom in and out at specific moments, enhancing the visual impact of your video content.

People also ask

How to Create a Journal in Canva

How to Print Double Sided on Canva

How to Stretch Text in Canva

How to Download Multiple Files at Once from Canva

How To Fade Edges Of Photo In Canva

Start creating videos with our AI Video + Doc generator

Start creating videos with our AI Video + Doc generator

Start creating videos with our AI Video + Doc generator

Start creating videos with our AI Video + Doc generator

Instant AI Product Videos & Docs from Rough Screen Recordings

Experience the new & faster way of creating product videos.

Instant AI Product Videos and Docs from Rough Screen Recordings.

Experience the new & faster way of creating product videos.

Instant AI Product Videos and Docs from Rough Screen Recordings.

Experience the new & faster way of creating product videos.

Instant AI Product Videos and Docs from Rough Screen Recordings.