
كيفية إضافة هوامش القص في Canva للتصاميم الجاهزة للطباعة
تعرّف على كيفية إضافة الهوامش الخارجية في Canva لضمان طباعة تصاميمك بدون حواف بيضاء. مثالي لبطاقات الأعمال، والمنشورات، والكتيبات.
توضح هذه الوثيقة عملية بسيطة لإضافة النزف إلى مشاريع التصميم الخاصة بك في Canva. وهذا يضمن أن تكون تصاميمك جاهزة للطباعة، ويمنع أي حواف بيضاء غير مرغوب فيها بعد الطباعة.
تضمن إضافة النزف أن تخرج تصاميم الطباعة بألوان نظيفة تمتد من الحافة إلى الحافة دون حدود بيضاء غير مقصودة.
دليل خطوة بخطوة:
1. تفعيل نزف الطباعة
افتح تصميمك في Canva.
انتقل إلى القائمة العلوية، ثم انقر على ملف > إظهار نزف الطباعة.
ستظهر خط متقطع بالقرب من الحواف، وهذا يحدد أين يبدأ النزف.
2. تمديد عناصر التصميم
يجب أن تمتد الخلفيات والصور والألوان إلى ما بعد الخط المتقطع حتى حافة اللوحة.
أبقِ النص والرسومات الأساسية داخل المنطقة الآمنة (داخل الخط المتقطع) لتجنب مشاكل القص.
3. تنزيل الملف الجاهز للطباعة
انقر على مشاركة > تنزيل.
اضبط نوع الملف على PDF للطباعة.
حدد خيار "علامات القص والنزف".
انقر على تنزيل.
دليل خطوة بخطوة: كيفية إضافة النزف في Canva للطباعة
الخطوة 1
حدّد المشروع الحالي الذي ترغب في تعديله.

الخطوة 2
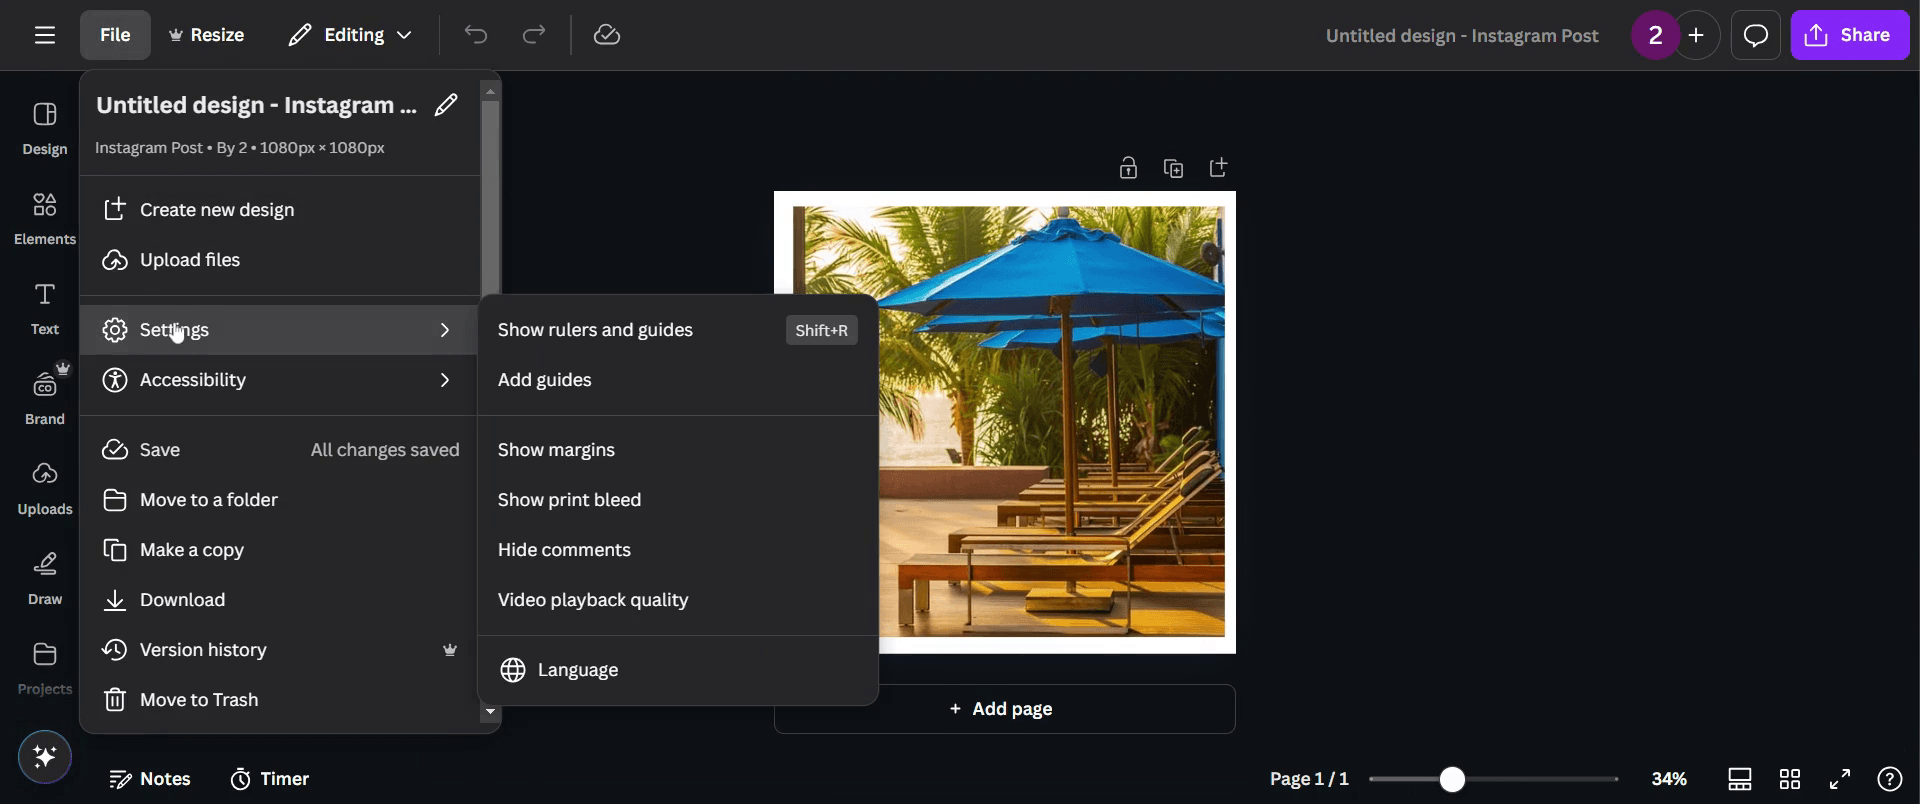
بعد ذلك، انتقل إلى خيار 'ملف' وانقر عليه.

الخطوة 3
ثم اختر 'الإعدادات'.
الخطوة 4
انقر على 'إظهار نزف الطباعة'.

الخطوة 5
عدّل صورتك لتغطية أي فراغات بيضاء حول الحواف.

الخطوة 6
بعد التعديل، تابع بالنقر على زر 'مشاركة'.

الخطوة 7
ثم انقر على 'تنزيل'.

الخطوة 8
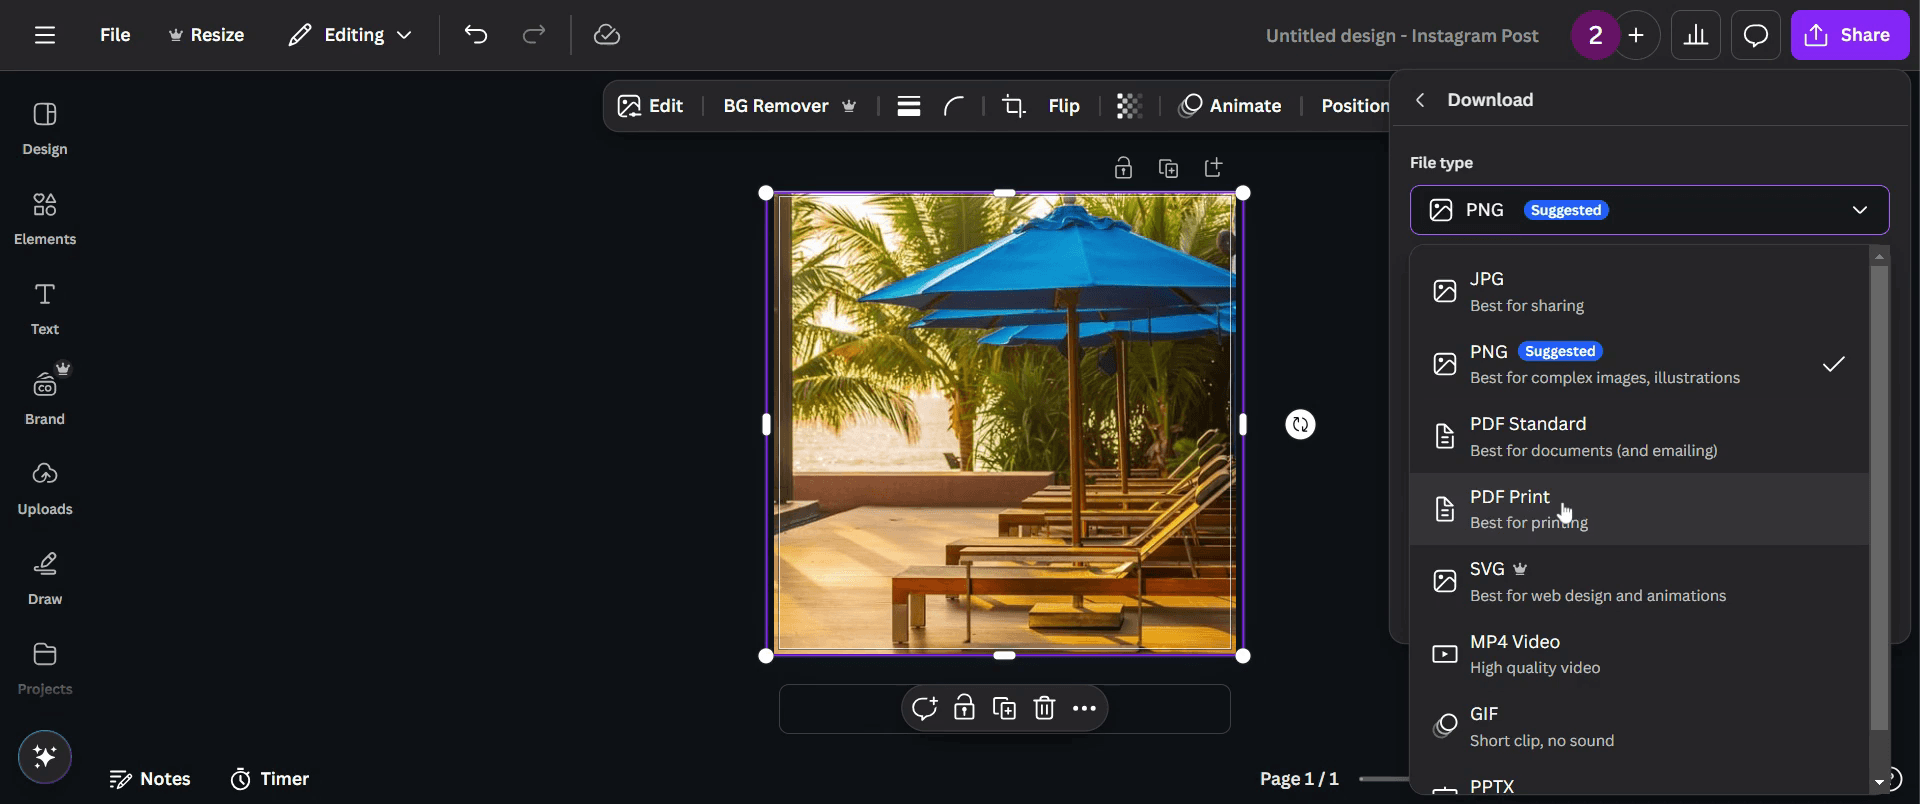
الآن، غيّر نوع الملف إلى 'PDF للطباعة'.
الخطوة 9
تأكد من النقر على 'علامات القص والنزف'.

الخطوة 10
أخيرًا، اضغط على 'تنزيل'، ليصبح تصميمك جاهزًا.

نصائح احترافية لإضافة النزف في Canva
فعّل إعداد النزف في قائمة ملف في Canva لضمان ألا تُقتطع عناصر التصميم المهمة أثناء الطباعة
مدّد صور الخلفية والألوان إلى ما بعد خطوط النزف لتجنب ظهور حواف بيضاء بعد القص
نزّل التصميم دائمًا بصيغة PDF مع علامات القص وخطوط النزف للحصول على نتائج طباعة احترافية
المشكلات الشائعة وكيفية تجنبها عند إضافة النزف في Canva
قد يؤدي نسيان تفعيل إعدادات النزف إلى ظهور حدود بيضاء غير مرغوبة، لذا تحقّق دائمًا من إعدادات النزف قبل إنهاء التصميم
قد يؤدي وضع النص أو العناصر المهمة قريبًا جدًا من منطقة النزف إلى قصّها، لذا أبقِها داخل هامش الأمان جيدًا
قد يؤثر عدم استخدام صيغة التصدير الصحيحة في جودة الطباعة، لذا نزّل دائمًا بصيغة PDF Print مع علامات القص وخطوط النزف
الأسئلة الشائعة حول إضافة النزيف في كانفا
1. لماذا يُعد النزيف مهمًا في تصاميم كانفا؟
يضمن النزيف امتداد تصميمك إلى ما بعد خط القص، مما يمنع ظهور حواف بيضاء غير مرغوبة عند الطباعة
2. هل يمكنني تعديل حجم النزيف في كانفا؟
تضبط كانفا تلقائيًا هامش نزيف قياسيًا، ولا يمكن تعديله يدويًا داخل المنصة
3. كيف أصدّر تصميم كانفا مع نزيف للطباعة?
انقر على التنزيل، واختر صيغة PDF للطباعة، ثم فعّل خيار علامات القص والنزيف قبل الحفظ
4. هل ستكون منطقة النزيف مرئية عند طباعة تصميمي؟
لا، سيتم قص منطقة النزيف، ولن تبقى سوى النسخة النهائية من التصميم دون حدود غير مرغوب فيها
5. كيف أسجل الشاشة على الماك؟
لتسجيل الشاشة على جهاز Mac، يمكنك استخدام Trupeer AI. فهو يتيح لك التقاط الشاشة بالكامل ويوفر إمكانات ذكاء اصطناعي مثل إضافة صور رمزية بالذكاء الاصطناعي، وإضافة تعليق صوتي، وإضافة التكبير والتصغير في الفيديو. ومع ميزة ترجمة الفيديو بالذكاء الاصطناعي من trupeer، يمكنك ترجمة الفيديو إلى أكثر من 30 لغة.
6. كيف أضيف صورة رمزية بالذكاء الاصطناعي إلى تسجيل الشاشة?
لإضافة صورة رمزية بالذكاء الاصطناعي إلى تسجيل الشاشة، ستحتاج إلى استخدام أداة تسجيل شاشة بالذكاء الاصطناعي. Trupeer AI هي أداة تسجيل شاشة بالذكاء الاصطناعي، تساعدك على إنشاء مقاطع فيديو بعدة صور رمزية، كما تساعدك في إنشاء صورتك الرمزية الخاصة بالفيديو.
7. كيف أسجل الشاشة على ويندوز?
لتسجيل الشاشة على Windows، يمكنك استخدام شريط الألعاب المدمج (Windows + G) أو أداة ذكاء اصطناعي متقدمة مثل Trupeer AI للحصول على ميزات أكثر تقدمًا مثل الصور الرمزية بالذكاء الاصطناعي، والتعليق الصوتي، والترجمة، إلخ.
8. كيف أضيف تعليقًا صوتيًا إلى الفيديو?
لإضافة تعليق صوتي إلى الفيديوهات، نزّل إضافة كروم trupeer ai. بعد التسجيل، ارفع الفيديو الخاص بك مع الصوت، واختر التعليق الصوتي المطلوب من trupeer ثم صدّر الفيديو المعدّل.
9. كيف أُكبّر في تسجيل الشاشة?
للتكبير أثناء تسجيل الشاشة، استخدم تأثيرات التكبير في Trupeer AI التي تتيح لك التكبير والتصغير في لحظات محددة، مما يعزز التأثير البصري لمحتوى الفيديو الخاص بك.
يسأل الناس أيضًا
كيفية تحويل صورة إلى صفحة تلوين في Canva
كيفية الطباعة على الوجهين في Canva
دروس ذات صلة

