

Hoe maak je een tijdlijn in Notion
Leer hoe je een tijdlijn maakt in Notion om projecten, deadlines en taken visueel te volgen. Een eenvoudige handleiding met de ingebouwde tijdlijnweergave en databasefuncties.
Stapsgewijze handleiding: hoe je een tijdlijn maakt in Notion
Stap 1
Begin door een nieuwe pagina in Notion te openen. Zoek op de pagina naar de optie met de drie puntjes.

Stap 2
Selecteer uit de beschikbare opties de tijdlijnoptie.

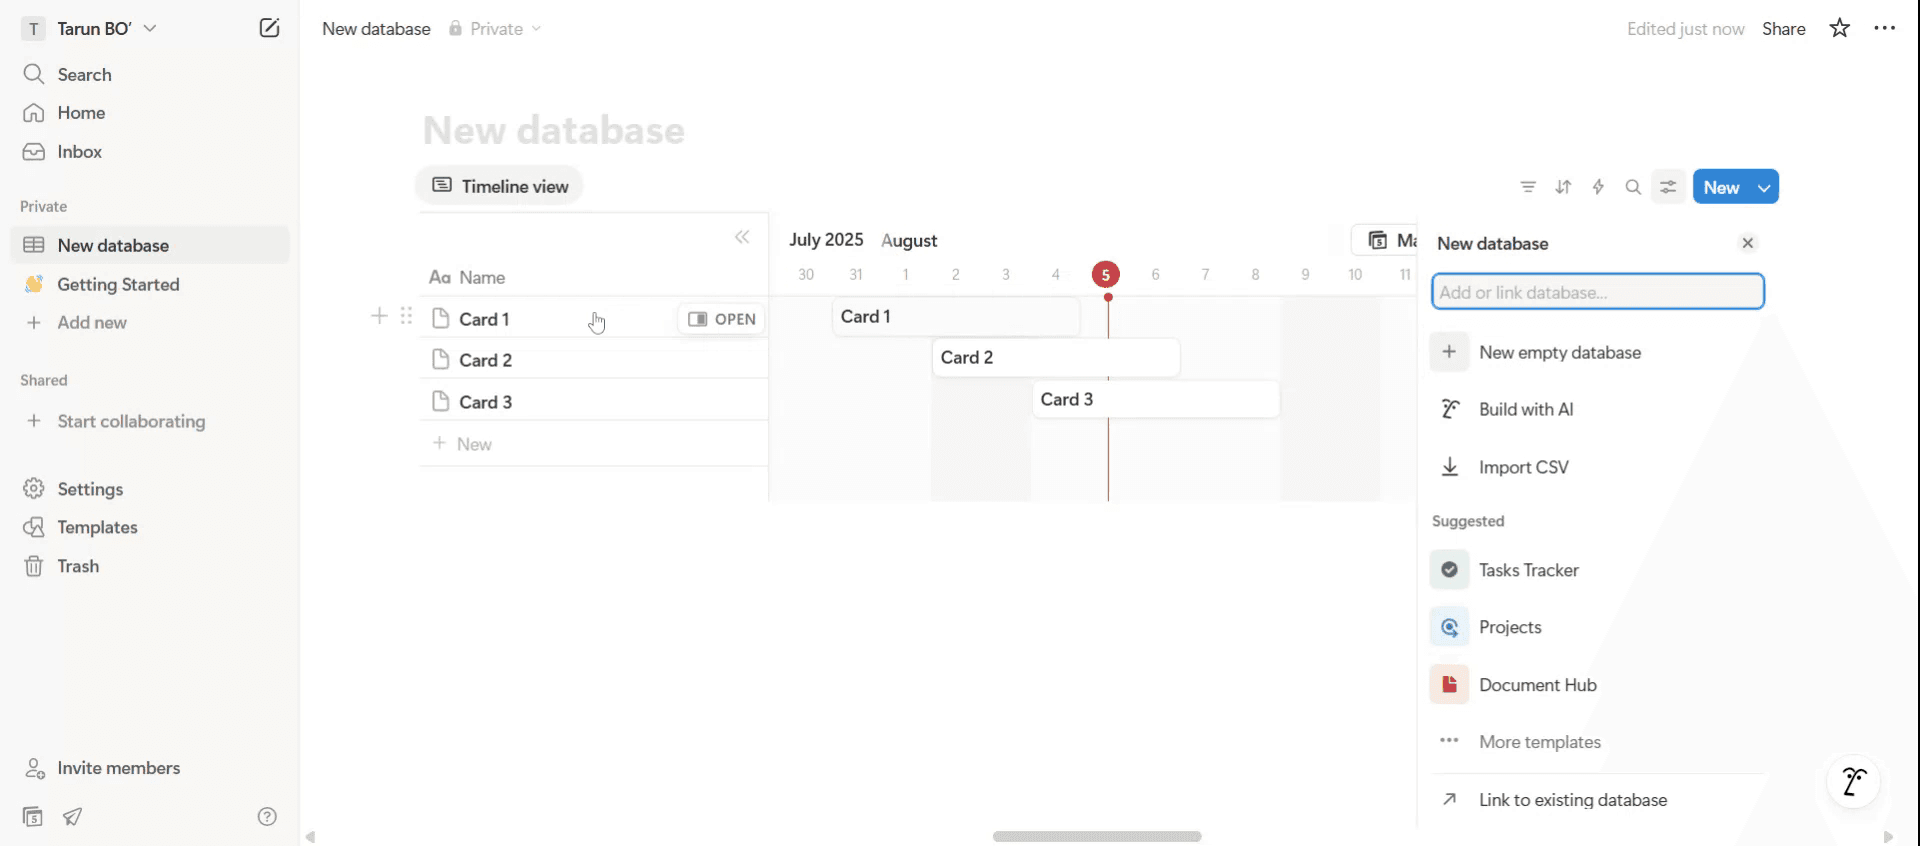
Stap 3
Er verschijnt een tijdlijn. Voeg een nieuwe database toe door op de lege databaseoptie te klikken of bewerk bestaande databases indien nodig.
Stap 4
Je kunt de database hernoemen. Hernoem deze op basis van je vereisten op passende wijze.

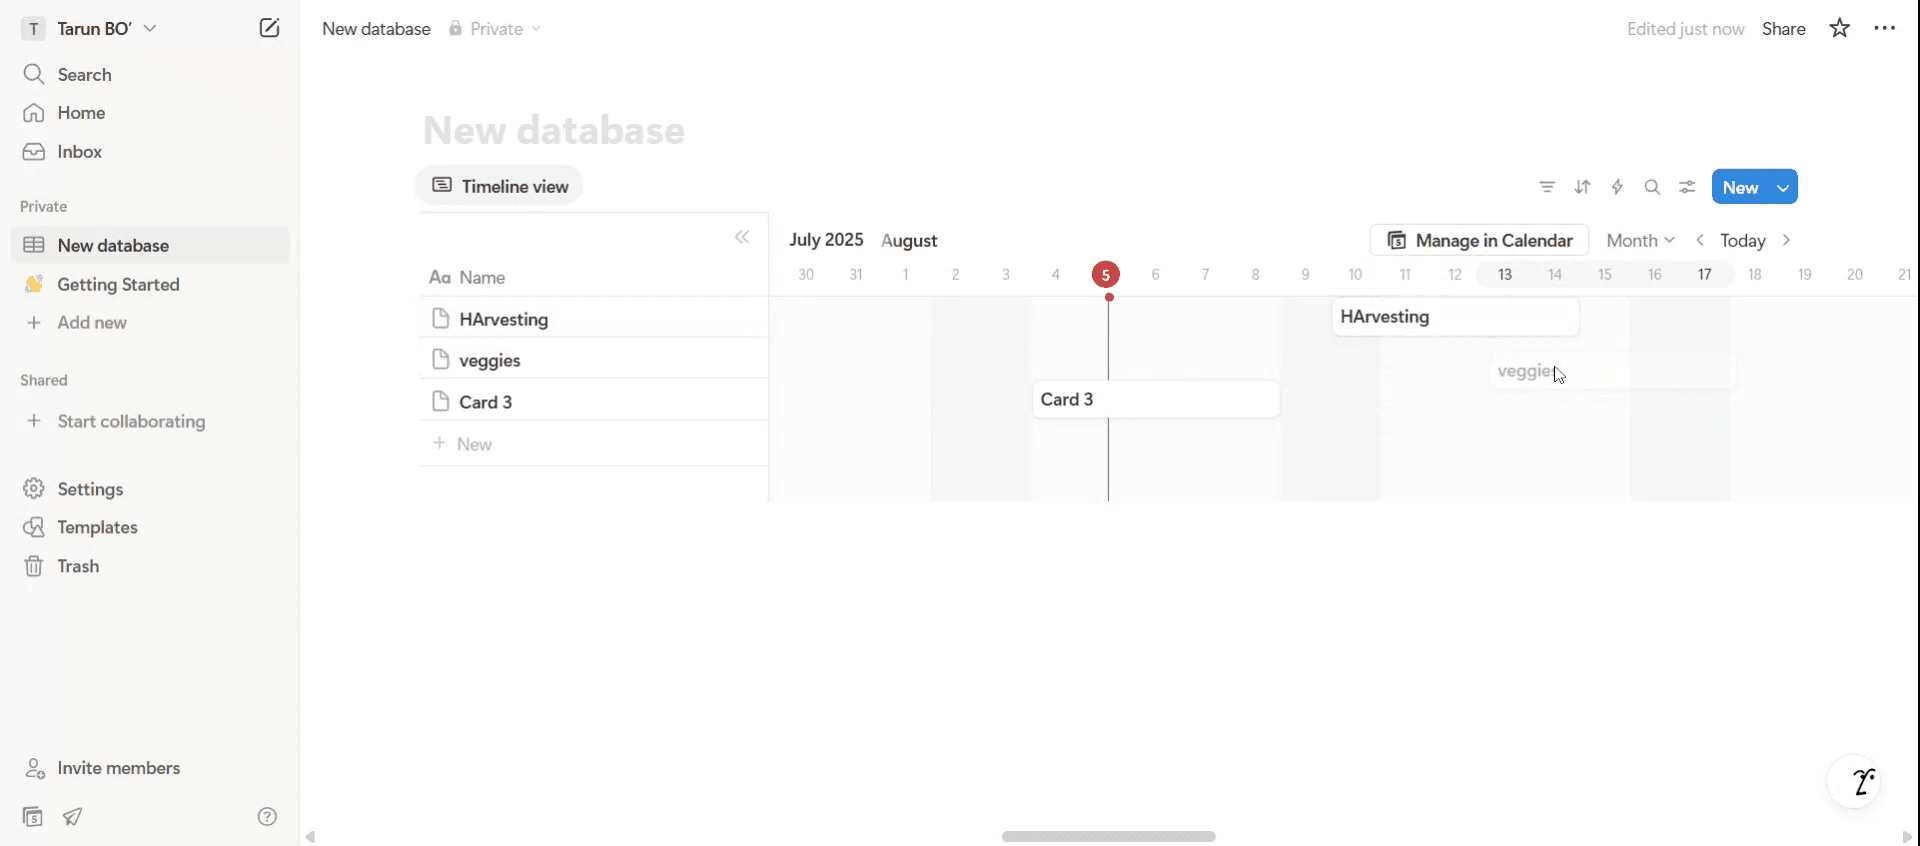
Stap 5
Gebruik slepen en neerzetten om de tijdlijn volgens jouw specificaties te ordenen.
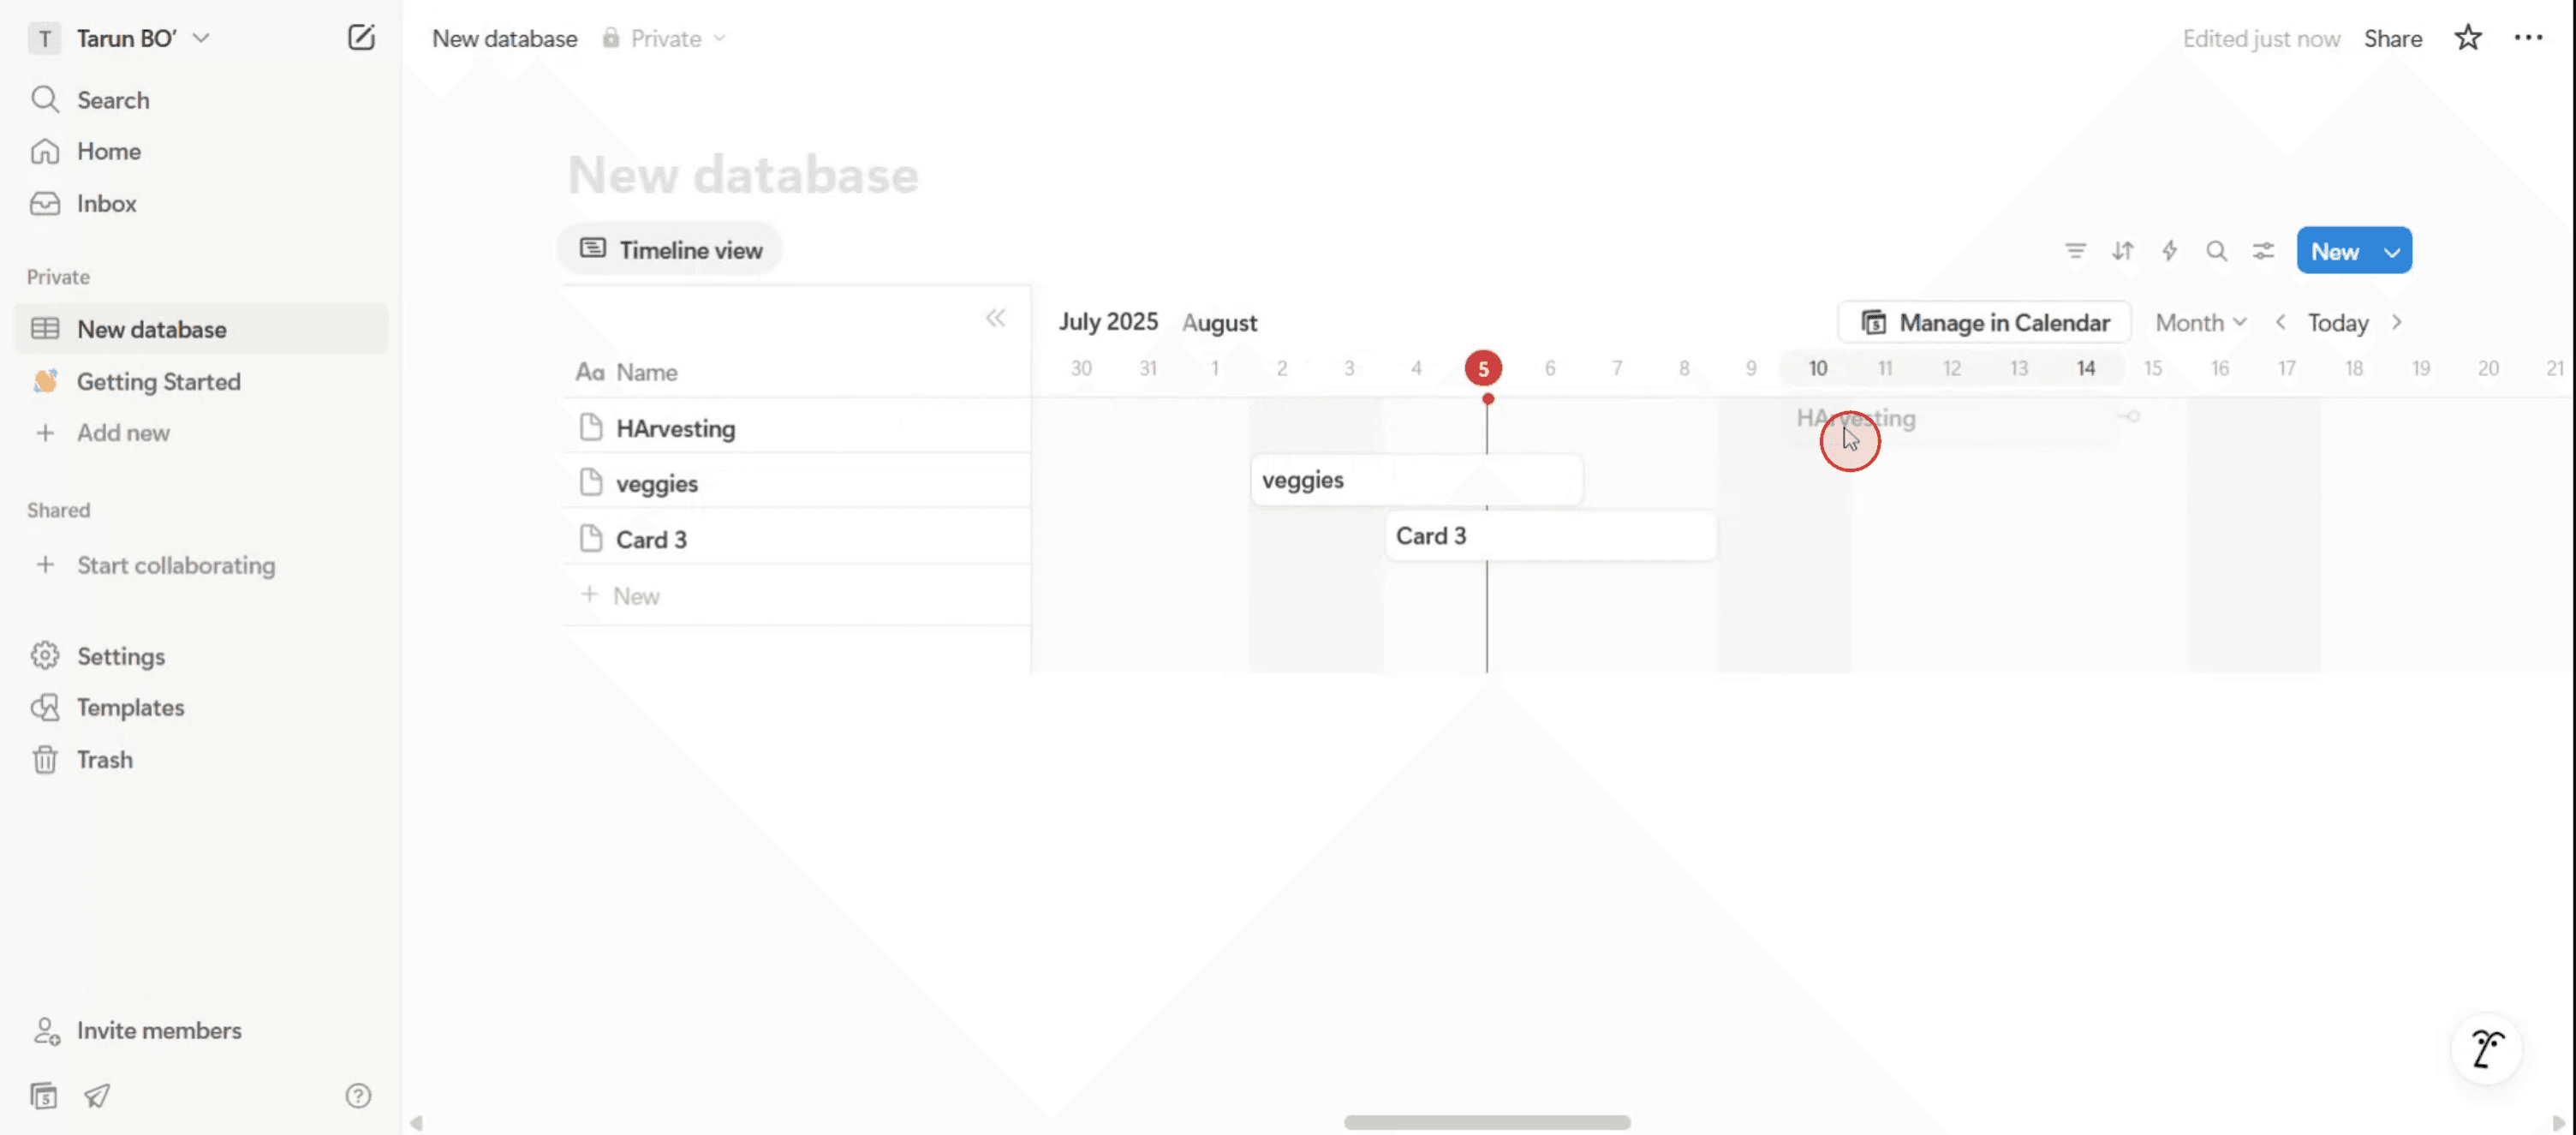
Stap 6
Dit omvat het slepen en neerzetten van items op specifieke datums en het aanpassen van de tijdlijn voor bepaalde datums en tijden.
Professionele tips voor het maken van een tijdlijn in Notion
Gebruik de weergave “Timeline” in een database
Begin met het maken van een database (zoals een tabel of bord), voeg vervolgens een nieuwe weergave toe en selecteer “Timeline”. Hiermee kun je taken, evenementen of projecten visualiseren langs een horizontale tijdschaal. Elk item moet een datum-eigenschap hebben zodat de tijdlijn correct wordt weergegeven.Voeg een datum-eigenschap toe aan je items
Zorg ervoor dat je database een eigenschap “Date” bevat. Zonder die eigenschap verschijnen items niet op de tijdlijn. Afhankelijk van je behoeften kun je enkele datums of datumbereiken gebruiken.Pas de tijdlijn aan met eigenschappen
Geef belangrijke details zoals projectstatus, prioriteit of toegewezen persoon rechtstreeks weer op de balken van de tijdlijn. Ga naar “Properties” en schakel velden zoals “Tags” of “Assignee” in voor beter beheer in één oogopslag.Gebruik groepen voor een betere organisatie
Groepeer je tijdlijn op basis van een eigenschap zoals projectfase, afdeling of teamlid. Dit creëert horizontale banen op de tijdlijn en helpt verschillende categorieën werk te scheiden.Pas de schaal van de tijdlijn aan
Zoom in of uit om per dag, week, maand, kwartaal of jaar te bekijken, afhankelijk van de omvang van je project. Dit helpt je om zowel kortetermijntaken als langetermijnplannen in perspectief te houden.
Veelvoorkomende valkuilen en hoe je ze kunt vermijden
Vergeten een datum-eigenschap toe te voegen
Als tijdlijnitems niet verschijnen, controleer dan of elk item een ingestelde eigenschap “Date” heeft. Zonder die eigenschap werkt de tijdlijn niet.Overladen met te veel informatie
Te veel zichtbare eigenschappen kunnen je tijdlijn rommelig maken. Geef alleen de belangrijkste details weer om het overzichtelijk en leesbaar te houden.Niet groeperen wanneer dat nodig is
Als je project meerdere teams of categorieën omvat, gebruik dan de functie “Group” om verwarring te voorkomen en georganiseerd te blijven.Deadlines missen
Gebruik herinneringen binnen de datum-eigenschap of integreer met andere taakbeheerders om belangrijke mijlpalen niet uit het oog te verliezen.De verkeerde weergave voor de taak gebruiken
Als je project beter als lijst of Kanban-bord wordt beheerd, forceer het dan niet in een tijdlijn. Kies de weergave die het beste bij de workflow past.
Veelgestelde vragen over het maken van een tijdlijn in Notion
Kan ik een tijdlijn maken zonder database?
Nee, de tijdlijnweergave is alleen beschikbaar in Notion-databases.Kan ik meerdere tijdlijnen op één pagina weergeven?
Ja, je kunt meerdere databases met verschillende tijdlijnweergaven toevoegen aan dezelfde Notion-pagina.Hoe wijzig ik de start- en einddatum van een item?
Klik op de datum-eigenschap van het item en selecteer een datumbereik in plaats van een enkele datum.Kan ik een tijdlijn dupliceren?
Ja, dupliceer de database of weergave en pas deze aan naar wens.Werkt de tijdlijnweergave op mobiel?
Ja, maar het kan compacter zijn. Gebruik voor betere bruikbaarheid de desktop- of webversie voor volledig overzicht.Hoe neem je het scherm op op een Mac?
Om het scherm op een Mac op te nemen, kun je Trupeer AI gebruiken. Hiermee kun je het hele scherm vastleggen en krijg je AI-mogelijkheden zoals het toevoegen van AI-avatars, voice-over toevoegen en in- en uitzoomen in de video. Met de AI-videotransformatiefunctie van Trupeer kun je de video vertalen naar meer dan 30 talen.Hoe voeg ik een AI-avatar toe aan een schermopname?
Om een AI-avatar aan een schermopname toe te voegen, heb je een AI-tool voor schermopnames nodig. Trupeer AI is een AI-tool voor schermopnames die je helpt video's met meerdere avatars te maken en je ook helpt je eigen avatar voor de video te creëren.Hoe neem je het scherm op in Windows?
Om het scherm op te nemen in Windows, kun je de ingebouwde Game Bar (Windows + G) gebruiken of een geavanceerde AI-tool zoals Trupeer AI voor uitgebreidere functies zoals AI-avatars, voice-over, vertaling enz.Hoe voeg ik voice-over toe aan video?
Om voice-over aan video's toe te voegen, download je de Trupeer AI Chrome-extensie. Na registratie upload je je video met stem, kies je de gewenste voice-over van Trupeer en exporteer je je bewerkte video.Hoe zoom ik in op een schermopname?
Om in te zoomen tijdens een schermopname gebruik je de zoomeffecten in Trupeer AI, waarmee je op specifieke momenten kunt in- en uitzoomen en zo de visuele impact van je videocontent vergroot.
Aanbevolen leesmateriaal
Technische documentatiegenerator
Hoe maak je Notion in de donkere modus
Hoe centreer je tekst in Notion
Gerelateerde tutorials

