
Google スプレッドシートで表を作成する方法 – ステップバイステップガイド
Google スプレッドシートでデータを効率よく整理したいですか?見出し、書式設定、フィルタを使って、構造化された表を作成する方法を学びましょう。
この文書では、Google スプレッドシート内で表を作成するためのわかりやすい手順を説明します。
以下の手順に従って、データを整理された表へスムーズにまとめましょう。
Google スプレッドシートで表を作成すると、データの整理、書式設定、分析がより簡単になります。空白のセルから始める場合でも、既存のデータを整える場合でも、まずは次の手順で始めましょう。
1. スプレッドシートを開く
Google スプレッドシートに移動し、表を挿入したいファイルを開きます。
2. データを選択する
既存のデータがある場合: 表に変換したいセルを選択します。
最初から作成する場合: 表を配置する空白の範囲を選択し、必要な行数と列数を指定します。
3. 表を挿入する
上部メニューから 「挿入」 をクリックします。
次に 「表」 を選択して表のレイアウトを作成します(注: この機能は、アカウントの設定によってはテンプレートに近い形式になる場合があります)。
代替方法:
Excel のようなネイティブの「表として書式設定」はありませんが、罫線、背景色、フィルタを使って手動でセルを書式設定すれば、同様の機能を実現できます。
4. 見出しを追加する(任意だが推奨)
表に見出し(たとえば「名前」「日付」「金額」)が含まれる場合は、必ず 1 行目 に配置してください。
その後、最上部の行を固定 すると(表示 > 固定 > 1 行)、スクロールしても見出しが表示されたままになります。
5. 表をカスタマイズする
ツールバーの 罫線 ボタンを使って、セル間に線を追加します。
読みやすさを向上させるために、交互の行に 塗りつぶし色 を適用します。
書式 > 条件付き書式設定 をクリックして、データに基づく色のルールを追加します。
6. 表に名前を付ける(任意)
Google スプレッドシートでは Excel のように表へ正式に名前を付けることはできませんが、範囲 に名前を付けることはできます。
表を選択 > 右クリック > 「名前付き範囲を定義」を選択します。
数式で参照しやすいように、わかりやすい一意の名前を付けます。
7. 表の機能を使う
並べ替えとフィルタ: 表を選択し、フィルターアイコン(じょうご)をクリックしてドロップダウンフィルタを追加します。
列と行のサイズを変更する: 列/行の端にカーソルを合わせてドラッグし、サイズを変更します。
行/列を追加する: 行または列のラベルを右クリックし、挿入を選択します。
ステップバイステップガイド: Sheets で表を作成する方法
ステップ 1
まず、Google スプレッドシートを開きます。表に整理したいデータセットを選択します。

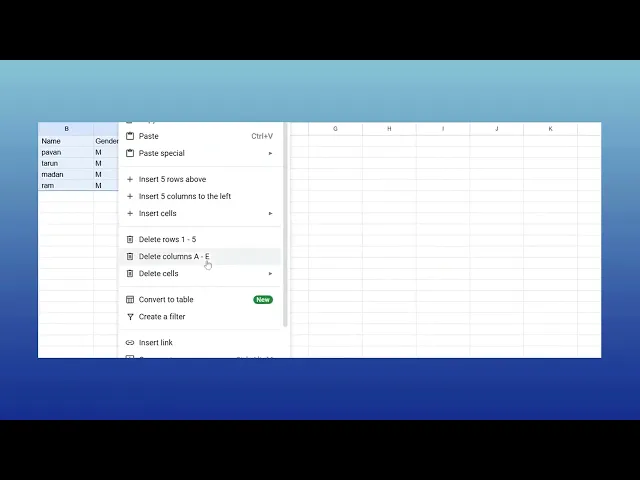
ステップ 2
右クリックして「表に変換」をクリックします。

ステップ 3
クリックすると、データは自動的に表へ変換されます。

Google Sheets で表を作成するためのプロのコツ
最初の行に見出しを入れ、太字にして、表を読みやすくしましょう。
ツールバーを使って罫線を適用し、表のセルを視覚的に区切りましょう。
交互の色を適用して読みやすさを高める「テーブルとして書式設定」オプションを使いましょう。
Google Sheets で表を作成する際によくある落とし穴とその回避方法
見出し行を固定し忘れると列名を追いかけにくくなります。表示 > 固定 > 1 行に移動しましょう。
データを適切に並べ替えたりフィルタしたりしないと、並べ替えを有効にするには、データ > フィルタを作成 を使いましょう。
結合セルを誤って使うと書式設定の問題が発生することがあります。必要な場合を除いてセルの結合は避けましょう。
Google スプレッドシートで表を作成するためのよくある質問
Google スプレッドシートで表を整形するには?
[表示形式]メニューの[交互の色]オプションを使い、見出しには太字を適用します。表にフィルタを追加できますか?
はい。データを選択し、[データ] > [フィルタを作成]をクリックすると、並べ替えとフィルタリングを有効にできます。新しいデータで表を自動更新するにはどうすればよいですか?
配列数式や名前付き範囲などの関数を使って動的範囲を設定すると、新しいデータを自動的に含められます。Mac で画面収録するには?
Mac で画面収録するには、Trupeer AI を使用できます。画面全体をキャプチャできるうえ、AI アバターの追加、ナレーションの追加、動画内でのズームイン/ズームアウトなどの AI 機能も利用できます。trupeer の AI 動画翻訳機能を使えば、動画を 30 以上の言語に翻訳できます。画面収録に AI アバターを追加するには?
画面収録に AI アバターを追加するには、AI 画面収録ツール。を使用する必要があります。Trupeer AI は AI 画面収録ツールで、複数のアバターを使った動画作成を支援し、動画用の自分専用アバターの作成にも役立ちます。Windows で画面収録するには?
Windows で画面収録するには、内蔵の Game Bar(Windows + G)や、AI アバター、ナレーション、翻訳など、より高度な機能を備えた Trupeer AI のような高度な AI ツールを使用できます。
動画にナレーションを追加するには?
動画にナレーションを追加するには、trupeer ai の Chrome 拡張機能をダウンロードします。サインアップ後、音声付きの動画をアップロードし、trupeer から希望のナレーションを選んで、編集した動画を書き出します。画面収録でズームインするには?
画面収録中にズームインするには、Trupeer AI のズーム効果を使います。特定のタイミングでズームイン/ズームアウトでき、動画コンテンツの視覚的なインパクトを高めます。
おすすめの読み物
関連チュートリアル

