
如何在 Figma 中制作 GIF
想在 Figma 中创建动画 GIF 吗?按照这份分步指南,使用 Figma 和第三方工具来设计、制作动画并导出你自己的 GIF。
1. 安装插件:
打开 Figma,并依次进入“插件” > “管理插件”。
搜索并安装 “Export to GIF/Video” 或 “动画 GIF 制作器”。
或者,你也可以在 Figma 社区网站上查找并安装插件。
2. 选择你的帧:
创建你想要制作动画的帧,并按它们在 GIF 中出现的顺序进行排列。
选择所有要包含在 GIF 中的帧。
3. 配置 GIF 设置:
打开你安装的插件。
如果可用,选择 GIF 格式。
设置帧率(动画播放速度)。
选择 GIF 所需的尺寸。
决定 GIF 是循环播放还是只播放一次。
某些插件还可能提供其他功能,例如添加透明背景。
4. 导出 GIF:
当你对设置满意后,点击“导出”或“生成 GIF”按钮。
插件将创建 GIF 文件,并允许你将其下载到电脑上。
分步指南:如何在 Figma 中制作 GIF
步骤 1
选择你想要转换为动画 GIF 的模板。
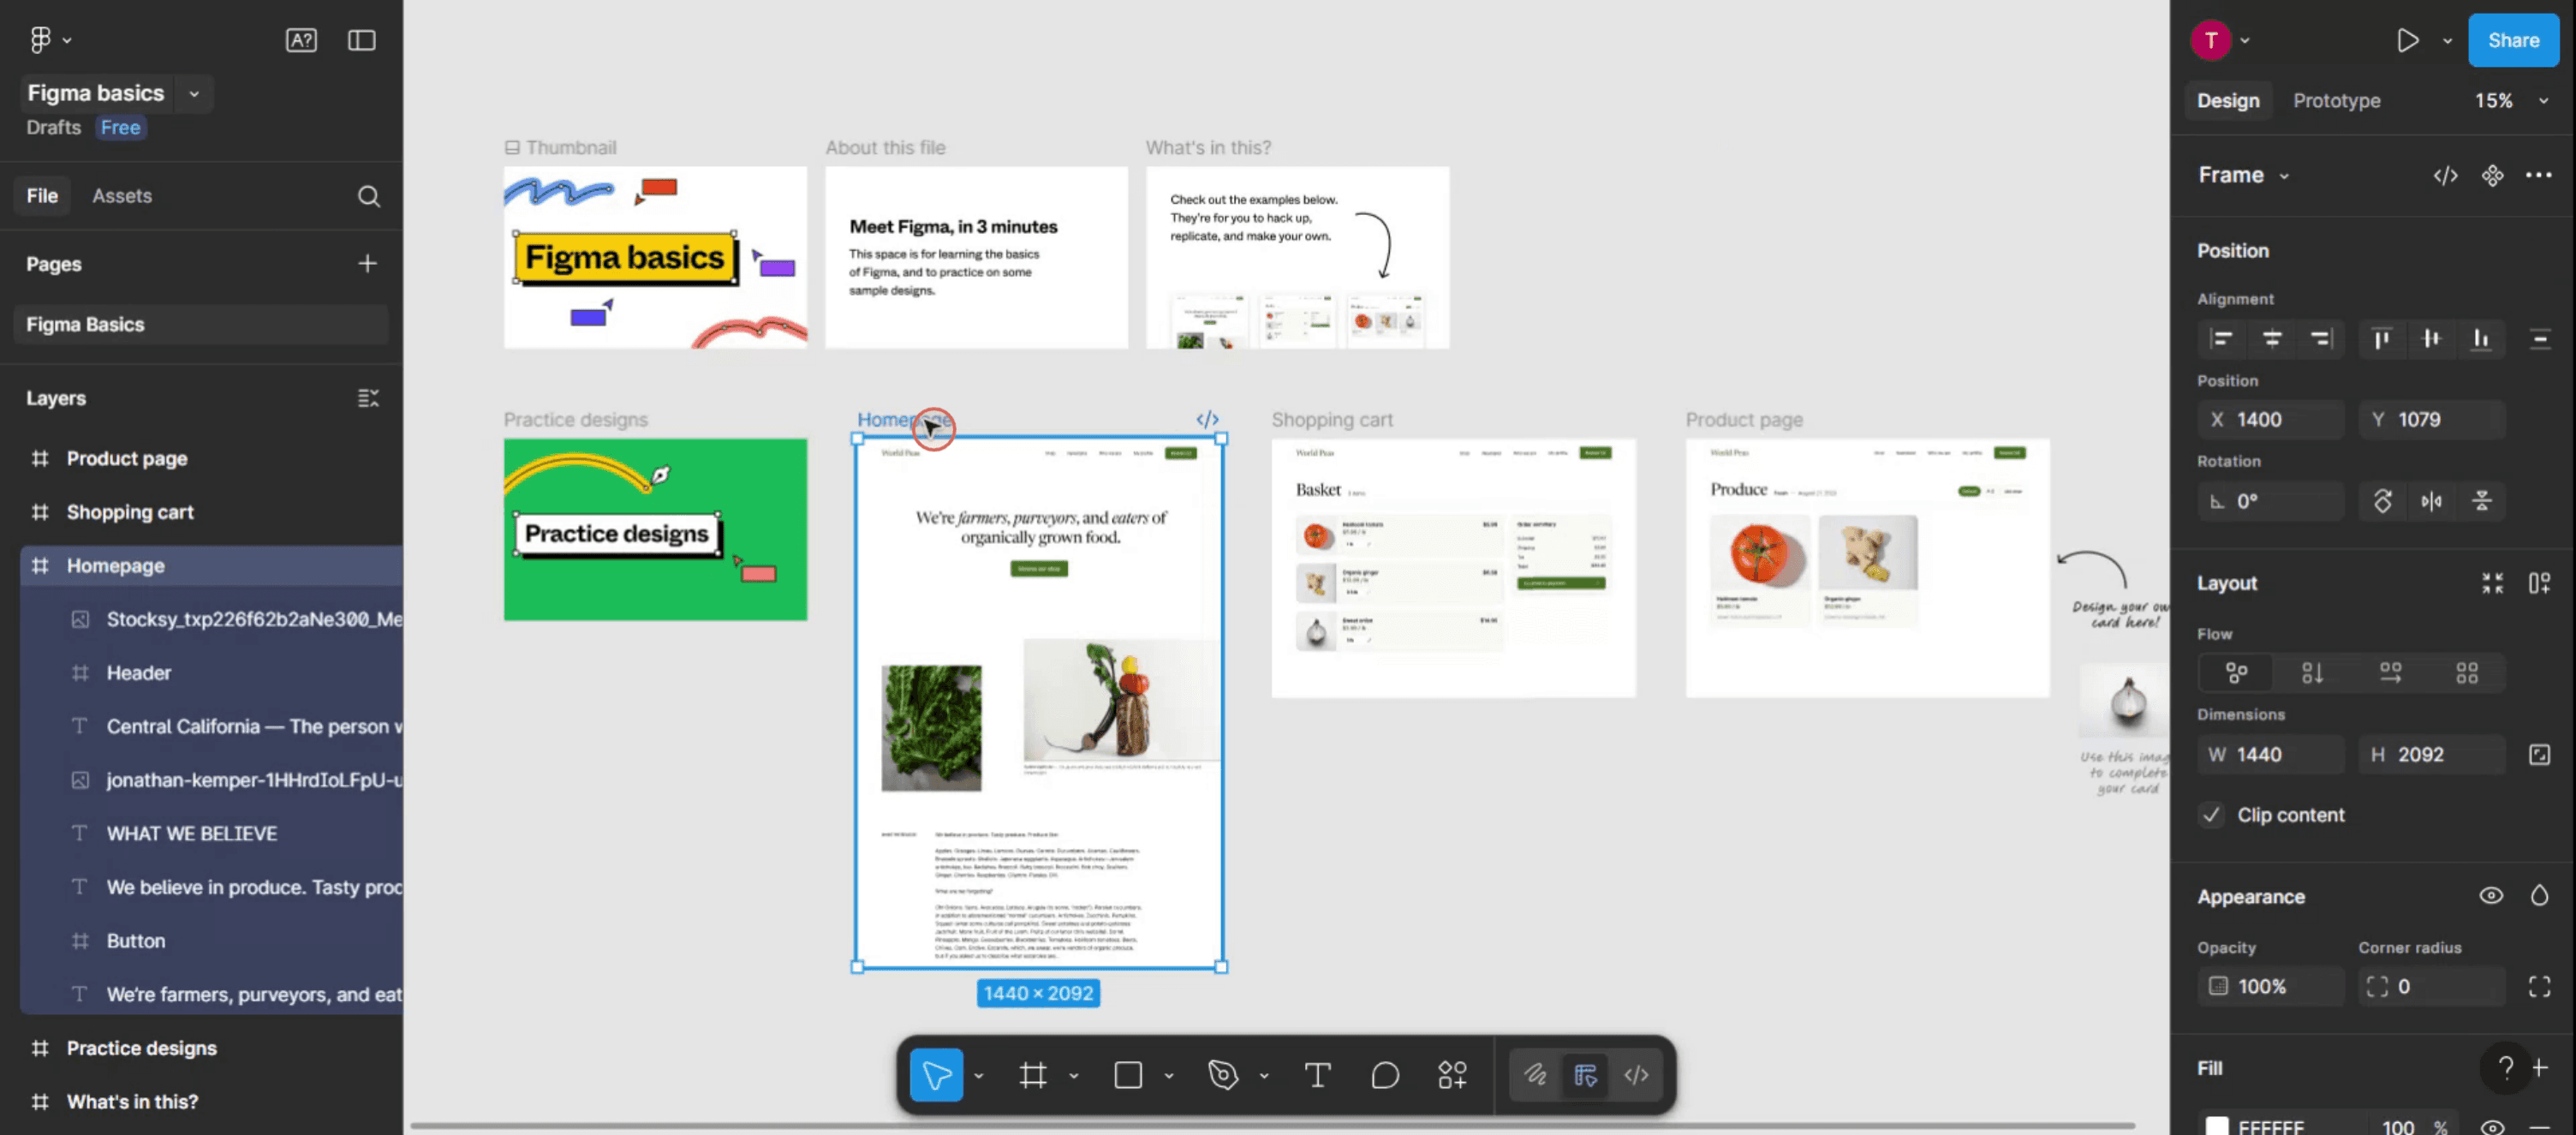
步骤 2
然后,点击 Figma 中的“操作”菜单。

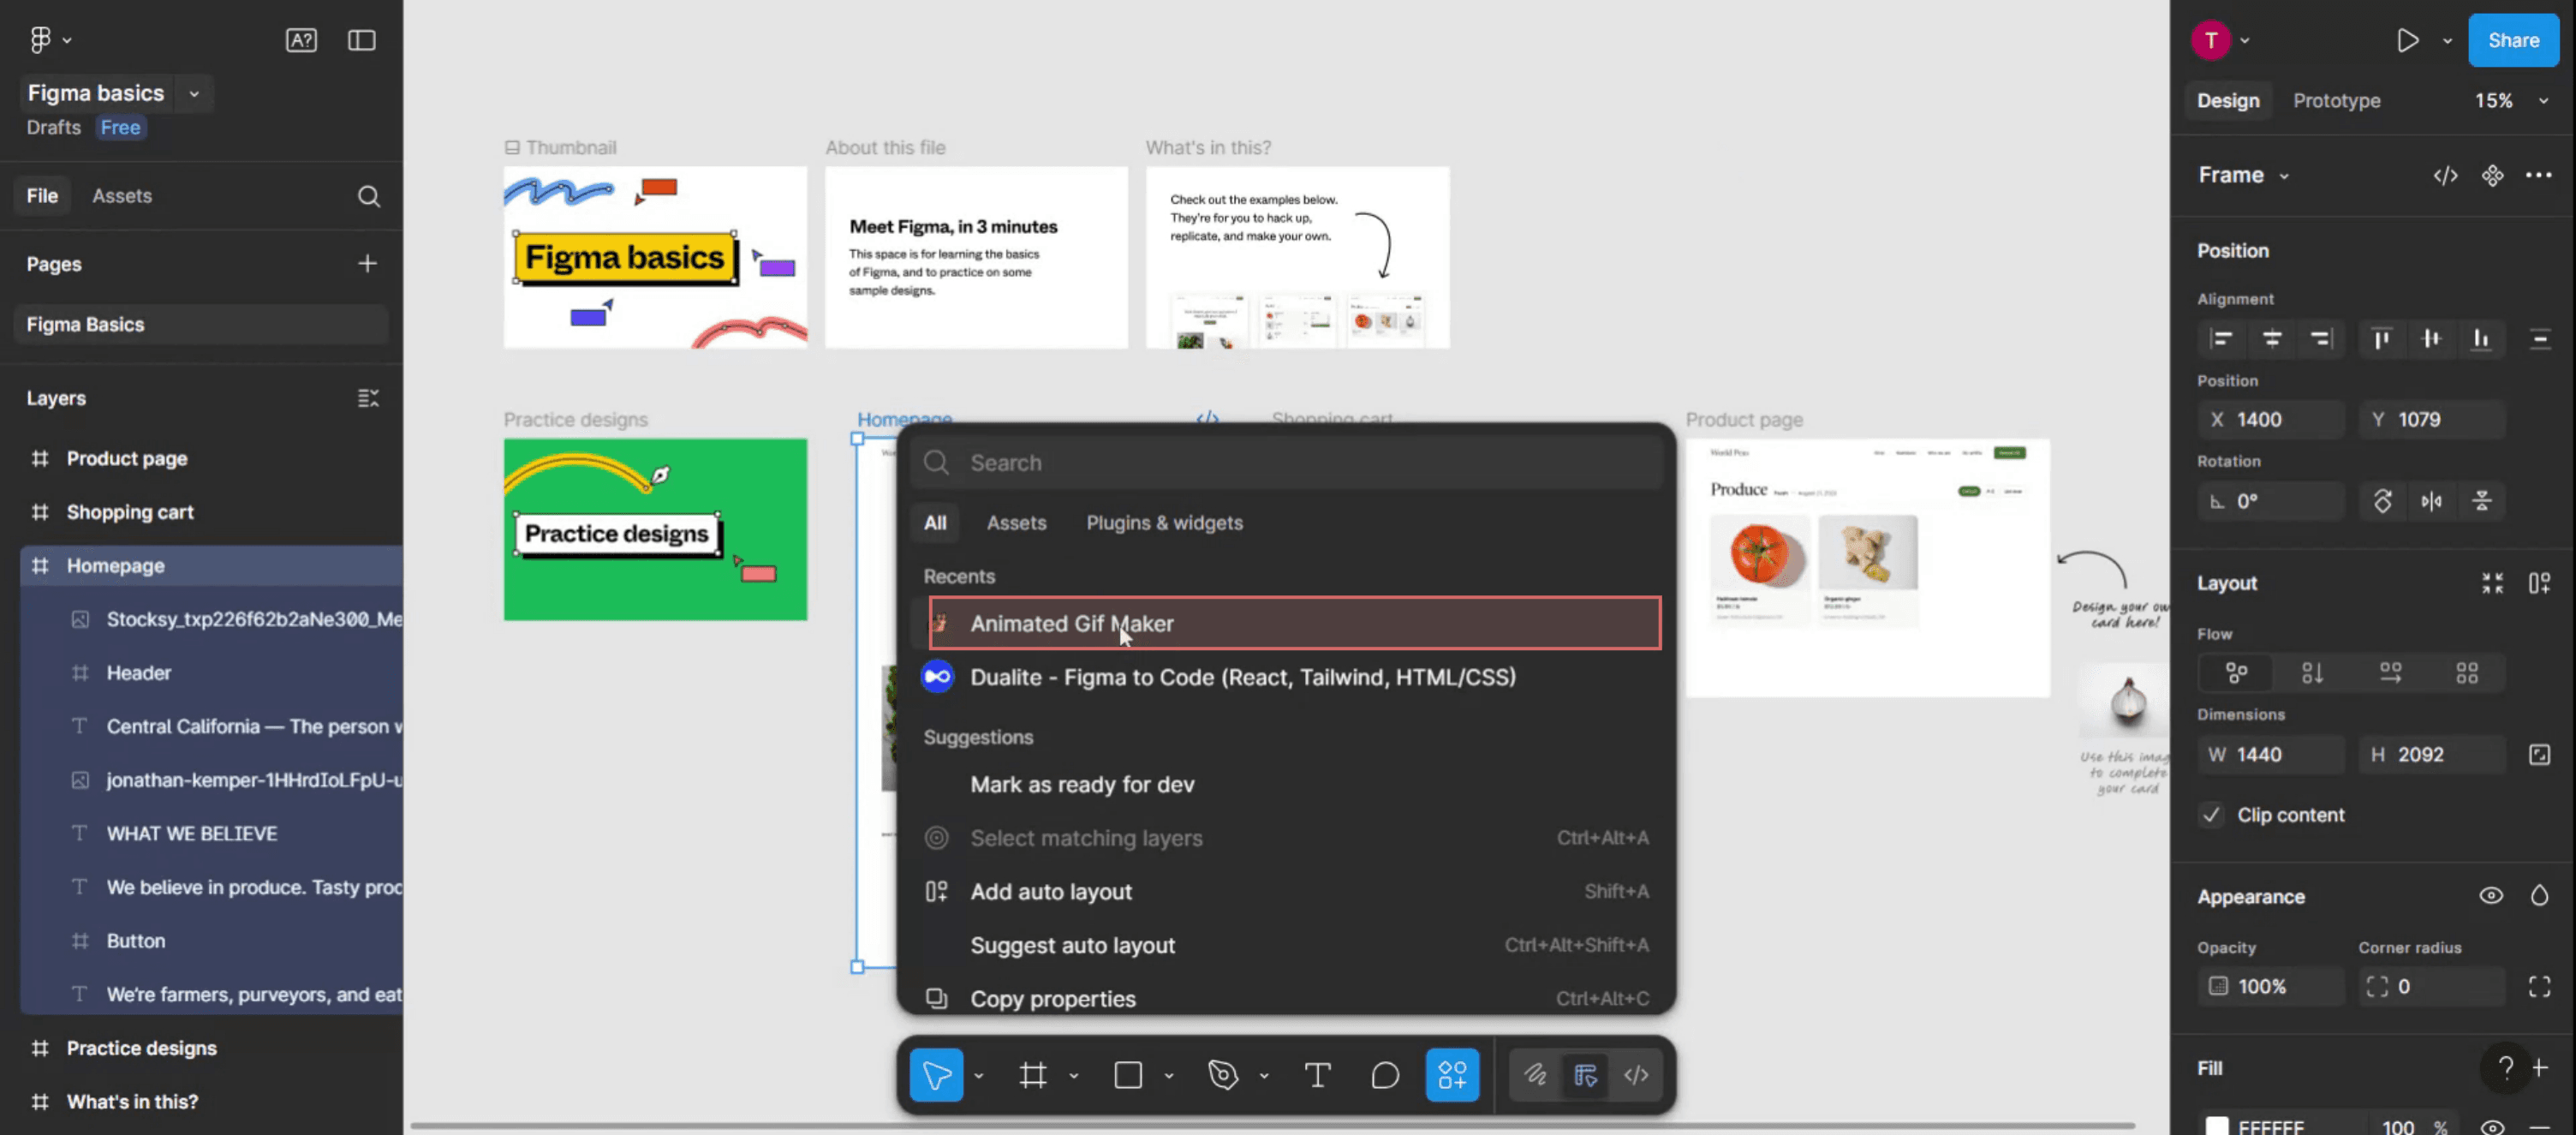
步骤 3
在搜索栏中查找“animated GIF maker”插件。
步骤 4
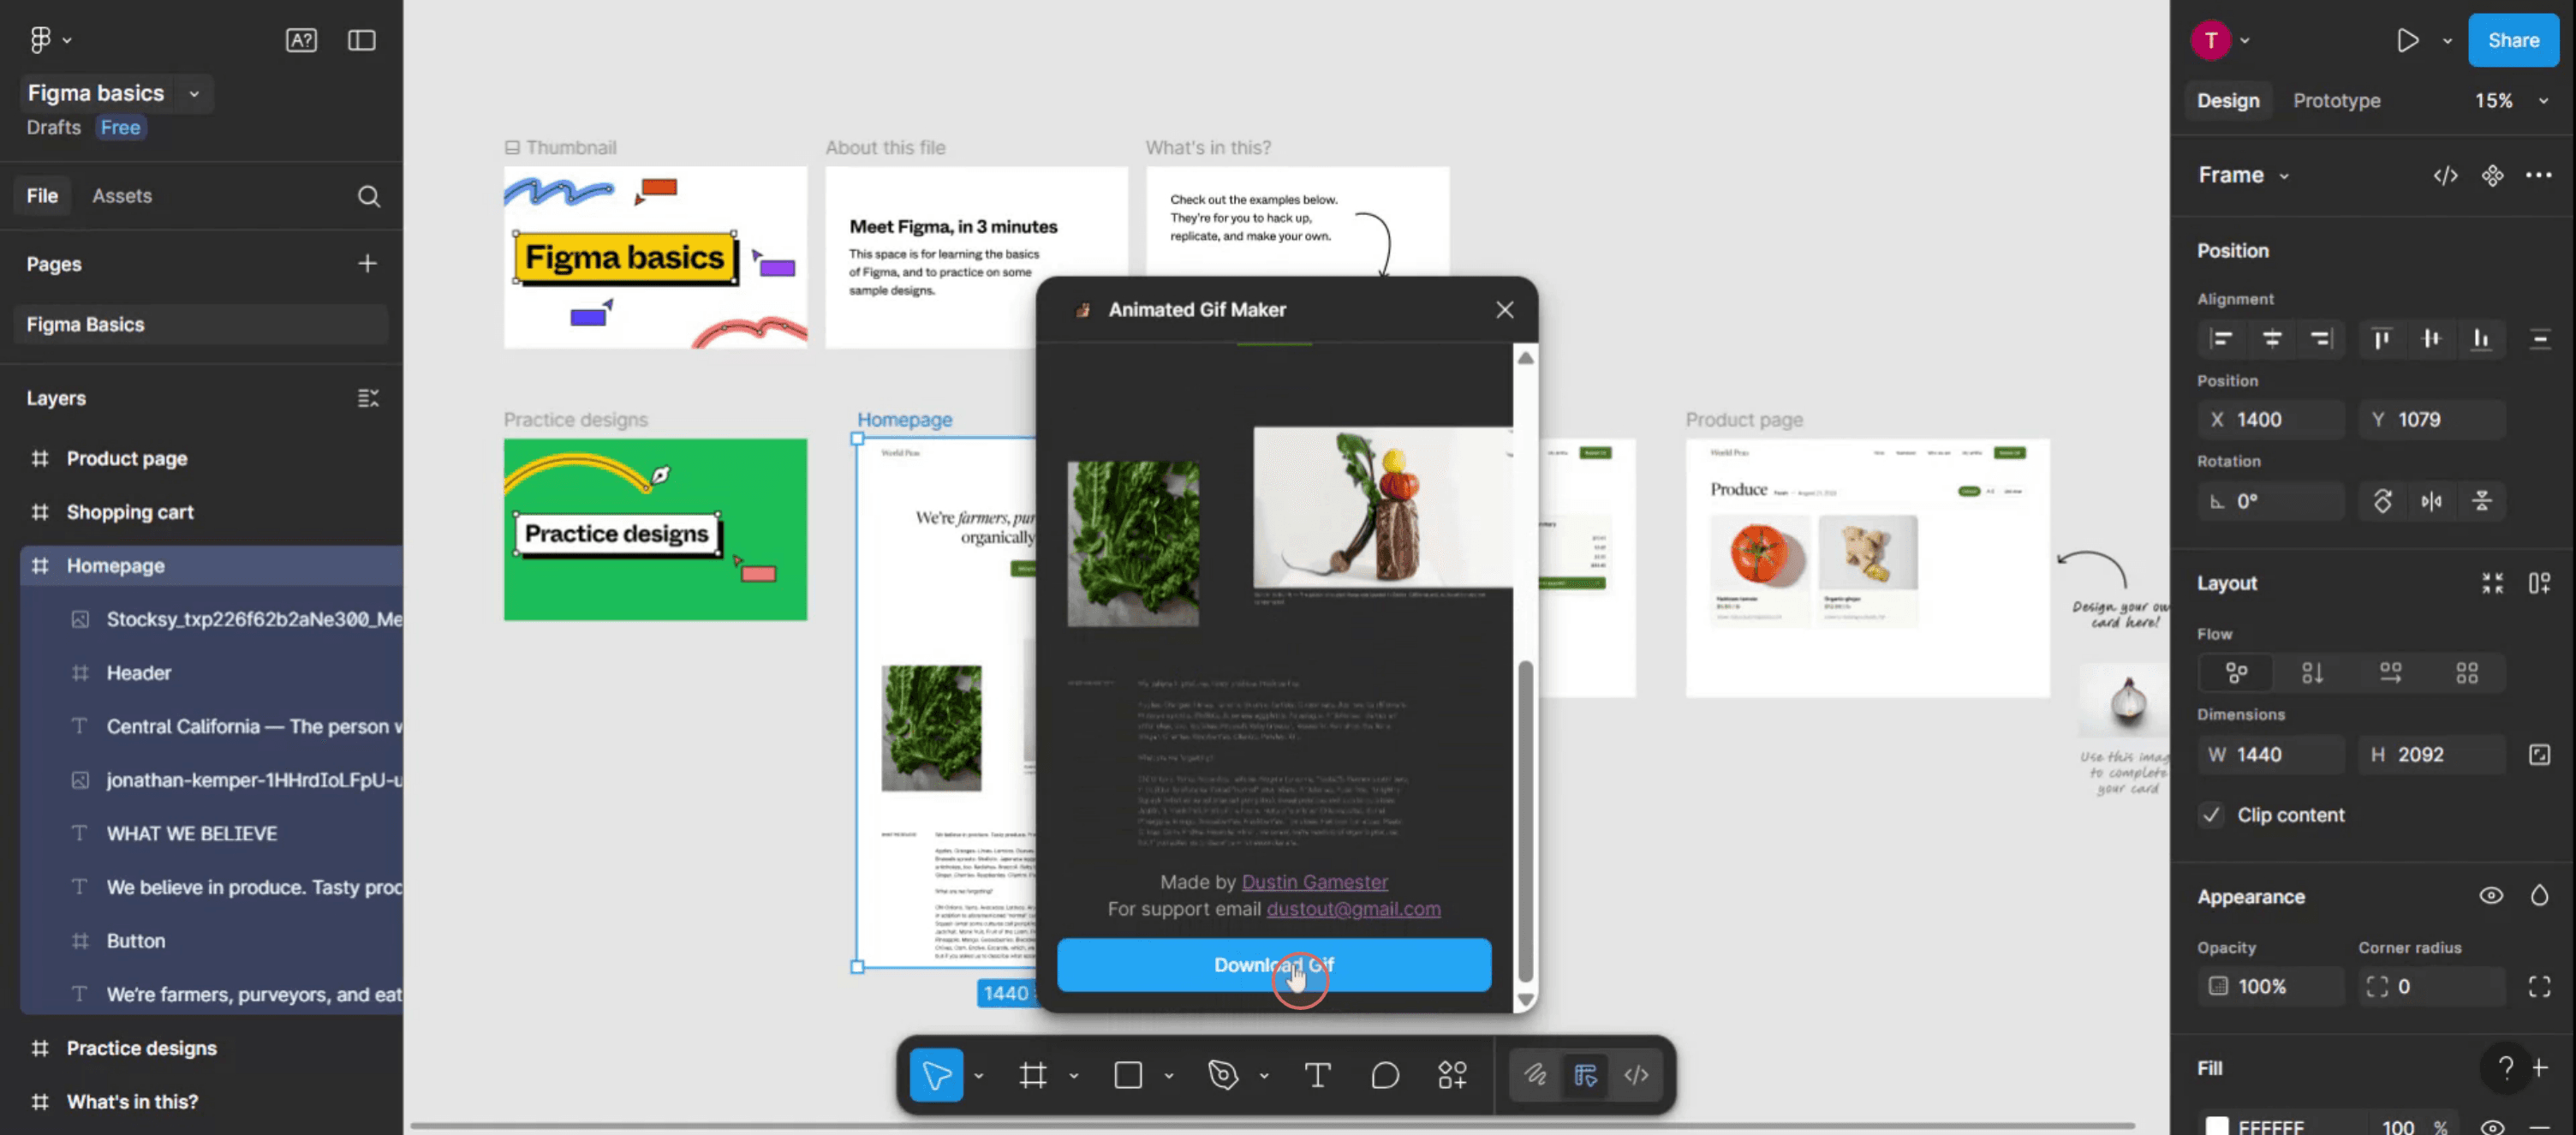
然后会出现一个弹出窗口,在其中你可以自定义 GIF 需求,
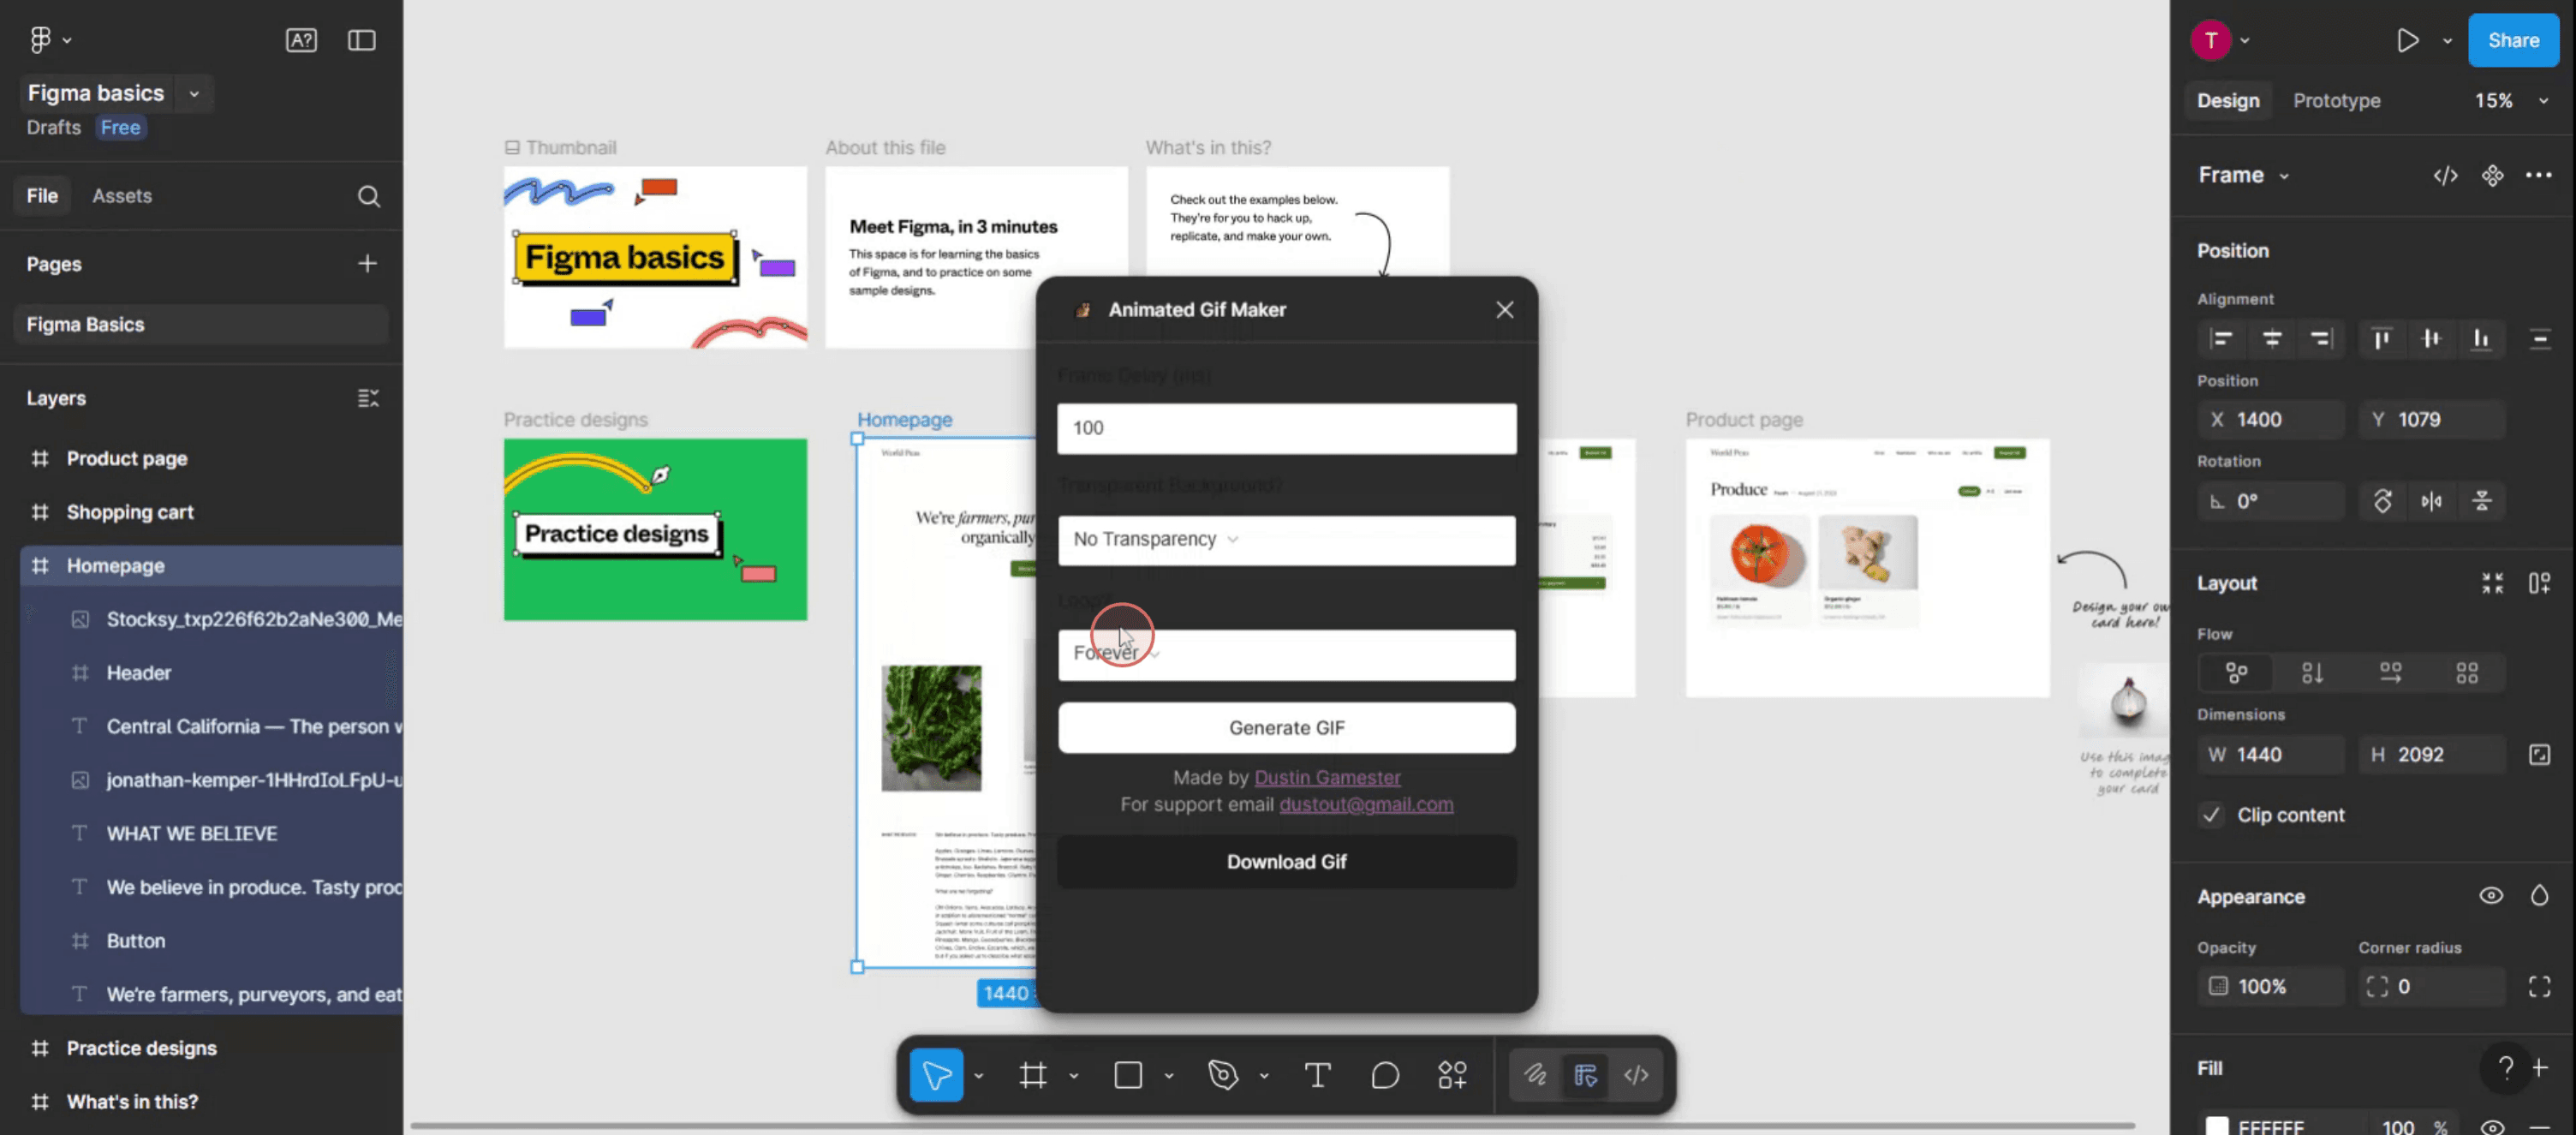
步骤 5
点击“下载 GIF”保存你的作品。
在 Figma 中制作 GIF 的专业技巧
在 Figma 中设计你的帧
通过复制画板(帧)并在每一帧中进行修改,以体现运动或变化,从而创建你想要制作动画的帧序列。按顺序命名帧
按顺序清晰地标记每一帧(例如:第 1 帧、第 2 帧等),这样在导出过程中更容易在之后识别它们。将帧导出为 PNG
选择每一帧,点击右下角面板中的导出选项,并将它们导出为 PNG 文件。确保所有帧的尺寸和缩放保持一致。使用外部 GIF 制作工具
打开一个 GIF 制作工具,例如 ezgif.com、Photoshop,或任何在线 GIF 制作工具。按正确顺序上传你导出的所有 PNG 文件。设置帧时长和循环播放
调整帧与帧之间的延迟时间,并启用循环播放,让你的 GIF 持续播放。导出最终 GIF
设置完成后,导出并下载 GIF 文件。现在你可以在演示文稿、网站或 UI 预览中使用它。
常见问题及如何避免
帧未对齐
确保所有元素在每一帧中都保持一致对齐,以避免 GIF 出现抖动或晃动。跳过命名规范
如果你的帧没有按顺序命名,在上传到 GIF 制作工具时就很难保持顺序。以不同尺寸导出
务必仔细检查每一帧的分辨率和缩放是否相同,以确保动画流畅。输出质量低
使用在线 GIF 制作工具时,选择支持高分辨率输出的工具,以避免像素化。文件过大
如果你的 GIF 变得过大,可以减少帧数,或在上传前稍微压缩图片。
关于在 Figma 中创建 GIF 的常见问题
我可以直接从 Figma 导出 GIF 吗?
不可以,Figma 没有内置的 GIF 导出选项。你需要导出帧并使用外部工具。从 Figma 导出帧的最佳格式是什么?
PNG 因其高质量和透明度支持而更受青睐。我可以使用哪些外部工具从 Figma 设计创建 GIF?
常用工具包括 ezgif.com、Adobe Photoshop 和 Giphy。为了让 GIF 更流畅,我应该使用多少帧?
通常,10–20 帧就足以制作短动画。更多帧会使动作更流畅,但文件也会更大。我可以控制动画速度吗?
可以,大多数 GIF 工具都允许你设置帧之间的延迟时间,以调整播放速度。如何在 Mac 上录屏?
要在 Mac 上录屏,你可以使用 Trupeer AI。它允许你捕捉整个屏幕,并提供 AI 功能,例如添加 AI 头像、添加旁白、在视频中放大和缩小。借助 trupeer 的 AI 视频翻译功能,你可以将视频翻译成 30 多种语言。如何给录屏添加 AI 头像?
要为屏幕录制添加 AI 头像,你需要使用AI 屏幕录制工具。Trupeer AI 是一款 AI 屏幕录制工具,可帮助你制作带有多个头像的视频,还能帮助你为视频创建自己的头像。如何在 Windows 上录屏?
在 Windows 上录屏时,你可以使用内置的 Game Bar(Windows + G),或者像 Trupeer AI 这样的高级 AI 工具,以获得更高级的功能,例如 AI 头像、旁白、翻译等。如何给视频添加旁白?
要给视频添加旁白,请下载 trupeer ai Chrome 扩展程序。注册后,上传带有声音的视频,从 trupeer 中选择所需的旁白,然后导出你编辑后的视频。如何在屏幕录制中放大?
要在屏幕录制时放大,请使用 Trupeer AI 中的缩放效果,它允许你在特定时刻放大和缩小,从而增强视频内容的视觉冲击力。

