
Como recortar uma imagem no Figma
Aprenda a recortar imagens no Figma de forma rápida e eficiente. Este guia passo a passo aborda a utilização da ferramenta de recorte, o ajuste dos limites da imagem e dicas para um design limpo.
Aqui está uma análise mais detalhada:
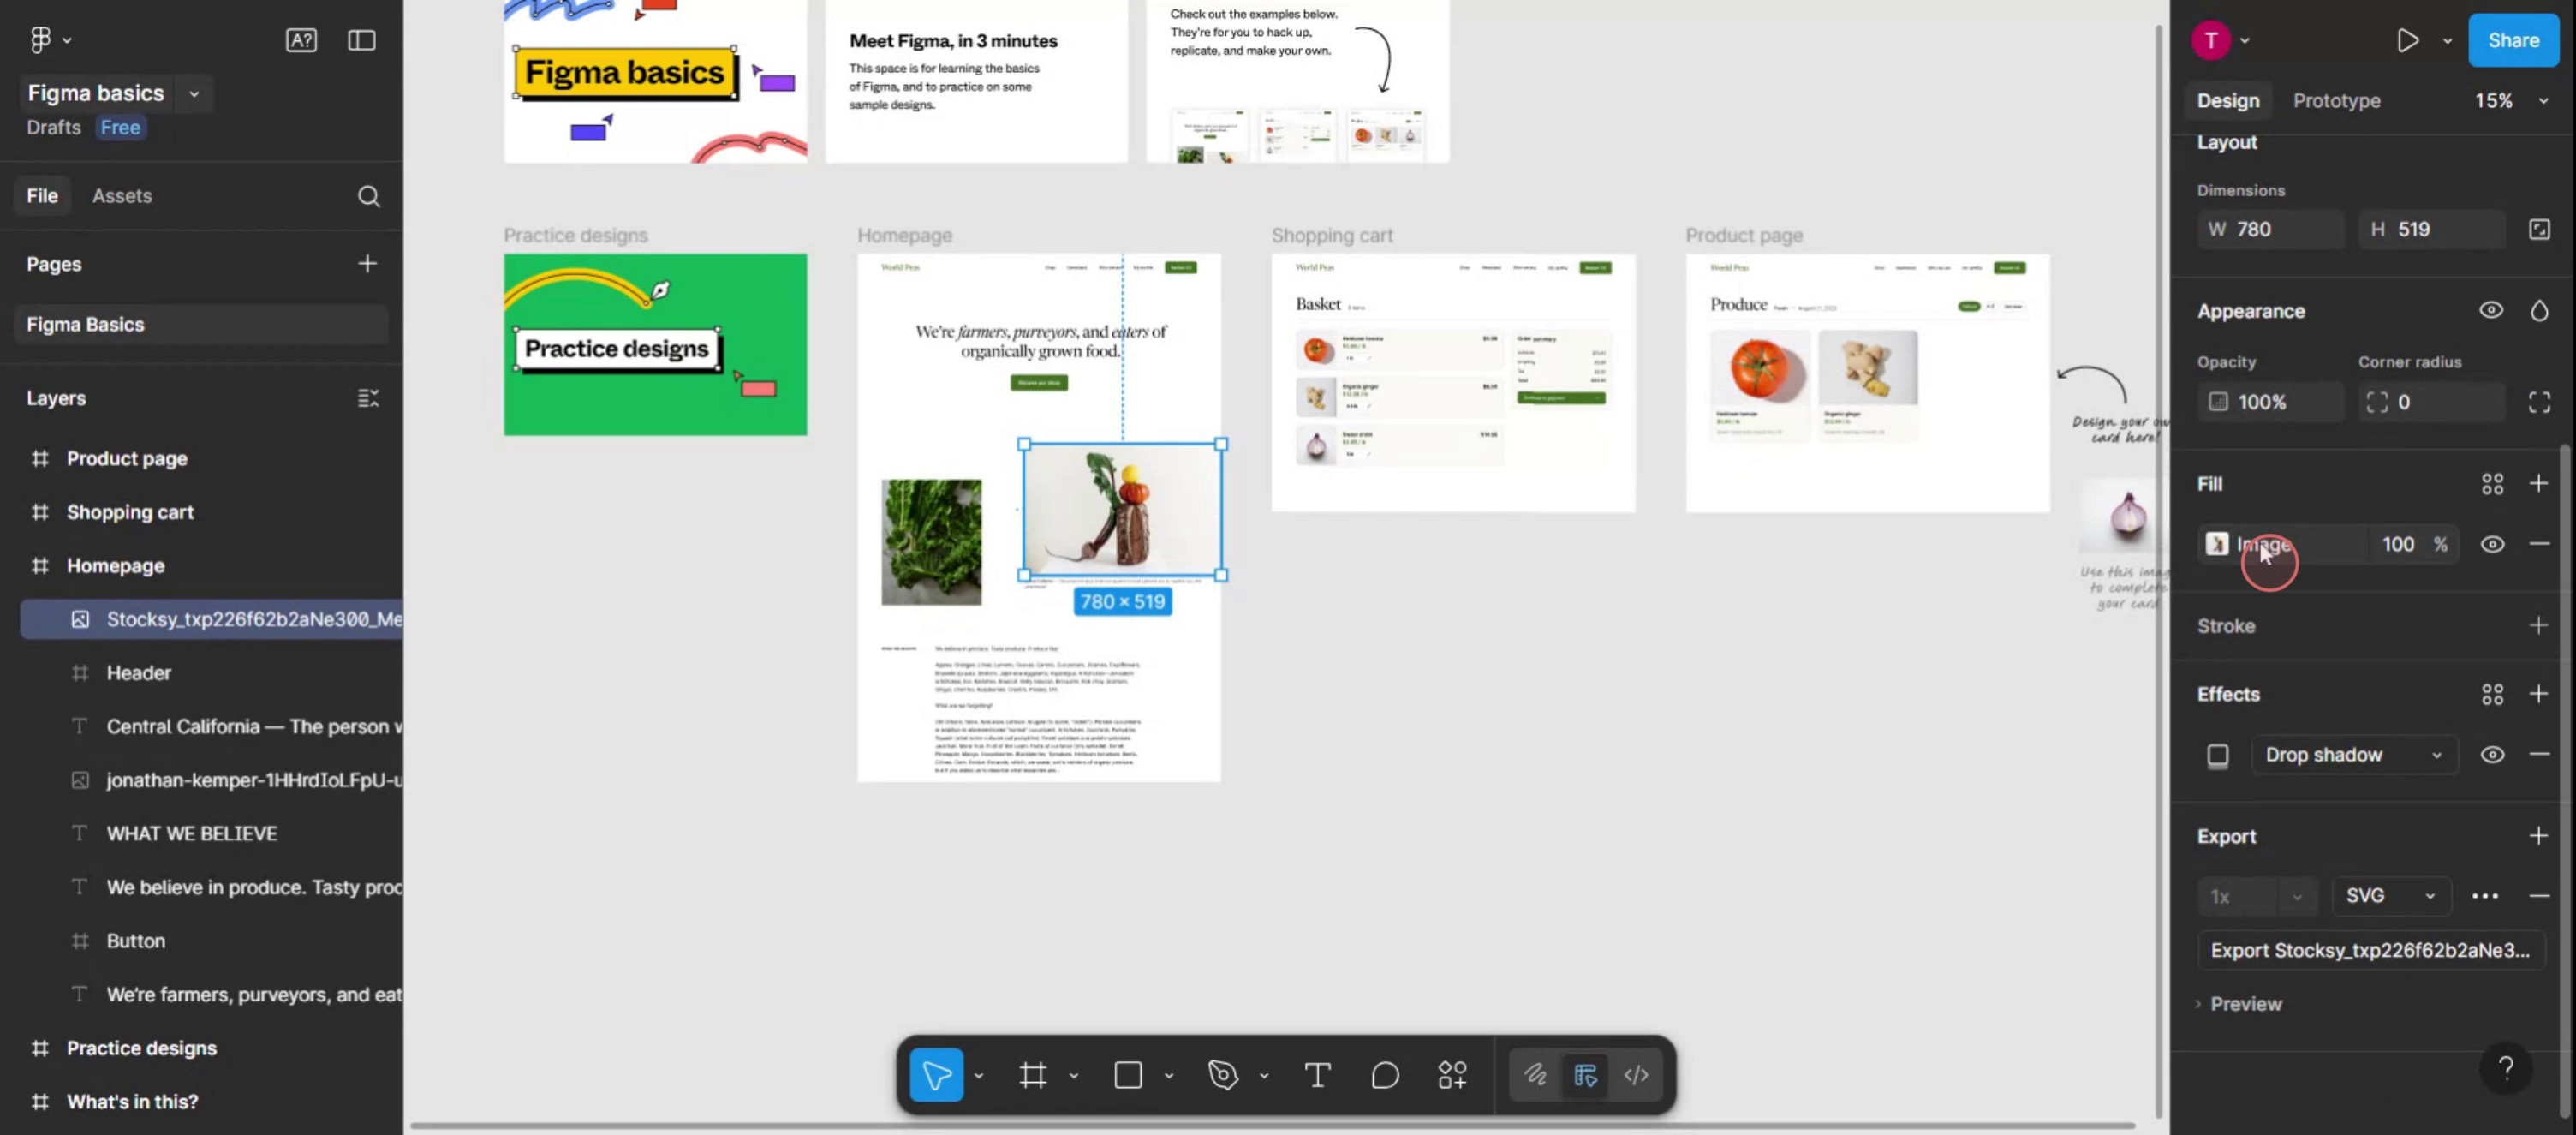
Selecione a imagem: Clique na camada de imagem que pretende cortar.
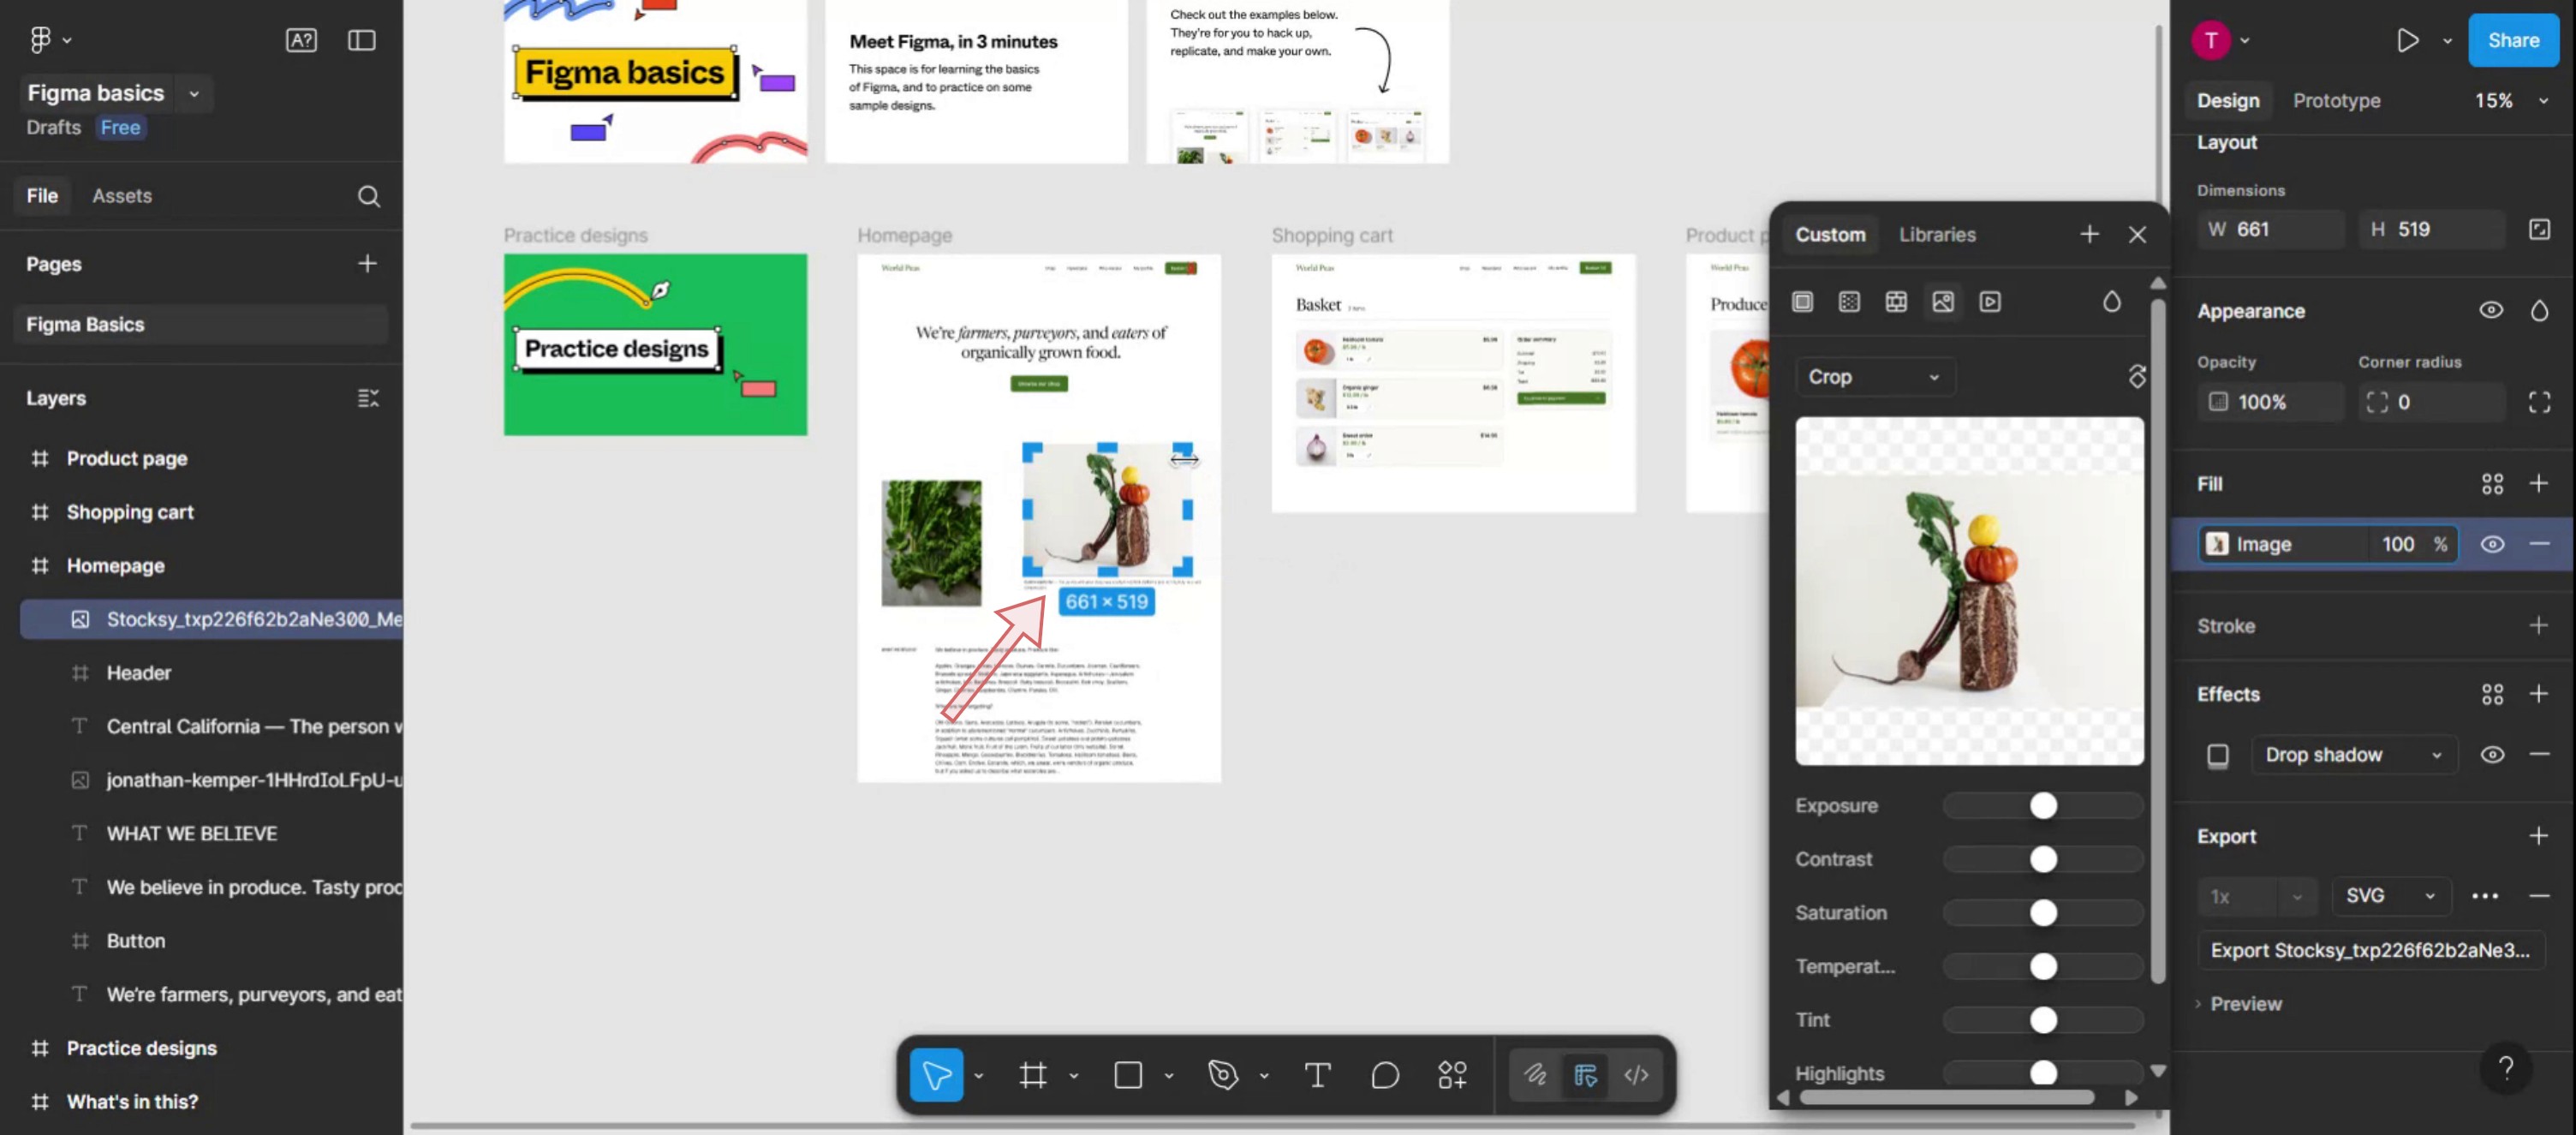
Entre no modo de corte: Pode clicar no botão "Cortar" na barra de ferramentas ou usar o atalho de teclado (Option/Alt + duplo clique).
Ajuste os controlos de corte: Surgirão controlos azuis à volta da imagem.
Arraste estes controlos para redimensionar a área de corte.
Reposicione a imagem: Clique e arraste dentro da área de corte para mover a imagem dentro da caixa de corte.
Finalize o corte: Clique fora da imagem ou prima Esc/Return para aplicar as alterações.
Mantenha a proporção: Mantenha premido Shift/Control enquanto arrasta para manter a proporção original.
Redimensione os lados opostos: Mantenha premido Option/Alt enquanto arrasta para redimensionar a imagem nos lados opostos.
Guia Passo a Passo: Como Cortar uma Imagem no Figma
Passo 1
Comece por selecionar a imagem do modelo no Figma.

Passo 2
Clique na secção da imagem dentro deste menu para abrir uma janela pop-up.
Passo 3
Clique no menu suspenso.

Passo 4
Selecione a opção de corte,

Passo 5
A função de corte será agora ativada para a imagem. Ajuste o corte de acordo com os seus requisitos específicos.
Dicas Pro para Cortar uma Imagem no Figma
Importe a imagem para a sua tela
Arraste e largue um ficheiro de imagem para a tela do Figma ou use a opção Ficheiro > Colocar imagem para o inserir.Selecione a camada da imagem
Clique na imagem que pretende cortar. Certifique-se de que apenas a imagem está selecionada e não agrupada com outros elementos.Clique no modo “Cortar”
Na barra de ferramentas superior, procure o menu suspenso que diz “Preenchimento.” Clique nele e escolha “Cortar” nas opções de modo.Ajuste a área de corte
Arraste as alças pretas a partir das margens ou dos cantos para definir a área visível da imagem.Reposicione a imagem dentro da moldura
Clique e arraste a imagem dentro da caixa de corte para ajustar que parte da imagem é mostrada.Clique em “Concluído” ou prima Enter
Assim que estiver satisfeito com o corte, prima Enter ou clique em qualquer ponto fora da imagem para aplicar as alterações.
Armadilhas Comuns e Como Evitá-las
A opção Cortar não está visível
Certifique-se de que selecionou uma imagem e não uma forma ou uma camada agrupada. A ferramenta Cortar só aparece para imagens.A imagem estica em vez de ser cortada
Evite usar as opções Escala ou Ajustar se quiser ocultar partes da imagem. Use especificamente o modo Cortar.Mover acidentalmente a moldura inteira
Use as alças brancas de corte para ajustar o corte, e não a caixa delimitadora azul exterior, que move a moldura.A área cortada é reposta após redimensionar
Se redimensionar a moldura da imagem após cortar, verifique novamente se as definições de corte continuam intactas.O corte não é aplicado
Prima Enter ou clique fora da área da imagem para confirmar e finalizar o corte. Se não for aplicado, as alterações podem ser perdidas.
Perguntas frequentes comuns sobre recortar imagens no Figma
Como recorto uma imagem no Figma?
Seleciona a imagem, vai ao menu pendente Fill, escolhe Crop, ajusta a caixa de recorte e depois prime Enter para aplicar.Posso recortar várias imagens de uma vez?
Não, o recorte tem de ser feito individualmente para cada imagem. O Figma não suporta recorte em lote.Qual é a diferença entre recorte e máscara no Figma?
O recorte oculta diretamente partes da imagem. A máscara usa outra forma para definir a área visível.Posso anular um recorte no Figma?
Sim, seleciona a imagem, volta ao modo Fill e repõe ou reajusta a área de recorte.O recorte reduz o tamanho da imagem?
Não, o recorte oculta visualmente partes da imagem, mas não reduz o tamanho do ficheiro nem remove os pixéis ocultos.Como gravar o ecrã no Mac?
Para gravar o ecrã num Mac, podes usar o Trupeer AI. Permite capturar o ecrã inteiro e oferece capacidades de IA como adicionar avatares de IA, adicionar narração e aplicar zoom in e zoom out no vídeo. Com a funcionalidade de tradução de vídeo por IA do Trupeer, podes traduzir o vídeo para mais de 30 idiomas.Como adicionar um avatar de IA a uma gravação de ecrã?
Para adicionar um avatar de IA a uma gravação de ecrã, vais precisar de usar uma ferramenta de gravação de ecrã com IA. O Trupeer AI é uma ferramenta de gravação de ecrã com IA, que te ajuda a criar vídeos com vários avatares e também a criar o teu próprio avatar para o vídeo.Como gravar o ecrã no Windows?
Para gravar o ecrã no Windows, podes usar a Barra de Jogo integrada (Windows + G) ou uma ferramenta de IA avançada como o Trupeer AI para funcionalidades mais avançadas como avatares de IA, narração, tradução, etc.Como adicionar narração a um vídeo?
Para adicionar narração a vídeos, descarrega a extensão Trupeer AI para o Chrome. Depois de te registares, carrega o teu vídeo com voz, escolhe a narração desejada no Trupeer e exporta o vídeo editado.Como faço zoom numa gravação de ecrã?
Para ampliar durante uma gravação de ecrã, usa os efeitos de zoom no Trupeer AI, que te permitem aproximar e afastar em momentos específicos, melhorando o impacto visual do conteúdo do teu vídeo.
Leituras sugeridas
Gerador de documentação técnica
Software de base de conhecimentos
Como ocultar nomes de frames no Figma
Como guardar ficheiro do Figma
Como criar uma grelha no Figma
Tutoriais relacionados

