

Como adicionar imagens ao Notion
Aprenda a adicionar imagens às páginas do Notion facilmente. Este guia abrange o carregamento de imagens, a incorporação a partir de ligações, a utilização de arrastar e largar e a organização de elementos visuais no seu espaço de trabalho.
Eis uma descrição dos métodos:
1. Carregar imagens:
Clique no botão "+" na margem esquerda ao passar o cursor sobre uma nova linha, ou escreva /image e prima Enter. Escolha "Carregar" e selecione o ficheiro de imagem no seu computador.
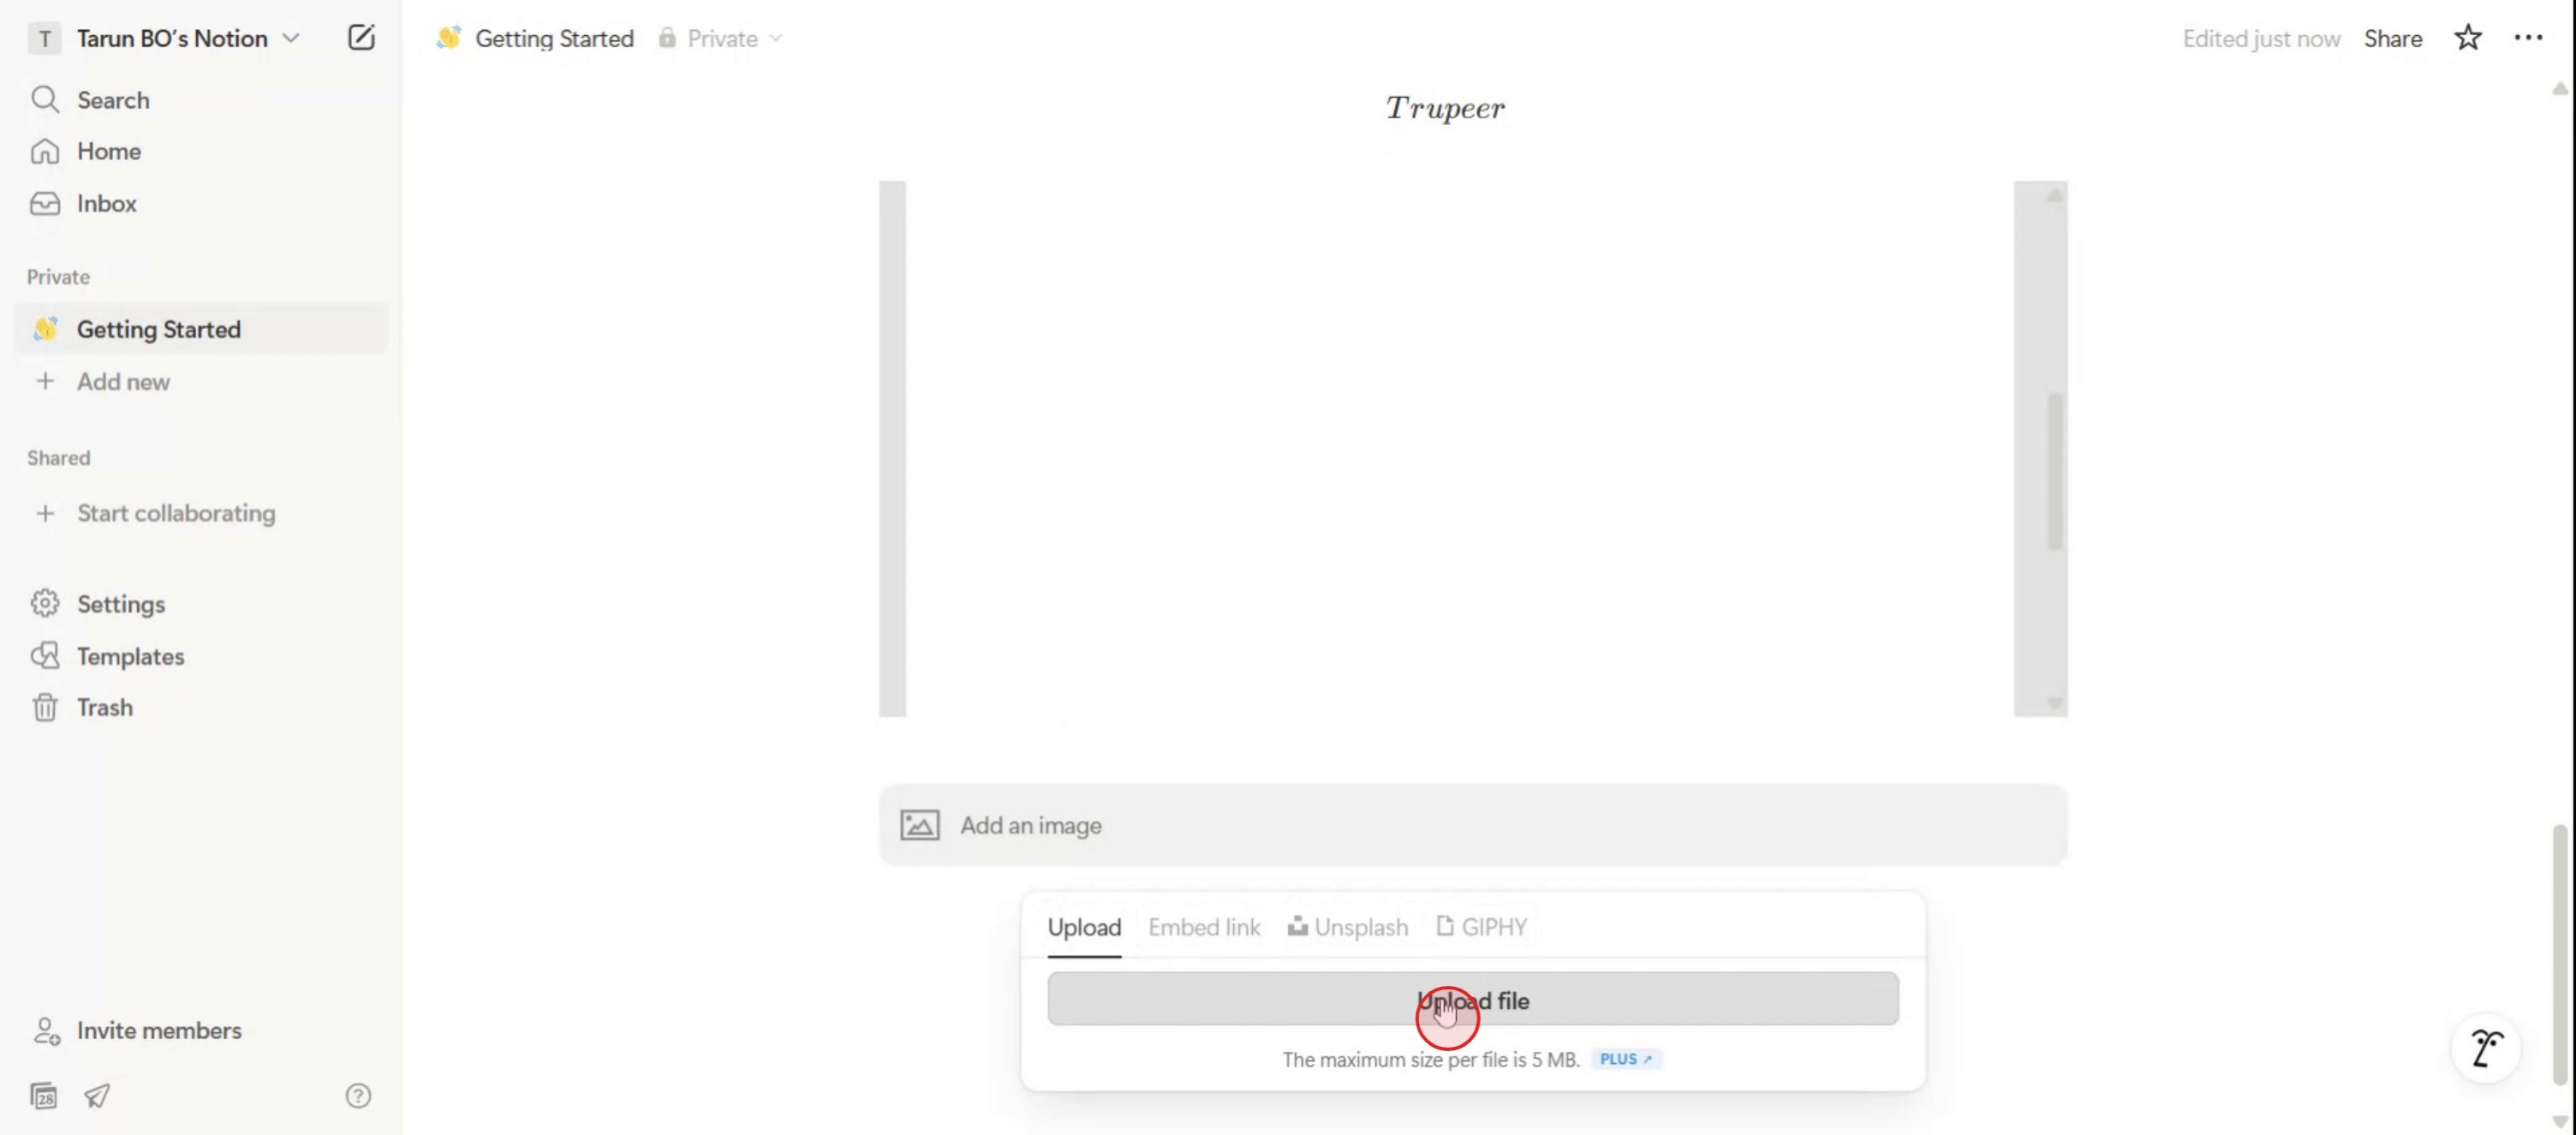
2. Incorporar imagens a partir de um URL:
Clique no botão "+" ou escreva /image. Escolha "Incorporar ligação" e cole o URL da imagem.
3. Utilizar o Unsplash:
Clique no botão "+" ou escreva /image.Escolha "Unsplash" e procure a imagem de que precisa.
4. Arrastar e largar:
Basta arrastar o ficheiro de imagem do seu computador e largá-lo na sua página do Notion.
5. Dicas adicionais:
Pode redimensionar, mover e adicionar legendas às suas imagens depois de serem adicionadas. O Notion permite-lhe apresentar imagens de diferentes formas, como em largura total, centradas ou alinhadas à esquerda/direita. Nas vistas de galeria, também pode escolher a forma como a imagem é apresentada dentro do cartão (por exemplo, capa, imagem completa).
Guia passo a passo: Como adicionar imagens ao Notion
Passo 1
Para começar, navegue até à consola de texto do Notion. Basta escrever uma barra oblíqua ("/") seguida de introduzir o comando image.

Passo 2
Clique na opção de imagem.

Passo 3
Clique em Carregar ficheiro e selecione a imagem pretendida no seu dispositivo.
Passo 4
Parabéns! Carregou com sucesso uma imagem para o seu espaço de trabalho do Notion.

Dicas profissionais para adicionar imagens ao Notion
Abra a sua página do Notion
Comece por navegar até à página do Notion onde pretende adicionar a imagem. Pode usar uma página existente ou criar uma nova usando a opção + Nova Página na barra lateral.Use o comando de barra para adicionar uma imagem
Digite /image e prima Enter. Isto abrirá o bloco de imagem, dando-lhe opções para carregar um ficheiro ou colar um link de imagem.Carregue a partir do seu dispositivo
Clique em Carregar no bloco de imagem para procurar ficheiros no seu computador. Selecione a imagem que pretende carregar, e esta será incorporada diretamente na página.Cole um link da Web
Se quiser adicionar uma imagem online, escolha Incorporar link e cole o URL direto da imagem. O Notion irá obter e apresentar a imagem em linha na sua página.Arraste e largue para um carregamento rápido
Também pode arrastar um ficheiro de imagem diretamente do seu ambiente de trabalho ou do explorador de ficheiros e largá-lo na página do Notion. Será carregado automaticamente e aparecerá no local.
Erros comuns e como evitá-los
Carregar imagens com formatos não suportados
O Notion suporta os tipos de imagem mais comuns, como JPG, PNG e GIF. Evite usar ficheiros TIFF ou RAW, que podem não ser carregados corretamente.Incorporar imagens com links quebrados
Ao usar um link para incorporar uma imagem, certifique-se de que é um link direto que termina em .jpg, .png ou .gif. Se o link não for direto, a imagem pode não ser exibida.Imagens que não redimensionam corretamente
Se estiver a tentar criar imagens lado a lado, coloque-as em colunas separadas em vez de tentar redimensioná-las manualmente umas ao lado das outras.Não otimizar o tamanho das imagens
Ficheiros de imagem grandes podem tornar a página mais lenta. Comprima ou redimensione as suas imagens antes de as carregar para um carregamento da página mais rápido e melhor desempenho.Esquecer-se de adicionar legendas a elementos visuais importantes
Imagens sem contexto podem confundir os leitores. Use a opção Adicionar legenda para maior clareza, especialmente quando a imagem dá suporte a um parágrafo ou ideia.
Perguntas frequentes comuns sobre adicionar imagens ao Notion
Posso carregar várias imagens de uma vez?
Sim, pode arrastar e largar vários ficheiros de imagem para uma página ou carregá-los um a um para uma galeria ou disposição em colunas.Posso mover imagens entre secções da página?
Sim, clique e arraste o bloco de imagem para o reposicionar em qualquer lugar da página ou movê-lo para diferentes alternadores ou colunas.Posso colar uma imagem diretamente da área de transferência?
Sim, se tiver copiado uma imagem, pode colá-la diretamente no Notion usando Ctrl+V (ou Cmd+V no Mac).As imagens carregadas no Notion contam para o armazenamento?
Sim, todos os ficheiros carregados, incluindo imagens, contam para a sua quota de armazenamento do Notion, especialmente nos planos gratuitos.Posso substituir uma imagem sem apagar o bloco?
Não, terá de apagar o bloco de imagem existente e inserir um novo para o substituir por outra imagem.Como gravar o ecrã num Mac?
Para gravar o ecrã num Mac, pode usar o Trupeer AI. Permite capturar o ecrã inteiro e fornece capacidades de IA, como adicionar avatares de IA, adicionar narração e adicionar zoom de aproximação e afastamento no vídeo. Com a funcionalidade de tradução de vídeo por IA da Trupeer, pode traduzir o vídeo para mais de 30 idiomas.Como adicionar um avatar de IA a uma gravação de ecrã?
Para adicionar um avatar de IA a uma gravação de ecrã, terá de usar uma ferramenta de gravação de ecrã com IA. O Trupeer AI é uma ferramenta de gravação de ecrã com IA, que ajuda a criar vídeos com vários avatares e também o ajuda a criar o seu próprio avatar para o vídeo.Como gravar o ecrã no Windows?
Para gravar o ecrã no Windows, pode usar a Barra de Jogos integrada (Windows + G) ou uma ferramenta avançada de IA como o Trupeer AI para funcionalidades mais avançadas, como avatares de IA, narração, tradução, etc.Como adicionar narração a um vídeo?
Para adicionar narração a vídeos, descarregue a extensão do Chrome do Trupeer AI. Depois de se registar, carregue o seu vídeo com voz, escolha a narração pretendida no Trupeer e exporte o seu vídeo editado.Como faço zoom numa gravação de ecrã?
Para fazer zoom durante uma gravação de ecrã, use os efeitos de zoom no Trupeer AI, que lhe permitem aproximar e afastar em momentos específicos, melhorando o impacto visual do conteúdo do seu vídeo.
As pessoas também perguntam
Gerador de documentação técnica
Software de base de conhecimentos
Como ativar o modo escuro no Notion
Como descarregar o Notion no Mac
Tutoriais relacionados

