
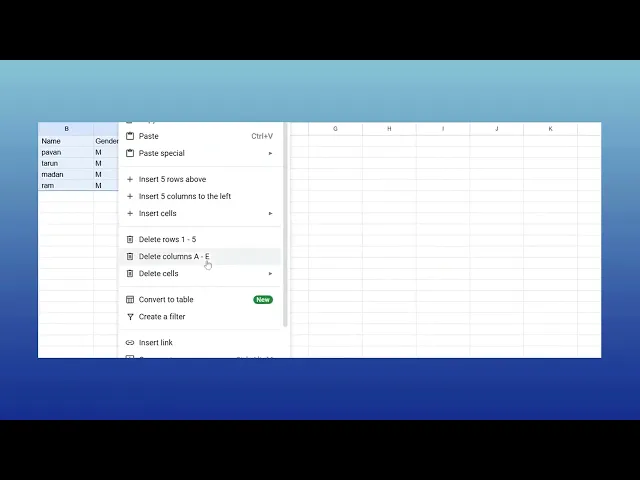
Jak utworzyć tabelę w Arkuszach Google — przewodnik krok po kroku
Chcesz efektywnie organizować dane w Arkuszach Google? Dowiedz się, jak utworzyć uporządkowaną tabelę z nagłówkami, formatowaniem i filtrami.
This document provides a straightforward process for creating a table within Google sheet.
Follow these steps to seamlessly organize your data into a well-structured table.
Creating a table in Google Sheets helps you organize, format, and analyze your data more easily. Whether you're starting with blank cells or formatting existing data, here's how to get started:
1. Open Your Spreadsheet
Go to Google Sheets and open the file where you'd like to insert a table.
2. Select the Data
With existing data: Highlight the cells you want to convert into a table.
Starting from scratch: Select a blank range where your table will go, choose the number of rows and columns you'll need.
3. Insert the Table
Click “Insert” from the top menu.
Then choose “Table” to generate a table layout (note: this feature may be more template-like depending on your account setup).
Alternative Method:
There’s no native "Format as Table" like in Excel, but you can manually format cells using borders, background colors, and filters for similar functionality.
4. Add Headers (Optional but Recommended)
If your table includes headers (like "Name", "Date", "Amount"), make sure they're in the first row.
You can then freeze the top row (View > Freeze > 1 row) so headers stay visible as you scroll.
5. Customize Your Table
Use the Borders button in the toolbar to add lines between cells.
Apply fill colors to alternate rows for better readability.
Click Format > Conditional formatting to add color rules based on your data.
6. Name Your Table (Optional)
While Google Sheets doesn’t officially name tables like Excel, you can name the range:
Select your table > right-click > “Define named range”.
Give it a unique name for easy reference in formulas.
7. Use Table Features
Sort and filter: Highlight your table and click the filter icon (funnel) to add dropdown filters.
Resize columns and rows: Hover over the edge of a column/row and drag to resize.
Add rows/columns: Right-click on a row or column label and choose Insert.
Step-by-Step Guide: How to create a table in Sheets
Step 1
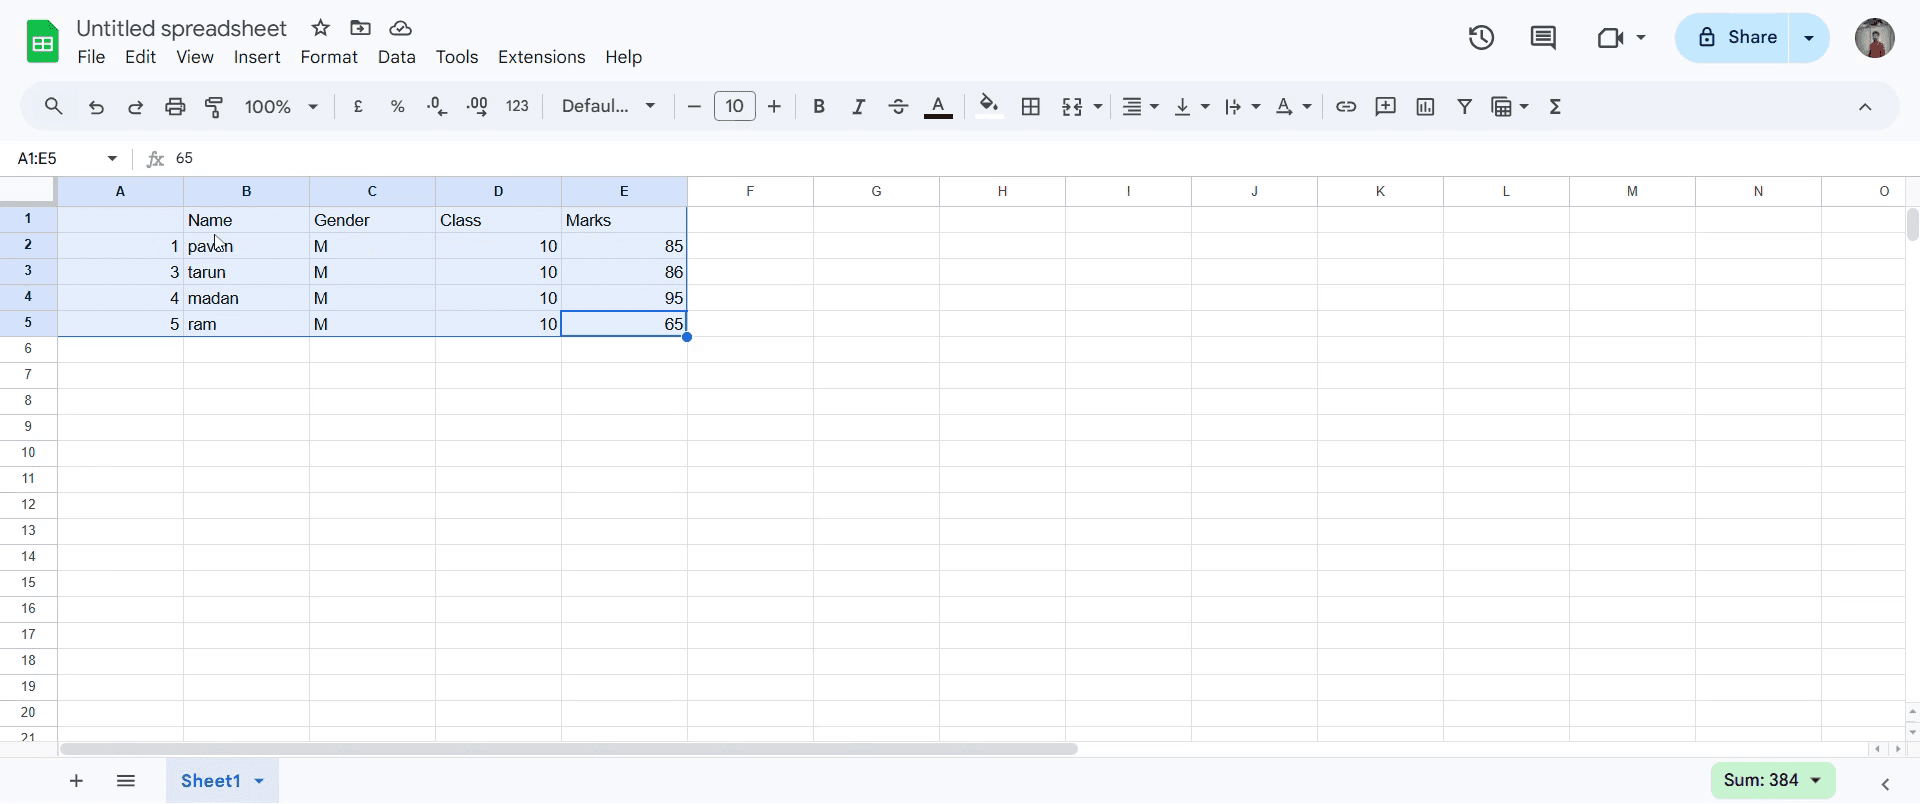
To begin, open your Google Spreadsheet. Select the dataset that you wish to organize into a table.
Step 2
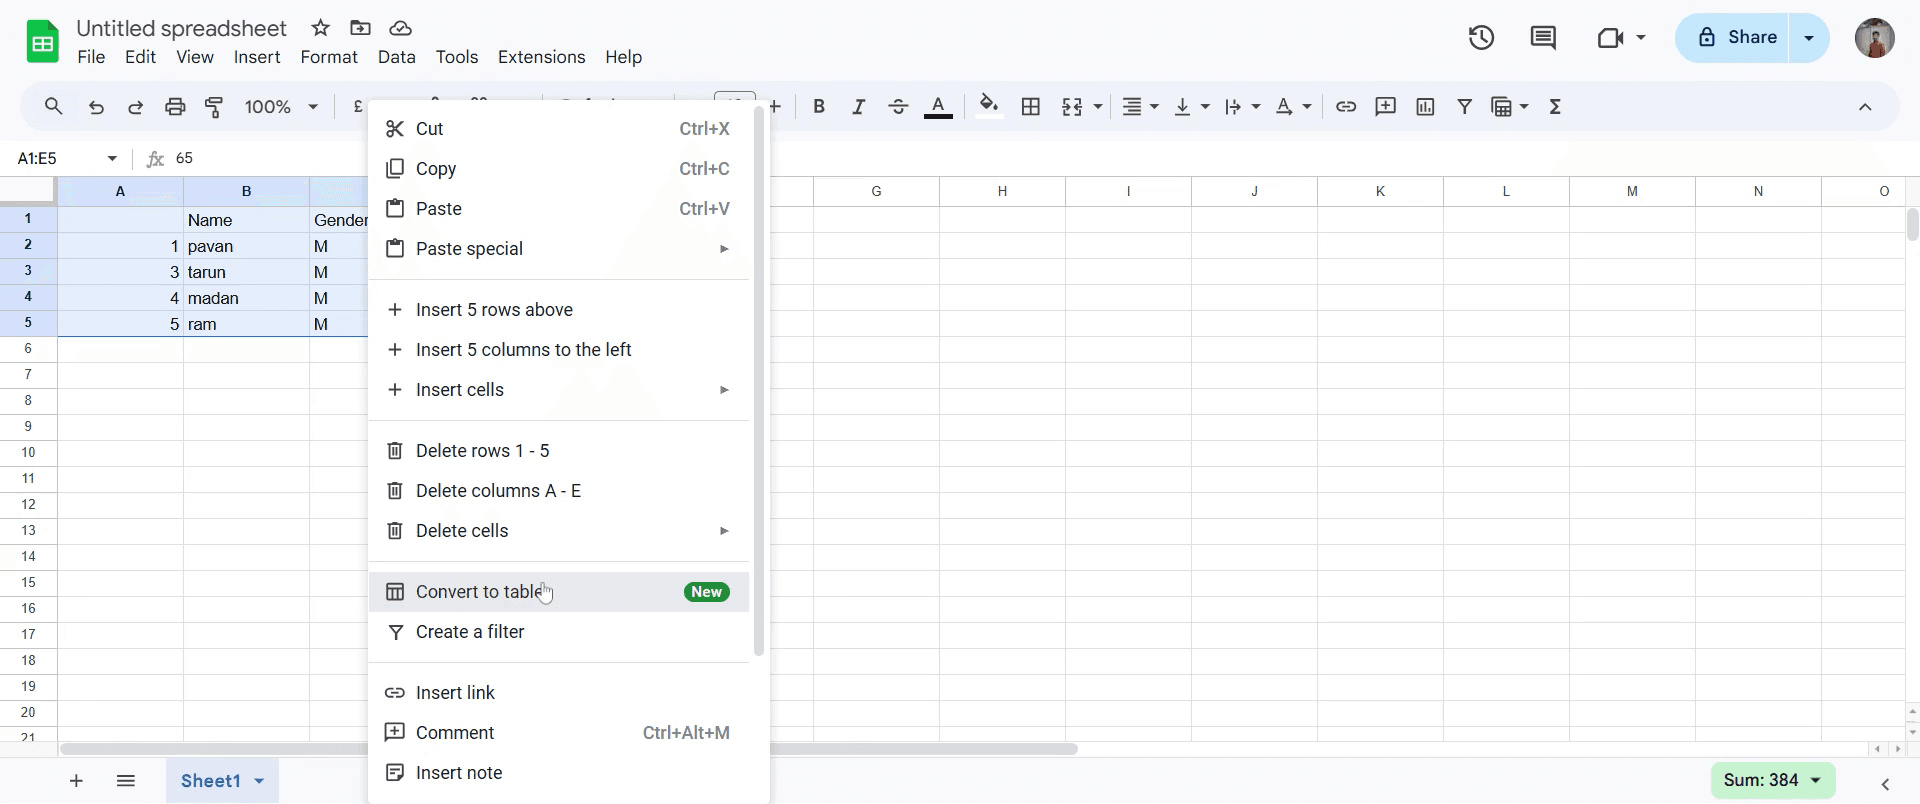
Right-click and Click on "Convert to table".
Step 3
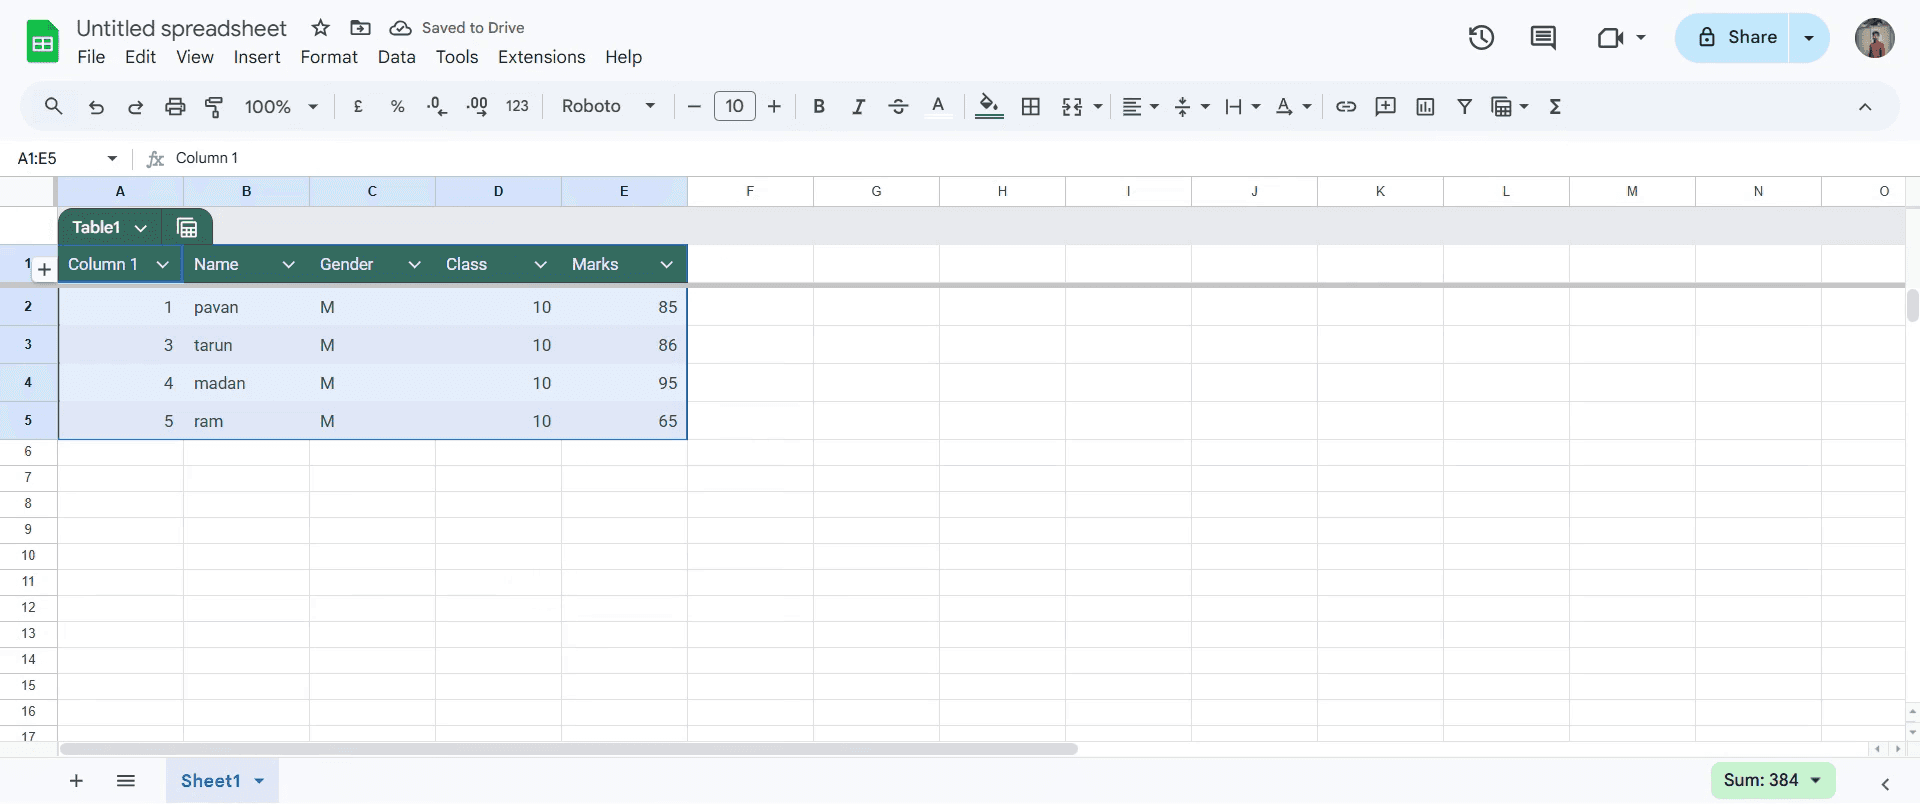
After clicking, its automatically convert data in to Table.
Pro tipy dotyczące tworzenia tabeli w Arkuszach Google
Używaj nagłówków w pierwszym wierszu i pogrub je, aby ułatwić czytanie tabeli.
Zastosuj obramowania za pomocą paska narzędzi, aby wizualnie oddzielić komórki tabeli.
Użyj opcji formatowania jako tabela, stosując naprzemienne kolory dla lepszej czytelności.
Najczęstsze błędy & jak ich uniknąć podczas tworzenia tabeli w Arkuszach Google
Zapomnienie o zamrożeniu wiersza z nagłówkami może utrudnić śledzenie nazw kolumn — przejdź do widoku > zamroź > 1 wiersz.
Nieprawidłowe sortowanie lub filtrowanie danych — użyj opcji danych > utwórz filtr, aby włączyć sortowanie.
Nieprawidłowe użycie scalonych komórek może powodować problemy z formatowaniem — unikaj scalania, chyba że jest to konieczne.
Najczęstsze pytania dotyczące tworzenia tabeli w Arkuszach Google
Jak sformatować tabelę w Arkuszach Google?
Wybierz opcję naprzemiennych kolorów w menu formatowania i zastosuj pogrubiony tekst do nagłówków.Czy mogę dodać filtr do mojej tabeli?
Tak, zaznacz swoje dane i kliknij dane > utwórz filtr, aby włączyć sortowanie i filtrowanie.Jak sprawić, aby moja tabela automatycznie aktualizowała się wraz z nowymi danymi?
Użyj zakresów dynamicznych z funkcjami takimi jak formuła tablicowa lub nazwane zakresy, aby automatycznie uwzględniać nowe dane.Jak nagrać ekran na mac?
Aby nagrywać ekran na komputerze Mac, możesz użyć Trupeer AI. Umożliwia przechwycenie całego ekranu i oferuje funkcje AI, takie jak dodawanie awatarów AI, dodawanie lektora, dodawanie przybliżenia i oddalenia w filmie. Dzięki funkcji tłumaczenia wideo Trupeer AI możesz przetłumaczyć wideo na 30+ języków.Jak dodać awatara AI do nagrania ekranu?
Aby dodać awatara AI do nagrania ekranu, musisz użyć narzędzia do nagrywania ekranu z AI. Trupeer AI to narzędzie do nagrywania ekranu z AI, które pomaga tworzyć filmy z wieloma awatarami oraz umożliwia stworzenie własnego awatara do wideo.Jak nagrać ekran na windows?
Aby nagrywać ekran w systemie Windows, możesz użyć wbudowanego paska gier (Windows + G) lub zaawansowanego narzędzia AI, takiego jak Trupeer AI, aby uzyskać bardziej zaawansowane funkcje, takie jak awatary AI, lektor, tłumaczenie itd.
Jak dodać lektora do wideo?
Aby dodać lektora do filmów, pobierz rozszerzenie trupeer ai do Chrome. Po rejestracji prześlij swoje wideo z lektorem, wybierz wybrany lektor w trupeer i wyeksportuj edytowane wideo.Jak przybliżyć obraz w nagraniu ekranu?
Aby przybliżyć obraz podczas nagrywania ekranu, użyj efektów przybliżenia w Trupeer AI, które pozwalają przybliżać i oddalać w określonych momentach, wzmacniając wizualny efekt Twojej treści wideo.
Polecane lektury
Generator dokumentacji technicznej
Jak zamienić obraz w kolorowankę w Canvie
Jak drukować dwustronnie w Canvie
Powiązane samouczki