

Hoe sluit je een Jira-ticket
Leer hoe je een Jira-ticket op de juiste manier sluit met behulp van workflowtransities. Stapsgewijze handleiding voor het als voltooid markeren van issues, het oplossen van bugs en het afronden van taken in Jira.
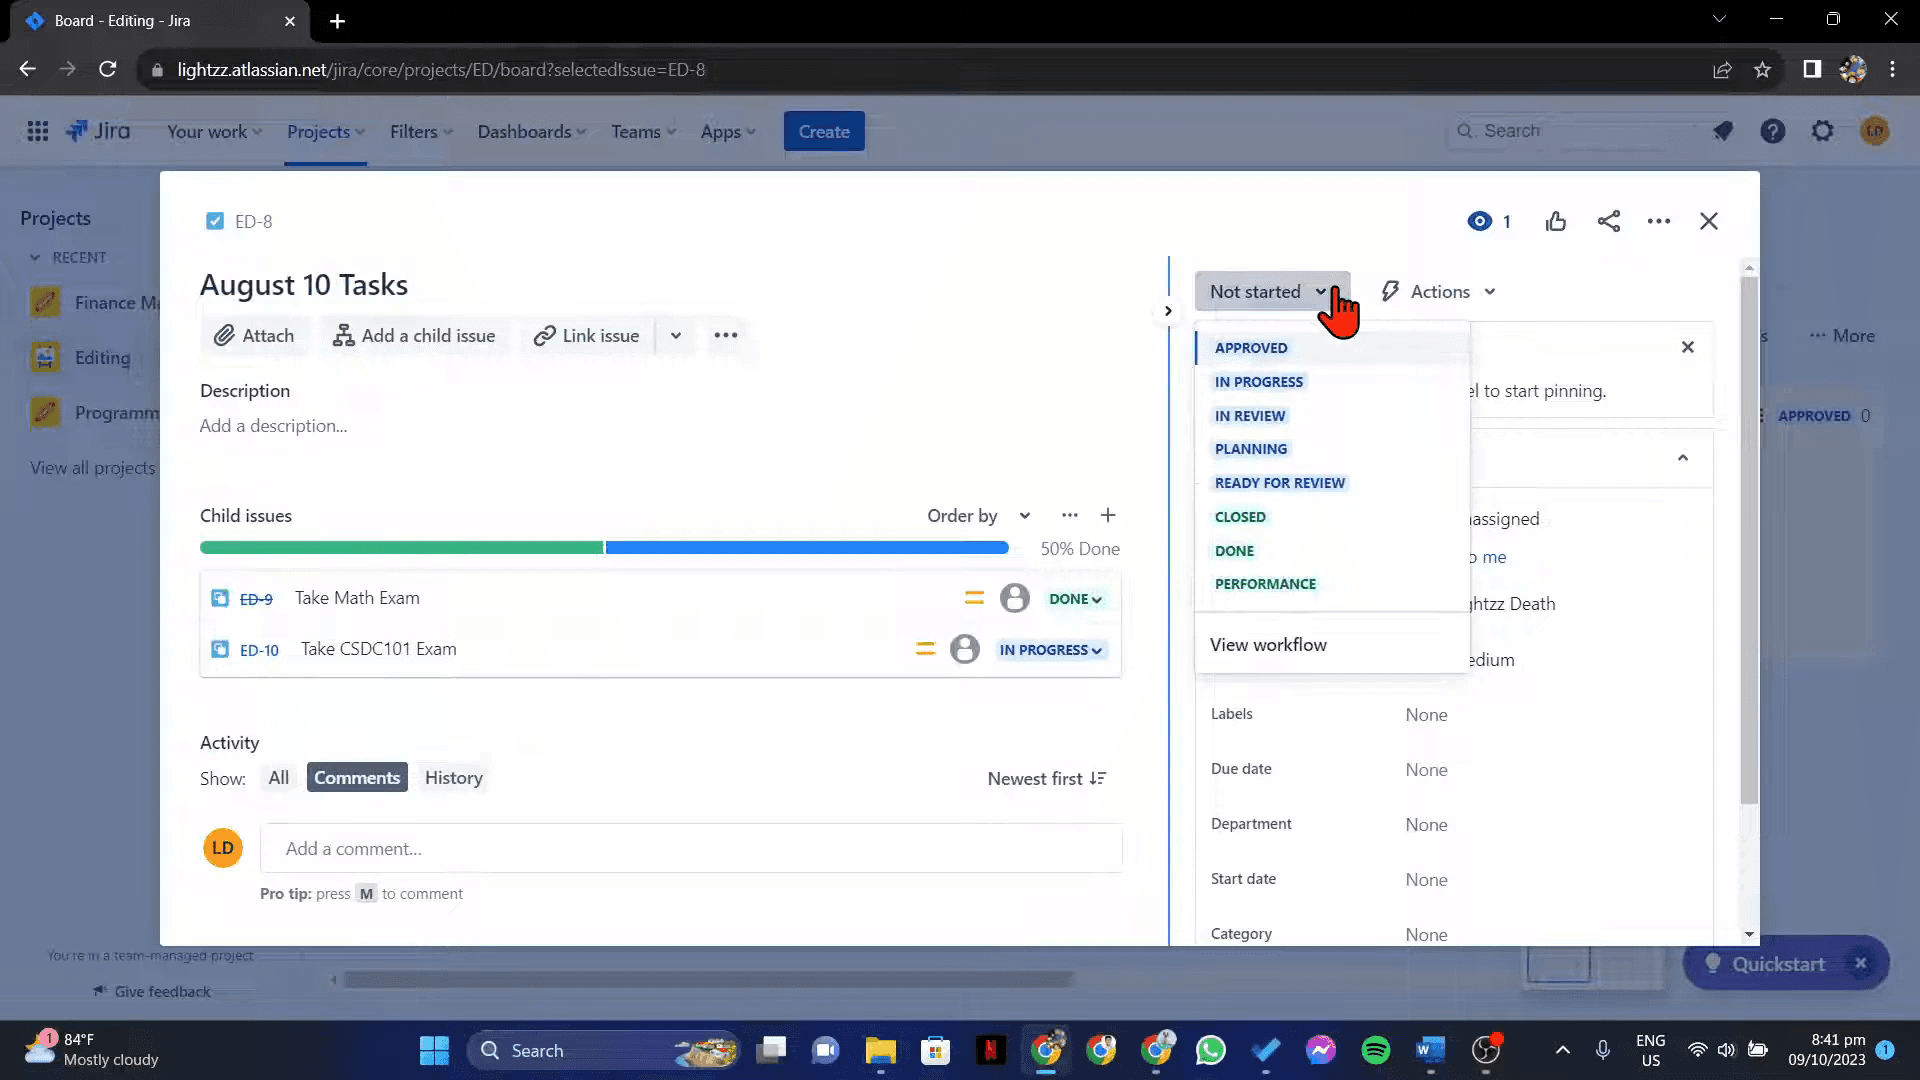
Om een Jira-ticket te sluiten, moet je het overzetten naar een status die voltooiing aangeeft, zoals "Done" of "Resolved". Dit doe je door het ticket te openen, de huidige status te vinden en deze te wijzigen naar de juiste "gesloten" status binnen de workflow van je project. Je kunt het ticket ook slepen naar een "Done"-kolom op een bord als je project een Kanban- of Scrum-bord gebruikt.
Hier volgt een meer gedetailleerde uitleg:
1. Open het ticket: Navigeer naar het specifieke Jira-ticket dat je wilt sluiten.
2. Zoek de status: Vind de huidige status van het ticket, die meestal duidelijk zichtbaar wordt weergegeven.
3. Wijzig de status: Klik op de huidige status en selecteer de status die aangeeft dat het werk is voltooid, zoals "Done", "Resolved" of "Closed".
4. Bevestig de wijziging: Sommige workflows vereisen mogelijk dat je oplossingsdetails opgeeft of gerelateerde issues koppelt voordat het ticket volledig wordt gesloten.
5. Als alternatief, gebruik een bord: Als je project een Kanban- of Scrum-bord gebruikt, kun je het ticket vaak rechtstreeks naar de "Done"-kolom slepen om het te sluiten.
Stapsgewijze handleiding: Hoe sluit je een Jira-ticket
Stap 1
Open het ticket in Jira.

Stap 2
Klik op de huidige Status van het ticket. En markeer het Done.
Stap 3
Klik op de optie "Closed".

Stap 4
Navigeer ter controle van de afsluiting naar de sectie Resolved.

Pro-tips voor het afsluiten van een Jira-ticket
Log in op je Jira-account
Open je Jira-werkruimte en meld je aan met je inloggegevens.Navigeer naar het projectbord
Ga naar het project dat de ticket bevat die je wilt afsluiten. Gebruik indien nodig de zoekbalk of filters.Zoek het specifieke issue of ticket
Klik op de issue-key of samenvatting om de ticket te openen die je wilt afsluiten.Controleer de ticketstatus en checklist
Zorg ervoor dat alle vereiste taken, subtaken en checklistitems zijn voltooid. Voeg eventuele benodigde bestanden of opmerkingen toe.Wijzig de ticketstatus naar Done of Closed
Klik op de vervolgkeuzelijst voor de workflowstatus (meestal bovenaan het issue) en selecteer de optie Done of Closed, afhankelijk van je workflowconfiguratie.Voeg indien gevraagd een resolutie toe
Sommige workflows vereisen dat je een resolutietype selecteert (zoals Fixed, Won’t Fix, Duplicate). Kies de juiste optie en bevestig.Bevestig de overgang
Klik op de knop Confirm of Transition om de ticket officieel af te sluiten.
Veelvoorkomende valkuilen en hoe je ze kunt vermijden
Proberen een ticket af te sluiten zonder de juiste machtigingen
Alleen gebruikers met de juiste rol of machtigingen kunnen issues naar Done of Closed verplaatsen. Neem indien nodig contact op met je Jira-beheerder.Ticket verplaatst niet naar de laatste kolom
Sommige workflows vereisen goedkeuringen of extra overgangen voordat een ticket als Done kan worden gemarkeerd.De selectie van een resolutie overslaan
Als een resolutievak verplicht is en leeg blijft, kan de ticket onvolledig lijken, zelfs nadat deze als gesloten is gemarkeerd.Onvolledig werk afsluiten
Controleer altijd dubbel of de ticket voldoet aan de Definition of Done. Onvolledige taken kunnen invloed hebben op teamstatistieken.Resolved verwarren met Closed
Sommige Jira-configuraties scheiden Resolved (werk voltooid) van Closed (eindcontrole voltooid). Controleer de workflow van je team voor duidelijkheid.
Algemene veelgestelde vragen over het sluiten van Jira-tickets
Wat is het verschil tussen Done en Closed in Jira?
Het hangt af van je workflow. Done betekent meestal dat het werk is afgerond, terwijl Closed volledige goedkeuring of implementatie kan aangeven.Kan ik een gesloten ticket opnieuw openen in Jira?
Ja, als je workflow dit toestaat. Klik op de optie Reopen of een vergelijkbare overgang, als die beschikbaar is.Waarom zie ik de optie Close niet?
Mogelijk heb je niet de vereiste machtigingen, of bevat de workflow geen stap Close.Kunnen tickets automatisch worden gesloten in Jira?
Ja, Jira kan zo worden geconfigureerd dat tickets automatisch worden gesloten op basis van voorwaarden, zoals een geslaagde implementatie of tijdsgebonden regels.Moet ik een resolution invullen bij het sluiten van een ticket?
Veel workflows vereisen dat het resolution-veld wordt ingevuld bij het overgaan naar Done of Closed.Hoe neem je een schermopname op mac?
Om een schermopname op een Mac te maken, kun je Trupeer AI gebruiken. Hiermee kun je het volledige scherm vastleggen en krijg je AI-mogelijkheden zoals het toevoegen van AI-avatars, voice-over toevoegen en in- en uitzoomen in de video. Met de AI-videotranslatiefunctie van Trupeer kun je de video vertalen naar meer dan 30 talen.Hoe voeg je een AI-avatar toe aan een schermopname?
Om een AI-avatar toe te voegen aan een schermopname, moet je een AI-schermopnametool gebruiken. Trupeer AI is een AI-schermopnametool die je helpt video's met meerdere avatars te maken en je ook helpt bij het maken van je eigen avatar voor de video.Hoe neem je een schermopname op Windows?
Om een schermopname op Windows te maken, kun je de ingebouwde Game Bar (Windows + G) gebruiken of een geavanceerde AI-tool zoals Trupeer AI voor meer geavanceerde functies zoals AI-avatars, voice-over, vertaling enz.Hoe voeg je voice-over toe aan video?
Om voice-over aan video's toe te voegen, download je de Chrome-extensie van Trupeer AI. Nadat je je hebt aangemeld, upload je je video met stem, kies je de gewenste voice-over van Trupeer en exporteer je je bewerkte video.Hoe zoom ik in op een schermopname?
Gebruik tijdens een schermopname de zoomeffecten in Trupeer AI, waarmee je op specifieke momenten kunt in- en uitzoomen en zo de visuele impact van je videocontent vergroot.
Aanbevolen artikelen
Generator voor technische documentatie
Hoe je een Jira-backlog exporteert naar Excel
Hoe je het issue-type in Jira wijzigt
Hoe je in bulk bijwerkt in Jira
Gerelateerde tutorials

