
如何在 Canva 中更改不透明度
了解如何在 Canva 中更改元素的不透明度以创建透明效果。分步指南:调整文本、图片和形状的透明度
要在 Canva 中调整元素的不透明度或透明度,请选择该元素,找到透明度图标(棋盘格或淡化的方块),然后使用滑块来调整透明度级别。您还可以在输入框中输入具体数值(0-100)。
详细步骤:
1. 选择元素:点击您在 Canva 设计中想要变透明的具体图片、文本框、形状或其他元素。
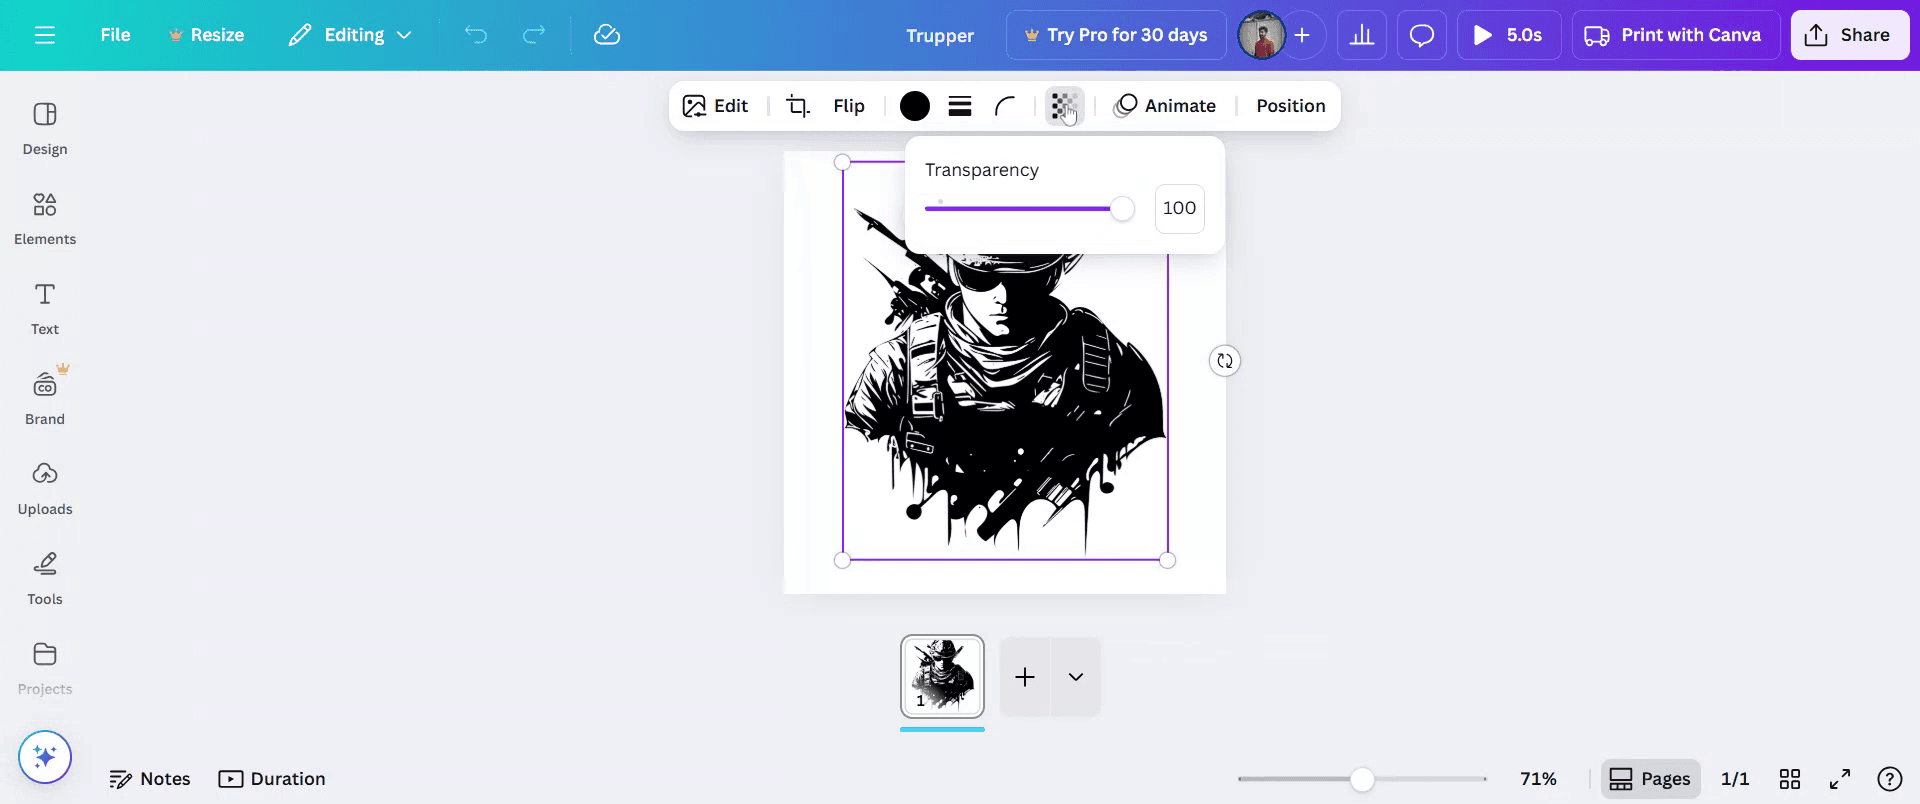
2. 访问透明度工具:找到透明度图标,它看起来像棋盘格或淡化的方块。此图标通常位于 Canva 编辑器顶部工具栏中。
3. 调整滑块:选中后,会出现一个滑块。向左拖动滑块可降低不透明度(使元素更透明),向右拖动可提高不透明度(使元素更不透明)。您也可以在滑块旁边的输入框中输入具体百分比(0-100)。
4. 预览更改:当您调整滑块时,您会在设计画布上实时看到元素透明度的更新。
5. 完成设计:点击所选元素或对象外的任意位置以取消选择并完成不透明度调整。
分步指南:如何在 Canva 中更改不透明度
步骤 1
首先,在 Canva 中选择您想要编辑的现有项目。

步骤 2
接下来,点击项目中您希望修改的具体元素。

步骤 3
点击“透明度”选项,并将透明度级别调整到您喜欢的程度。
步骤 4
当您对更改满意后,点击“分享”以分发您的项目。

在 Canva 中更改透明度的专业技巧
在 Canva 中打开你的设计
登录 Canva,打开你想调整某个元素透明度的设计。选择你要编辑的元素
点击你想更改透明度的图片、文本框、形状或图形。点击透明度图标
查看工具栏右上角,点击代表透明度的棋盘格图标。调整透明度滑块
使用滑块更改透明度级别。向左滑可降低透明度,向右滑可提高透明度,最高可达 100%。预览并微调
检查你的设计,看看调整后的透明度效果如何。根据需要进一步修改,以获得更好的平衡和清晰度。
常见问题以及如何避免
透明度图标不可见
请确保你已选中一个元素。只有在可编辑对象处于活动状态时,透明度图标才会显示。透明度未应用到背景
若要更改背景透明度,请在背景上添加一个形状或图层,然后改为调整其透明度。忘记单独调整文本
如果你正在编辑分组项目,请记住文本和形状可能需要逐一调整。透明度过低导致元素难以看清
避免将透明度设置得过低,尤其是文本或徽标等关键元素,以保持可读性。下载后透明度没有保留
在 PDF 或 JPG 格式中,透明效果看起来可能会有所不同。下载带有透明度的设计时,使用 PNG 可获得更好的效果。
关于在 Canva 中更改不透明度的常见问题
如何在 Canva 中调整某个元素的不透明度
选择该元素,点击工具栏中的透明度图标,然后将滑块移动到所需的级别。我可以一次更改多个项目的不透明度吗
可以,你可以选择多个元素并一起调整透明度。不透明度适用于文本和图片吗
可以,你可以更改文本、图片、形状以及其他设计元素的不透明度。我可以设置自定义的不透明度百分比吗
可以,你可以使用滑块,或手动输入 0 到 100 之间的数值,以便精确控制。Canva 的免费版支持不透明度功能吗
可以,免费用户和 Pro 用户都可以使用不透明度控制。如何在 Mac 上录屏?
要在 Mac 上录屏,你可以使用 Trupeer AI。它可以让你捕获整个屏幕,并提供诸如添加 AI 虚拟形象、添加配音、在视频中放大和缩小等 AI 功能。借助 trupeer 的 AI 视频翻译功能,你可以将视频翻译成 30 多种语言。如何为录屏添加 AI 虚拟形象?
要为录屏添加 AI 虚拟形象,你需要使用一个 AI 录屏工具。 Trupeer AI 是一款 AI 录屏工具,可帮助你创建包含多个虚拟形象的视频,也能帮助你为视频创建自己的虚拟形象。如何在 Windows 上录屏?
要在 Windows 上录屏,你可以使用内置的 Game Bar(Windows + G),或者像 Trupeer AI 这样的高级 AI 工具,以获得更高级的功能,例如 AI 虚拟形象、配音、翻译等。如何为视频添加配音?
要为视频添加配音,请下载 trupeer ai chrome 扩展程序。注册后,上传带有声音的视频,从 trupeer 中选择所需的配音,然后导出你编辑后的视频。如何在录屏中放大画面?
要在录屏过程中放大画面,请使用 Trupeer AI 中的缩放效果,它可以让你在特定时刻放大和缩小,增强视频内容的视觉效果。

