
كيفية إدراج مربع نص في مستندات Google – دليل سريع
تعلم كيفية إدراج مربع نص في مستندات Google باستخدام أداة الرسم أو الجداول. مثالي للملاحظات الجانبية، والاقتباسات، والتخطيطات المخصصة.
يوفر هذا الدليل عملية خطوة بخطوة لمساعدتك على إضافة مربع نص إلى مستند Google Docs الخاص بك.
اتبع هذه التعليمات لإنشاء مربعات النص وتخصيصها بسهولة لمحتواك.
لا يحتوي Google Docs على زر مباشر لـ “مربع نص”، ولكن يمكنك إدراجه بسهولة باستخدام أداة الرسم.
دليل خطوة بخطوة
افتح مستندك
انتقل إلى مستند Google Doc الذي تريد مربع النص فيه.
أدرج رسماً
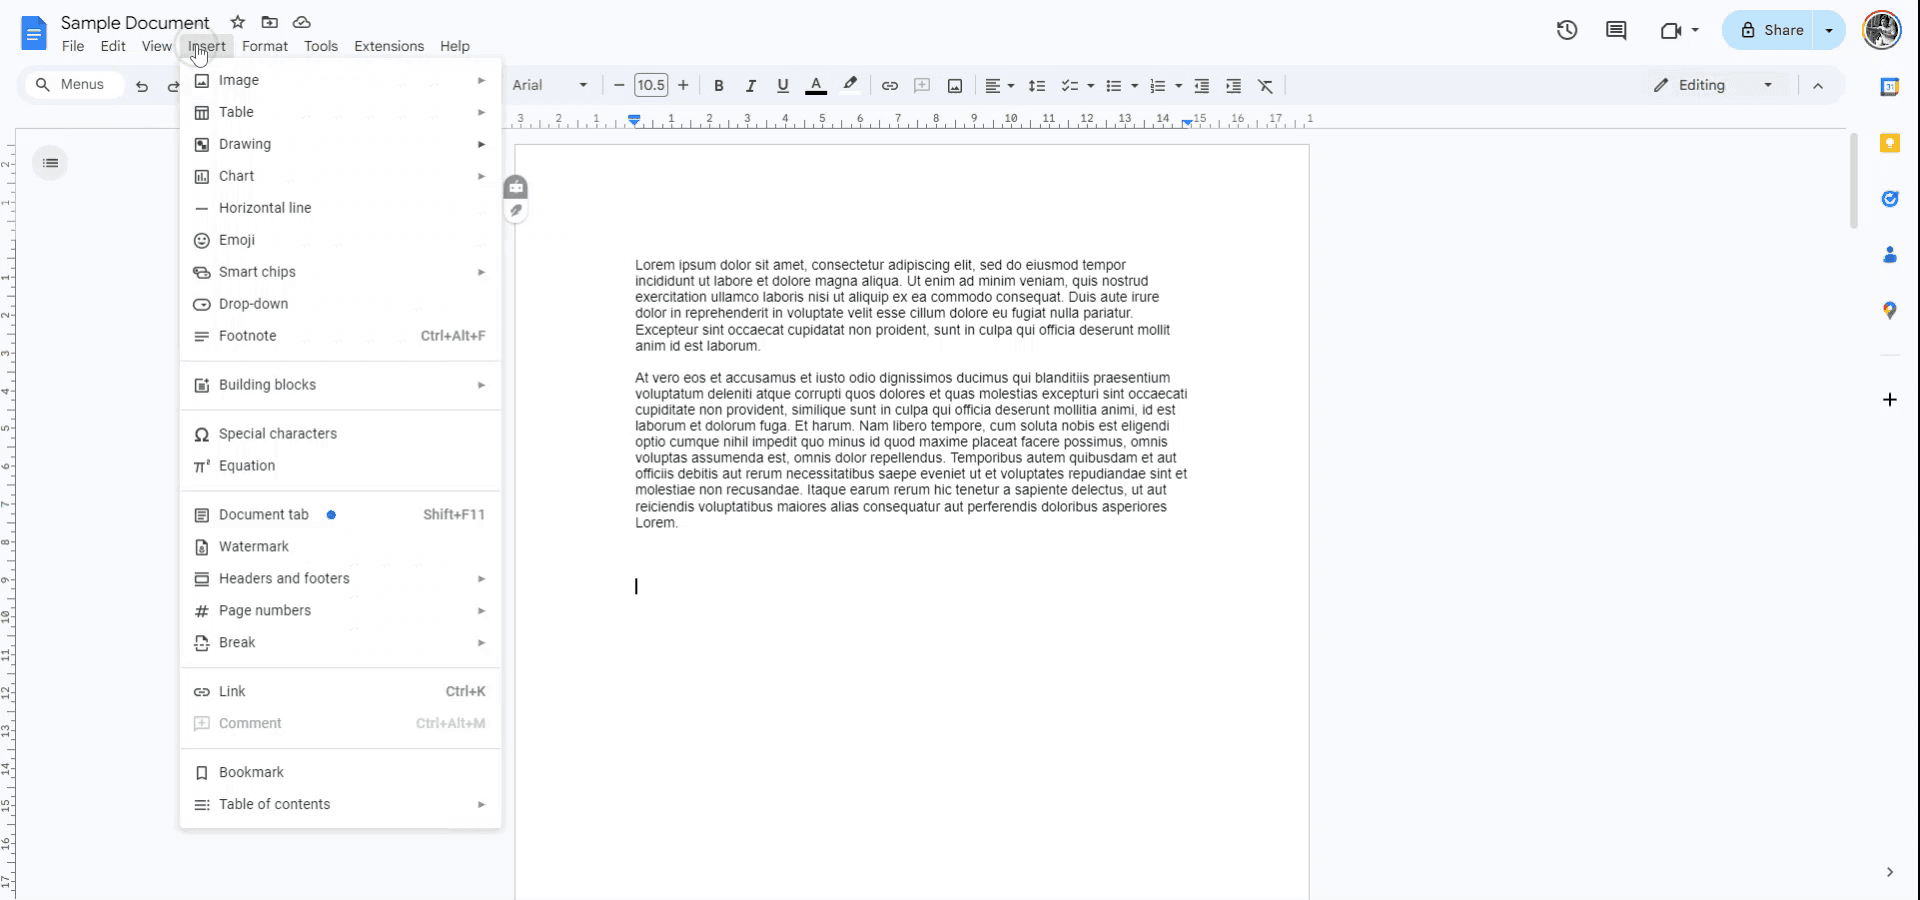
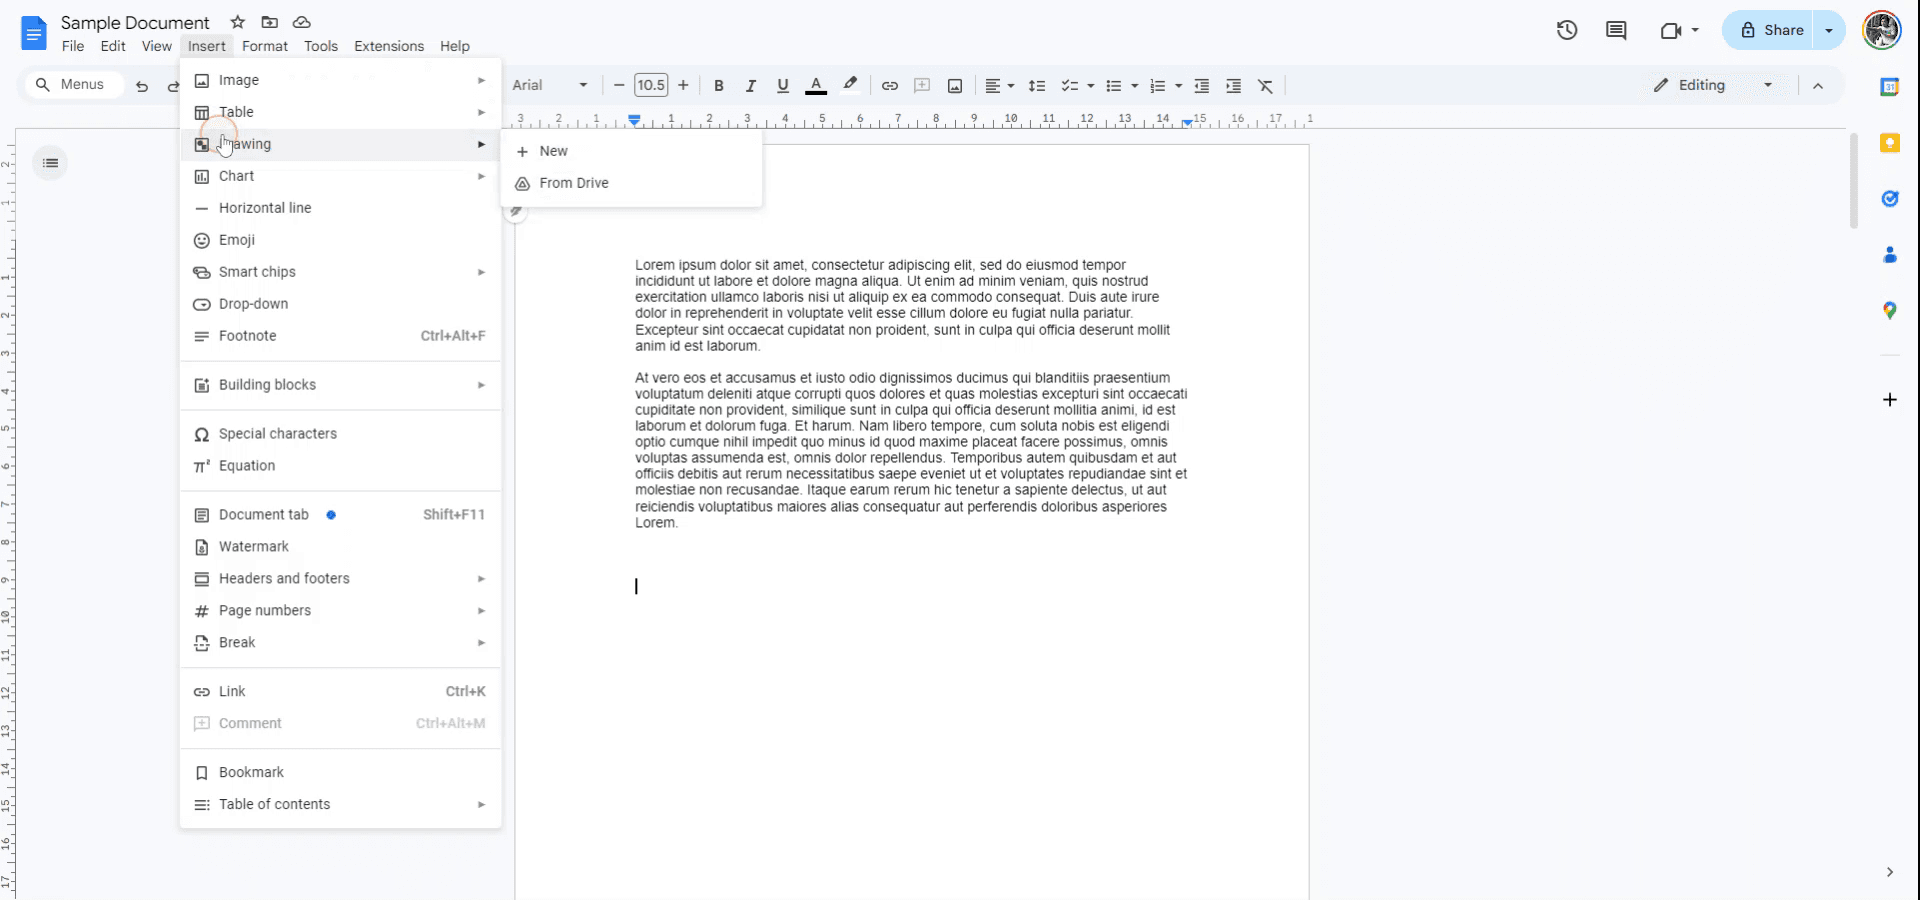
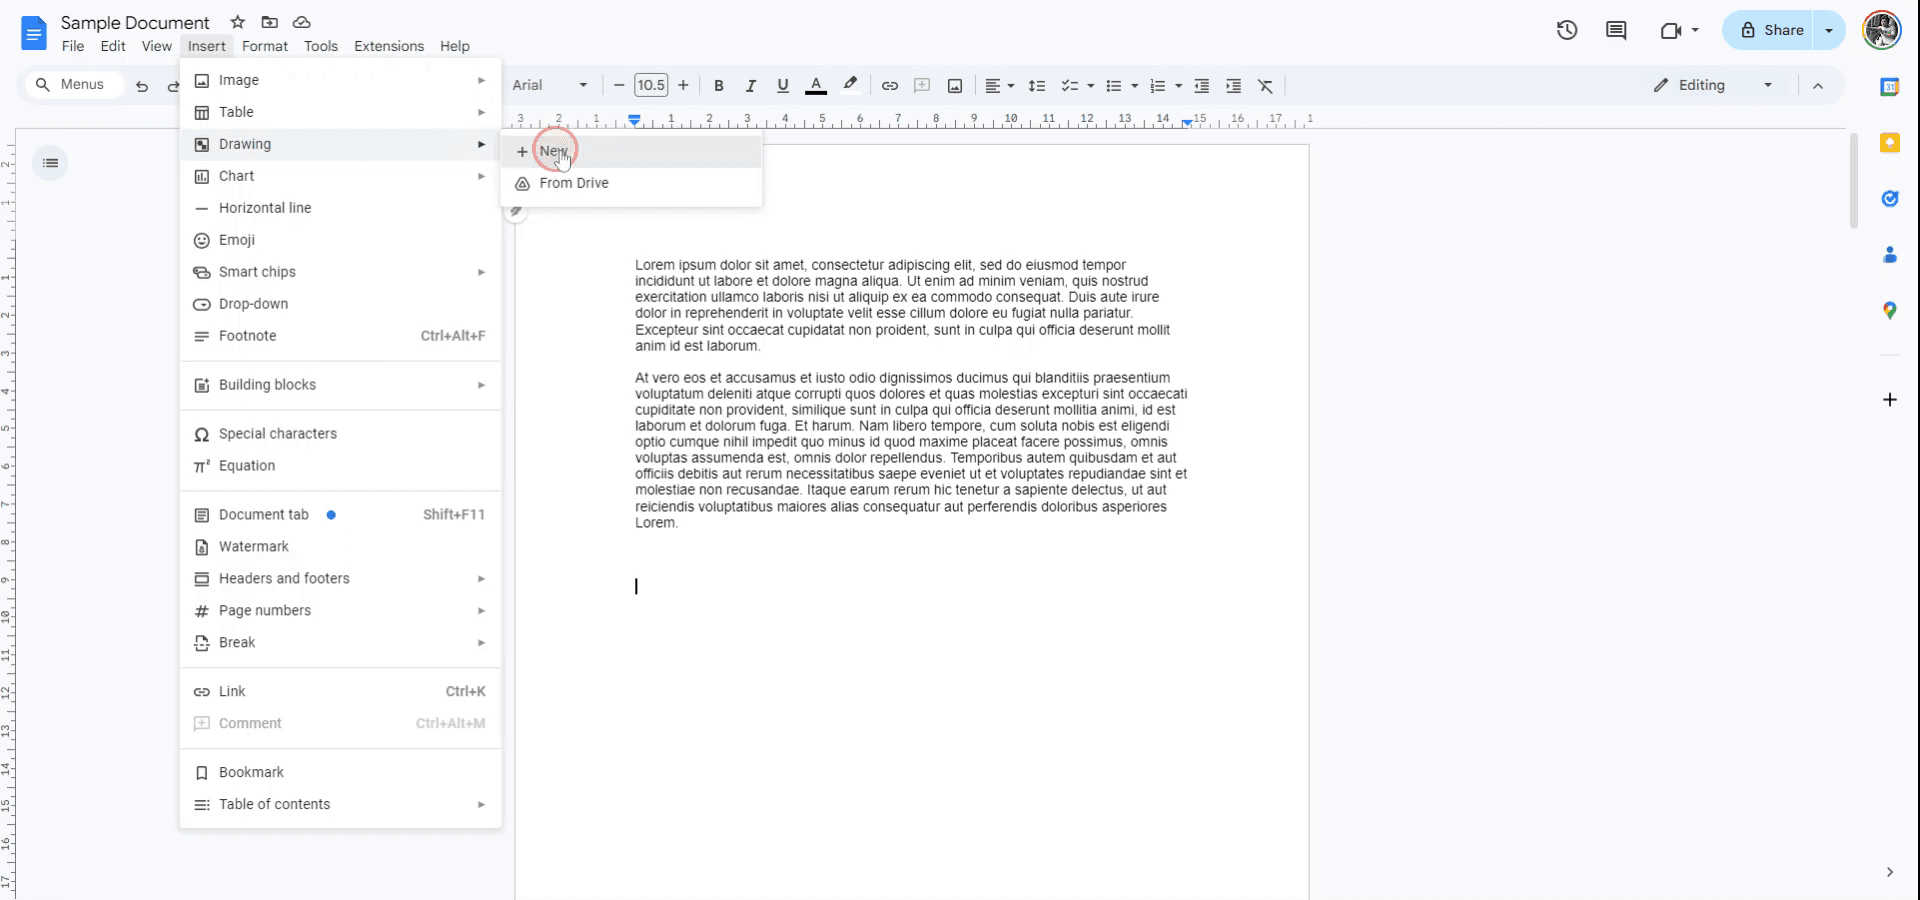
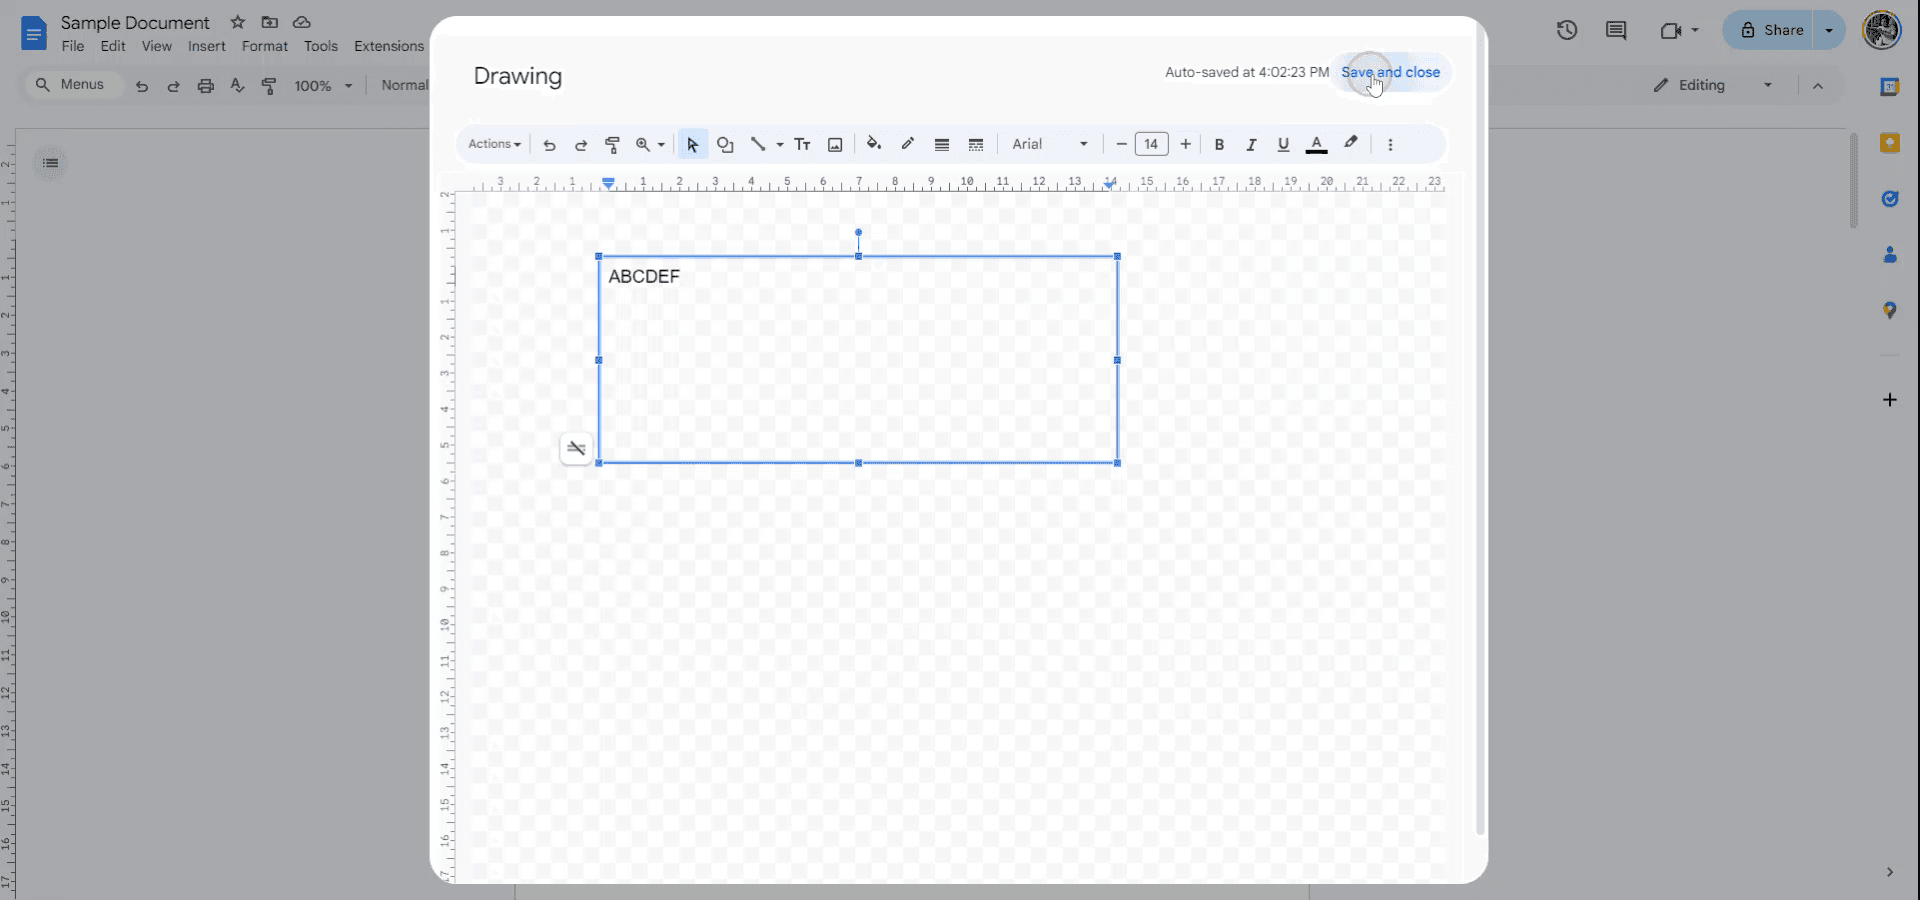
انقر على إدراج > رسم > + جديد لفتح مربع حوار الرسم.
أضف مربع نص
في شريط أدوات الرسم، انقر على أيقونة مربع النص (حرف "T" داخل مربع).
انقر واسحب على اللوحة لرسم مربع النص الخاص بك.
أدخل النص ونسّقه
اكتب النص داخل المربع.
استخدم أدوات التنسيق لضبط حجم الخط واللون والمحاذاة، إلخ.
احفظ وأدرج
بعد الانتهاء، انقر على “حفظ وإغلاق”. سيتم تضمين مربع النص داخل مستندك.
دليل خطوة بخطوة: كيفية إدراج مربع نص في Google Docs
الخطوة 1
لإدراج مربع نص في Google Docs، ابدأ بفتح المستند الذي تريد إضافة مربع النص إليه. بعد ذلك، انتقل إلى قائمة "إدراج".
الخطوة 2
ضمن قائمة "إدراج"، اختر خيار "الرسم".
الخطوة 3
اختر "جديد" من القائمة الفرعية للرسم لفتح نافذة رسم جديدة.
الخطوة 4
في نافذة الرسم، اختر أداة "مربع النص" من شريط أدوات الإجراءات. ارسم مربع النص بالحجم الذي تريده وأدخل النص. عند الانتهاء، انقر على "حفظ وإغلاق" لإدراج مربع النص في مستندك.
نصائح احترافية لإدراج مربع نص في مستندات Google
استخدم أداة الرسم: اذهب إلى إدراج > رسم > جديد، ثم استخدم خيار مربع النص لإنشاء مربع نص قابل للتخصيص مع تنسيق متقدم.
اضبط الحجم والموضع: بعد إدراج مربع النص، انقر واسحب الزوايا لتغيير حجمه. استخدم خيارات الموضع لضبط مكانه بدقة على الصفحة.
أضف لون خلفية: لجعل مربع النص بارزًا، استخدم خيار لون التعبئة في أداة الرسم لإضافة لون خلفية.
تراكب مربعات النص: استخدم خيار ترتيب > ترتيب الطبقات في أداة الرسم لتراكب عدة مربعات نص، مع التأكد من ظهور العناصر الصحيحة في الأعلى.
استخدم شريط الأدوات للتنسيق السريع: بمجرد إدراج مربع النص، استخدم شريط الأدوات لتنسيق النص وتغيير حجم الخط واللون والمحاذاة بما يناسب احتياجاتك.
المشكلات الشائعة عند إدراج مربع نص في مستندات Google
مرونة محدودة خارج أداة الرسم: مربعات النص المدرجة عبر أداة الرسم لا يمكن نقلها أو تغيير حجمها بسهولة مباشرةً داخل المستند.
الحل: اضبط مربع النص داخل أداة الرسم نفسها قبل إدراجه في المستند.محاذاة غير متناسقة: قد لا تتوافق مربعات النص مع المحتوى الآخر، خاصة عند تغيير الحجم أو إعادة الموضع.
الحل: استخدم خيارات الموضع لضبط محاذاة مربع النص بدقة بالنسبة لبقية المستند.تجاوز النص للحدود: قد يتجاوز النص داخل مربع النص الحدود أو لا يتسع إذا كان المربع صغيرًا جدًا.
الحل: غيّر حجم مربع النص أو عدّل حجم النص داخله للتأكد من أن كل شيء يتسع بشكل صحيح.لون الخلفية غير ظاهر عند الطباعة: قد لا تظهر بعض ألوان الخلفية في مربعات النص عند الطباعة.
الحل: اختبر معاينة الطباعة قبل إنهاء المستند للتأكد من ظهور ألوان الخلفية وإمكانية طباعتها.صعوبة التحرير بعد الإدراج: بعد الإدراج، قد يكون من الصعب تحرير مربع النص أو ضبطه، خاصةً إذا كنت تعمل مع عدة عناصر.
الحل: انقر نقرتين على مربع النص لإعادة فتح أداة الرسم لتسهيل التحرير والتعديل.
الأسئلة الشائعة العامة لإدراج مربع نص في مستندات Google
كيف أدرج مربع نص في مستندات Google؟
انتقل إلى إدراج > رسم > جديد، ثم انقر على خيار مربع النص لإنشاء مربع النص الخاص بك.هل يمكنني تغيير حجم مربع النص بعد إدراجه؟
نعم، يمكنك تغيير حجم مربع النص بالنقر على الزوايا وسحبها بعد إدراجه في المستند.هل يمكنني إضافة لون أو نمط إلى مربع النص؟
نعم، يمكنك إضافة لون خلفية، وضبط نمط الحدود، وتنسيق النص داخل مربع النص باستخدام أداة الرسم.هل يمكنني إدراج عدة مربعات نص في مستندات Google؟
نعم، يمكنك إدراج أكبر عدد تحتاجه من مربعات النص بتكرار العملية عبر أداة الرسم.لماذا لا يظهر مربع النص الخاص بي بشكل صحيح في المستند؟
تأكد من أن مربع النص موضوع في المكان الصحيح وأنك غيّرت حجمه بشكل مناسب. يمكنك ضبط المحاذاة والموقع في خيارات الموضع لتحكم أفضل.كيفية تسجيل الشاشة على ماك؟
لتسجيل الشاشة على جهاز Mac، يمكنك استخدام Trupeer AI. يتيح لك التقاط الشاشة بالكامل ويوفر إمكانات الذكاء الاصطناعي مثل إضافة صور رمزية بالذكاء الاصطناعي، وإضافة تعليق صوتي، وإضافة تقريب وتصغير في الفيديو. ومع ميزة ترجمة الفيديو بالذكاء الاصطناعي من trupeer، يمكنك ترجمة الفيديو إلى أكثر من 30 لغة.كيفية إضافة صورة رمزية بالذكاء الاصطناعي إلى تسجيل الشاشة؟
لإضافة صورة رمزية بالذكاء الاصطناعي إلى تسجيل الشاشة، ستحتاج إلى استخدام أداة تسجيل شاشة بالذكاء الاصطناعي. Trupeer AI هي أداة تسجيل شاشة بالذكاء الاصطناعي، وتساعدك على إنشاء مقاطع فيديو متعددة الصور الرمزية، كما تساعدك في إنشاء صورتك الرمزية الخاصة للفيديو.كيفية تسجيل الشاشة على ويندوز؟
لتسجيل الشاشة على Windows، يمكنك استخدام شريط الألعاب المدمج (Windows + G) أو أداة ذكاء اصطناعي متقدمة مثل Trupeer AI للحصول على ميزات أكثر تقدمًا مثل الصور الرمزية بالذكاء الاصطناعي، والتعليق الصوتي، والترجمة، إلخ.كيفية إضافة تعليق صوتي إلى فيديو؟
لإضافة تعليق صوتي إلى مقاطع الفيديو، حمّل ملحق trupeer ai chrome. بعد التسجيل، ارفع الفيديو الخاص بك مع الصوت، واختر التعليق الصوتي المطلوب من trupeer ثم صدّر الفيديو المعدّل الخاص بك.كيف أقرّب في تسجيل الشاشة؟
لتكبير العرض أثناء تسجيل الشاشة، استخدم تأثيرات التكبير في Trupeer AI التي تتيح لك التكبير والتصغير في لحظات محددة، مما يعزز التأثير البصري لمحتوى الفيديو الخاص بك.
قراءات مقترحة
كيفية إضافة عنوان فرعي في مستندات Google
كيفية استخدام البحث والاستبدال في مستندات Google
كيفية كتابة رمز TM (™) في مستندات Google
دروس ذات صلة

