
كيفية إدراج مربع اختيار في Google Docs – دليل تنسيق سريع
تعرّف على كيفية إضافة مربعات اختيار في مستندات Google لقوائم المهام أو النماذج أو تتبّع المهام. اتّبع هذه الخطوات البسيطة لإدراج مربعات اختيار تفاعلية أو ثابتة بسهولة.
يوفّر هذا الدليل عملية خطوة بخطوة لإدراج مربعات الاختيار في مستند Google.
من خلال اتباع هذه التعليمات، يمكن للمستخدمين تحويل النص المحدد بسهولة إلى عناصر قابلة للتحديد، مما يجعل من السهل إنشاء قوائم أو عناصر مهام داخل المستند.
يمكنك إدراج مربع اختيار في مستندات Google باستخدام اختصار لوحة المفاتيح، أو قائمة التنسيق، أو شريط الأدوات. أسرع طريقة هي بكتابة [] (قوسين مربعين بدون مسافة) ثم الضغط على مفتاح المسافة. يمكنك أيضًا تحويل النص الموجود إلى قائمة تحقق باستخدام قائمة التنسيق.
استخدام اختصار لوحة المفاتيح:
اكتب
[]بدون أي مسافة بين القوسين.اضغط على مفتاح المسافة.
سيظهر مربع اختيار تلقائيًا. يمكنك كتابة عنصر القائمة ثم الضغط على Enter لإضافة مربع اختيار آخر.
استخدام قائمة التنسيق:
قم بتمييز النص الذي تريد تحويله إلى قائمة تحقق.
انتقل إلى تنسيق > تعداد نقطي وترقيم > قائمة تحقق.
اختر نمط مربع الاختيار المفضل لديك — مع شطب أو بدونه.
استخدام شريط الأدوات:
ابحث عن أيقونة قائمة التحقق في شريط الأدوات (مربع صغير بداخله علامة صح).
انقر عليها لإدراج مربعات الاختيار في النص المحدد أو لتحويل قائمة إلى قائمة تحقق.
انقر السهم الصغير بجانب الأيقونة لرؤية المزيد من خيارات النمط، مثل إضافة شطب على العناصر المحددة.
ملاحظات إضافية:
إذا لم ترَ أيقونة قائمة التحقق، فانقر زر المزيد (ثلاث نقاط عمودية) في شريط الأدوات لإظهار الأدوات المخفية.
على الهاتف المحمول، تكون العملية تقريبًا نفسها — فقط استخدم النقرات بدلًا من الضغطات.
دليل خطوة بخطوة: كيفية إدراج مربع اختيار في مستندات Google
الخطوة 1
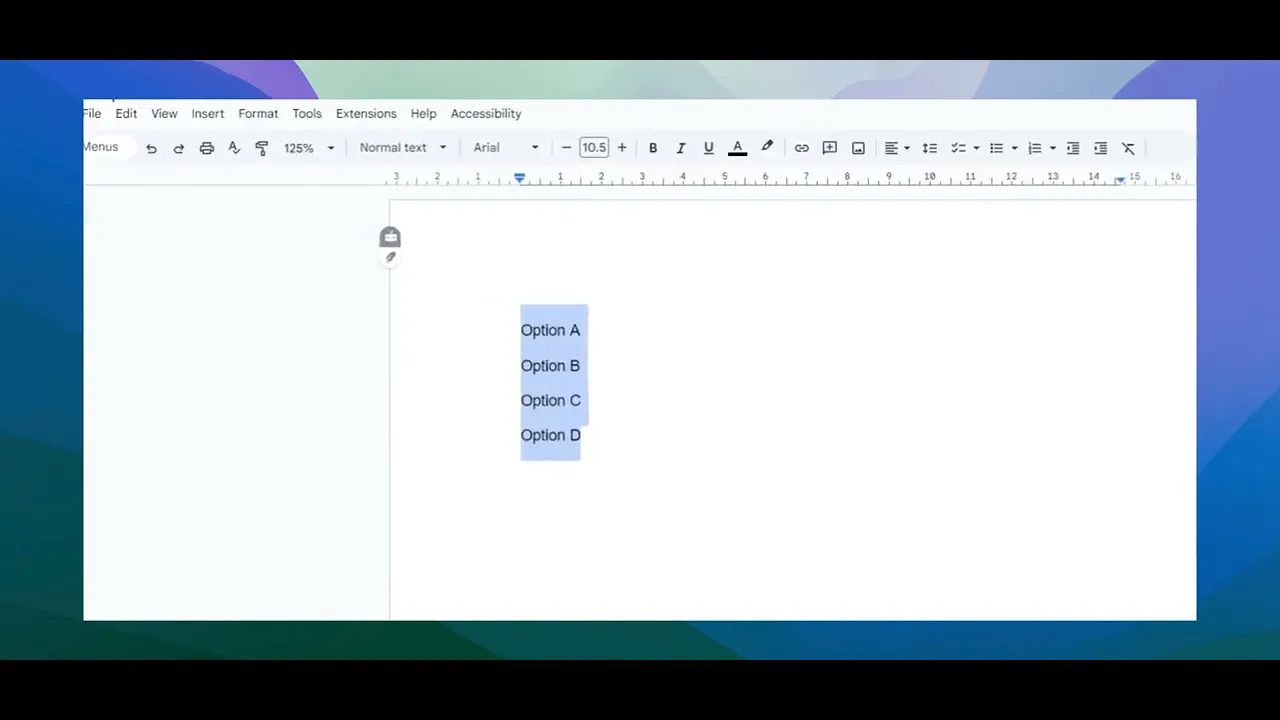
لبدء ذلك، افتح مستند Google الذي ترغب في إدراج مربعات الاختيار فيه. بعد فتح المستند، حدد النص الذي تريد أن تظهر فيه مربعات الاختيار.
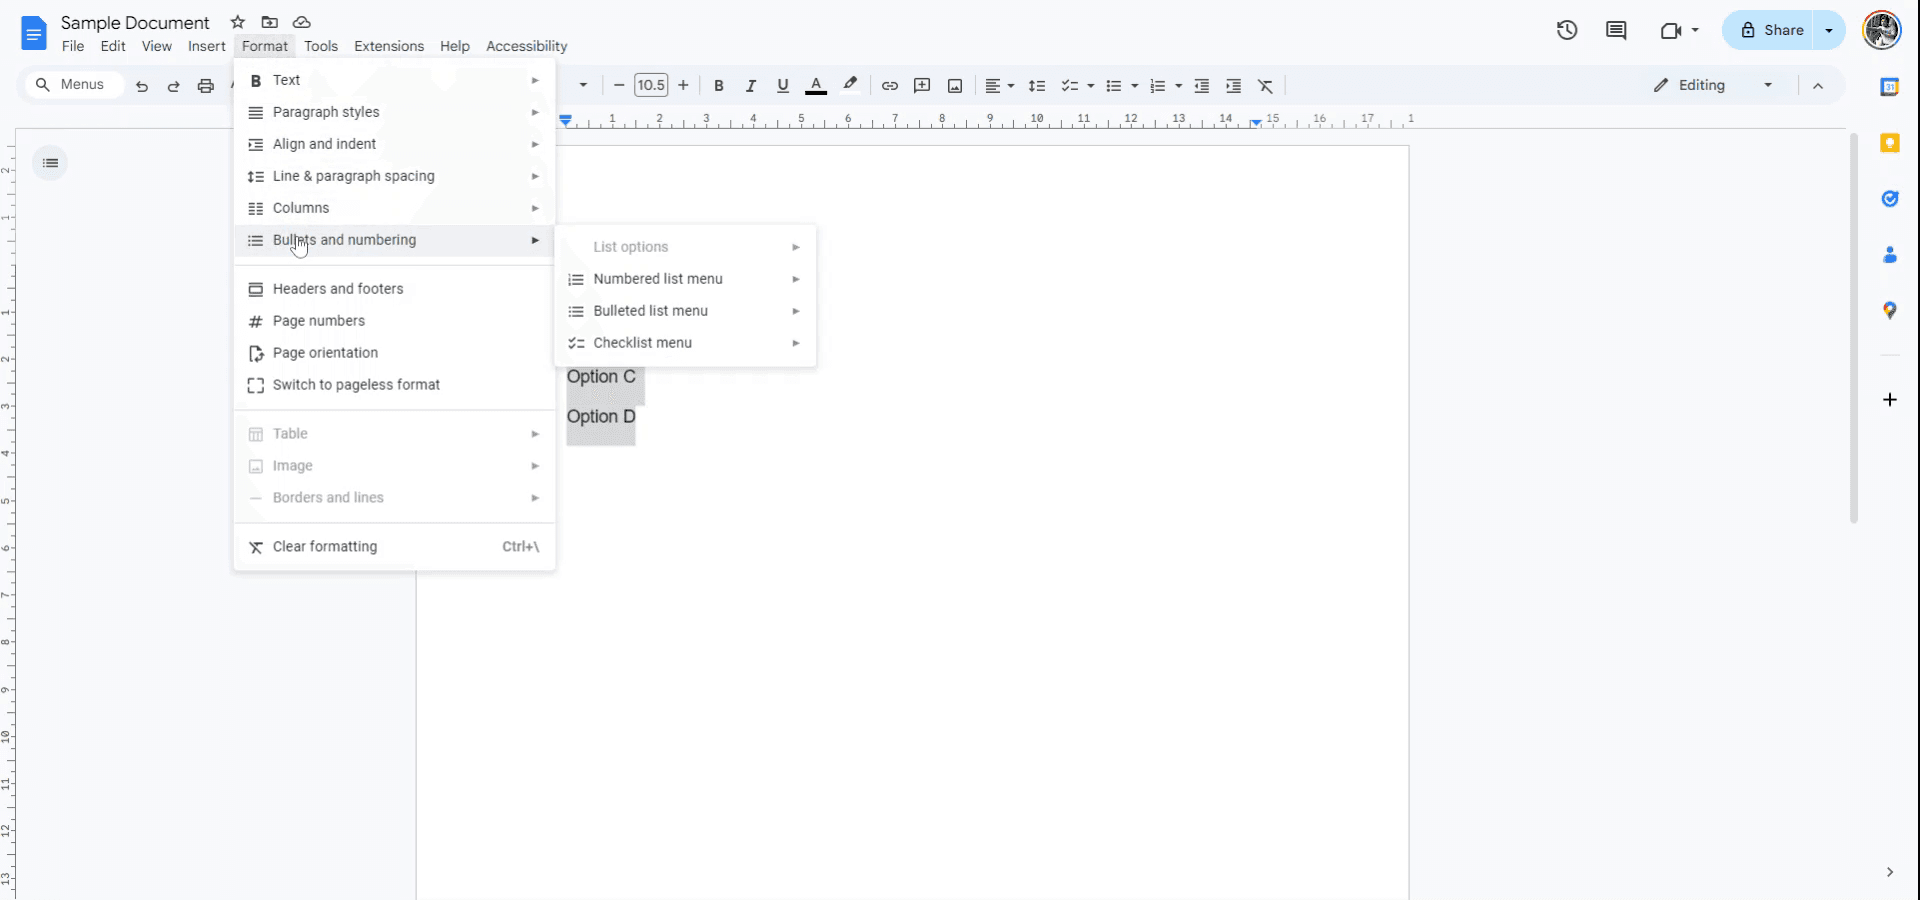
الخطوة 2
بعد تحديد النص، انتقل إلى قائمة 'تنسيق'. ومن القائمة المنسدلة، حدد خيار 'التعداد النقطي والترقيم'.
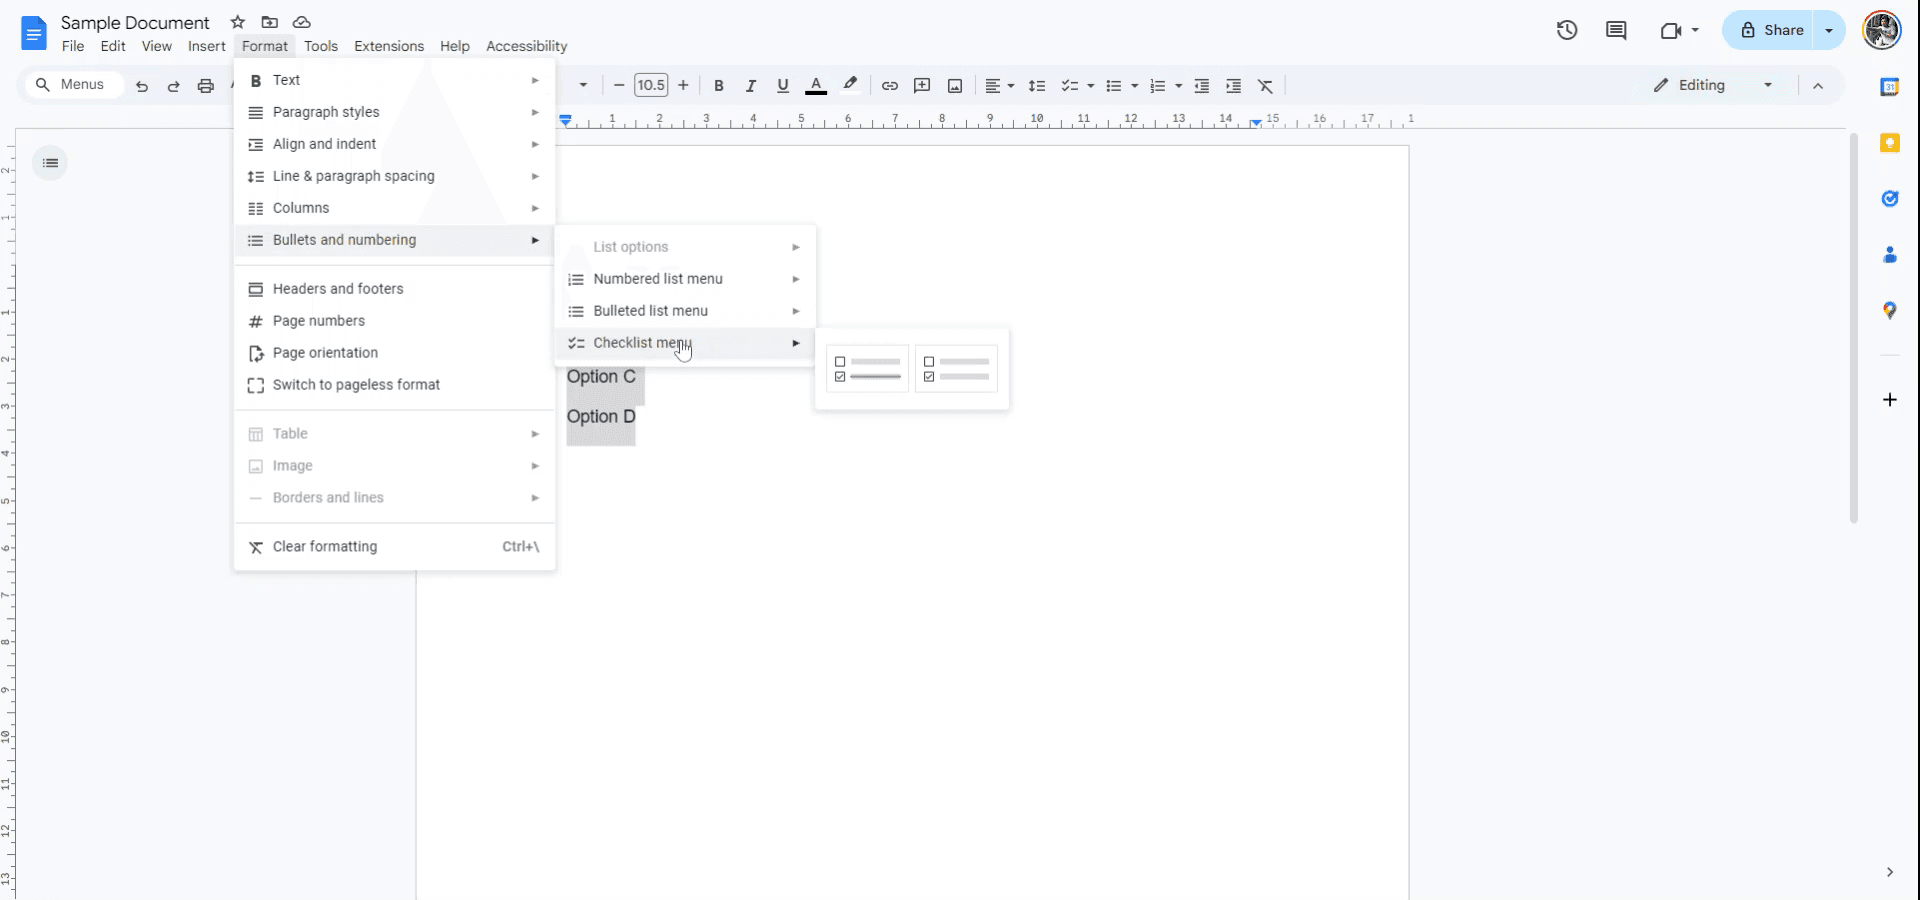
الخطوة 3
ضمن القائمة الفرعية 'التعداد النقطي والترقيم'، اختر خيار 'قائمة تحقق' لتحويل النص المحدد إلى مربعات اختيار.
ستكون لديك الآن خياران: أحدهما يتيح شطب مربع الاختيار عند تحديده، والآخر يعرض مربع اختيار عاديًا.
سيعرض النص المحدد الآن مربعات الاختيار وفقًا لاختيارك.
نصائح احترافية لإدراج مربعات الاختيار بنجاح في Google Docs
استخدم ميزة مربّع الاختيار المدمجة: لإدراج مربّع اختيار، انتقل إلى إدراج > مربّع اختيار. سيؤدي ذلك تلقائيًا إلى إدراج مربّع اختيار تفاعلي يمكن تحديده أو إلغاء تحديده في Google Docs.
أنشئ قوائم تفاعلية: استخدم مربعات الاختيار في القوائم النقطية أو كقائمة مهام عن طريق إضافة مربعات اختيار قبل كل عنصر لإنشاء قائمة مهام أو قائمة مراجعة.
اختصار لوحة المفاتيح لمربعات الاختيار: استخدم Ctrl + Shift + 8 (Windows) أو Cmd + Shift + 8 (Mac) لإضافة قائمة مربعات اختيار إلى مستندك بسرعة.
خصّص قوائم مربعات الاختيار: يمكنك تخصيص الحجم والخط والنمط لعناصر قائمة مربعات الاختيار لجعلها بارزة أو منسجمة مع التصميم العام لمستندك.
استخدم مربعات الاختيار في Google Docs للتعاون: تُعد مربعات الاختيار رائعة للمستندات التعاونية، إذ تتيح لعدة مستخدمين وضع علامة على المهام كمكتملة أو شطب العناصر من قائمة مراجعة مشتركة.
الأخطاء الشائعة وكيفية تجنبها عند إدراج مربعات الاختيار في Google Docs
مربعات الاختيار لا تظهر عند الطباعة أو في المستند المُصدَّر: قد لا تظهر مربعات الاختيار التفاعلية بشكل صحيح عند طباعة المستند أو تصديره كملف PDF.
الإصلاح: استخدم مربعات اختيار غير تفاعلية أو تأكد من عرض المستند بتنسيق يدعم الميزات التفاعلية.إزالة مربّع الاختيار بالخطأ: من السهل حذف مربعات الاختيار بالخطأ أثناء تحرير المستند.
الإصلاح: تأكد من أنك تحدد مربّع الاختيار نفسه فقط وليس السطر أو الفقرة كاملةً لتجنب إزالته.عدم محاذاة مربعات الاختيار مع النص: أحيانًا قد لا تصطف مربعات الاختيار بشكل صحيح مع النص، خاصةً في المستندات الكبيرة ذات الأعمدة المتعددة.
الإصلاح: تأكد من المحاذاة الصحيحة عبر ضبط تنسيق القائمة أو استخدام الجداول للحفاظ على محاذاة العناصر بشكل صحيح.عدم وضع علامة على مربعات الاختيار بشكل صحيح: في البيئات التعاونية، قد لا تظهر مربعات الاختيار محددة عندما يقوم الآخرون بتحرير المستند.
الإصلاح: حدّث المستند أو تأكد من أن لكل متعاون صلاحية التحرير وأنه يستخدم إصدارات متوافقة من Google Docs.صعوبة إدارة قوائم مربعات الاختيار الكبيرة: قد تصبح قائمة التحقق الطويلة صعبة الإدارة أو مربكة بصريًا.
الإصلاح: قسّم القائمة إلى أقسام أصغر أو استخدم عناوين لتجميع المهام ذات الصلة، مما يجعلها منظمة وسهلة التنقل.
الأسئلة الشائعة حول إدراج مربعات الاختيار في مستندات Google
كيف أدرج مربع اختيار في مستندات Google؟
اذهب إلى إدراج > مربع اختيار لإضافة مربع اختيار تفاعلي. وبدلاً من ذلك، استخدم Ctrl + Shift + 8 (Windows) أو Cmd + Shift + 8 (Mac) لإنشاء قائمة مربعات اختيار بسرعة.هل يمكنني إنشاء قائمة تحقق بمربعات اختيار في مستندات Google؟
نعم، يمكنك إدراج مربعات اختيار في قائمة نقطية أو مرقمة لإنشاء قائمة تحقق للمهام أو العناصر.هل يمكن التفاعل مع مربعات الاختيار في مستندات Google؟
نعم، مربعات الاختيار في مستندات Google تفاعلية ويمكن تحديدها أو إلغاء تحديدها عند عرض المستند في وضع التحرير.كيف أنسّق قائمة مربعات اختيار في مستندات Google؟
بعد إدراج مربعات الاختيار، يمكنك تخصيص الخط والحجم ومحاذاة النص بجوار مربعات الاختيار ليتناسب مع نمط المستند.هل يمكنني طباعة مربعات الاختيار من مستندات Google؟
مربعات الاختيار تفاعلية داخل مستندات Google، ولكن إذا كنت تريد أن تظهر بشكل صحيح عند الطباعة، فتأكد من تنسيق المستند بشكل مناسب للطباعة (فكّر في استخدام مربعات اختيار غير تفاعلية للطباعة).كيف أسجل الشاشة على Mac؟
لتسجيل الشاشة على جهاز Mac، يمكنك استخدام Trupeer AI. يتيح لك التقاط الشاشة بالكامل ويوفر إمكانات الذكاء الاصطناعي مثل إضافة صور رمزية بالذكاء الاصطناعي، وإضافة تعليق صوتي، وإضافة التكبير والتصغير في الفيديو. وبفضل ميزة ترجمة الفيديو بالذكاء الاصطناعي من trupeer، يمكنك ترجمة الفيديو إلى أكثر من 30 لغة.كيف أضيف صورة رمزية بالذكاء الاصطناعي إلى تسجيل الشاشة؟
لإضافة صورة رمزية بالذكاء الاصطناعي إلى تسجيل الشاشة، ستحتاج إلى استخدام أداة تسجيل شاشة بالذكاء الاصطناعي. Trupeer AI هي أداة تسجيل شاشة بالذكاء الاصطناعي، تساعدك على إنشاء مقاطع فيديو بعدة صور رمزية، كما تساعدك في إنشاء صورتك الرمزية الخاصة بالفيديو.كيف أسجل الشاشة على Windows؟
لتسجيل الشاشة على Windows، يمكنك استخدام Game Bar المدمج (Windows + G) أو أداة ذكاء اصطناعي متقدمة مثل Trupeer AI للحصول على ميزات أكثر تقدمًا مثل الصور الرمزية بالذكاء الاصطناعي، والتعليق الصوتي، والترجمة، إلخ.كيف أضيف تعليقًا صوتيًا إلى الفيديو؟
لإضافة تعليق صوتي إلى مقاطع الفيديو، نزّل إضافة trupeer ai على كروم. بعد إنشاء حساب، ارفع الفيديو الخاص بك مع الصوت، واختر التعليق الصوتي المطلوب من trupeer ثم صدّر الفيديو المعدّل.كيف أُكبّر في تسجيل شاشة؟
لتكبير الصورة أثناء تسجيل الشاشة، استخدم تأثيرات التكبير في Trupeer AI التي تتيح لك التكبير والتصغير في لحظات محددة، مما يعزز التأثير البصري لمحتوى الفيديو الخاص بك.
قراءات مقترحة
كيفية إضافة قائمة منسدلة في مستندات Google
كيفية إضافة عنوان فرعي في مستندات Google
كيفية كتابة رمز TM (™) في مستندات Google
دروس ذات صلة

