

Como fechar um ticket do Jira
Aprenda a encerrar corretamente um ticket do Jira usando transições de fluxo de trabalho. Guia passo a passo para marcar questões como concluídas, resolver erros e finalizar tarefas no Jira.
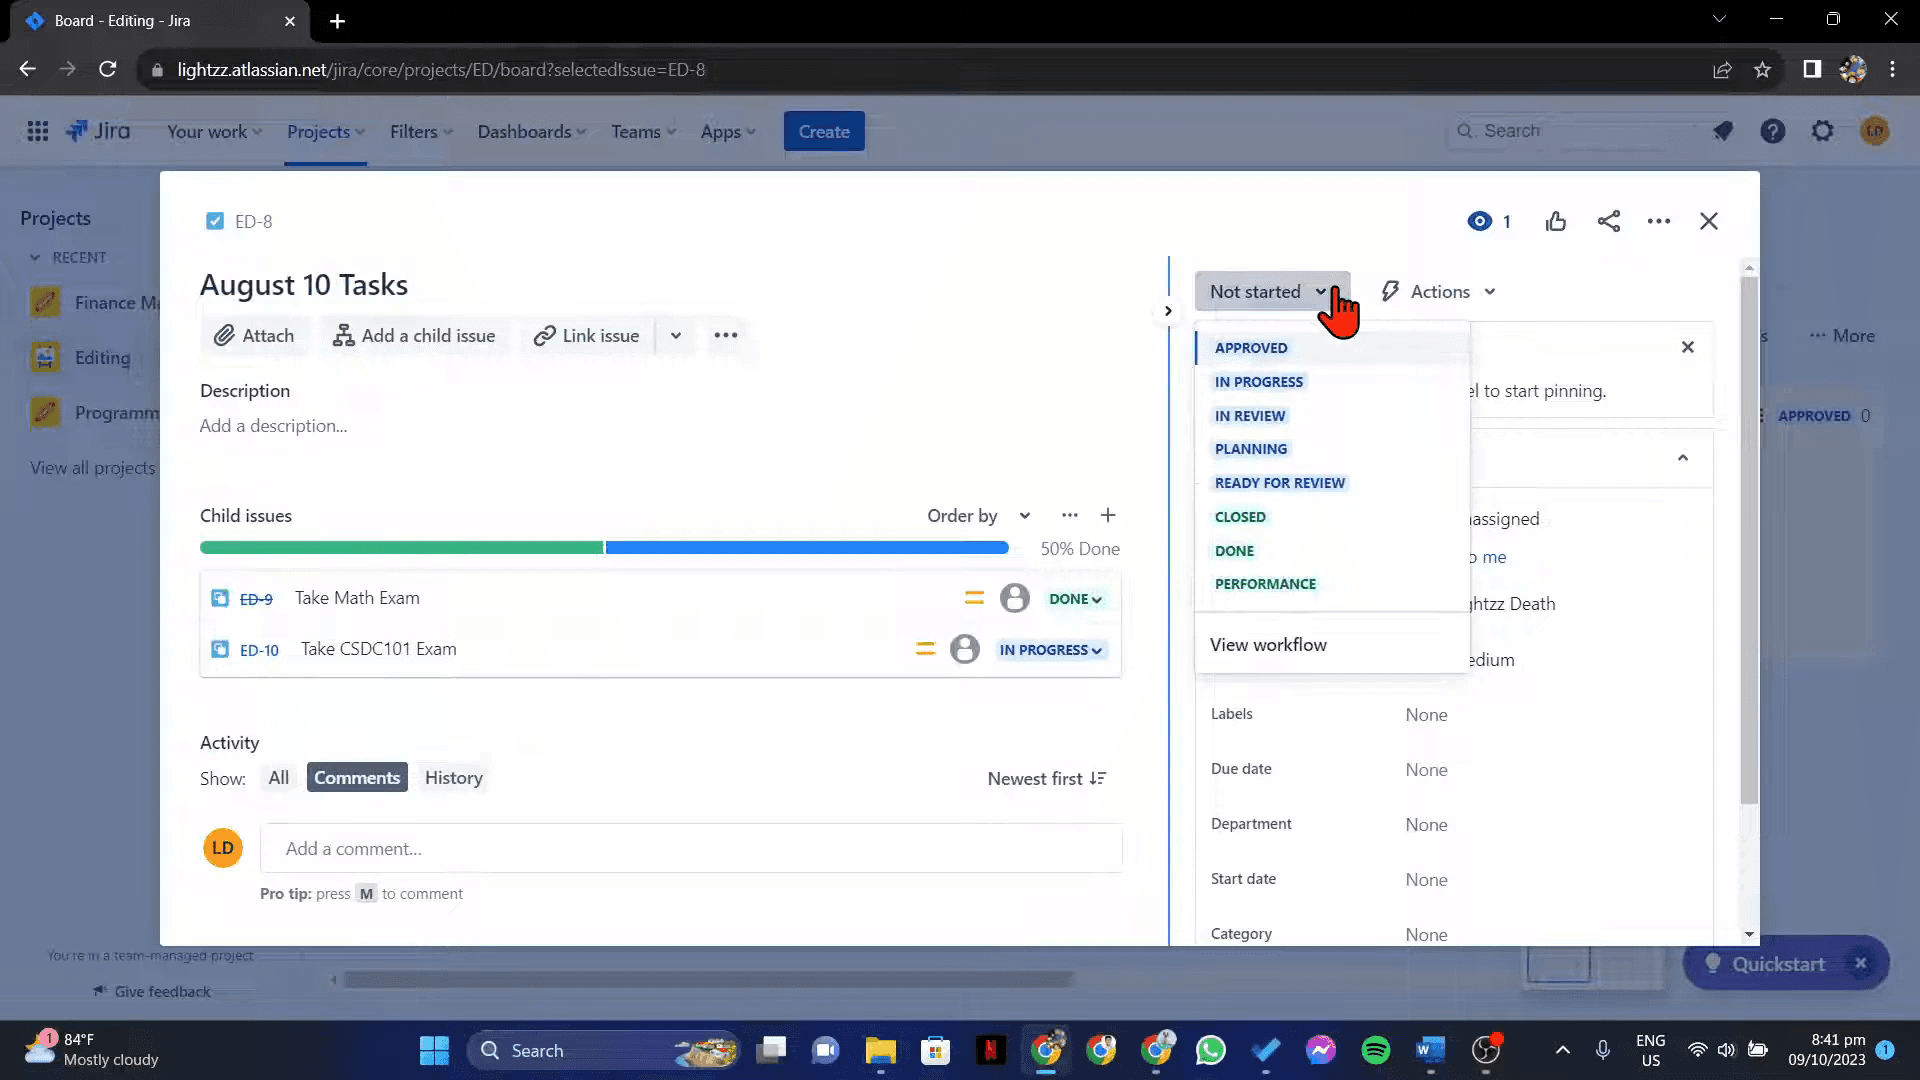
Para encerrar um ticket do Jira, é necessário movê-lo para um estado que signifique conclusão, como "Done" ou "Resolved". Isto é feito ao abrir o ticket, encontrar o estado atual e alterá-lo para o estado "fechado" apropriado no fluxo de trabalho do seu projeto. Também pode arrastar e largar o ticket para uma coluna "Done" num quadro, se o seu projeto utilizar um quadro Kanban ou Scrum.
Segue uma análise mais detalhada:
1. Abra o ticket: Navegue até ao ticket específico do Jira que pretende encerrar.
2. Localize o estado: Encontre o estado atual do ticket, que normalmente é apresentado em destaque.
3. Altere o estado: Clique no estado atual e selecione o estado que indica que o trabalho está concluído, como "Done", "Resolved" ou "Closed".
4. Confirme a alteração: Alguns fluxos de trabalho podem exigir que forneça detalhes da resolução ou associe issues relacionadas antes de encerrar totalmente o ticket.
5. Em alternativa, use um quadro: Se o seu projeto utilizar um quadro Kanban ou Scrum, muitas vezes pode arrastar e largar o ticket diretamente para a coluna "Done" para o encerrar.
Guia passo a passo: Como encerrar um ticket do Jira
Passo 1
Abra o ticket no Jira.

Passo 2
Clique no Estado atual do ticket e marque-o Concluído.
Passo 3
Clique na opção "Fechado".

Passo 4
Para verificar o encerramento, navegue até à secção "Resolvido".

Dicas Profissionais para Encerrar um Ticket do Jira
Inicie sessão na sua conta Jira
Abra o seu espaço de trabalho Jira e autentique-se com as suas credenciais.Navegue até ao quadro do projeto
Vá para o projeto que contém o ticket que pretende encerrar. Use a barra de pesquisa ou filtros, se necessário.Localize a incidência ou o ticket específico
Clique na chave da incidência ou no resumo para abrir o ticket que pretende encerrar.Reveja o estado do ticket e a lista de verificação
Certifique-se de que todas as tarefas obrigatórias, subtarefas e itens da lista de verificação estão concluídos. Anexe quaisquer ficheiros ou comentários necessários.Altere o estado do ticket para Concluído ou Fechado
Clique no menu pendente do estado do fluxo de trabalho (normalmente localizado perto do topo da incidência) e selecione a opção Concluído ou Fechado, consoante a configuração do seu fluxo de trabalho.Adicione uma resolução, se lhe for solicitado
Alguns fluxos de trabalho exigem que selecione um tipo de resolução (como Corrigido, Não será corrigido, Duplicado). Escolha a opção adequada e confirme.Submeta a transição
Clique no botão Confirmar ou Transição para encerrar oficialmente o ticket.
Armadilhas Comuns e Como Evitá-las
Tentar Encerrar um Ticket Sem as Permissões Adequadas
Apenas utilizadores com a função ou permissões corretas podem transitar incidências para Concluído ou Fechado. Contacte o administrador do Jira, se necessário.O Ticket Não Passa para a Coluna Final
Alguns fluxos de trabalho podem exigir aprovações ou transições adicionais antes de um ticket poder ser marcado como Concluído.Ignorar a Seleção da Resolução
Se o campo de resolução for obrigatório e ficar em branco, o ticket pode parecer incompleto mesmo depois de ser marcado como fechado.Encerrar Trabalho Incompleto
Verifique sempre se o ticket cumpre a Definição de Concluído. Tarefas incompletas podem afetar as métricas da equipa.Confundir Resolvido com Fechado
Algumas configurações do Jira separam Resolvido (trabalho concluído) de Fechado (revisão final concluída). Verifique o fluxo de trabalho da sua equipa para maior clareza.
FAQs comuns sobre fechar tickets do Jira
Qual é a diferença entre Done e Closed no Jira?
Depende do teu fluxo de trabalho. Done normalmente significa que o trabalho está concluído, enquanto Closed pode indicar aprovação final ou implementação.Posso reabrir um ticket fechado no Jira?
Sim, se o teu fluxo de trabalho o permitir. Clica na opção de transição Reopen ou similar, se estiver disponível.Porque não consigo ver a opção Close?
Talvez não tenhas as permissões necessárias, ou o fluxo de trabalho pode não incluir uma etapa Close.Os tickets podem ser fechados automaticamente no Jira?
Sim, o Jira pode ser configurado para fechar tickets automaticamente com base em condições, como uma implementação bem-sucedida ou regras baseadas no tempo.Preciso de introduzir uma resolução ao fechar um ticket?
Muitos fluxos de trabalho exigem que o campo de resolução seja preenchido ao transitar para Done ou Closed.Como gravar o ecrã no Mac?
Para gravar o ecrã num Mac, podes usar o Trupeer AI. Permite-te capturar o ecrã inteiro e oferece capacidades de IA como adicionar avatares de IA, adicionar narração e aproximar e afastar o vídeo. Com a funcionalidade de tradução de vídeo por IA do trupeer, podes traduzir o vídeo para mais de 30 idiomas.Como adicionar um avatar de IA a uma gravação de ecrã?
Para adicionar um avatar de IA a uma gravação de ecrã, precisas de usar uma ferramenta de gravação de ecrã com IA. O Trupeer AI é uma ferramenta de gravação de ecrã com IA, que te ajuda a criar vídeos com múltiplos avatares e também te ajuda a criar o teu próprio avatar para o vídeo.Como gravar o ecrã no Windows?
Para gravar o ecrã no Windows, podes usar a Game Bar integrada (Windows + G) ou uma ferramenta avançada de IA como o Trupeer AI para funcionalidades mais avançadas como avatares de IA, narração, tradução, etc.Como adicionar narração a um vídeo?
Para adicionar narração a vídeos, transfere a extensão do Chrome do trupeer ai. Depois de te registares, carrega o teu vídeo com voz, escolhe a narração desejada do trupeer e exporta o teu vídeo editado.Como faço zoom numa gravação de ecrã?
Para fazer zoom durante uma gravação de ecrã, usa os efeitos de zoom no Trupeer AI, que te permitem aproximar e afastar em momentos específicos, melhorando o impacto visual do conteúdo do teu vídeo.
Leituras sugeridas
Gerador de documentação técnica
Software de base de conhecimento
Como exportar o backlog do Jira para Excel
Como alterar o tipo de issue no Jira
Tutoriais relacionados

