
Hoe verlaat je een Slack-werkruimte
Leer hoe je een Slack-werkruimte in slechts een paar stappen verlaat. Volg deze eenvoudige handleiding om vanaf desktop of mobiel elke Slack-organisatie te verlaten.
Om een Slack-werkruimte te verlaten, moet je je account voor die specifieke werkruimte deactiveren, wat via je profielinstellingen kan worden gedaan. Dit proces verwijdert de werkruimte uit je lijst en verwijdert je toegang, maar heeft geen invloed op andere werkruimten waarin je mogelijk zit.
Hier is een stapsgewijze handleiding:
1. Open de Slack-werkruimte: open de werkruimte die je wilt verlaten via de zijbalk in de Slack-app.
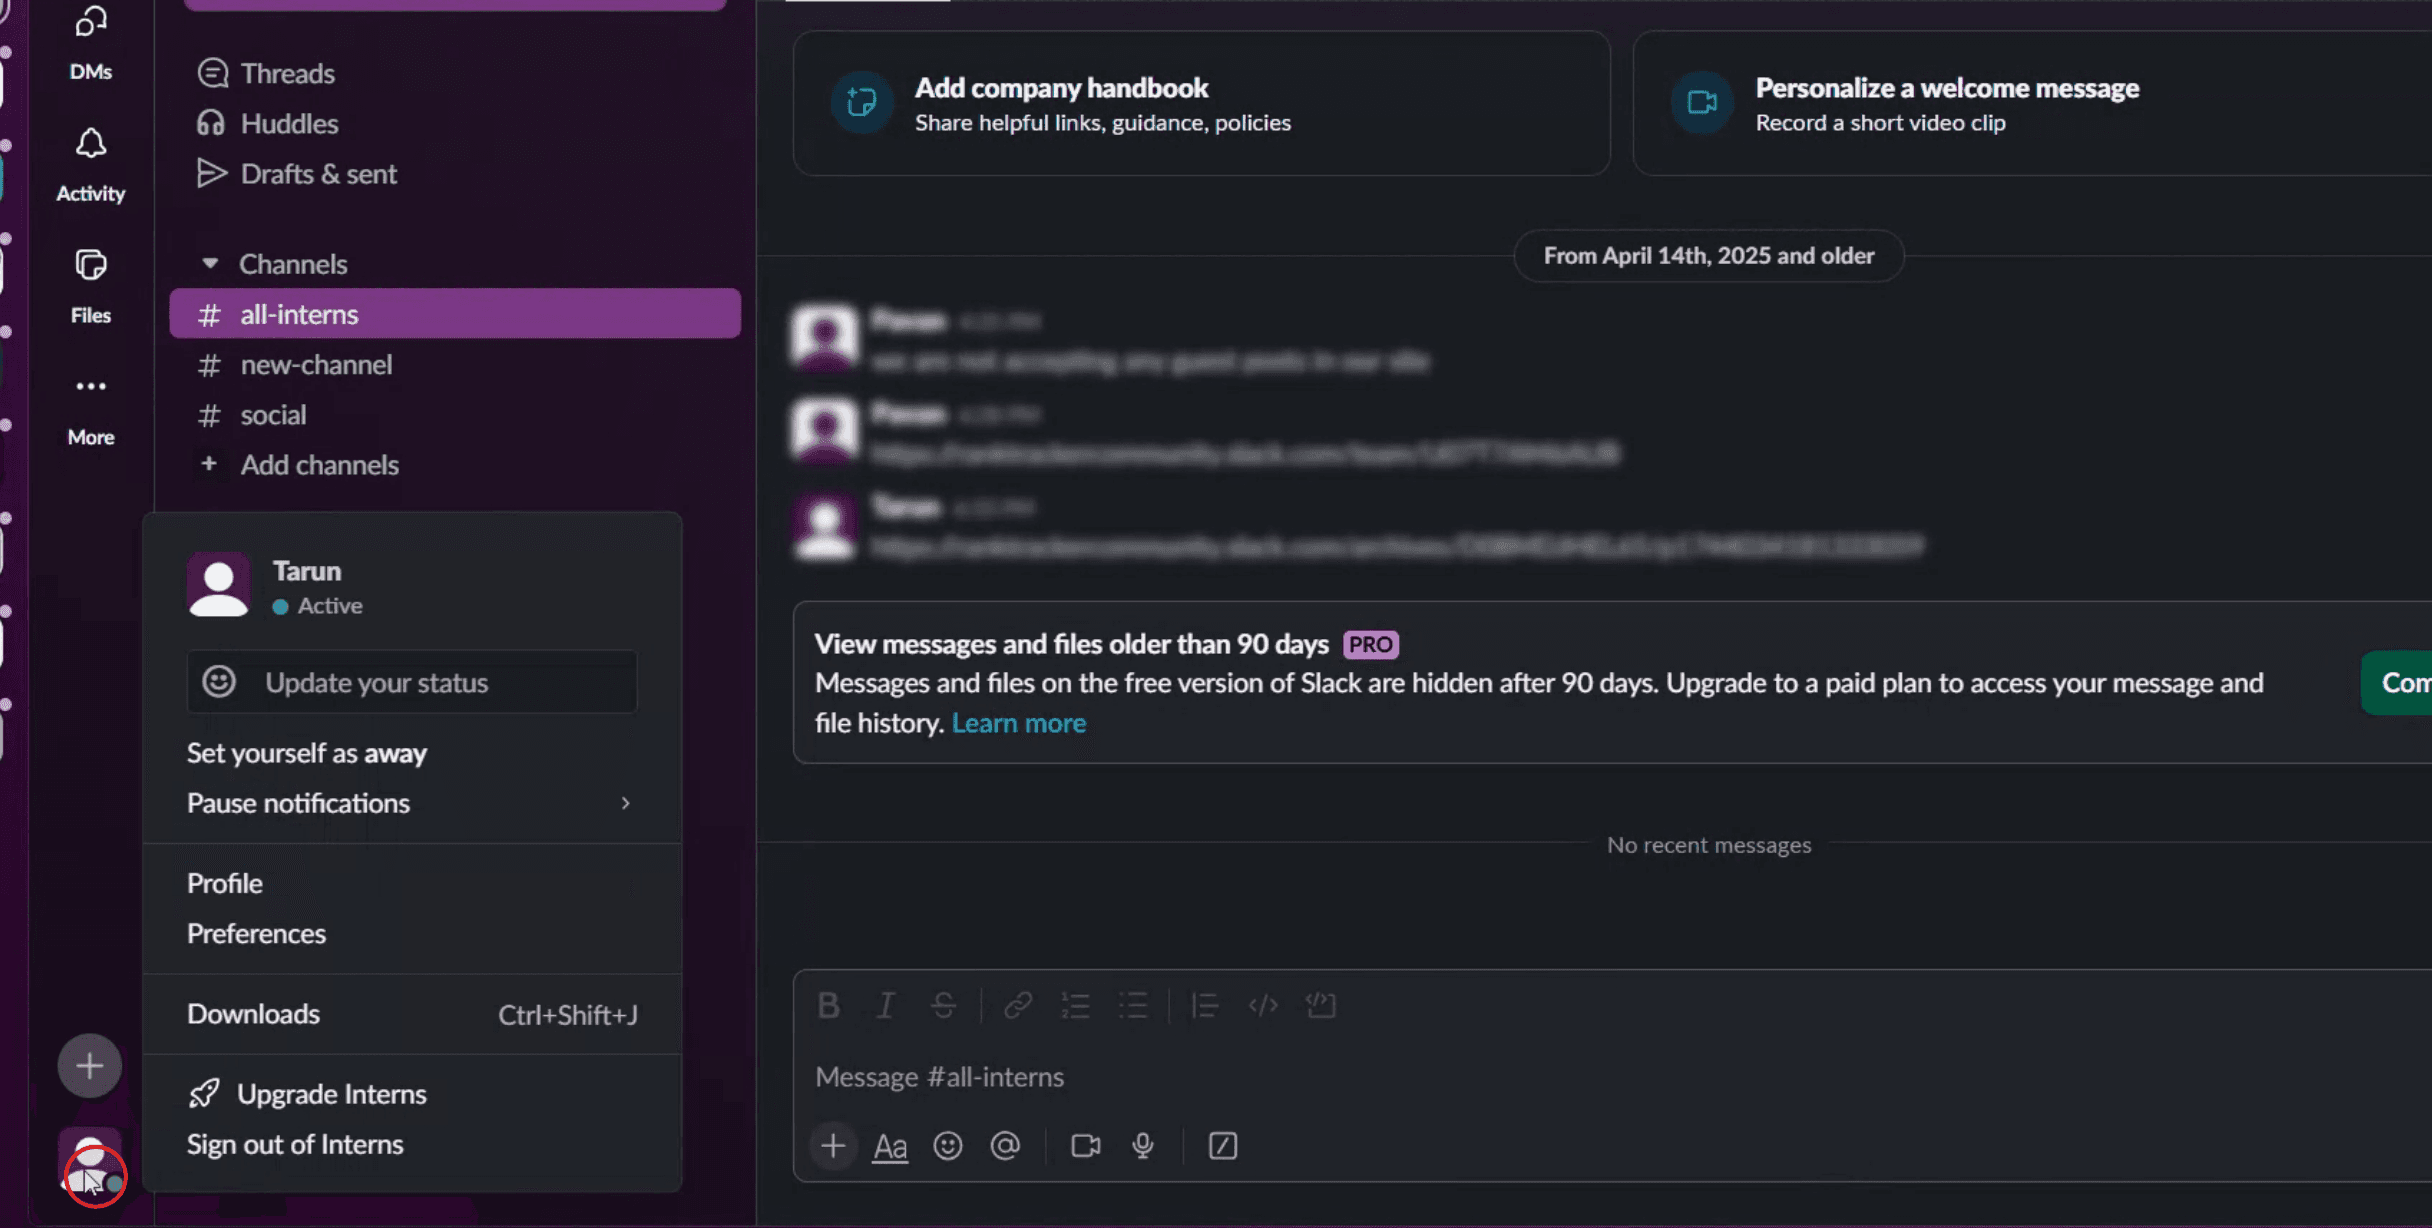
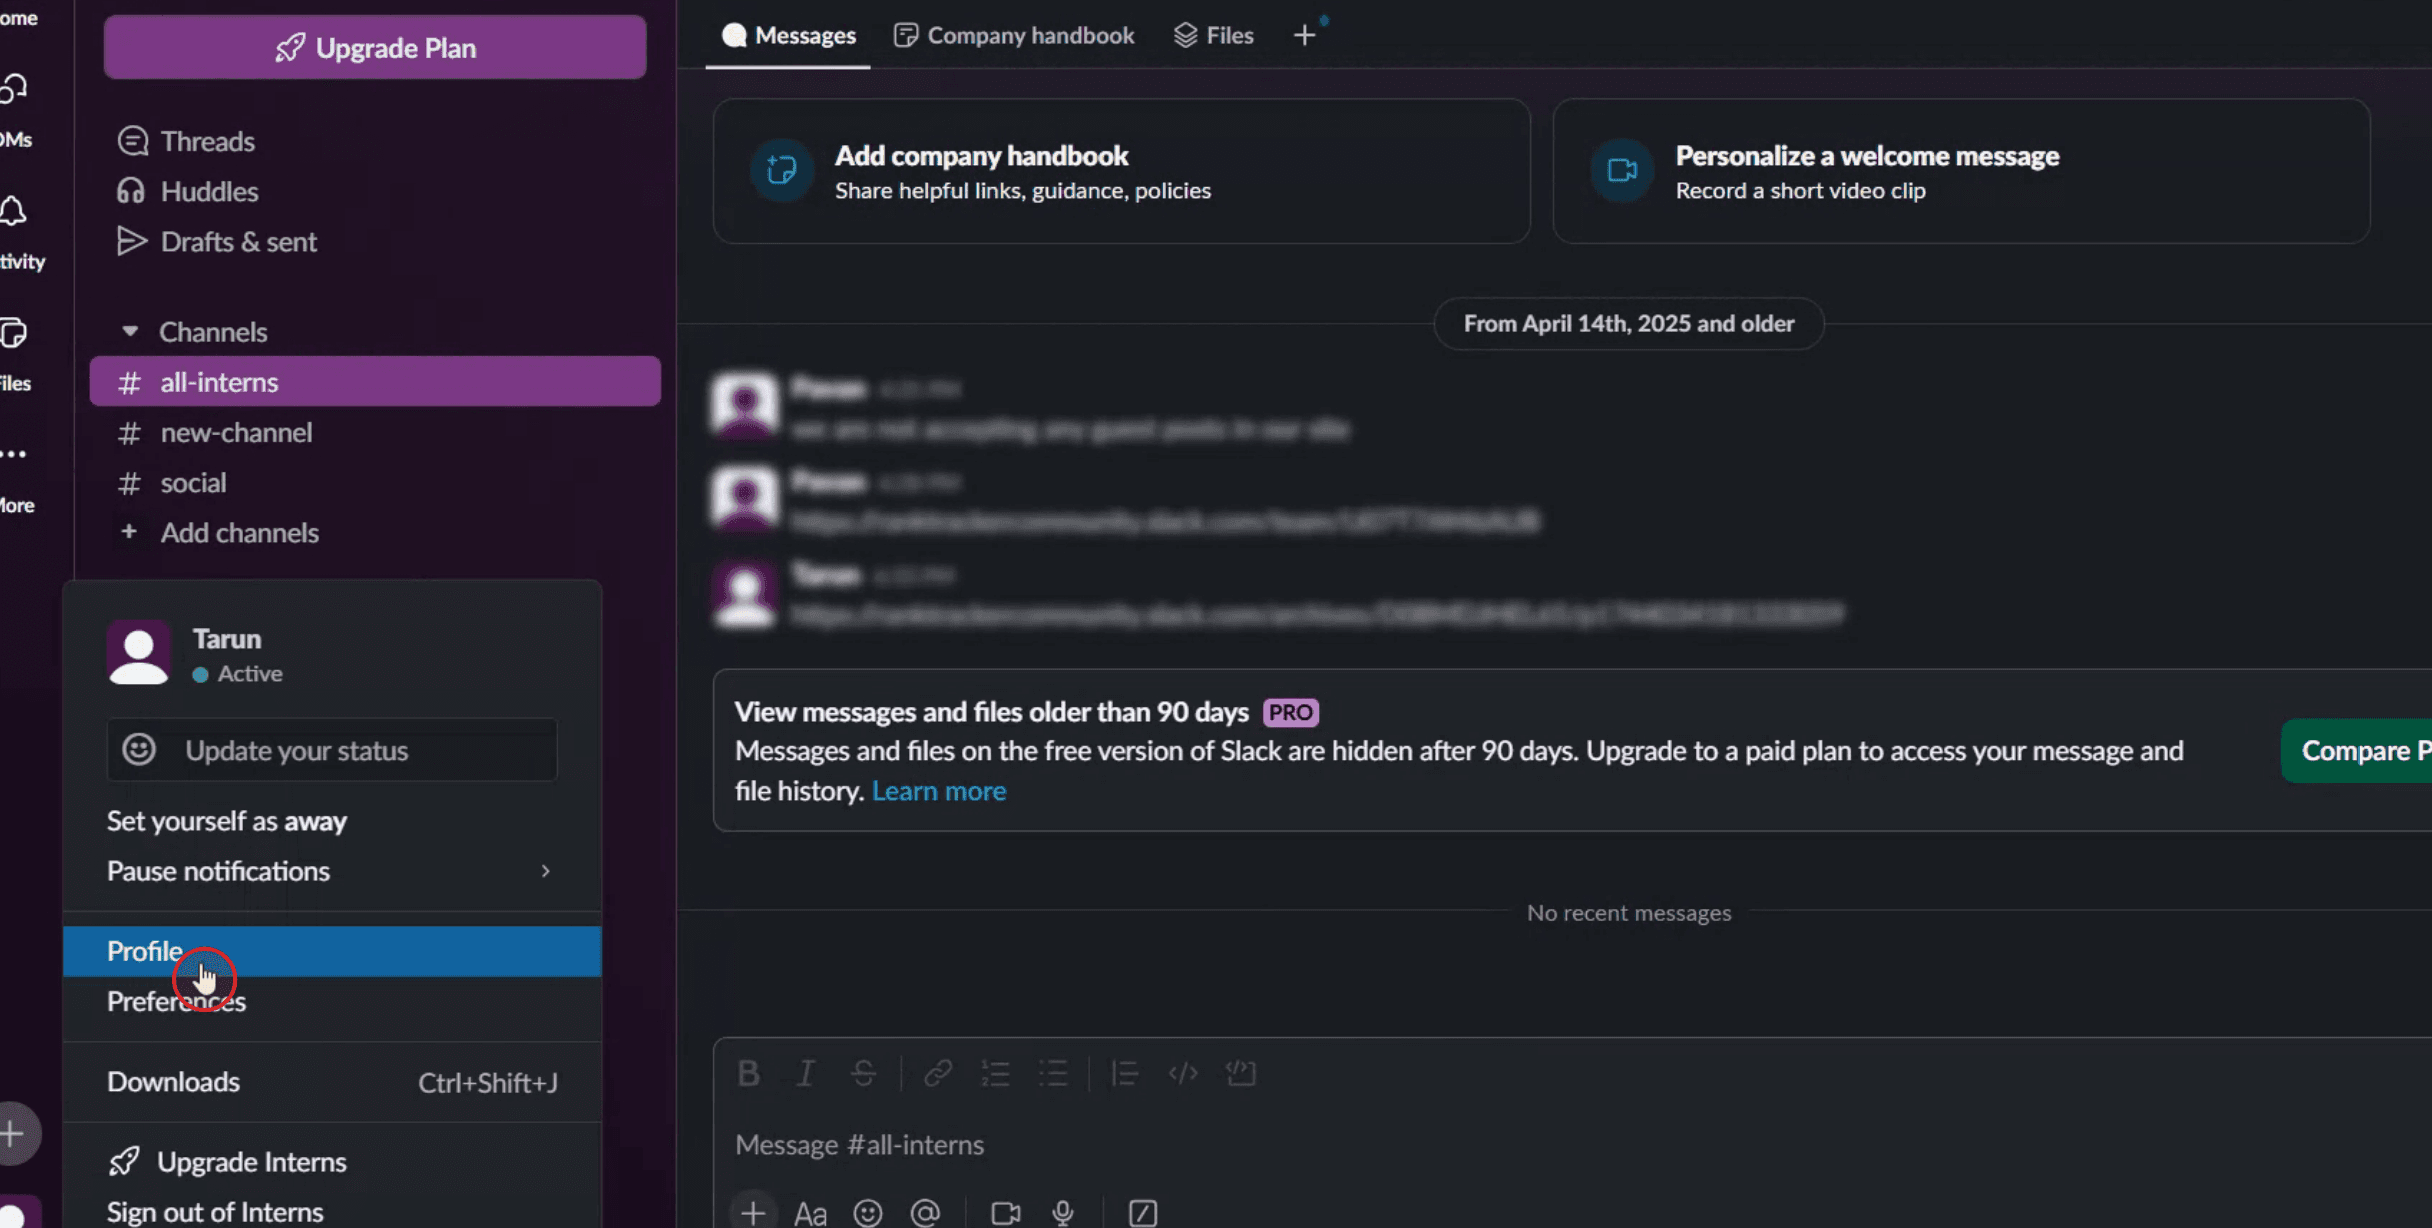
2. Ga naar je profielinstellingen: klik op je profielfoto (meestal in de rechterbovenhoek) en selecteer "Profiel & account" of "Accountinstellingen".
3. Zoek accountdeactivering: zoek naar de optie "Account deactiveren", die mogelijk onder "Accountinstellingen" of een vergelijkbare sectie staat.
4. Bevestig deactivering: waarschijnlijk wordt je gevraagd te bevestigen dat je de werkruimte wilt verlaten. Volg de instructies om de deactivering te voltooien.
Stapsgewijze handleiding: hoe je een Slack-werkruimte verlaat
Stap 1
Klik op de profielfoto,
Stap 2
Selecteer de profieloptie,
Stap 3
Selecteer vervolgens de optie met de drie puntjes.

Stap 4
Klik op de optie Accountinstellingen.

Stap 5
Klik op Account deactiveren.

Stap 6
Voer ten slotte je wachtwoord in en klik op Bevestig je wachtwoord.

Pro-tips voor het verlaten van een Slack-werkruimte
Open Slack en meld u aan bij uw werkruimte
Start de Slack-desktopapp of ga naar slack.com en log in op de werkruimte die u wilt verlaten.Klik op uw profielfoto
U vindt uw profielfoto of initialen in de rechterbovenhoek. Klik erop om het vervolgkeuzemenu te openen.Selecteer Profiel in het menu
Klik op “Profiel” om uw volledige profielweergave aan de rechterkant van het scherm te openen.Open accountinstellingen
Klik in het profielvenster op het pictogram met de drie puntjes en kies “Accountinstellingen.” Hiermee opent u een browservenster met uw Slack-accountinstellingen.Scroll naar Account deactiveren
Scroll op de pagina met accountinstellingen omlaag totdat u de sectie “Account deactiveren” ziet.Klik op Uw account deactiveren
Klik op de link “Uw account deactiveren”. Bevestig uw beslissing door uw wachtwoord in te voeren en op de definitieve deactiveringsknop te klikken. Hiermee wordt u uit de Slack-werkruimte verwijderd.Herhaal dit indien nodig voor andere werkruimtes
Als u deel uitmaakt van meerdere werkruimtes, moet u uw account in elk daarvan afzonderlijk deactiveren.
Veelvoorkomende valkuilen en hoe u ze kunt vermijden
Kan de deactiveringsoptie niet vinden
Zorg ervoor dat u de werkruimte in een browser hebt geopend, niet alleen in de app. Sommige instellingen zijn alleen via het web toegankelijk.Deactiveren verwarren met uitloggen
Uitloggen meldt u alleen af; u wordt hierdoor niet uit de werkruimte verwijderd. Gebruik de deactiveringsoptie om volledig te vertrekken.Geen toestemming om te deactiveren
Als u een door een bedrijf beheerde werkruimte gebruikt, moet u mogelijk contact opnemen met de beheerder van de werkruimte voor hulp bij het deactiveren van uw account.Nog steeds meldingen ontvangen
Na deactivering zou u geen Slack-meldingen meer moeten ontvangen. Als dat toch zo is, wis dan uw browsercookies of log uit op alle apparaten.Per ongeluk het verkeerde account deactiveren
Controleer nogmaals of u zich in de juiste werkruimte bevindt voordat u deactiveert. U ziet de naam van de werkruimte in de linkerbovenhoek van de app of pagina.
Veelgestelde vragen over het verlaten van een Slack-werkruimte
Kan ik een Slack-werkruimte verlaten zonder mijn account te deactiveren?
Nee, Slack heeft geen knop ‘werkruimte verlaten’. U moet uw account deactiveren om de werkruimte volledig te verlaten.Zullen anderen weten dat ik de werkruimte heb verlaten?
Uw naam verschijnt niet langer in de ledenlijst, maar Slack stuurt geen openbare melding over uw vertrek.Kan ik na het verlaten opnieuw deelnemen aan een werkruimte?
Ja, maar alleen als de werkruimte nieuwe leden toestaat of als een beheerder u een uitnodiging stuurt.Wat gebeurt er met mijn berichten nadat ik vertrek?
Uw berichten blijven in kanalen en directe berichten staan, maar uw profiel wordt weergegeven als ‘Gedeactiveerd account’.Kan ik meerdere werkruimtes tegelijk verlaten?
Nee, u moet uw account per werkruimte deactiveren.Hoe maak je een schermopname op een Mac?
Om een schermopname op een Mac te maken, kunt u Trupeer AI gebruiken. Hiermee kunt u het hele scherm vastleggen en biedt het AI-mogelijkheden zoals het toevoegen van AI-avatars, voice-over toevoegen en in- en uitzoomen in de video. Met de AI-videovertalingsfunctie van Trupeer kunt u de video vertalen naar meer dan 30 talen.Hoe voeg je een AI-avatar toe aan een schermopname?
Om een AI-avatar toe te voegen aan een schermopname, moet u een AI-tool voor schermopnames gebruiken. Trupeer AI is een AI-tool voor schermopnames, waarmee u video's met meerdere avatars kunt maken en die u ook helpt bij het maken van uw eigen avatar voor de video.Hoe maak je een schermopname op Windows?
Om een schermopname op Windows te maken, kunt u de ingebouwde Game Bar (Windows + G) gebruiken of een geavanceerde AI-tool zoals Trupeer AI voor meer geavanceerde functies zoals AI-avatars, voice-over, vertaling enz.Hoe voeg je voice-over toe aan video?
Om voice-over aan video's toe te voegen, downloadt u de Trupeer AI Chrome-extensie. Nadat u zich hebt aangemeld, uploadt u uw video met audio, kiest u de gewenste voice-over van Trupeer en exporteert u uw bewerkte video.Hoe zoom ik in tijdens een schermopname?
Om tijdens een schermopname in te zoomen, gebruikt u de zoomeffecten in Trupeer AI, waarmee u op specifieke momenten kunt in- en uitzoomen en zo de visuele impact van uw videocontent vergroot.
Aanbevolen lectuur
Technische documentatiegenerator
Hoe je een Huddle in Slack gebruikt
Hoe je een hyperlink maakt in Slack
Gerelateerde tutorials

