

كيفية ترقية حساب زوم
تعرّف على كيفية ترقية حساب Zoom الخاص بك إلى خطة Pro أو Business أو Enterprise. دليل خطوة بخطوة لفتح الميزات المميزة مثل الاجتماعات الأطول والتسجيل السحابي.
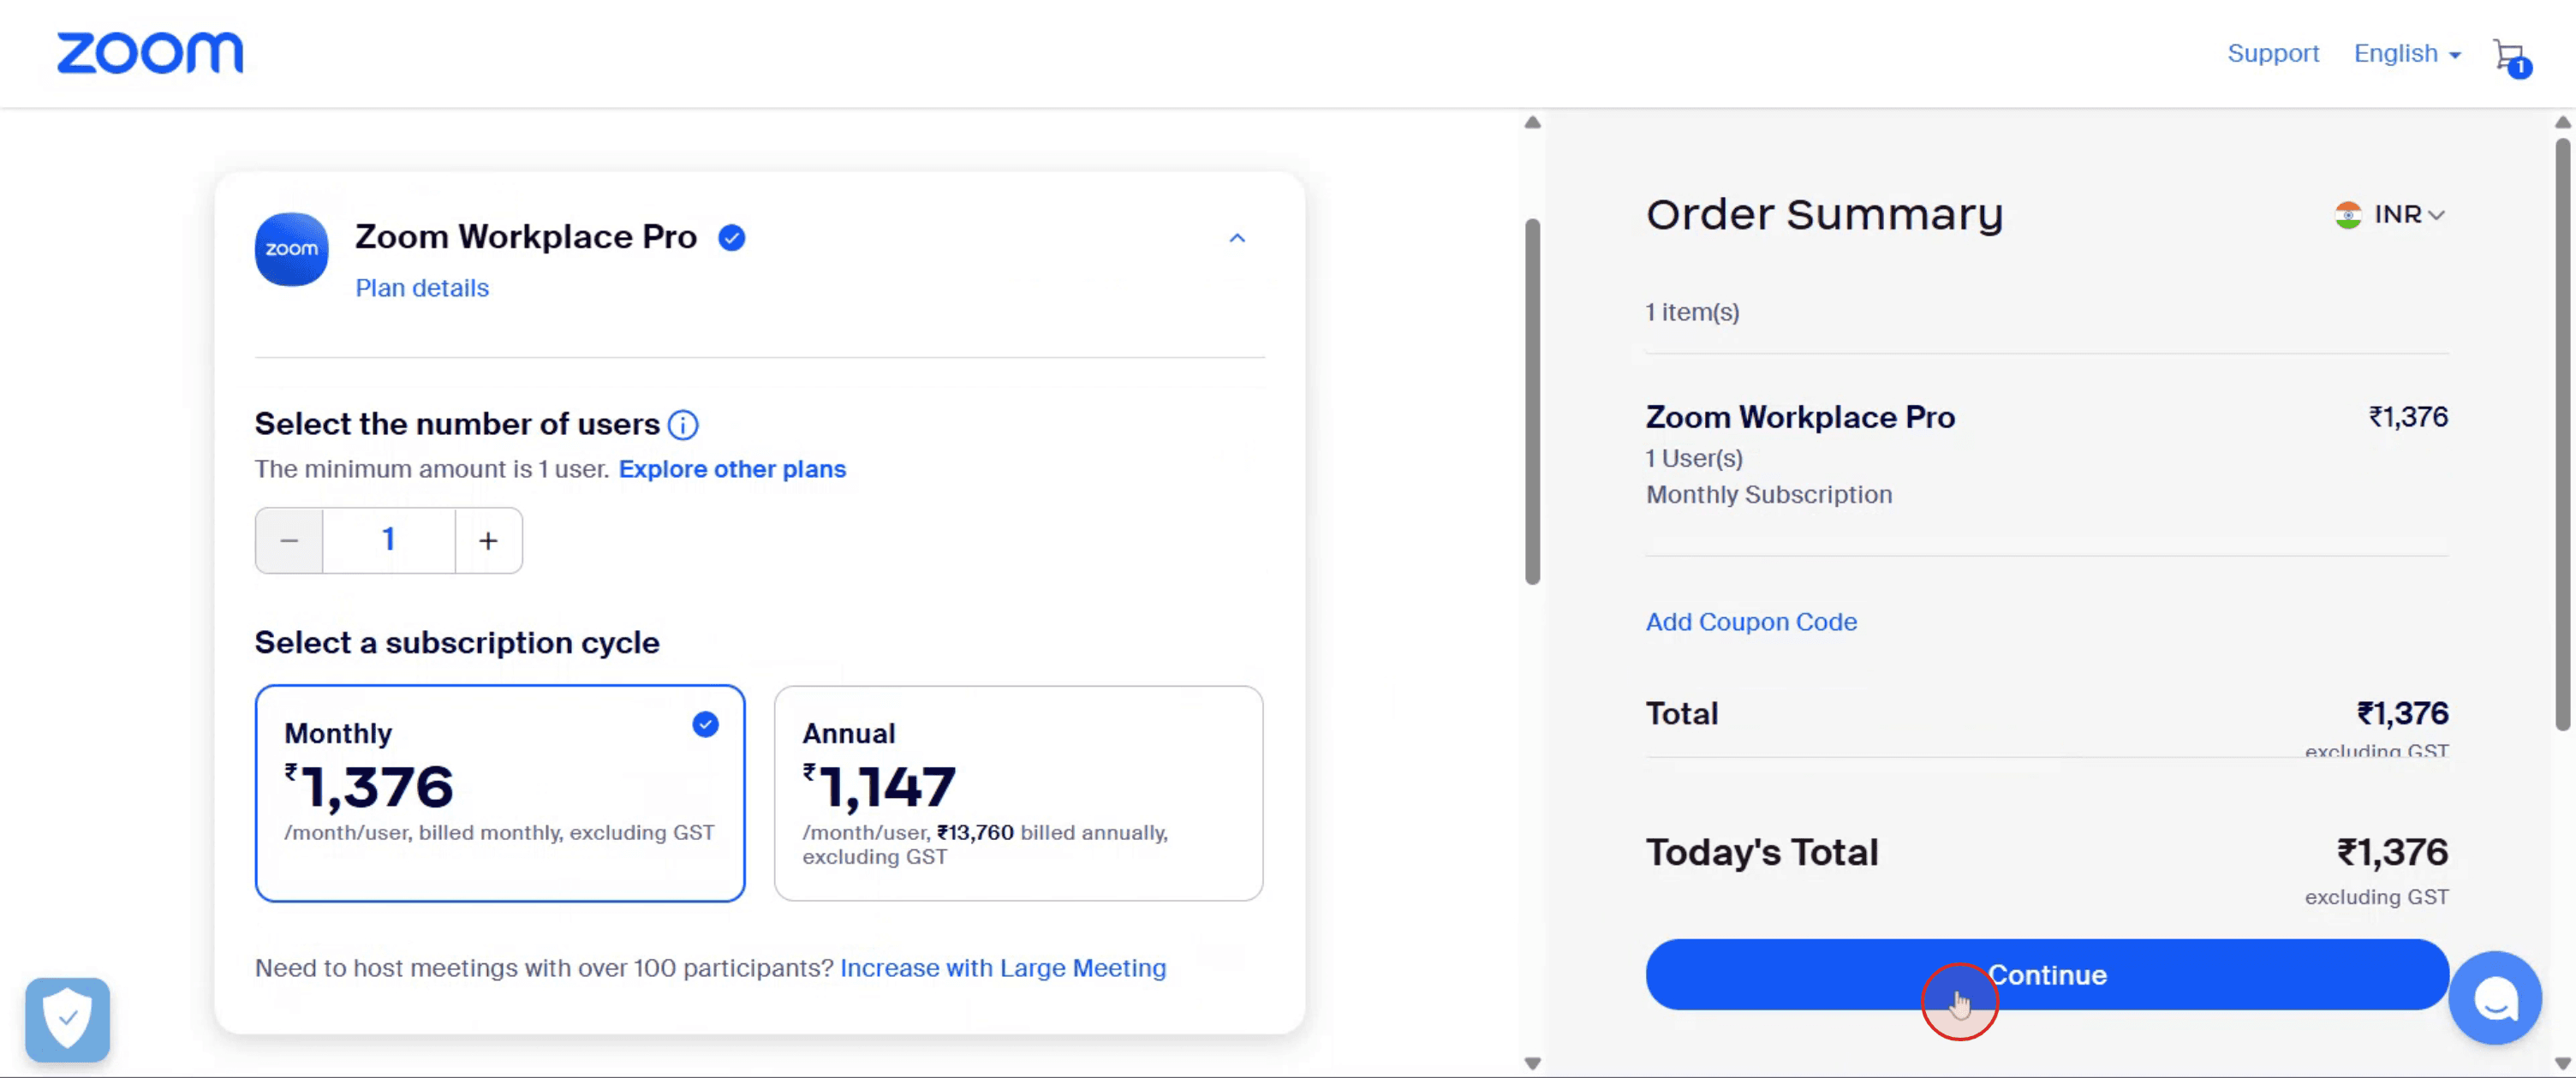
لترقية حساب Zoom، سجّل الدخول إلى بوابة Zoom على الويب، وانتقل إلى إدارة الحساب ثم الفوترة، ثم انقر على ترقية الحساب. اختر الخطة التي تريدها، وحدد دورة الاشتراك (شهريًا أو سنويًا)، ثم تابع لإدخال معلومات الفوترة والدفع. وأخيرًا، راجع طلبك وأكد عملية الشراء.
إليك شرحًا أكثر تفصيلًا:
سجّل الدخول إلى Zoom: قم بالوصول إلى بوابة Zoom على الويب باستخدام بيانات اعتمادك.
انتقل إلى الفوترة: بعد تسجيل الدخول، انتقل إلى إدارة الحساب ثم انقر على الفوترة.
ابدأ الترقية: حدد علامة التبويب "الخطط الحالية" وانقر على زر "ترقية الحساب".
اختر خطتك: تصفح الخطط المتاحة (مثل Pro وBusiness وEnterprise) واختر الخطة التي تناسب احتياجاتك على أفضل وجه.
حدد دورة الاشتراك: اختر ما إذا كنت تريد الدفع شهريًا أو سنويًا للخطة التي اخترتها.
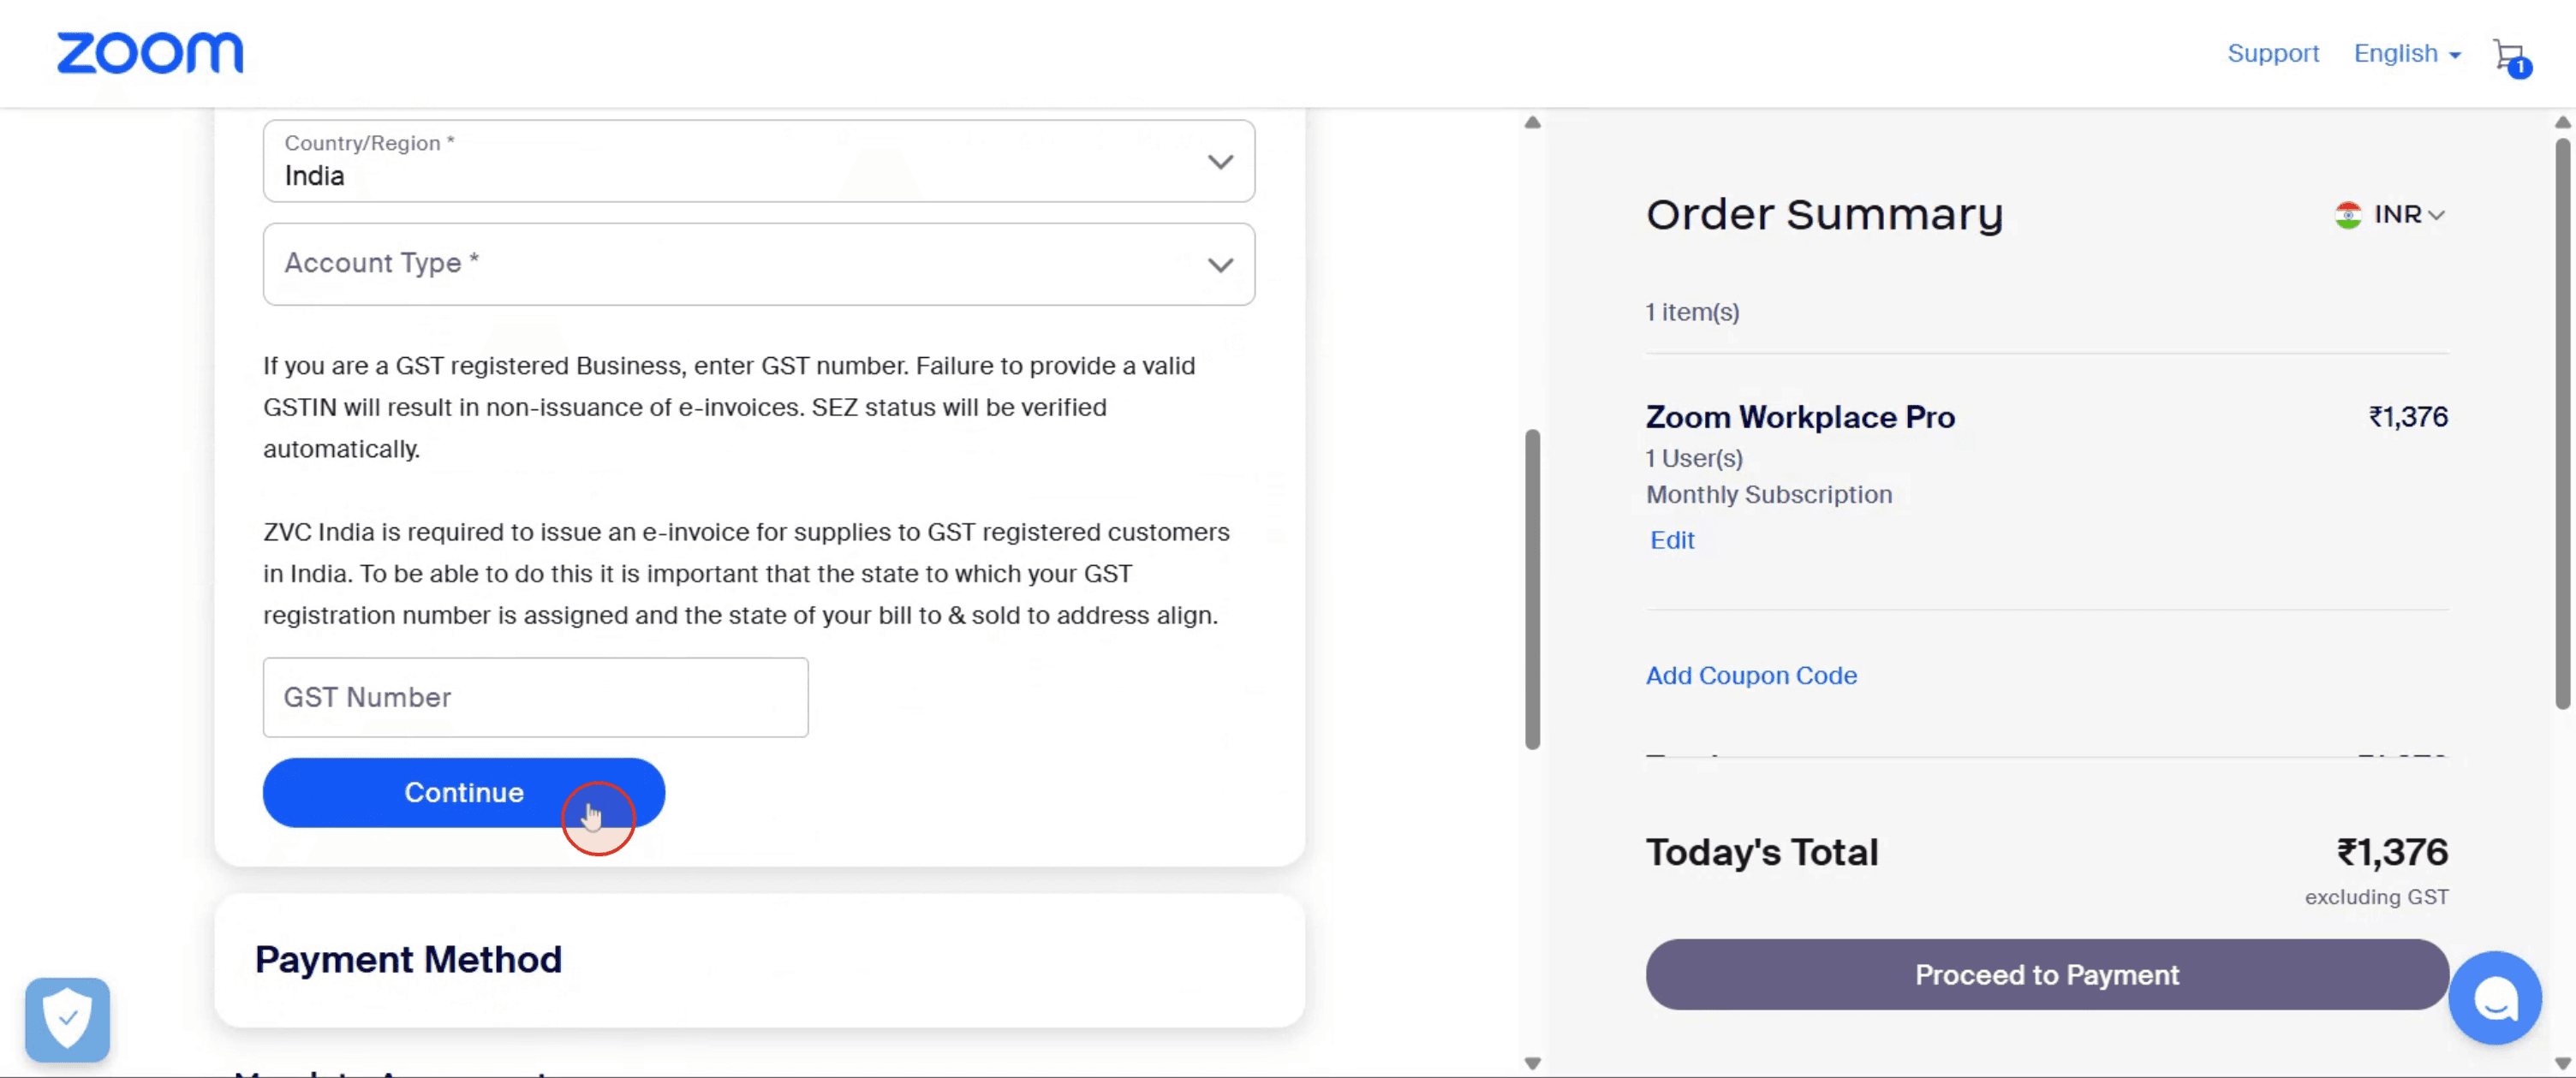
أدخل معلومات الفوترة: قدّم عنوان الفوترة وتفاصيل الاتصال اللازمة.
قدّم معلومات الدفع: اختر طريقة الدفع المفضلة لديك وأدخل التفاصيل المطلوبة.
راجع وأكّد: راجع ملخص الطلب بعناية، بما في ذلك الخطة المختارة ودورة الاشتراك ومعلومات الفوترة.
أكمل الترقية: انقر على زر "إتمام الطلب" أو "رقّي الآن" لإكمال عملية الشراء.
دليل خطوة بخطوة: كيفية ترقية حساب Zoom
الخطوة 1
انتقل إلى شريط التنقل العلوي وانقر على "الخطط والأسعار".

الخطوة 2
تصفح الخطط المتاحة ثم انقر على زر "ترقية" أسفل سعر اشتراك Zoom الذي تفضله.

الخطوة 3
بعد ذلك، اختر "دورة الاشتراك" التي تفضلها.

الخطوة 4
اضغط على "متابعة" بعد ذلك.
الخطوة 5
أخيرًا، قدّم عنوان الفوترة ثم اضغط على "متابعة إلى الدفع". سدد المبلغ المستحق باستخدام طريقة الدفع المفضلة لديك لإكمال عملية الشراء وترقية حساب Zoom فورًا.
نصائح احترافية لترقية حساب Zoom
سجّل الدخول إلى حساب Zoom الخاص بك
انتقل إلى zoom.us وسجّل الدخول باستخدام بيانات اعتماد Zoom الحالية لديك.انقر على الخطط والأسعار
في أعلى الصفحة الرئيسية، انقر على الخطط والأسعار لعرض خيارات الترقية المتاحة.اختر الخطة التي تناسب احتياجاتك
راجع ميزات كل خطة (Pro، Business، Enterprise) ثم انقر على اشترِ الآن أسفل الخطة التي تفضّلها.حدّد عدد التراخيص
اختر عدد التراخيص التي تحتاجها. كل ترخيص يساوي حساب مستخدم واحد مع وصول مُرقّى.أدخل معلومات الفوترة
قدّم بيانات الاتصال والفوترة الخاصة بك، بما في ذلك البريد الإلكتروني والعنوان وطريقة الدفع.أكّد وأكمل عملية الدفع
راجع ملخص طلبك ثم انقر على ترقية أو إتمام الطلب لإكمال عملية الترقية.الوصول إلى الميزات المُرقّاة
بعد الدفع، سيتم ترقية حسابك على الفور، وستتمكن من الوصول إلى ميزات جديدة مثل الاجتماعات الأطول والتسجيل السحابي وأدوات التقارير.
الأخطاء الشائعة وكيفية تجنبها
نسيان تسجيل الدخول أولًا
يجب أن تكون مسجّل الدخول إلى حساب Zoom الخاص بك قبل شراء أي خطة، وإلا فلن يتم تطبيقها بشكل صحيح.اختيار الخطة الخاطئة
راجع قائمة الميزات بعناية للتأكد من أن الخطة التي تختارها تدعم احتياجاتك مثل الندوات عبر الويب أو الاجتماعات الكبيرة.عدم تطابق عنوان الفوترة
تأكد من أن عنوان الفوترة يطابق طريقة الدفع لتجنب أخطاء المعاملة.عدم العثور على الإيصال أو تأكيد الطلب
تحقق من مجلد البريد العشوائي/غير المرغوب فيه في بريدك الإلكتروني للحصول على تأكيد الترقية والفاتورة.محاولة الترقية عبر التطبيق
يجب إكمال معظم ترقيات الخطط عبر موقع Zoom الإلكتروني، وليس عبر تطبيق سطح المكتب أو التطبيق على الهاتف المحمول.
الأسئلة الشائعة حول ترقية حساب Zoom
كيف أعرف أن ترقية حساب Zoom تمت بنجاح؟
ستصلك رسالة تأكيد عبر البريد الإلكتروني وسيظهر على لوحة تحكم حسابك اشتراكك الجديد فورًا.هل يمكنني ترقية حساب Zoom مجاني؟
نعم، يمكن ترقية الحسابات المجانية (Basic) في أي وقت عبر موقع Zoom الإلكتروني.هل ستتغير روابط الاجتماعات أو الإعدادات بعد الترقية؟
لا، ستبقى روابط الاجتماعات والإعدادات الحالية كما هي ما لم تختر تغييرها.هل يمكنني الرجوع إلى خطة أقل لاحقًا إذا لزم الأمر؟
نعم، يمكنك خفض الخطة أو إلغاء اشتراكك المدفوع في نهاية دورة الفوترة.هل الدفع لخطط Zoom شهري أم سنوي؟
يوفّر Zoom خيارات فوترة شهرية وسنوية. اختر الدورة التي تفضّلها أثناء إتمام الشراءكيف أسجّل الشاشة على Mac؟
لتسجيل الشاشة على Mac، يمكنك استخدام Trupeer AI. يتيح لك التقاط الشاشة بالكامل ويوفر إمكانات ذكاء اصطناعي مثل إضافة شخصيات افتراضية بالذكاء الاصطناعي، وإضافة تعليق صوتي، وإضافة تقريب وتصغير داخل الفيديو. ومع ميزة ترجمة الفيديو بالذكاء الاصطناعي من trupeer، يمكنك ترجمة الفيديو إلى أكثر من 30 لغة.كيف أضيف شخصية افتراضية بالذكاء الاصطناعي إلى تسجيل الشاشة؟
لإضافة شخصية افتراضية بالذكاء الاصطناعي إلى تسجيل الشاشة، ستحتاج إلى استخدام أداة لتسجيل الشاشة بالذكاء الاصطناعي. Trupeer AI هي أداة لتسجيل الشاشة بالذكاء الاصطناعي، وتساعدك على إنشاء مقاطع فيديو بعدة شخصيات افتراضية، كما تساعدك على إنشاء شخصيتك الافتراضية الخاصة بالفيديو.كيف أسجّل الشاشة على windows?
لتسجيل الشاشة على Windows، يمكنك استخدام شريط الألعاب المدمج (Windows + G) أو أداة ذكاء اصطناعي متقدمة مثل Trupeer AI للحصول على ميزات أكثر تقدمًا مثل الشخصيات الافتراضية بالذكاء الاصطناعي، والتعليق الصوتي، والترجمة، إلخ.كيف أضيف تعليقًا صوتيًا إلى الفيديو؟
لإضافة تعليق صوتي إلى الفيديوهات، حمّل إضافة trupeer ai لمتصفح chrome. بعد التسجيل، ارفع فيديوك الذي يحتوي على صوت، واختر التعليق الصوتي المطلوب من trupeer ثم صدّر الفيديو المعدّل.كيف أقوم بالتكبير في تسجيل الشاشة؟
لتكبير الصورة أثناء تسجيل الشاشة، استخدم تأثيرات التكبير في Trupeer AI التي تتيح لك التكبير والتصغير في لحظات محددة، مما يعزز التأثير البصري لمحتوى الفيديو الخاص بك.
قراءات مقترحة
كيفية تحويل صورة إلى صفحة تلوين في Canva
كيفية الطباعة على الوجهين في Canva
دروس ذات صلة

