
كيفية إدراج الأشكال في Canva – نصائح سريعة للتصميم
تعلّم كيفية إضافة الأشكال وتخصيصها في Canva لتحسين تصميمك. خطوات بسيطة لإدراج الدوائر والمربعات والسهام والمزيد.
توفر هذه الوثيقة شرحًا تفصيليًا حول إدراج الأشكال وتخصيصها داخل تطبيق GIMP.
تشمل العملية تحديد الأشكال وتخصيصها وتعديلها لتناسب احتياجات تصميمك بفعالية.
إضافة الأشكال في Canva سهلة وتساعد على تحسين تخطيط تصميمك. إليك كيفية القيام بذلك:
دليل خطوة بخطوة:
افتح تصميمك:
ابدأ تصميمًا جديدًا أو افتح تصميمًا موجودًا في Canva.
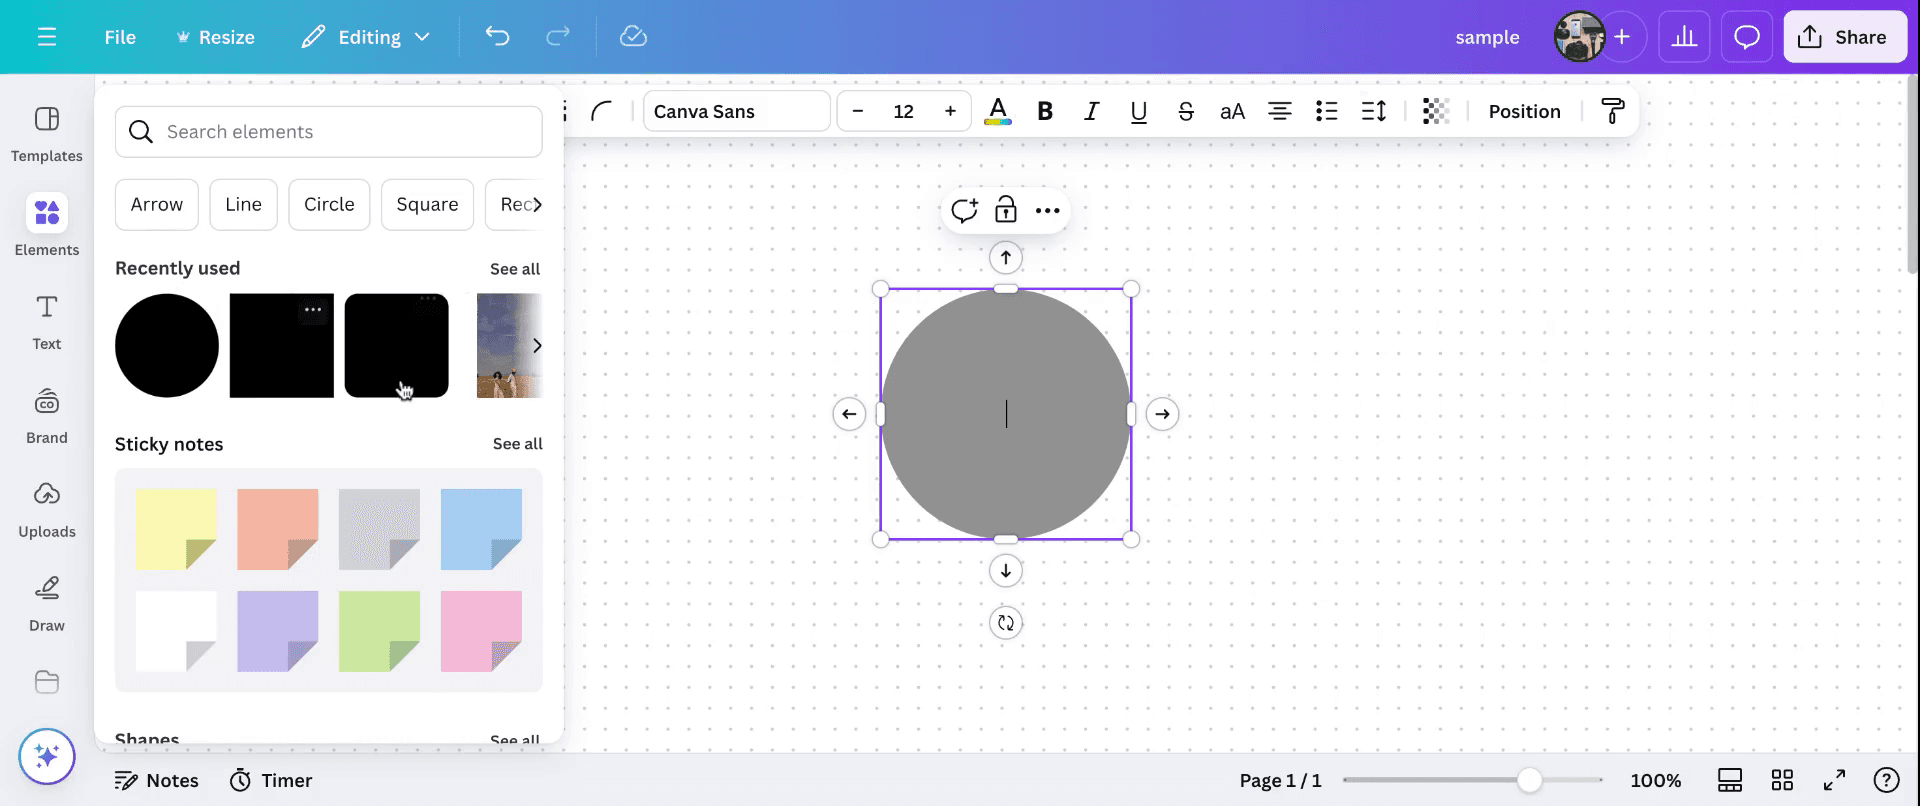
اذهب إلى علامة تبويب “العناصر”:
الموجودة في شريط الأدوات الأيسر، انقر على العناصر.
حدد “الخطوط والأشكال”:
مرّر إلى قسم الخطوط والأشكال، أو اكتب شكلًا محددًا (مثل: "دائرة"، "سهم"، "قلب") في شريط البحث.
أدرج الشكل:
انقر على الشكل الذي تريد استخدامه. سيظهر على لوحة العمل الخاصة بك.
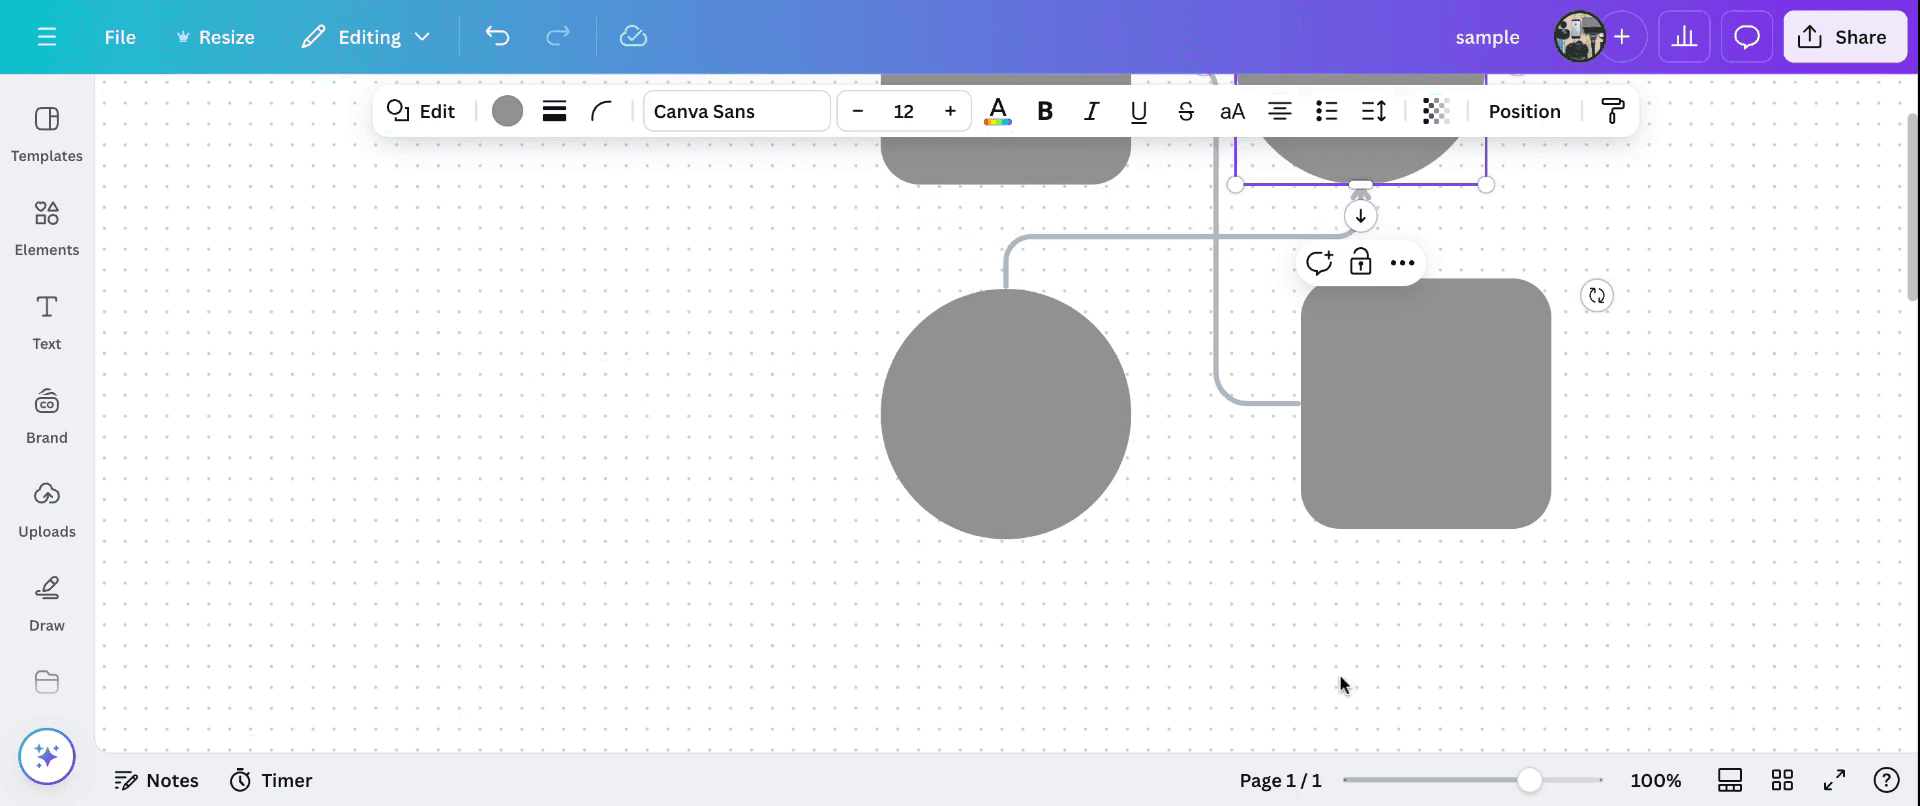
خصّص الشكل:
يمكنك:
تغيير الحجم بسحب الزوايا.
التدوير باستخدام مقبض التدوير.
تغيير اللون، وسُمك الحد، والشفافية، وترتيب الطبقات باستخدام شريط الأدوات العلوي.
دليل خطوة بخطوة: كيفية إدراج الأشكال في Canva
الخطوة 1
في هذا الشرح، سنتعلم كيفية إدراج الأشكال في Canva. ابدأ بالانتقال إلى قسم 'العناصر' ثم حدد الأشكال التي تريد العمل عليها. بمجرد تحديد شكل ما، يمكنك تخصيصه باختيار أدوات مختلفة. يتيح لك ذلك ضبط خصائص الشكل مثل اللون والخصائص الأخرى.
الخطوة 2
بعد تحديد شكل، يمكنك إدراج أشكال إضافية وتعديل أحجامها عن طريق السحب وتغيير التخطيطات.
الخطوة 3
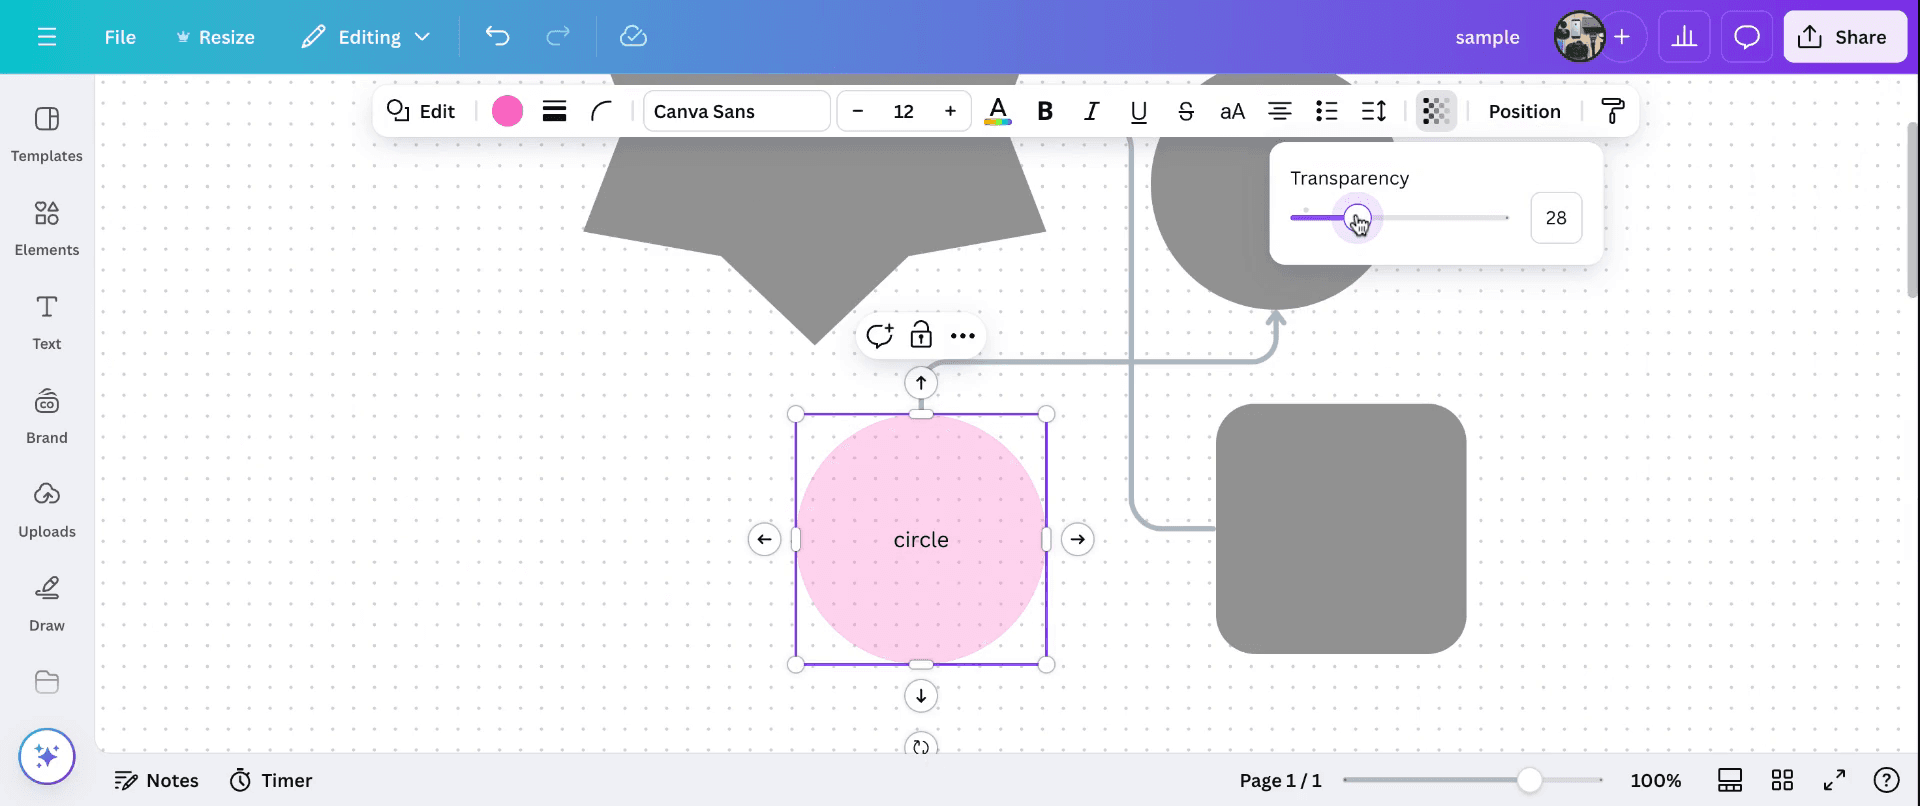
بالإضافة إلى ذلك، لديك خيار إضافة نص داخل شكل وضبط مستويات الشفافية لتناسب متطلبات تصميمك. هذه هي طريقة إدراج الأشكال في Canva، مما يتيح لك إنشاء تصاميم معقدة ومخصصة.
نصائح احترافية لإدراج الأشكال بنجاح في Canva
استخدم تبويب "Elements": انتقل إلى قسم Elements واختر Shapes للعثور على مجموعة متنوعة من الخيارات مثل الدوائر والمربعات والمثلثات والأشكال المخصصة.
خصّص الشكل: بمجرد إضافته إلى تصميمك، يمكنك تغيير الحجم، وتدويره، وتغيير لون الشكل ليتناسب مع أسلوب تصميمك أو الثيم.
ضع الأشكال في طبقات ورتّبها: استخدم أداة Position لترتيب الأشكال في طبقات، ووضعها فوق بعضها البعض، أو ترتيبها بترتيب محدد لإنشاء تصاميم أكثر تعقيدًا.
اضبط الشفافية: يمكنك ضبط شفافية الشكل لإنشاء تأثيرات مثل التراكبات الناعمة أو الخلفيات شبه الشفافة.
اجمع الأشكال لتصاميم مخصصة: يمكنك دمج عدة أشكال لإنشاء تصاميم فريدة ومخصصة. استخدم خيار Group لتجميع عدة أشكال وإجراء التعديلات عليها دفعة واحدة.
الأخطاء الشائعة وكيفية تجنبها عند إدراج الأشكال في Canva
تداخل الأشكال عن غير قصد: قد تتداخل الأشكال بشكل غير متناسق عند إضافة عدة عناصر إلى التصميم.
الحل: استخدم أداة Position لمحاذاة الأشكال وتوزيعها بالتساوي، مع التأكد من أنها لا تتداخل عن غير قصد.الأشكال المشوّهة: قد يؤدي تغيير حجم الأشكال بشكل غير متساوٍ إلى تشويه نسبها.
الحل: اضغط مع الاستمرار على مفتاح Shift أثناء تغيير الحجم للحفاظ على النسب الأصلية للشكل.ألوان الأشكال المتعارضة مع الخلفية: أحيانًا قد لا يبرز لون الشكل جيدًا مقابل الخلفية.
الحل: اختر ألوانًا تتكامل مع الخلفية أو تتباين معها للحفاظ على الوضوح. يمكنك أيضًا ضبط الشفافية لتحقيق توازن في التصميم.الأشكال غير المحاذاة بشكل صحيح: قد يجعل عدم المحاذاة تصميمك يبدو غير احترافي أو غير متساوٍ.
الحل: استخدم Snap to Grid في Canva أو أدوات المحاذاة للتأكد من أن الأشكال مصطفّة بشكل صحيح.ازدحام التصميم بعدد كبير من الأشكال: قد تجعل إضافة عدد كبير جدًا من الأشكال تصميمك يبدو مزدحمًا وفوضويًا.
الحل: حافظ على نظافة التصميم باستخدام الأشكال الأساسية فقط، وتأكد من وجود مساحة كافية بينها لتجنب الفوضى البصرية.
الأسئلة الشائعة حول إدراج الأشكال في Canva
كيف أُدرِج شكلاً في Canva؟
انتقل إلى تبويب العناصر، ثم اختر الأشكال، وحدد الشكل الذي تريد إضافته إلى تصميمك. بعد ذلك، اسحبه إلى مساحة التصميم.هل يمكنني تخصيص لون شكل في Canva؟
نعم، بعد إضافة الشكل يمكنك النقر عليه واختيار لون من لوحة الألوان أو إضافة ألوان مخصصة لتتناسب مع تصميمك.هل يمكنني تغيير حجم الشكل أو تدويره؟
نعم، يمكنك تغيير حجم الشكل بسحب زواياه أو تدويره بالنقر على مقبض التدوير أعلى الشكل.كيف أُرتّب عدة أشكال في طبقات؟
لترتيب الأشكال في طبقات، حدّد الشكل واستخدم زر الموضع لنقله إلى الأمام أو الخلف، مما يتيح لك تكديس الأشكال فوق بعضها البعض.هل يمكنني دمج عدة أشكال في تصميم واحد؟
نعم، يمكنك دمج الأشكال من خلال تجميعها معًا. حدّد عدة أشكال، ثم انقر بزر الماوس الأيمن واختر Group لدمجها في عنصر واحد يسهل تعديلُه.شكرًا لك على متابعة هذا الشرح.كيفية تسجيل الشاشة على ماك؟
لتسجيل الشاشة على جهاز Mac، يمكنك استخدام Trupeer AI. يتيح لك التقاط الشاشة بالكامل ويوفر إمكانات للذكاء الاصطناعي مثل إضافة شخصيات افتراضية بالذكاء الاصطناعي، وإضافة تعليق صوتي، وإضافة تكبير وتصغير في الفيديو. وبفضل ميزة ترجمة الفيديو بالذكاء الاصطناعي من Trupeer، يمكنك ترجمة الفيديو إلى أكثر من 30 لغة.كيفية إضافة شخصية افتراضية بالذكاء الاصطناعي إلى تسجيل الشاشة؟
لإضافة شخصية افتراضية بالذكاء الاصطناعي إلى تسجيل شاشة، ستحتاج إلى استخدام أداة تسجيل شاشة بالذكاء الاصطناعي. Trupeer AI هي أداة لتسجيل الشاشة بالذكاء الاصطناعي، وتساعدك على إنشاء فيديوهات بعدة شخصيات افتراضية، كما تساعدك أيضًا في إنشاء شخصيتك الافتراضية الخاصة بالفيديو.كيفية تسجيل الشاشة على ويندوز؟
لتسجيل الشاشة على Windows، يمكنك استخدام شريط الألعاب المدمج (Windows + G) أو أداة ذكاء اصطناعي متقدمة مثل Trupeer AI للحصول على ميزات أكثر تقدمًا مثل الشخصيات الافتراضية بالذكاء الاصطناعي، والتعليق الصوتي، والترجمة، إلخ.كيفية إضافة تعليق صوتي إلى الفيديو؟
لإضافة تعليق صوتي إلى مقاطع الفيديو، حمّل إضافة trupeer ai لمتصفح Chrome. بعد إنشاء حسابك، ارفع الفيديو الخاص بك مع الصوت، واختر التعليق الصوتي المطلوب من trupeer ثم صدّر الفيديو المعدّل.كيف أُكبّر أثناء تسجيل الشاشة؟
لتكبير الصورة أثناء تسجيل الشاشة، استخدم تأثيرات التكبير في Trupeer AI التي تتيح لك التكبير والتصغير في لحظات محددة، مما يعزز الأثر البصري لمحتوى الفيديو الخاص بك.
قراءات مقترحة
كيفية تحويل صورة إلى صفحة تلوين في Canva
كيفية الطباعة على الوجهين في Canva
دروس ذات صلة

