
كيفية استخراج صورة من فيديو في Canva
تعلّم كيف تلتقط صورة من فيديو في Canva عن طريق التقاط إطار وتصديره كصورة. اتبع هذا الدرس البسيط وأنشئ أدلة مرئية واضحة باستخدام Trupeer.
يقدم هذا الدليل شرحًا تفصيليًا شاملًا لكيفية التقاط صورة ثابتة من مقطع فيديو داخل Canva.
اتبع الخطوات أدناه لاستخراج الصورة المطلوبة من مشروع الفيديو الخاص بك بكفاءة.
لالتقاط صورة من مقطع فيديو في Canva، قم بتحميل الفيديو، وضعه لعرض الإطار المطلوب، ثم نزّل التصميم كملف صورة (PNG أو JPEG). على الرغم من أن Canva لا توفر ميزة مخصصة لـ"التقاط الإطار"، فإن هذا الحل البديل يتيح لك فعليًا استخراج صورة ثابتة.
دليل خطوة بخطوة:
1. حمّل الفيديو الخاص بك:
افتح مشروع Canva الخاص بك وقم بتحميل الفيديو الذي تريد استخدامه. اسحبه إلى اللوحة القماشية الخاصة بك.
2. اضبط الإطار:
حرّك مؤشر التشغيل (شريط السحب) في الخط الزمني للفيديو إلى الإطار الذي ترغب في التقاطه. غيّر حجم الفيديو وموضعه على اللوحة القماشية حسب الحاجة.
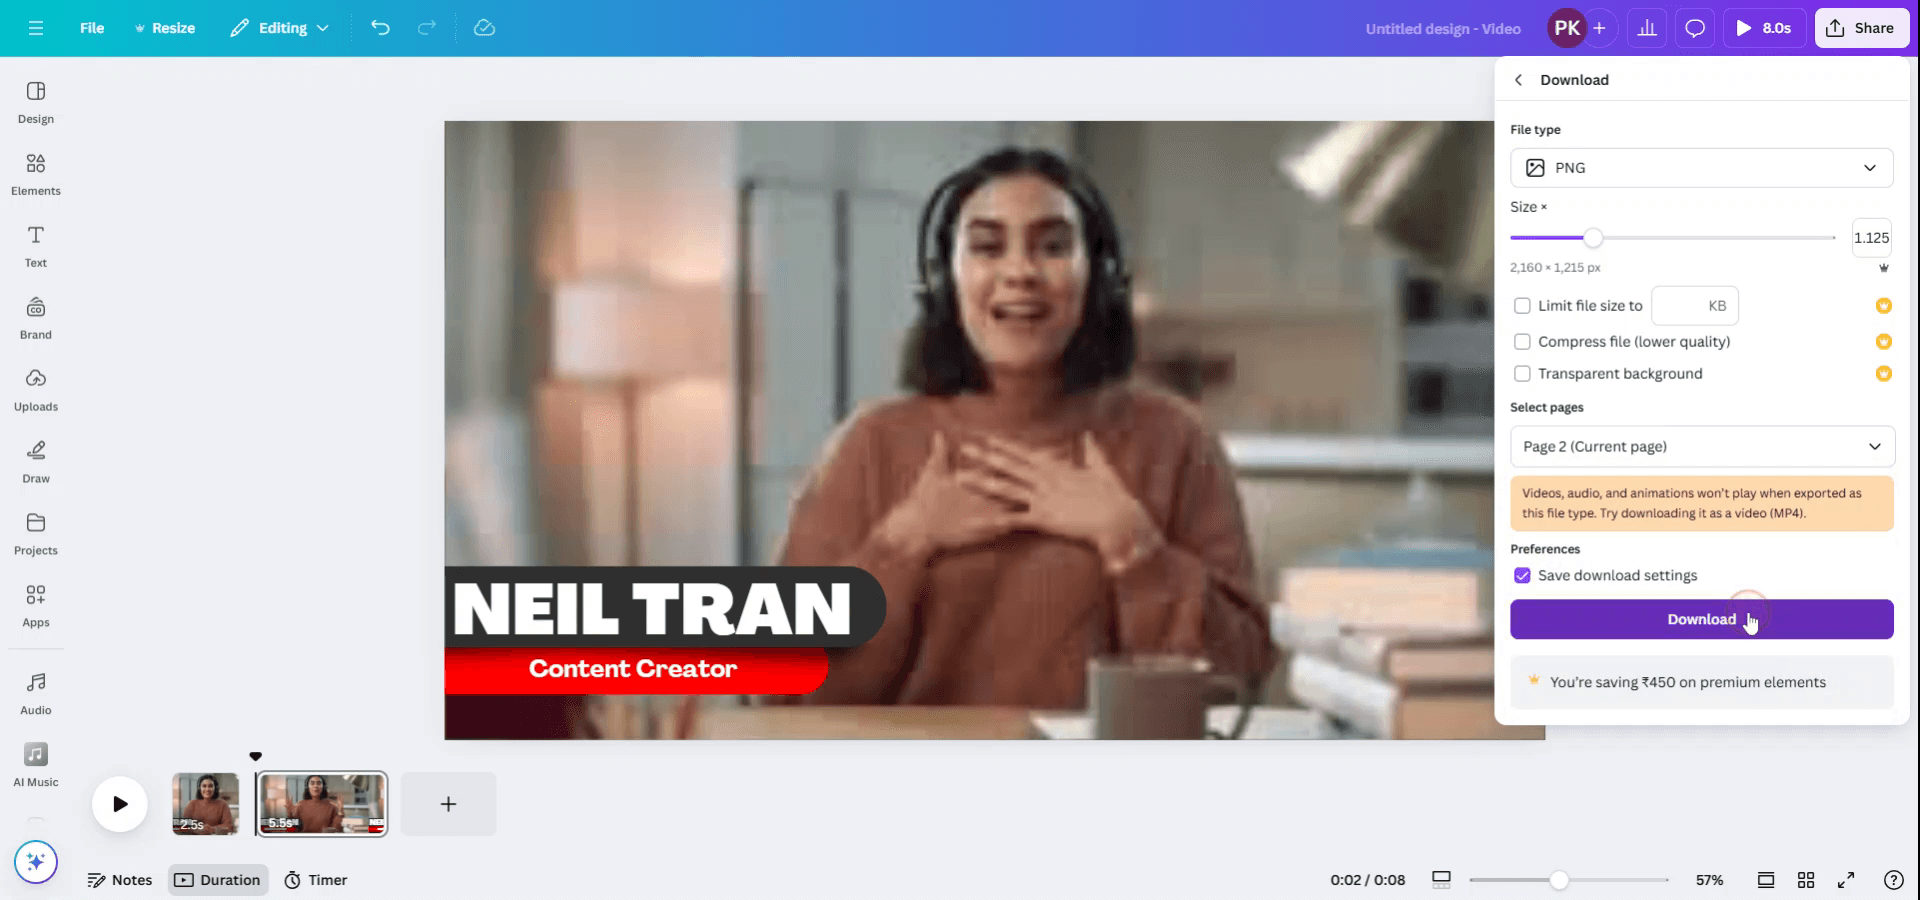
3. نزّل الإطار كصورة:
انقر على "مشاركة" في الزاوية العلوية اليمنى.
اختر "تنزيل".
اختر "PNG" أو "JPEG" كنوع الملف.
ضمن “تحديد الصفحات”، اختر الصفحة الحالية فقط.
دليل خطوة بخطوة: كيفية التقاط صورة من فيديو في canva
الخطوة 1
للشروع في التقاط صورة من فيديو في Canva، افتح تصميمًا موجودًا يحتوي على الفيديو. استخدم مؤقت المدة الموجود أسفل الفيديو للتشغيل ثم أوقفه بدقة عند اللحظة التي ترغب في التقاطها.

الخطوة 2
بمجرد تحديد الإطار الدقيق الذي ترغب في التقاطه، انقر على "S" لتقسيم الفيديو. أو انقر بزر الفأرة الأيمن على الفيديو واختر "تقسيم الصفحة" لعزل الإطار.
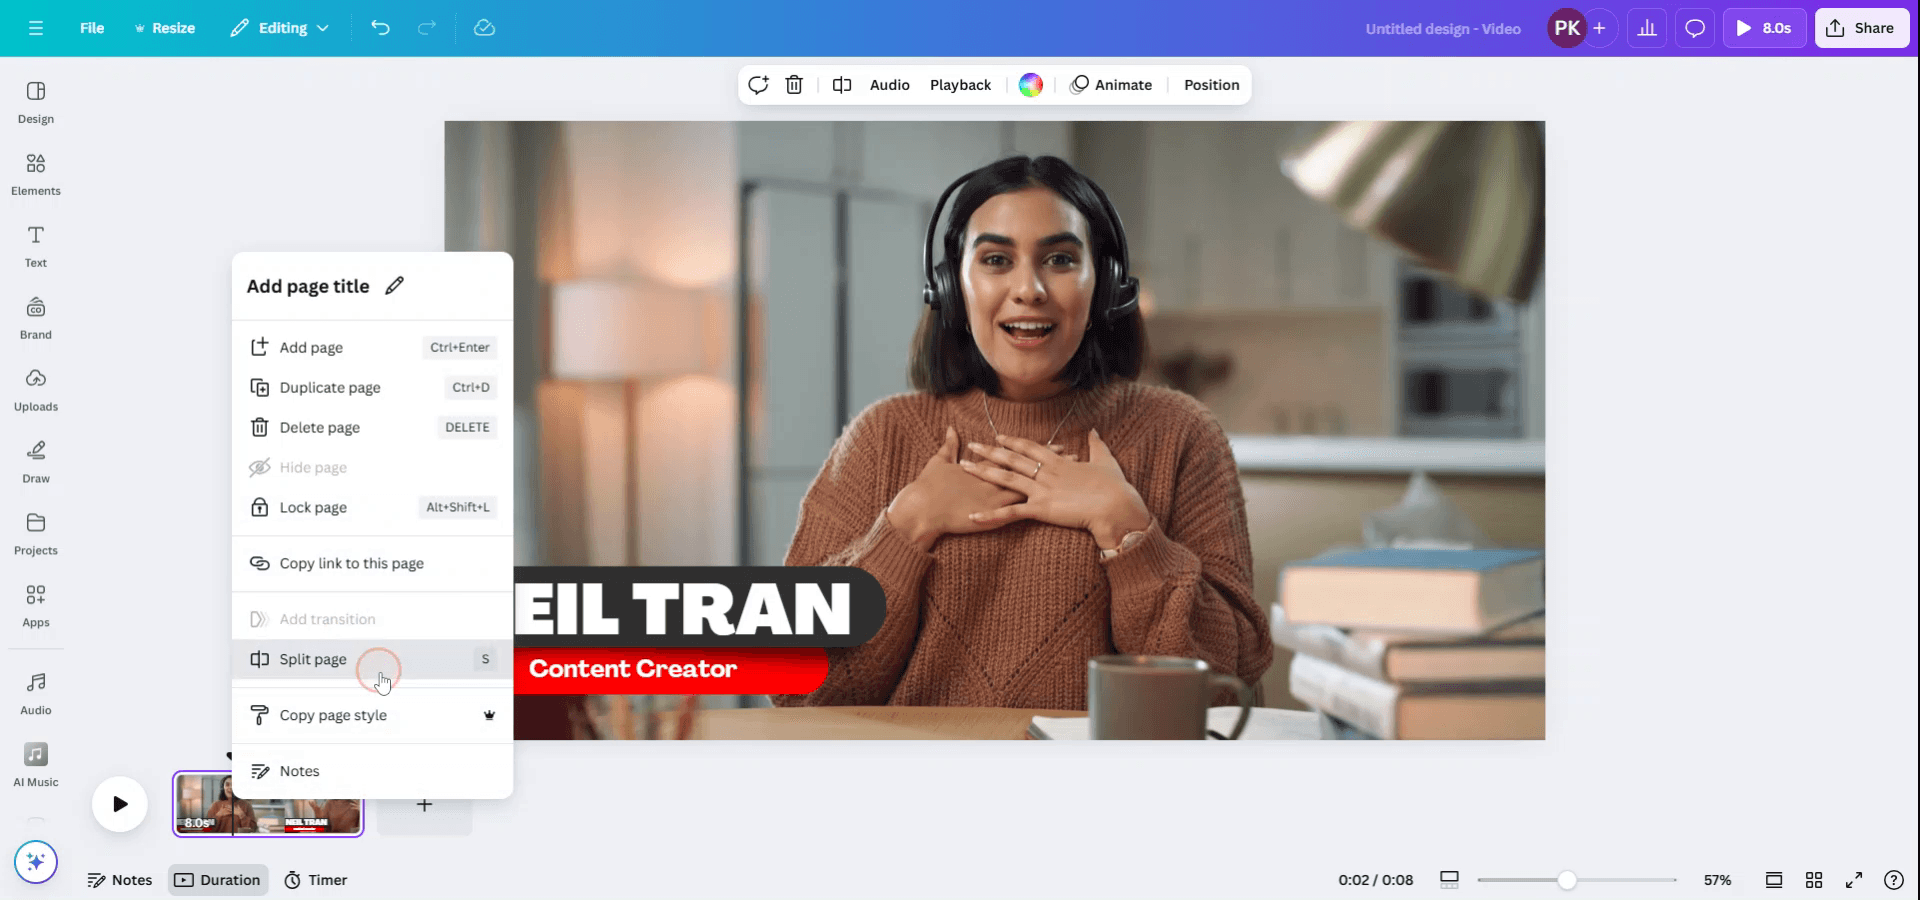
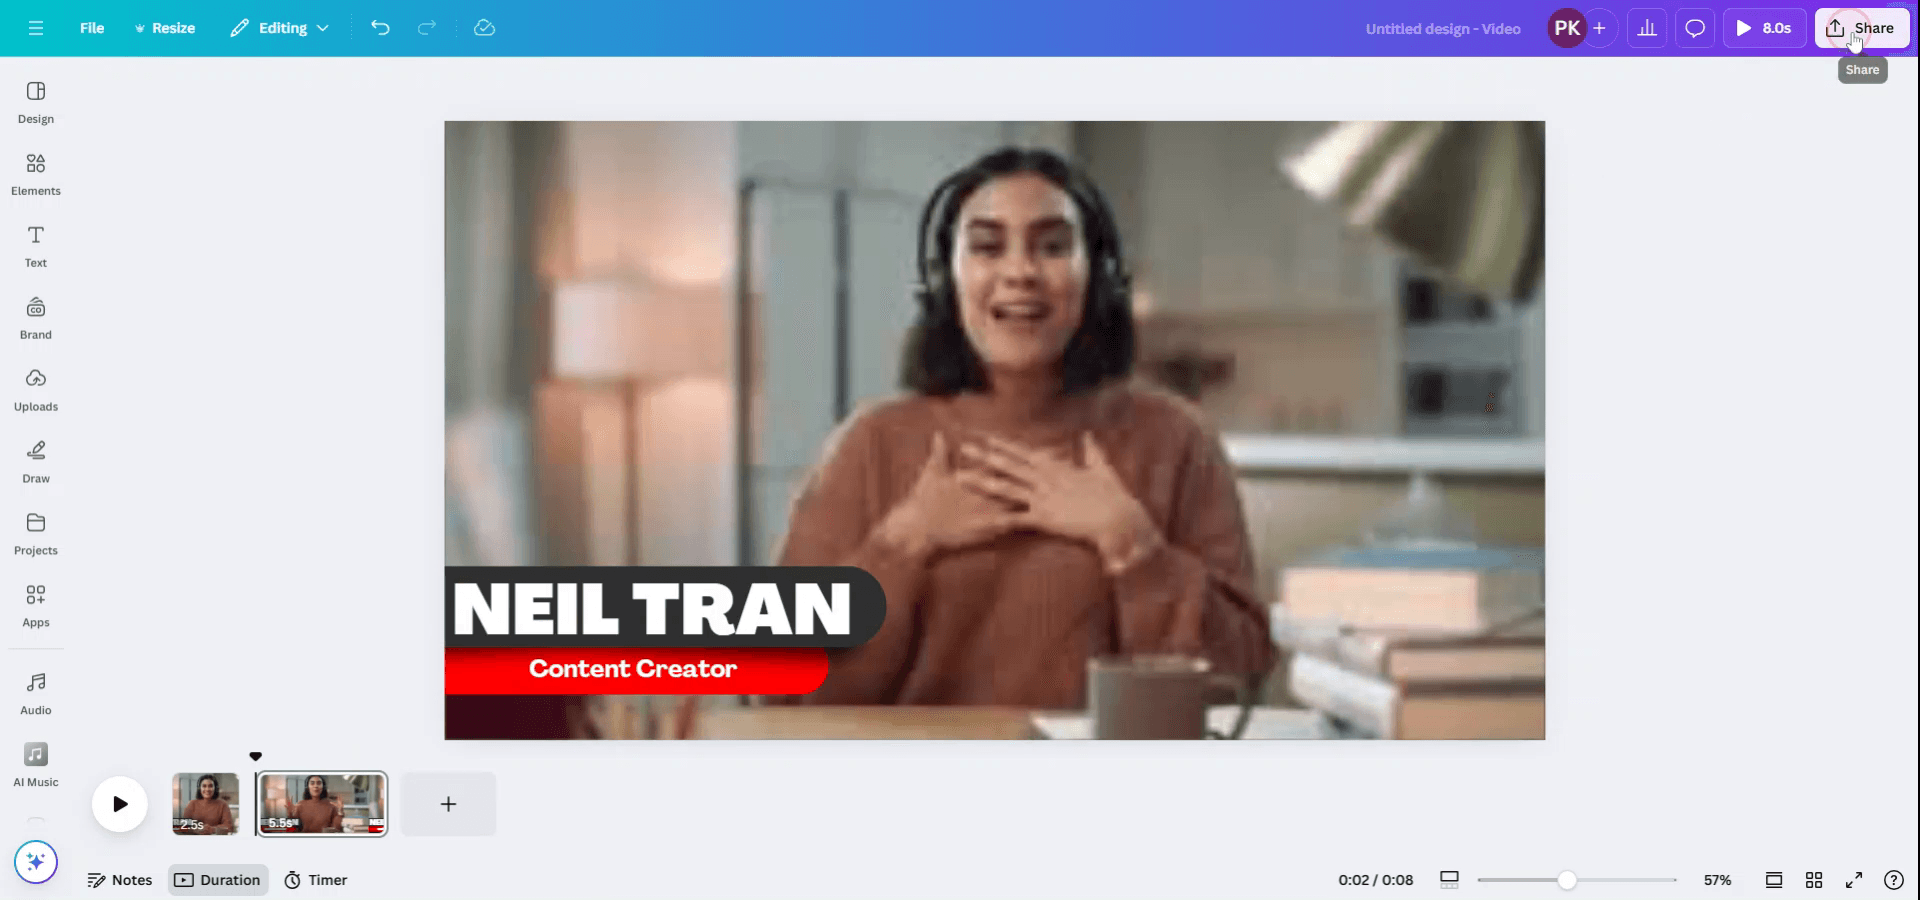
الخطوة 3
سيظهر الإطار المختار الآن في صفحة جديدة، مثل الصفحة 2. لتنزيل هذا الإطار كصورة، انقر على زر "مشاركة" واختر "تنزيل" من القائمة المنسدلة.
الخطوة 4
اضبط نوع الملف على PNG، وعدّل الحجم حسب الحاجة.
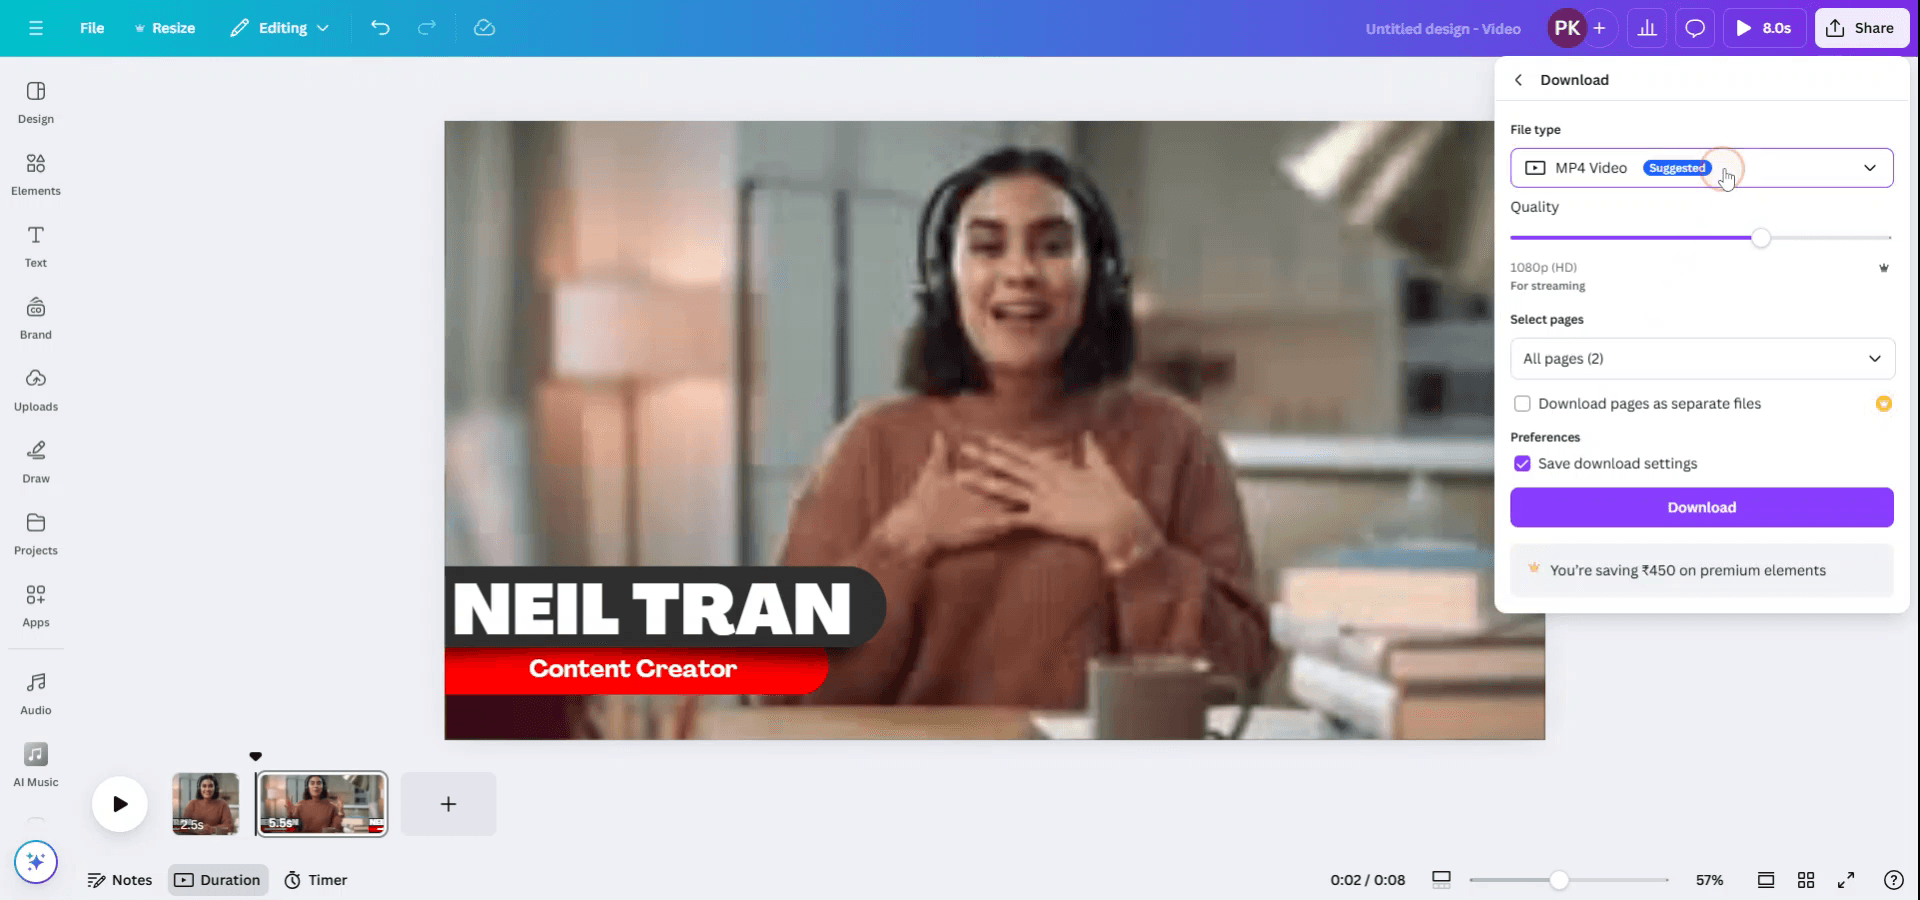
الخطوة 5
تأكد من أنك اخترت الصفحة الصحيحة (الصفحة 2) حيث توجد الصورة المطلوبة قبل المتابعة.

الخطوة 6
بعد تأكيد جميع الإعدادات، انقر على "تم" ثم على "تنزيل" لحفظ الصورة على جهازك.
نصائح احترافية لاستخراج صورة من فيديو في Canva
أوقف التشغيل عند الإطار المطلوب: شغّل الفيديو وأوقفه عند الإطار الدقيق الذي تريد التقاطه كصورة.
التقط لقطة شاشة: استخدم ميزة لقطة الشاشة في جهازك أو الكمبيوتر (مثل Snipping Tool في Windows وCommand+Shift+4 في Mac) لالتقاط الإطار.
ارفع لقطة الشاشة إلى Canva: بعد التقاط لقطة الشاشة، ارفعها إلى Canva بالسحب والإفلات أو باستخدام علامة التبويب "Uploads".
استخدم أداة تحرير الفيديو: يتيح لك Canva قصّ الفيديو وتقسيمه. استخدم هذه الميزة للتركيز على الجزء من الفيديو الذي تريد استخراج صورة منه قبل التقاط لقطة الشاشة.
استخدم محرر الصور في Canva للتحسينات: بمجرد رفع الصورة، استخدم محرر الصور في Canva لضبط السطوع والتباين وتطبيق المرشحات لإضفاء لمسة احترافية.
الأخطاء الشائعة وكيفية تجنبها عند استخراج صورة من فيديو في Canva
لقطة شاشة منخفضة الجودة: إذا التقطت لقطة شاشة من فيديو منخفض الدقة، فقد تكون جودة الصورة ضعيفة.
الحل: تأكد من أن الفيديو عالي الدقة قبل التقاط لقطة شاشة للحفاظ على وضوح الصورة.عناصر غير مرغوب فيها في الإطار: أحيانًا قد تظهر أجزاء أخرى من الفيديو في الإطار الذي تريد التقاطه.
الحل: قصّ الفيديو في Canva قبل الإيقاف المؤقت لعزل الإطار المطلوب، أو استخدم أدوات الاقتصاص بعد التقاط الصورة.عدم ضبط حجم الصورة: بعد رفع لقطة الشاشة، قد تنسى تغيير حجمها لتناسب تصميمك.
الحل: استخدم خيارات تغيير الحجم في Canva لضبط الصورة بحيث تناسب التخطيط لديك بشكل مثالي.فقدان نسبة الأبعاد: قد يؤدي تغيير حجم الصورة إلى تشويه نسبة الأبعاد الأصلية.
الحل: اضغط مع الاستمرار على مفتاح "Shift" أثناء تغيير الحجم للحفاظ على النسب الصحيحة للصورة.قيود تنسيق الملف: قد لا تكون لقطات الشاشة دائمًا بالصيغة الأفضل لـ Canva.
الحل: احفظ لقطات الشاشة بصيغ صور شائعة (PNG أو JPG) قبل رفعها إلى Canva.
الأسئلة الشائعة حول استخراج صورة من فيديو في Canva
هل يمكنني استخراج صورة مباشرة من فيديو في Canva؟
لا، لا تحتوي Canva على ميزة مدمجة لاستخراج الصور من الفيديوهات. تحتاج إلى التقاط الإطار عبر لقطة شاشة أولًا.ما تنسيقات الفيديو التي يمكنني رفعها إلى Canva؟
تدعم Canva رفع فيديوهات MP4 وMOV وغيرها من تنسيقات الفيديو الشائعة.هل يمكنني تعديل الصورة بعد التقاطها من فيديو؟
نعم، بمجرد رفعها إلى Canva، يمكنك استخدام أدوات التحرير في المنصة لتحسين الصورة أو تعديلها.هل توجد طريقة أفضل لاستخراج صور عالية الجودة من فيديو؟
إذا كنت بحاجة إلى صورة بجودة أعلى، ففكّر في استخدام برنامج مخصص لتحويل الفيديو إلى صورة قبل رفعه إلى Canva.هل يمكنني استخدام إطار من فيديو لأغراض تجارية؟
تأكد من امتلاكك الحقوق المناسبة لاستخدام محتوى الفيديو. توفر Canva مقاطع فيديو وصورًا مخزنة مع حقوق استخدام تجاري، لكن قد تتطلب مقاطع الفيديو الشخصية إذنًا أو ترخيصًا.كيف أسجل الشاشة على ماك؟
لتسجيل الشاشة على جهاز Mac، يمكنك استخدام Trupeer AI. يتيح لك التقاط الشاشة كاملة ويوفر إمكانات الذكاء الاصطناعي مثل إضافة أفاتارات بالذكاء الاصطناعي، وإضافة تعليق صوتي، وإضافة التكبير والتصغير في الفيديو. مع ميزة ترجمة الفيديو بالذكاء الاصطناعي من Trupeer، يمكنك ترجمة الفيديو إلى أكثر من 30 لغة.كيف أضيف أفاتارًا بالذكاء الاصطناعي إلى تسجيل الشاشة؟
لإضافة أفاتار بالذكاء الاصطناعي إلى تسجيل الشاشة، ستحتاج إلى استخدام أداة تسجيل شاشة بالذكاء الاصطناعي. Trupeer AI هي أداة تسجيل شاشة بالذكاء الاصطناعي، تساعدك على إنشاء فيديوهات بعدة أفاتارات، كما تساعدك أيضًا في إنشاء أفاتارك الخاص للفيديو.كيف أسجل الشاشة على ويندوز؟
لتسجيل الشاشة على Windows، يمكنك استخدام Game Bar المدمج (Windows + G) أو أداة متقدمة بالذكاء الاصطناعي مثل Trupeer AI للحصول على ميزات أكثر تقدمًا مثل أفاتارات الذكاء الاصطناعي، والتعليق الصوتي، والترجمة، إلخ.كيف أضيف تعليقًا صوتيًا إلى الفيديو؟
لإضافة تعليق صوتي إلى الفيديوهات، نزّل إضافة Chrome الخاصة بـ trupeer ai. بعد التسجيل، ارفع الفيديو الخاص بك مع الصوت، واختر التعليق الصوتي المطلوب من trupeer ثم صدّر الفيديو المعدّل.كيف أقوم بالتكبير في تسجيل شاشة؟
للتكبير أثناء تسجيل الشاشة، استخدم تأثيرات التكبير في Trupeer AI التي تتيح لك التكبير والتصغير في لحظات محددة، مما يعزز التأثير البصري لمحتوى الفيديو الخاص بك.
يسأل الناس أيضًا
كيفية تحويل صورة إلى صفحة تلوين في Canva
كيفية الطباعة على الوجهين في Canva
دروس ذات صلة

