
كيفية جعل النص منحنيًا في Canva – دليل سريع خطوة بخطوة
هل تريد نصًا منحنيًا في Canva؟ تعرّف على كيفية استخدام ميزة Curve Text لثني النص بسهولة للشعارات والملصقات وغيرها.
يقدم هذا الدليل عملية خطوة بخطوة حول كيفية جعل النص منحنياً في Canva.
اتبع هذه التعليمات الواضحة لتعزيز مشاريعك التصميمية بعناصر نصية منحنية.
يُعدّ تقويس النص في Canva طريقة رائعة لإنشاء تصميم طباعي ديناميكي أو دائري أو شبه دائري للشعارات أو العناوين أو لمسات التصميم.
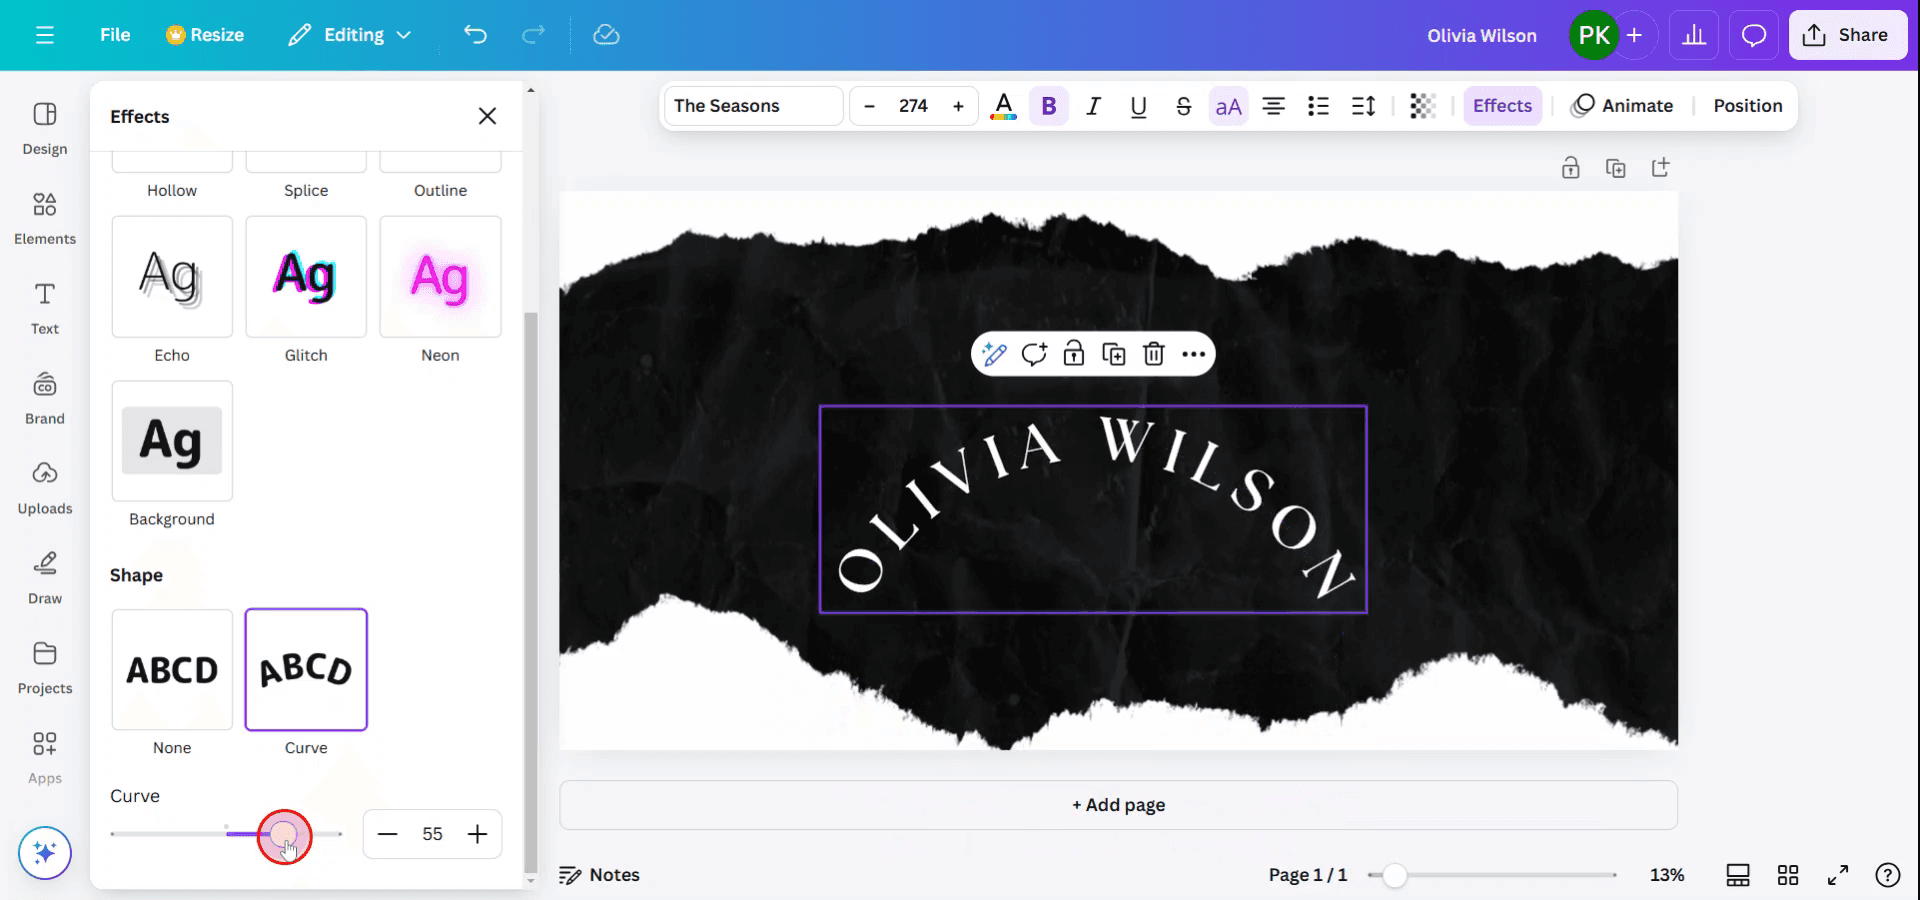
دليل خطوة بخطوة
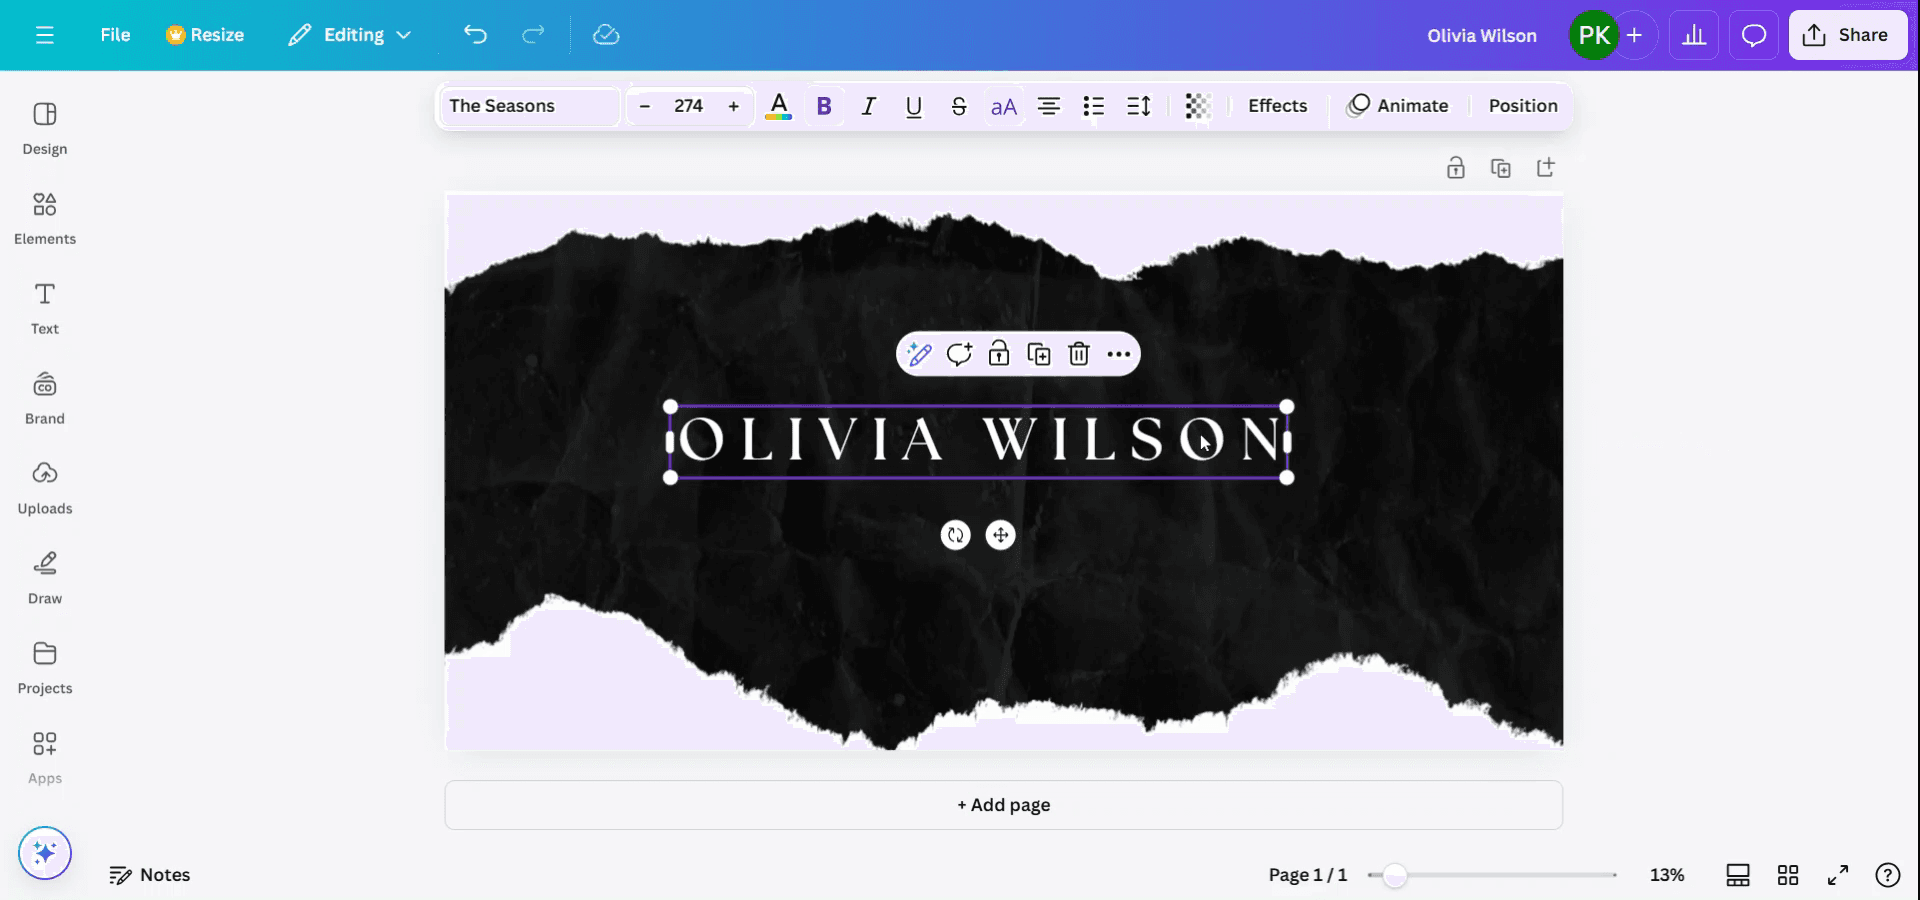
حدد النص
انقر على مربع النص الذي تريد تقويسه.
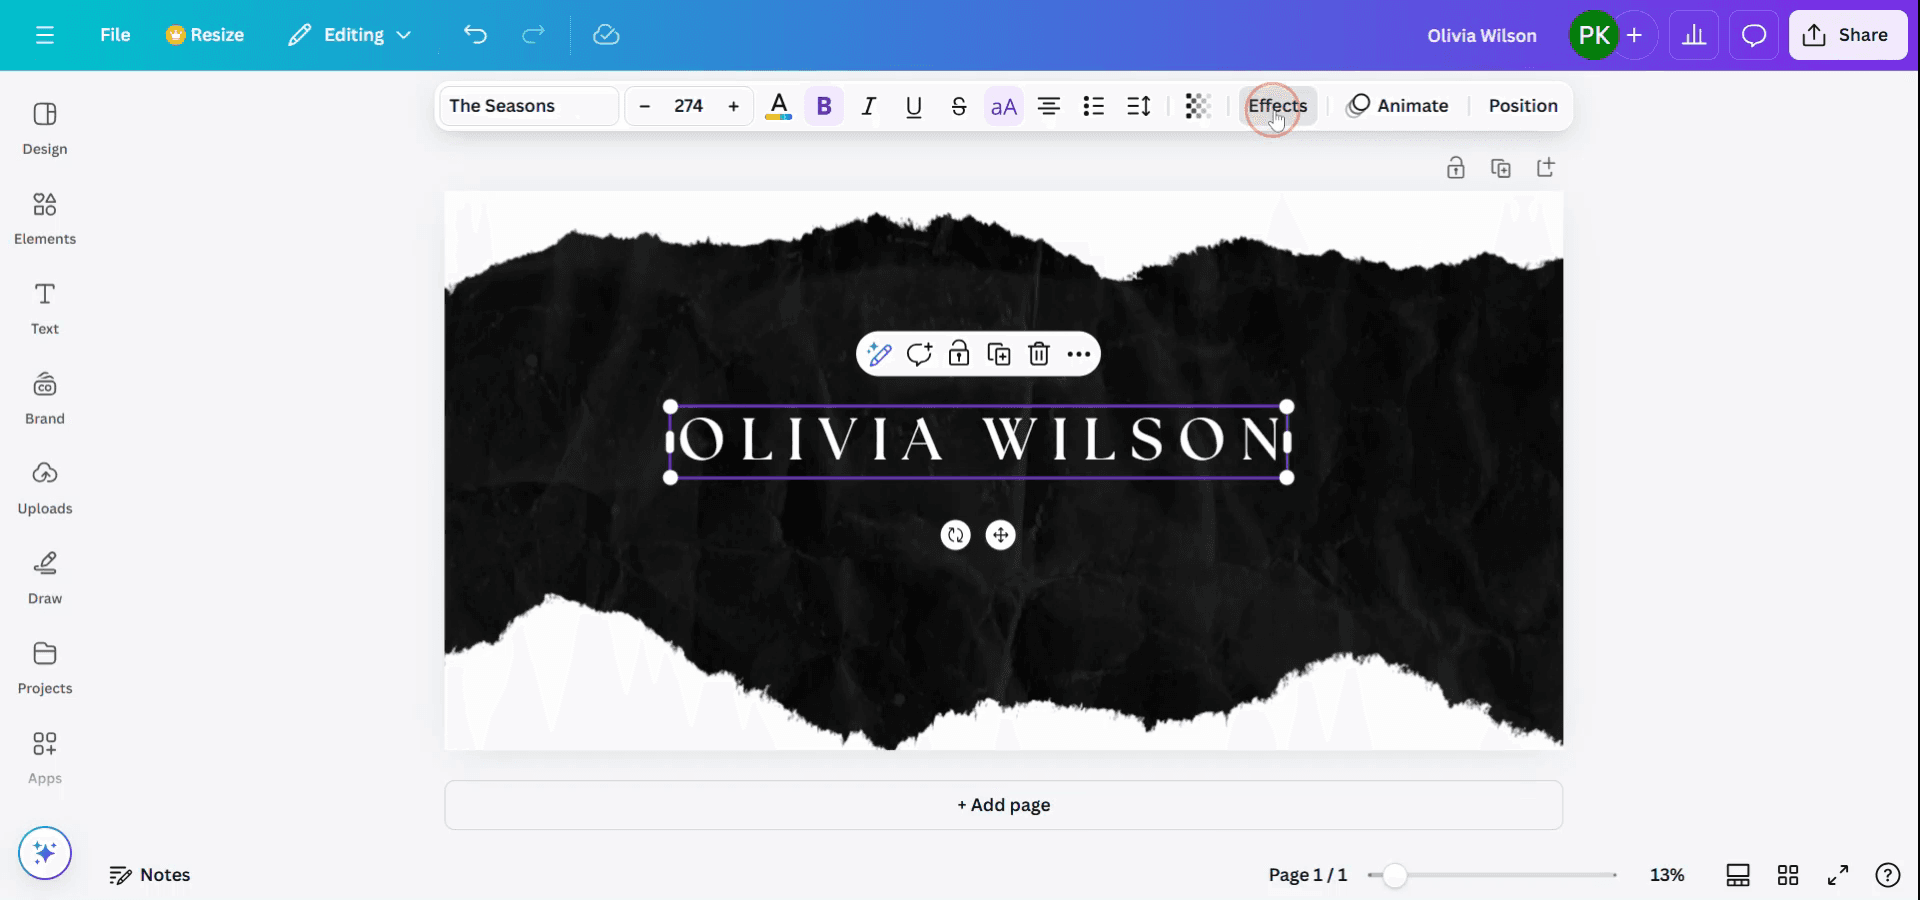
افتح لوحة التأثيرات
في شريط الأدوات العلوي، انقر على “Effects”.
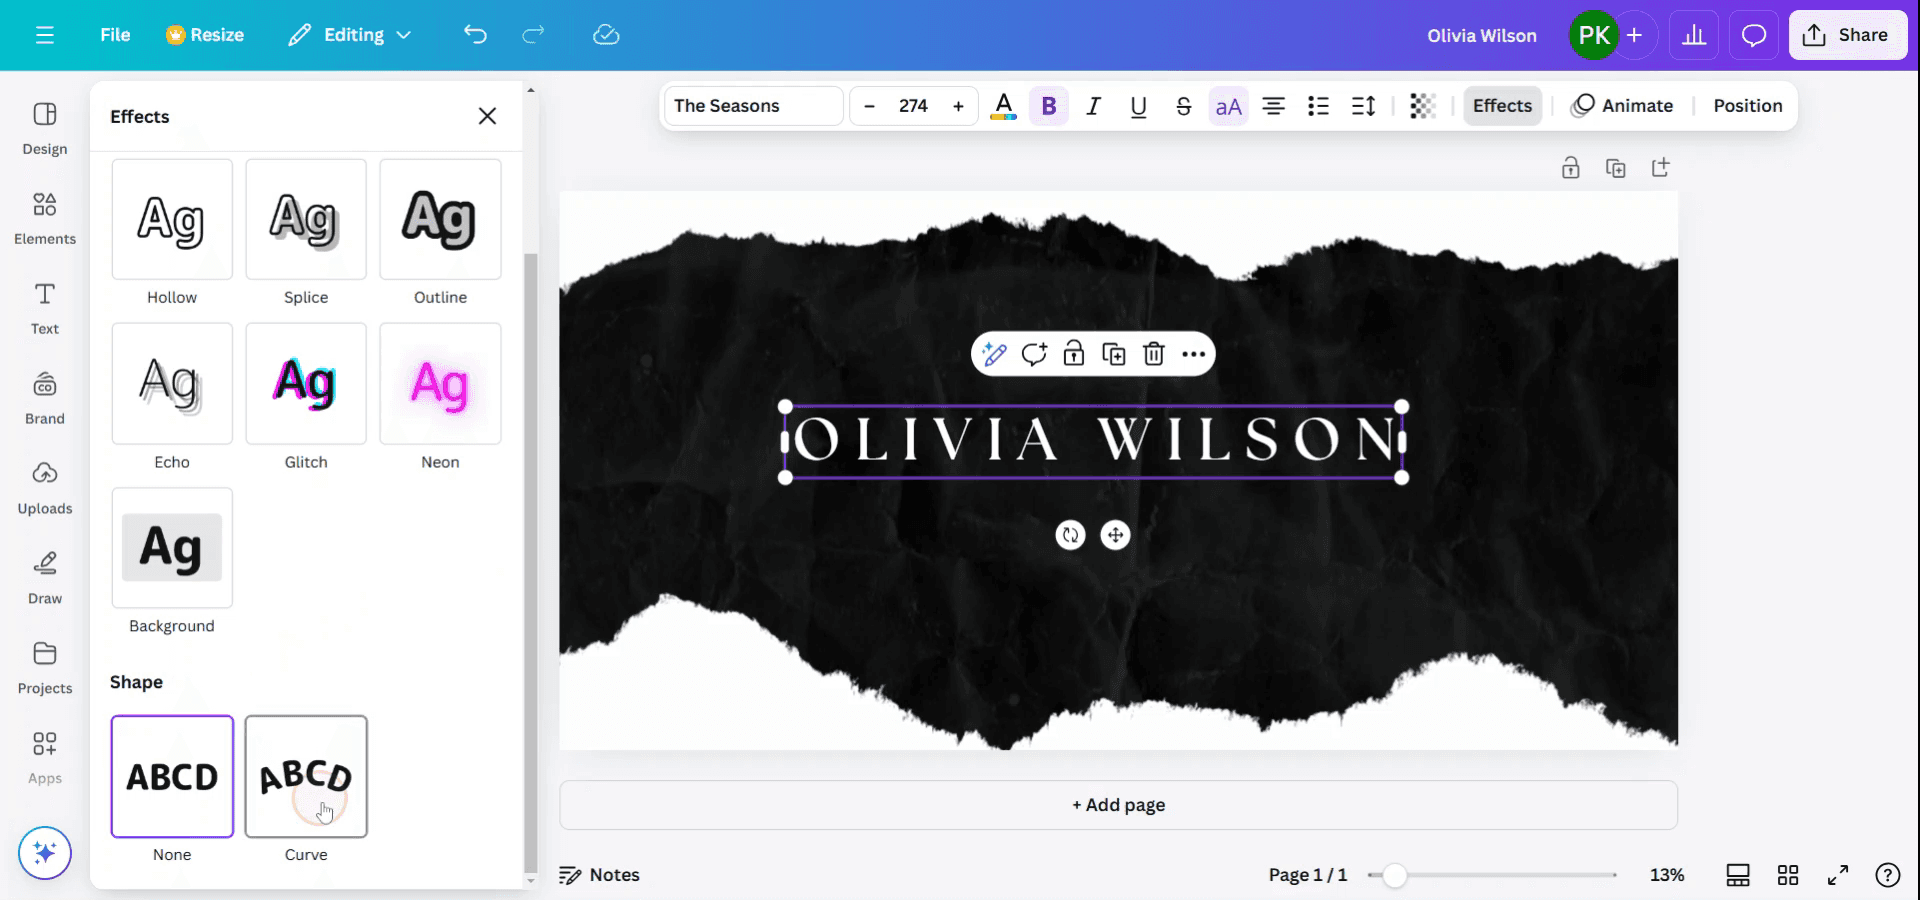
طبّق تأثير المنحنى
ضمن تأثيرات النص، اختر “Curve”.
سيتقوس النص فورًا في قوس قياسي.
اضبط المنحنى
استخدم شريط تمرير المنحنى للتحكم في درجة الانحناء:
اسحب إلى اليمين لزيادة الانحناء (قوس لأعلى).
اسحب إلى اليسار للحصول على منحنى عكسي (قوس لأسفل).
الضبط الدقيق (اختياري)
استخدم تباعد الأحرف لتوزيع الحروف للحصول على منحنى أنظف.
اجمعه مع تباعد الأسطر أو حجم الخط لمزيد من التحكم.
دليل خطوة بخطوة: كيفية تقويس النص في Canva
الخطوة 1
ابدأ بفتح تصميمك في Canva وتحديد النص الذي ترغب في تقويسه.
الخطوة 2
بمجرد تحديد النص، سيظهر شريط أدوات أعلى الشاشة. انقر على خيار 'Effects'.
الخطوة 3
بعد اختيار 'Effects'، استعرض الأنماط والأشكال المختلفة المعروضة في أسفل الواجهة.
اختر خيار 'Curve' من الأشكال المتاحة.
الخطوة 4
لاحظ أن النص أصبح الآن منحنياً. يمكنك ضبط الانحناء حسب تفضيلك من خلال تعديل إعدادات المنحنى.
نصائح احترافية حول كيفية جعل النص منحنياً في Canva
حدِّد النص:
انقر على مربع النص الذي تريد تقويسه.افتح لوحة “التأثيرات”:
بعد تحديد النص، انقر على زر “التأثيرات” في شريط الأدوات العلوي.اختر تأثير “الانحناء”:
في لوحة “التأثيرات”، مرِّر لأسفل واختر خيار “الانحناء”.اضبط الانحناء:
بعد اختيار الانحناء، استخدم شريط التمرير لضبط شدة الانحناء. اسحبه يمينًا أو يسارًا لجعل النص أكثر أو أقل انحناءً، حسب احتياجات تصميمك.اضبط الموضع بدقة:
استخدم مقابض الدوران لتعديل اتجاه النص إذا لزم الأمر، واضبط حجم مربع النص أو موضعه ليتناسب مع الانحناء بالشكل المناسب.
الأخطاء الشائعة وكيفية تجنبها عند تقويس النص في Canva
يصبح النص مشوَّهًا أكثر من اللازم:
الحل: تجنّب استخدام إعدادات انحناء شديدة تجعل النص صعب القراءة. اضبط الانحناء تدريجيًا حتى تجد توازنًا بين الشكل وسهولة القراءة.عدم القدرة على تعديل النص بعد تقويسه:
الحل: بعد تقويس النص، لا يزال بإمكانك تعديله مثل أي نص آخر في Canva. ما عليك سوى النقر على مربع النص وإجراء تغييرات على المحتوى أو التنسيق.الانحناء لا يتناسب مع التصميم:
الحل: تأكد من ضبط حجم مربع النص بشكل مناسب قبل تطبيق الانحناء. إذا شوَّه الانحناء النص كثيرًا، فحاول تغيير حجم المربع للحفاظ على وضوح القراءة.مشاكل المحاذاة بعد التقويس:
الحل: بعد التقويس، تأكد من أن النص لا يزال بمحاذاة صحيحة مع تصميمك. يمكنك استخدام أدوات المحاذاة في Canva لتعديله حسب الحاجة.عدم القدرة على تقويس عدة أسطر من النص:
الحل: إذا كان نصك يحتوي على عدة أسطر، فقد تحتاج إلى ضبط كل سطر على حدة أو تحويل النص إلى سطر واحد قبل تطبيق تأثير الانحناء.
الأسئلة الشائعة حول تقويس النص في Canva
هل يمكنني تقويس أي نص في Canva؟
نعم، يمكنك تقويس أي نص في Canva، طالما أنه مربع نص تم إنشاؤه داخل المنصة.كيف أغيّر اتجاه التقويس؟
يمكنك ضبط اتجاه التقويس بسحب شريط التمرير لليسار أو اليمين في لوحة “التأثيرات” لجعل النص ينحني إلى الأعلى أو الأسفل.هل يمكنني تطبيق التقويس على عدة أسطر من النص؟
رغم أنه يمكنك تقويس عدة أسطر، ستحتاج إلى تطبيق التأثير على كل سطر على حدة إذا أردت أن تكون كلها منحنية في التصميم نفسه.هل يمكنني تعديل التقويس بعد تطبيقه؟
نعم، يمكنك دائمًا تعديل التقويس عن طريق تحديد النص وتعديل شريط التقويس في لوحة “التأثيرات”.هل تقويس النص ميزة مجانية في Canva؟
نعم، تتوفر ميزة تقويس النص في النسخة المجانية من Canva.كيف أسجّل الشاشة على جهاز Mac؟
لتسجيل الشاشة على جهاز Mac، يمكنك استخدام Trupeer AI. يتيح لك التقاط الشاشة بالكامل ويوفر إمكانات ذكاء اصطناعي مثل إضافة صور رمزية بالذكاء الاصطناعي، وإضافة تعليق صوتي، وإضافة تقريب وتبعيد في الفيديو. ومع ميزة ترجمة الفيديو بالذكاء الاصطناعي من Trupeer، يمكنك ترجمة الفيديو إلى أكثر من 30 لغة.كيف أضيف صورة رمزية بالذكاء الاصطناعي إلى تسجيل الشاشة؟
لإضافة صورة رمزية بالذكاء الاصطناعي إلى تسجيل الشاشة، ستحتاج إلى استخدام أداة لتسجيل الشاشة بالذكاء الاصطناعي. Trupeer AI هي أداة لتسجيل الشاشة بالذكاء الاصطناعي، وتساعدك على إنشاء فيديوهات متعددة الصور الرمزية، كما تساعدك في إنشاء صورتك الرمزية الخاصة للفيديو.كيف أسجّل الشاشة على Windows؟
لتسجيل الشاشة على Windows، يمكنك استخدام Game Bar المدمج (Windows + G) أو أداة ذكاء اصطناعي متقدمة مثل Trupeer AI للحصول على ميزات أكثر تقدمًا مثل الصور الرمزية بالذكاء الاصطناعي، والتعليق الصوتي، والترجمة، إلخ.كيف أضيف تعليقًا صوتيًا إلى الفيديو؟
لإضافة تعليق صوتي إلى الفيديوهات، نزّل إضافة trupeer ai لمتصفح Chrome. بعد التسجيل، ارفع الفيديو الخاص بك مع الصوت، واختر التعليق الصوتي المطلوب من trupeer ثم صدّر الفيديو المعدّل.كيف أقرّب في تسجيل الشاشة؟
لتكبير أثناء تسجيل الشاشة، استخدم تأثيرات التكبير في Trupeer AI التي تتيح لك التكبير والتبعيد في لحظات محددة، مما يعزز التأثير البصري لمحتوى الفيديو الخاص بك.
قراءات مقترحة
كيفية تحويل صورة إلى صفحة تلوين في Canva
كيفية الطباعة على الوجهين في Canva
دروس ذات صلة

