
كيفية إضافة الانتقالات في كانفا
تعرّف على كيفية إضافة الانتقالات في Canva لإنشاء رسوم متحركة سلسة وذات مظهر احترافي بين الشرائح أو الصفحات. شرح خطوة بخطوة لكلٍ من مستخدمي سطح المكتب والجوال
دليل خطوة بخطوة: كيفية إضافة الانتقالات في Canva
الخطوة 1
حدد خيار الانتقال، وانقر عليه للمتابعة.

الخطوة 2
ستظهر قائمة على الجانب الأيسر من شاشتك، تعرض خيارات انتقال متنوعة.
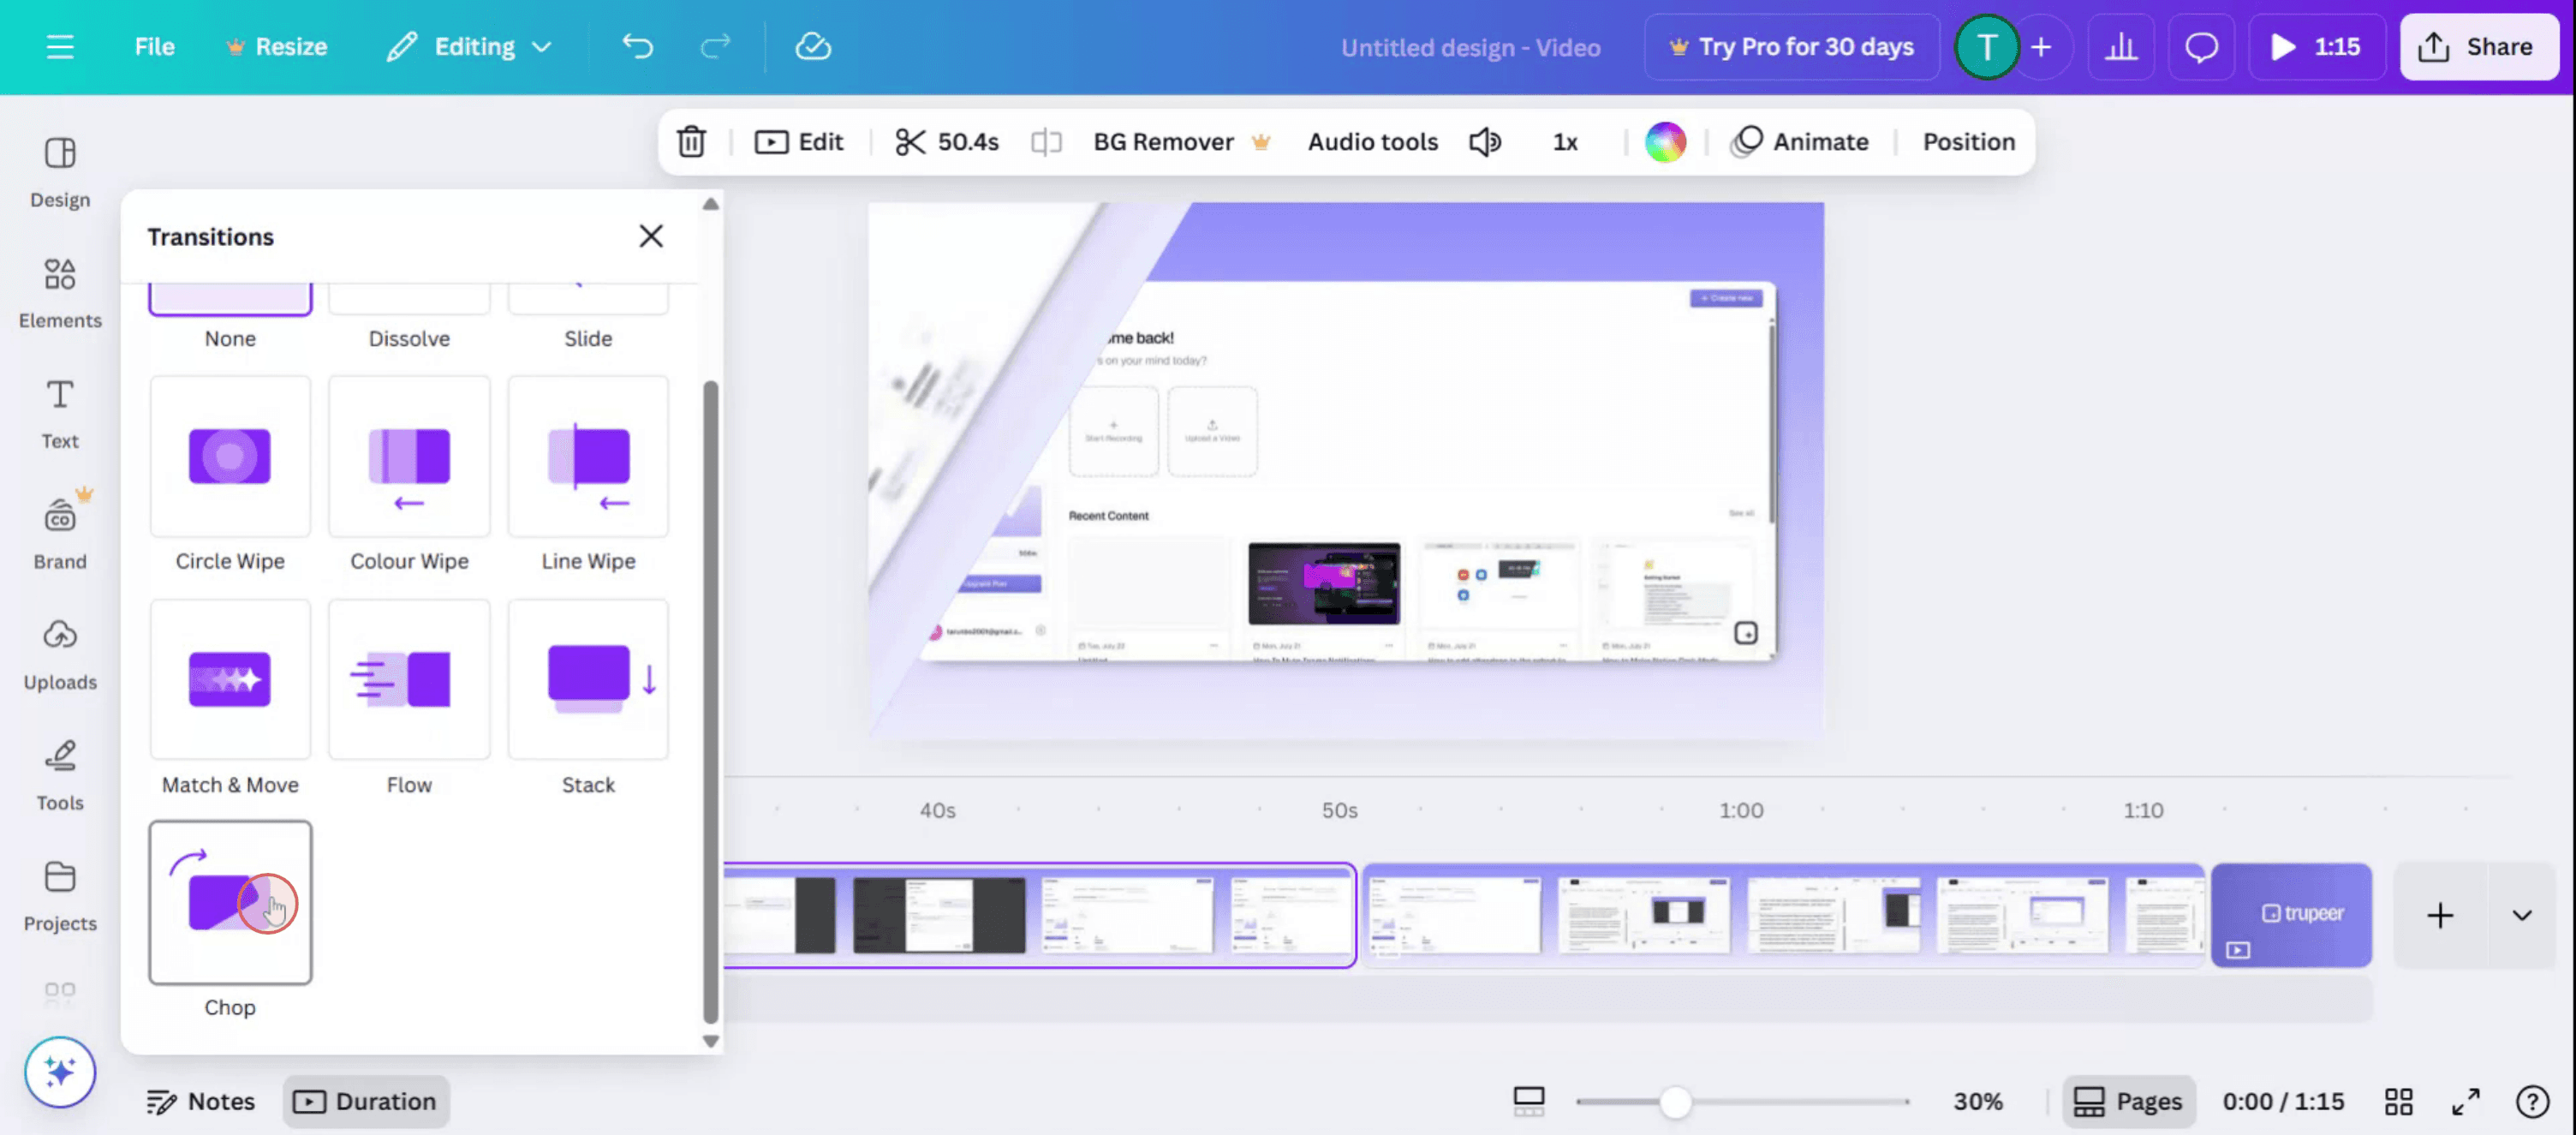
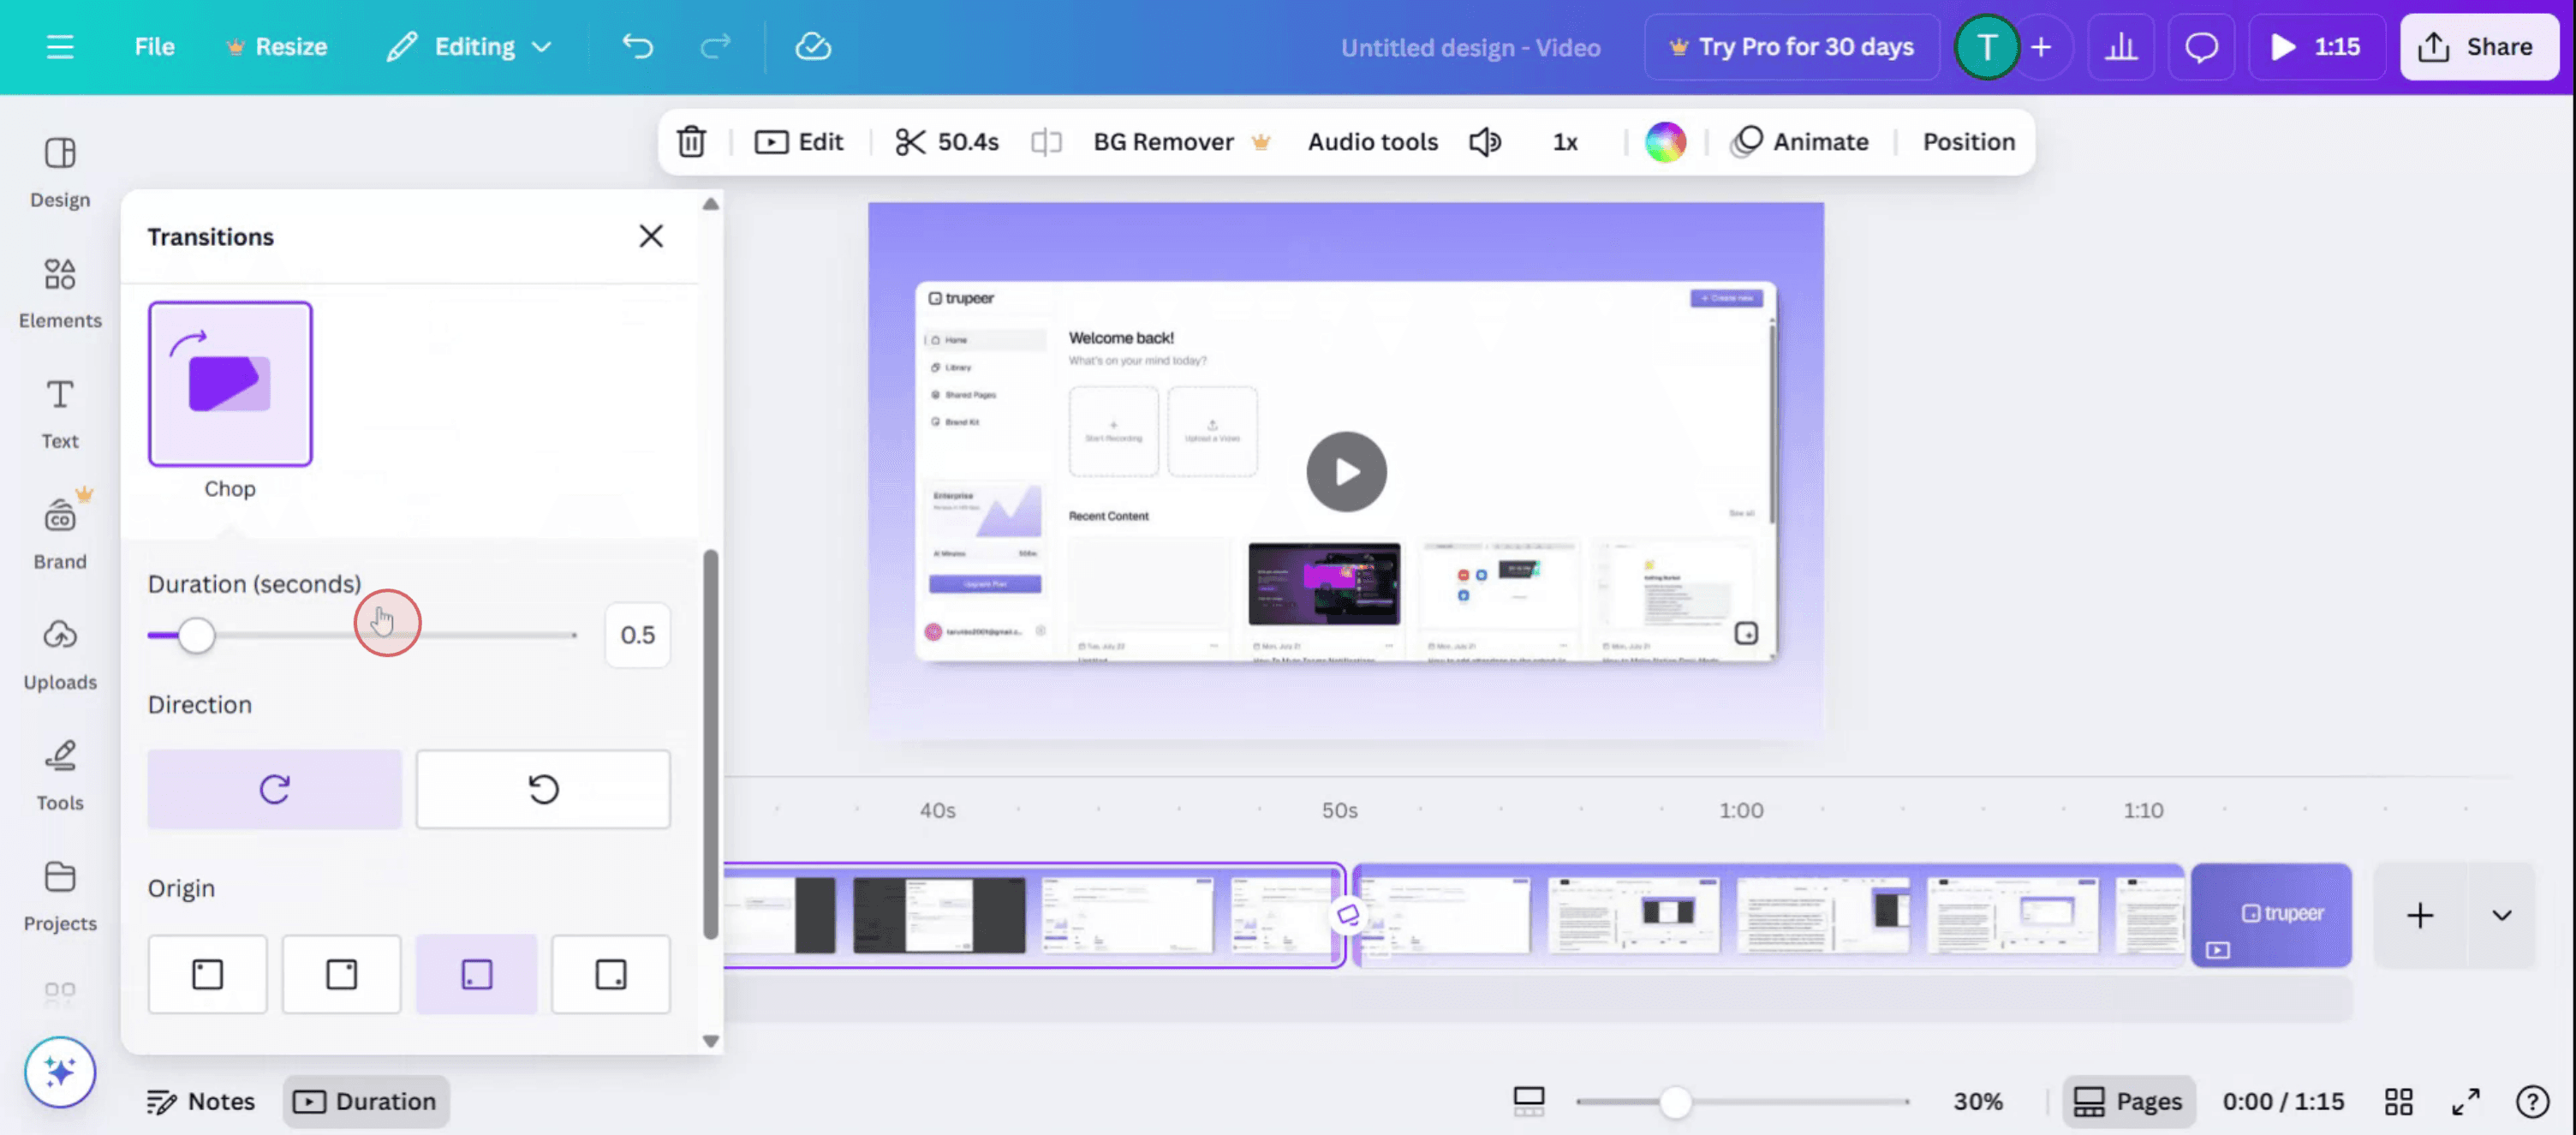
الخطوة 3
يمكنك أيضًا ضبط مدة الانتقال،
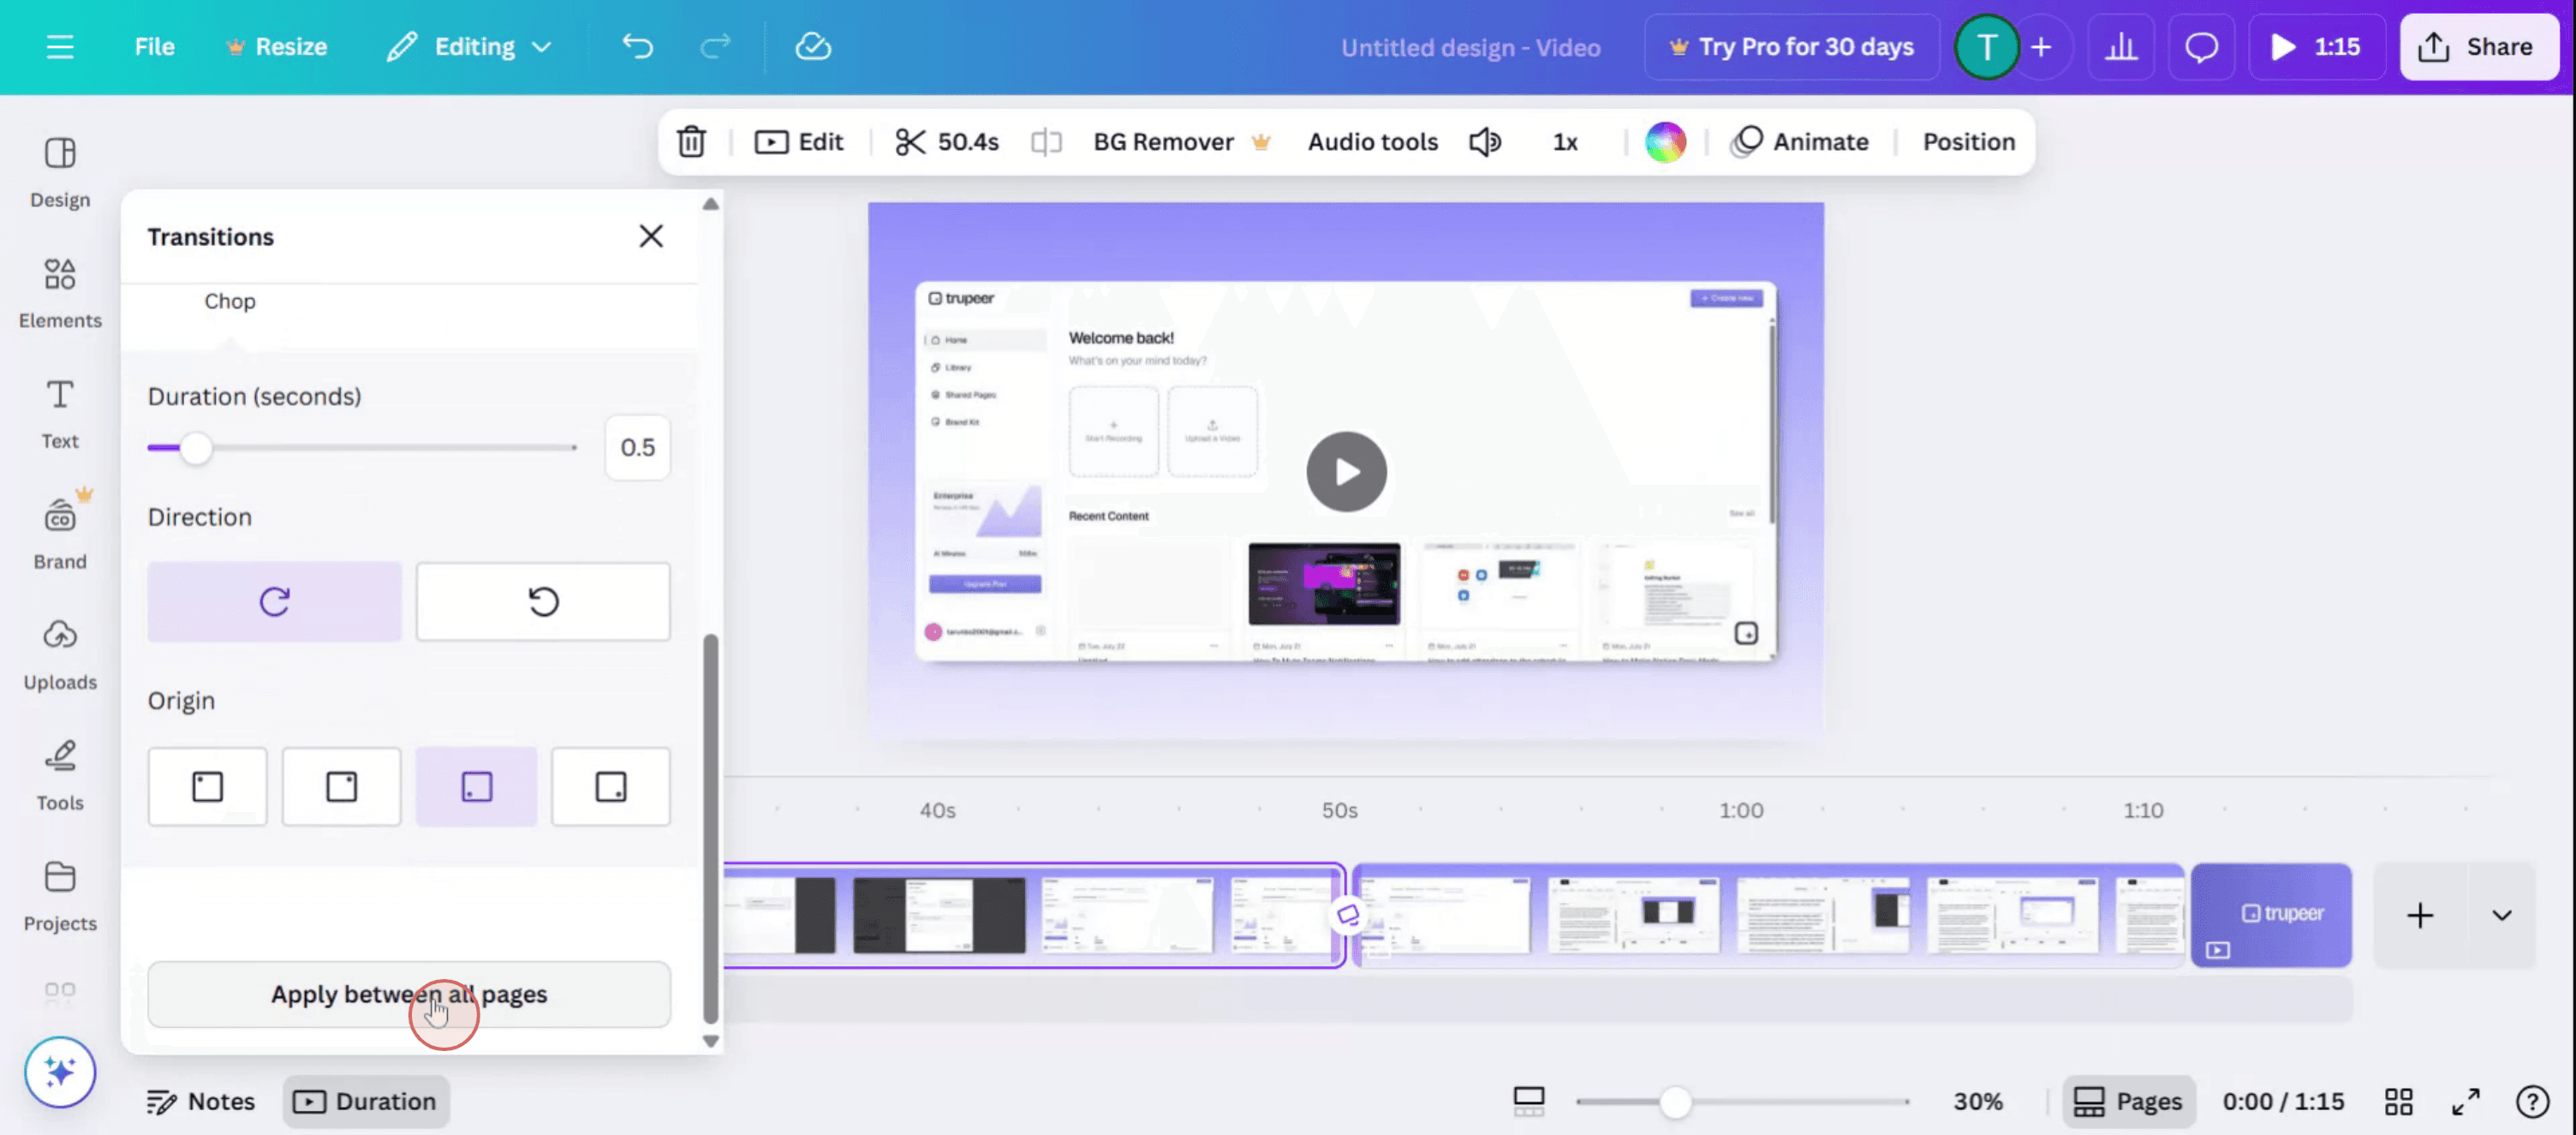
الخطوة 4
انقر على تطبيق بين جميع الصفحات لتطبيق التغييرات على كامل الفيديو.
نصائح احترافية لإضافة الانتقالات في Canva
افتح تصميمك
سجّل الدخول إلى Canva وافتح المشروع الذي تريد إضافة انتقالات بين صفحاته أو عناصره.انتقل إلى الصفحة التي تريد تحريكها
مرّر إلى الصفحة المحددة في تصميمك متعدد الصفحات حيث تريد أن يبدأ تأثير الانتقال.انقر على الصفحة نفسها أو على الخط الزمني
مرّر المؤشر فوق الصفحة وانقر على أيقونة «Transitions» الصغيرة التي تظهر بين صفحتين في الخط الزمني للصفحات أسفل الصفحة أو في الشريط الجانبي.اختر نمط انتقال
ستفتح لوحة بخيارات انتقال مثل Dissolve وSlide وCircle Wipe وLine Wipe أو Match & Move. انقر على النمط الذي تفضله.اضبط سرعة الانتقال
استخدم شريط تمرير المدة للتحكم في مدى سرعة أو بطء حدوث الانتقال بين الصفحات.تطبيق على جميع الصفحات (اختياري)
إذا كنت تريد الانتقال نفسه لجميع الصفحات، فانقر على «Apply to all pages» في أسفل لوحة الانتقال.معاينة الانتقال
استخدم زر التشغيل في الزاوية العلوية اليمنى من المحرر لمعاينة الانتقال أثناء التنفيذ.
الأخطاء الشائعة وكيفية تجنبها
عدم ظهور خيار الانتقال
الانتقالات متاحة فقط للتصاميم متعددة الصفحات مثل العروض التقديمية ومقاطع الفيديو والشرائح. ولن تظهر في المستندات ذات الصفحة الواحدة.الانتقالات لا تعمل على العناصر
انتقالات Canva مخصصة للصفحات بالكامل. إذا كنت تريد حركة على عناصر منفردة، فاستخدم الرسوم المتحركة بدلاً من الانتقالات.تطبيقها على صفحة واحدة فقط عن طريق الخطأ
إذا كنت تريد تأثيرًا موحدًا، فلا تنسَ استخدام زر «Apply to all pages».الإفراط في استخدام الانتقالات
قد تجعل كثرة الانتقالات أو تعدد الأنماط تصميمك يبدو غير متناسق. التزم بنمط واحد أو اثنين للحصول على تجربة أكثر سلاسة.سرعة الانتقال سريعة جدًا أو بطيئة جدًا
تأكد من أن المدة تناسب تدفق المحتوى. استخدم وضع المعاينة للاختبار والتعديل حسب الحاجة.
الأسئلة الشائعة حول إضافة الانتقالات في Canva
كيف أضيف انتقالات في Canva؟
انقر على أيقونة الانتقال بين الصفحات في تصميم متعدد الصفحات، ثم اختر التأثير المفضل لديك.هل يمكنني التحكم في سرعة الانتقال؟
نعم، استخدم شريط تمرير المدة في لوحة الانتقال لضبط السرعة.هل تتوفر الانتقالات في حسابات Canva المجانية؟
تتوفر بعض الانتقالات الأساسية للمستخدمين المجانيين، لكن الأنماط المميزة قد تتطلب Canva Pro.هل يمكنني تطبيق انتقالات مختلفة على صفحات مختلفة؟
نعم، يمكن أن يكون لكل صفحة انتقالها الفريد إذا لم تستخدم خيار “تطبيق على جميع الصفحات”.ما الفرق بين الانتقالات والحركات؟
تحدث الانتقالات بين الصفحات. وتُستخدم الحركات لتحريك عناصر النص أو الرسومات الفردية على الصفحة.كيفية تسجيل الشاشة على mac?
لتسجيل الشاشة على جهاز Mac، يمكنك استخدام Trupeer AI. يتيح لك التقاط الشاشة بالكامل ويوفر إمكانات ذكاء اصطناعي مثل إضافة شخصيات افتراضية بالذكاء الاصطناعي، وإضافة تعليق صوتي، وإضافة تأثير التكبير والتصغير في الفيديو. ومع ميزة ترجمة الفيديو بالذكاء الاصطناعي من trupeer، يمكنك ترجمة الفيديو إلى أكثر من 30 لغة.كيف أضيف شخصية افتراضية بالذكاء الاصطناعي إلى تسجيل الشاشة؟
لإضافة شخصية افتراضية بالذكاء الاصطناعي إلى تسجيل الشاشة، ستحتاج إلى استخدام أداة لتسجيل الشاشة بالذكاء الاصطناعي. Trupeer AI هي أداة لتسجيل الشاشة بالذكاء الاصطناعي، وتساعدك على إنشاء مقاطع فيديو بعدة شخصيات افتراضية، كما تساعدك على إنشاء شخصيتك الافتراضية الخاصة للفيديو.كيفية تسجيل الشاشة على windows?
لتسجيل الشاشة على Windows، يمكنك استخدام Game Bar المدمج (Windows + G) أو أداة ذكاء اصطناعي متقدمة مثل Trupeer AI للحصول على ميزات أكثر تقدمًا مثل الشخصيات الافتراضية بالذكاء الاصطناعي، والتعليق الصوتي، والترجمة، إلخ.كيف أضيف تعليقًا صوتيًا إلى الفيديو؟
لإضافة تعليق صوتي إلى مقاطع الفيديو، نزّل إضافة trupeer ai لمتصفح Chrome. بعد التسجيل، ارفع الفيديو الخاص بك مع الصوت، واختر التعليق الصوتي المطلوب من trupeer، ثم صدّر الفيديو المعدّل.كيف أقوم بالتكبير في تسجيل الشاشة؟
لتكبير الصورة أثناء تسجيل الشاشة، استخدم تأثيرات التكبير في Trupeer AI التي تتيح لك التكبير والتصغير في لحظات محددة، مما يعزز التأثير البصري لمحتوى الفيديو الخاص بك.
قراءات مقترحة
كيفية الطباعة على الوجهين في Canva
دروس ذات صلة

