

How to Change Date Format in Google Sheets
Learn how to change the date format in Google Sheets to match your regional or project preferences. Simple steps with examples.
This guide provides a step-by-step process on how to change the date format in Google Sheets. By following these instructions, you will be able to customize date formats to suit your preferences or project requirements effectively.
To modify how dates are displayed in Google Sheets, follow these steps:
1. Select the Cells
Highlight the cell or range of cells with the dates you want to format.
2. Open Format Menu
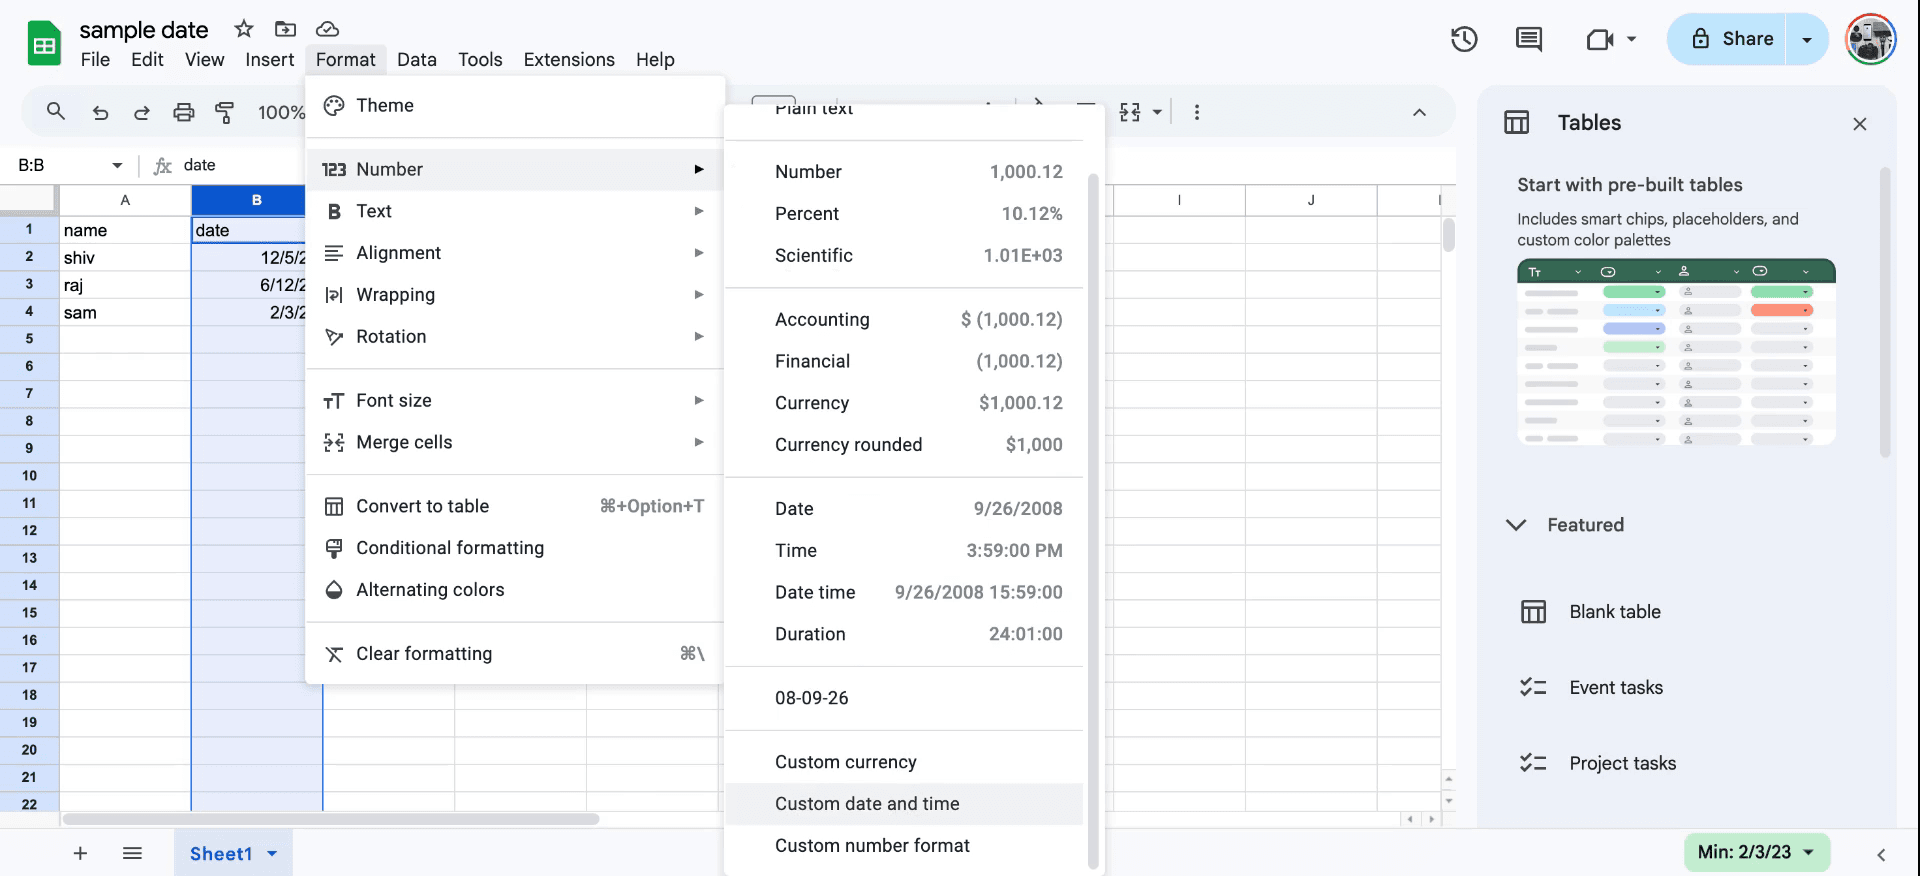
Click Format > Number > Date to apply a predefined format.
3. Customize the Date Format
For more control, go to Format > Number > Custom date and time.
In the window that appears, choose your preferred structure (e.g.,
dd-mm-yyyy,Month Day, Year).You can customize separators, leading zeros, or even include weekday names.
4. Apply the Format
Click Apply to confirm your changes. The selected cells will now display dates in the new format.
Step-by-Step Guide: How to change date format in Google Sheets
Step 1
To begin, open the Google Sheet you intend to modify. Identify and select the column containing the dates. Navigate to the "Format" menu.

Step 2
Within the "Format" menu, hover over "Number" and then select "Custom Date and Time."
Step 3
Choose your desired date format from the options provided. "two year o full numeric year option. Once you have made your selection, click "Apply" to implement the changes. So that's how to change date format in a sheets.

Pro tips for changing date format in Google Sheets
Select the cells with dates, then go to Format > Number > Date to apply the default date format.
Use the custom date and time option in the format menu to create a personalized format (e.g.,
DD-MM-YYYY).Ensure the regional settings in File > Settings > Locale match your desired format to avoid issues with how to change date format in Sheets.
Common pitfalls and how to avoid them for changing date format in Google Sheets
Dates stored as text: If dates don’t format correctly, convert them using the
DATEVALUEfunction first.Incorrect locale settings: Mismatched regional settings can lead to errors. Fix this in File > Settings > Locale before changing date format in Sheets.
Inconsistent data in a column: Ensure all cells in a column have the same data type to properly apply how to change date format in Sheets.
Common FAQs for changing date format in Google Sheets
How do I format the date to show the day of the week?
Use custom date and time and add theddddoption to include the weekday name.Why is the date not formatting correctly?
This often happens when the date is stored as text. Use theDATEVALUEfunction to fix it.Can I apply one date format to multiple columns at once?
Yes, select all the columns and apply how to change date format in Sheets using the format menu.How to screen record on mac?
To screen record on a Mac, you can use Trupeer AI. It allows you to capture the entire screen and provides AI capabilities such as adding AI avatars, add voiceover, add zoom in and out in the video. With trupeer’s AI video translation feature, you can translate the video into 30+ languages.How to add an AI avatar to screen recording?
To add an AI avatar to a screen recording, you'll need to use an AI screen recording tool. Trupeer AI is an AI screen recording tool, which helps you create videos with multiple avatars, also helps you in creating your own avatar for the video.How to screen record on windows?
To screen record on Windows, you can use the built-in Game Bar (Windows + G) or advanced AI tool like Trupeer AI for more advanced features such as AI avatars, voiceover, translation etc.How to add voiceover to video?
To add voiceover to videos, download trupeer ai chrome extension. Once signed up, upload your video with voice, choose the desired voiceover from trupeer and export your edited video.How do I Zoom in on a screen recording?
To zoom in during a screen recording, use the zoom effects in Trupeer AI which allows you to zoom in and out at specific moments, enhancing the visual impact of
People also ask
Technical Documentation Generator
How to Add Rupee Symbol in Google Sheets
How to Change Currency Format in Google Sheets
How to Add Bullet Points in Google Sheets
Related Tutorials

