Trupeer Blog
Resumir
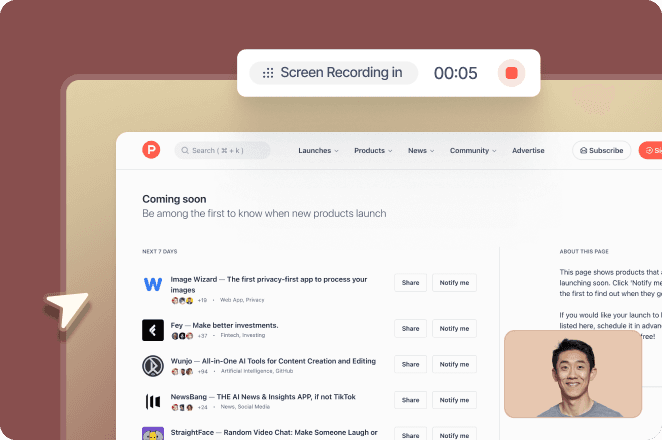
Imagine que está no meio de uma videoconferência importante e que a câmara muda subitamente o foco, deixando o seu público a encarar uma cadeira vazia enquanto continua a falar. As funcionalidades de auto-zoom alimentadas por IA revolucionaram a forma como conduzimos reuniões virtuais, webinars e demonstrações em direto. Mas nem sempre são perfeitas. Um zoom incorreto num momento crítico pode interromper o fluxo da sua apresentação, confundir o seu público e, no fim, enfraquecer a sua mensagem. É por isso que compreender quando e como substituir as decisões de zoom da IA é crucial para garantir a qualidade e a eficácia do seu conteúdo em vídeo.
A tecnologia de auto-zoom pode melhorar a experiência do utilizador ao focar dinamicamente o orador ou o objeto de interesse. No entanto, também pode interpretar mal os sinais, levando a transições pouco naturais ou a oportunidades perdidas para realçar pontos-chave. De acordo com um estudo,
Os erros de zoom impulsionados por IA podem reduzir o envolvimento do público em até 30%.
Esta estatística realça a importância de ter uma estratégia de substituição manual em vigor. Saber quando intervir garante que a sua mensagem é entregue como pretendido, mantendo a atenção e o interesse dos seus espectadores.
Para profissionais que dependem fortemente da comunicação por vídeo, como educadores, formadores corporativos e equipas de vendas, dominar o equilíbrio entre auto-zoom e zoom manual é essencial. Não se trata apenas de conhecer a tecnologia; trata-se de compreender as nuances do seu conteúdo e de o comunicar de forma eficaz. Ao incorporar boas práticas e ferramentas como o user manual generator da Trupeer, pode otimizar as suas apresentações em vídeo e garantir que ressoam com o seu público.
Porque é que o auto-zoom vs zoom manual importa?
A decisão entre auto-zoom e zoom manual vai além de uma escolha meramente técnica; é uma questão de apresentação profissional e de sucesso do negócio. Em ambientes em que uma comunicação clara e a entrega de informação precisa são fundamentais, como salas de reuniões de conselhos corporativos e contextos educativos, as apostas são elevadas. O auto-zoom, apesar de ser conveniente, pode por vezes interpretar mal o contexto ou focar no assunto errado, levando a mal-entendidos ou à perda de envolvimento. Isto é particularmente crucial em setores como a educação, onde o foco precisa de estar no formador ou nos materiais específicos que estão a ser apresentados.
As implicações para o negócio são significativas. Por exemplo, numa apresentação de vendas, um zoom desalinhado pode desviar a atenção de slides cruciais ou das expressões faciais do orador, que são essenciais para transmitir emoção e sinceridade. Isto pode impactar diretamente as taxas de fecho de negócios. Além disso, em indústrias como a saúde, em que cada detalhe conta, um zoom incorreto pode levar a mal-entendidos graves durante sessões de formação. Reconhecer quando confiar nos controlos manuais pode ajudar a mitigar estes riscos e a melhorar a eficácia global da sua estratégia de comunicação.
Adotar o auto-zoom vs zoom manual também se enquadra no mais amplo ai adoption workflow, em que compreender o equilíbrio entre a precisão humana e a da máquina é fundamental. As empresas que integram eficazmente ambas as abordagens podem melhorar a eficiência operacional e obter melhores resultados nas suas estratégias de implementação de IA. Assim, saber quando substituir decisões da IA não é apenas uma competência técnica, mas uma capacidade crítica para o negócio.
Quais são os benefícios de equilibrar o auto-zoom e o zoom manual?
Ao integrar o auto-zoom e o zoom manual na sua estratégia de apresentação em vídeo, pode obter inúmeras vantagens. Aqui estão alguns benefícios principais:
Maior envolvimento. Ao controlar com precisão o zoom, mantém o foco do público nos pontos críticos, o que pode levar a taxas de envolvimento mais elevadas.
Maior clareza. O zoom manual garante que toda a informação visual está clara, evitando falhas de comunicação devido a enquadramentos incorretos.
Mais flexibilidade. Pode adaptar-se a mudanças inesperadas na sua apresentação, garantindo que o seu vídeo continua relevante e eficaz.
Profissionalismo. Uma estratégia de zoom bem executada reflete profissionalismo e atenção ao detalhe, reforçando a reputação da sua marca.
Menos erros. Ao combinar auto-zoom com intervenção manual, reduz a probabilidade de problemas técnicos interromperem a sua apresentação.
Integração suave com ferramentas de IA. Plataformas como o user manual generator da Trupeer e a AI video platform facilitam um melhor controlo do conteúdo em vídeo, garantindo consistência e qualidade.
Que funcionalidades da Trupeer ajudam a gerir o zoom de forma eficaz?
A Trupeer oferece uma variedade de funcionalidades que podem ajudar a gerir as decisões de zoom de forma eficaz, quer esteja a usar auto-zoom ou definições manuais. Estas ferramentas foram concebidas para se integrarem sem esforço no seu fluxo de trabalho, proporcionando flexibilidade e controlo.
Gravação de ecrã com IA com auto-zoom e deteção de cliques
Esta funcionalidade permite-lhe capturar as atividades do seu ecrã com capacidades de zoom inteligentes. Os algoritmos de IA da Trupeer detetam automaticamente os pontos focais na sua apresentação, garantindo que a informação mais pertinente está sempre realçada. Isto é particularmente útil em ambientes dinâmicos, como demonstrações de software ou sessões de formação digital, em que os pontos de foco mudam frequentemente. Ao usar a AI-searchable knowledge base, pode rever e ajustar estas gravações, garantindo que cumprem os seus padrões antes de serem distribuídas.
Gravação silenciosa do ecrã com narração automática por IA
A Trupeer permite-lhe gravar apresentações em silêncio, com narração gerada por IA adicionada após a captura. Esta funcionalidade permite um controlo preciso do timing e da ênfase, facilitando a correção de quaisquer erros de auto-zoom na fase de gravação. É uma ferramenta essencial para criar vídeos polidos e profissionais, sem necessidade de uma edição manual extensa. A AI documentation platform pode ainda melhorar este processo ao fornecer documentação gerada automaticamente que se alinha com o seu conteúdo em vídeo.
Voiceover por IA em 65+ vozes naturais
As capacidades de voiceover da Trupeer oferecem uma variedade de vozes naturais, permitindo-lhe selecionar o tom e o ritmo que melhor se adequam ao seu conteúdo. Esta funcionalidade pode ajudar a criar uma narrativa coerente em torno do seu vídeo, garantindo que quaisquer ajustes de zoom manual não interrompem o fluxo geral. Ao integrar estas narrações com a manual creator tool, pode produzir conteúdos em vídeo abrangentes e envolventes.
Capítulos automáticos e deteção de segmentos
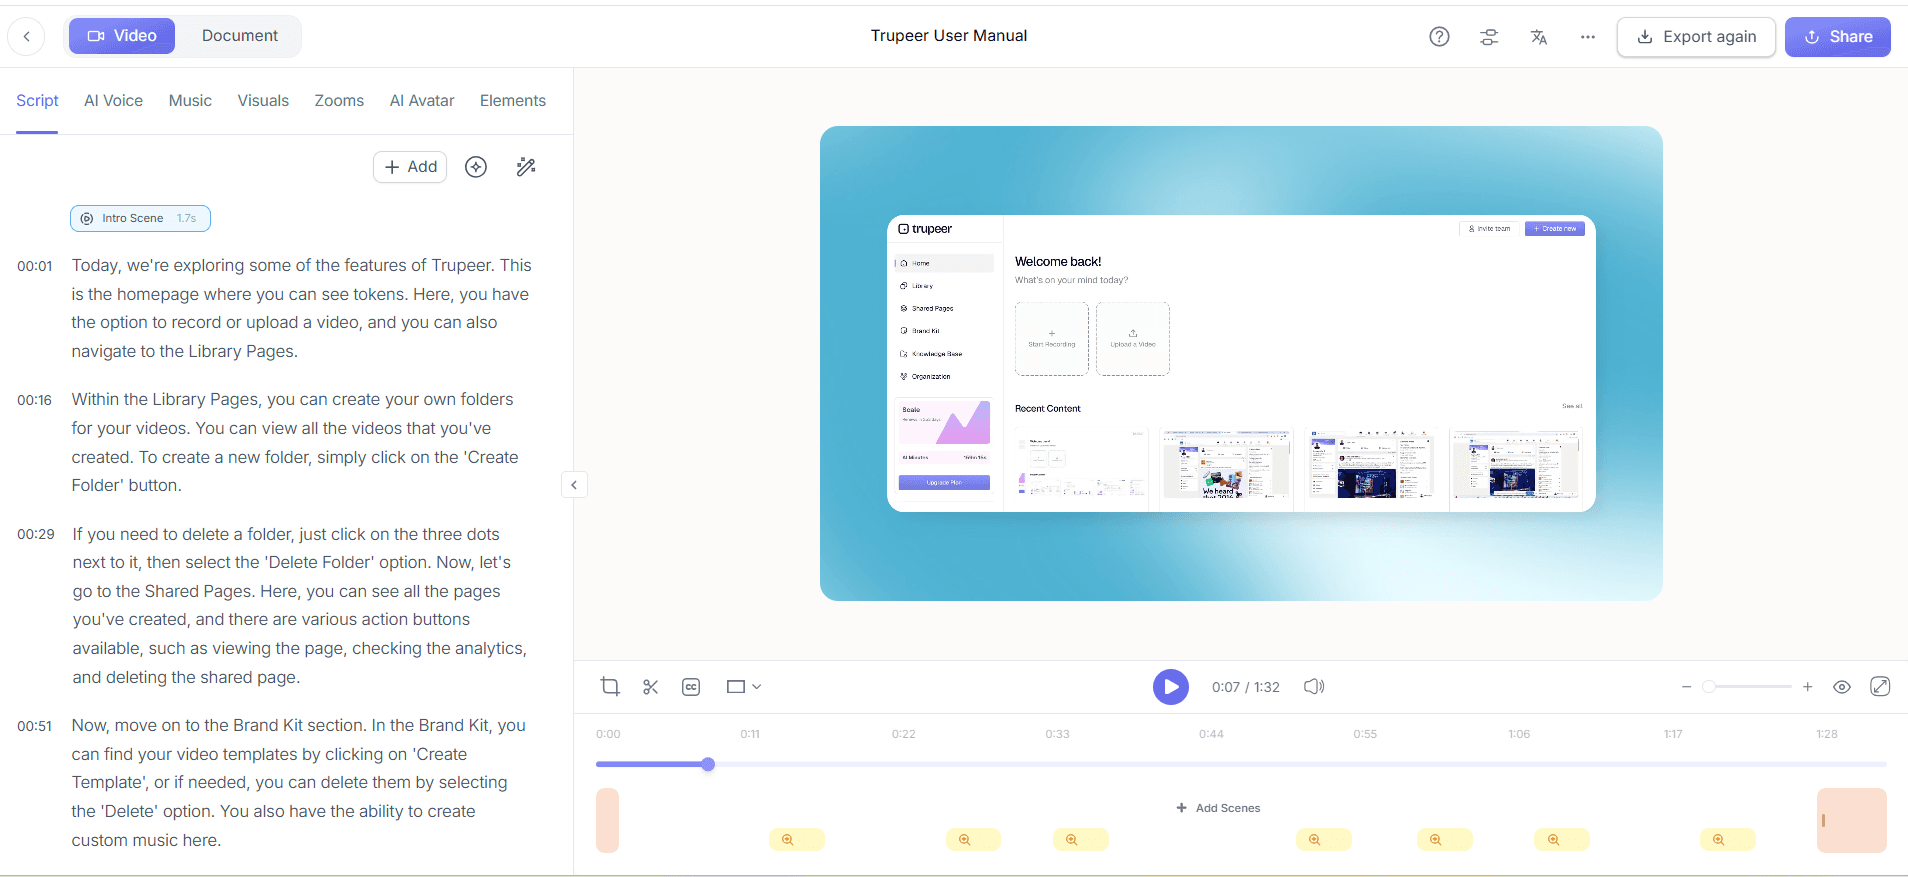
Com a Trupeer, pode criar automaticamente capítulos e segmentos dentro do seu conteúdo em vídeo. Esta funcionalidade é inestimável para apresentações longas, permitindo-lhe navegar e editar facilmente secções específicas. Se ocorrer um erro de auto-zoom, pode localizar rapidamente a secção relevante, fazer os ajustes necessários e garantir que o seu público recebe a mensagem pretendida. Esta capacidade aumenta a flexibilidade do seu conteúdo em vídeo, tornando-o mais acessível e mais fácil de gerir.
Avatares de IA e vídeo com apresentador em direto
A Trupeer oferece uma biblioteca de avatares de IA e vídeos com apresentador em direto, proporcionando uma forma única de apresentar o seu conteúdo. Estes avatares podem ser personalizados para refletir a sua marca e a sua mensagem, oferecendo uma alternativa dinâmica às apresentações de vídeo tradicionais. Ao incorporar controlos de zoom manual, pode garantir que estes avatares permanecem o ponto focal da sua apresentação, aumentando o envolvimento e a retenção dos espectadores. Esta funcionalidade é particularmente útil em cenários em que é necessário um estilo de apresentação consistente e alinhado com a marca.
Como gerir decisões de zoom passo a passo com a Trupeer?
Passo 1: Iniciar a gravação de ecrã com IA
Comece por iniciar a funcionalidade de gravação de ecrã da Trupeer. Escolha entre o gravador baseado no browser para acesso fácil ou a aplicação de ambiente de trabalho para uma funcionalidade mais sólida. Depois de selecionar o método de gravação, ative a gravação de ecrã com IA com auto-zoom e deteção de cliques. Esta funcionalidade ajusta automaticamente o zoom com base nos cliques e ações detetados, garantindo que o foco se mantém nas áreas relevantes. Normalmente, esta configuração demora cerca de 2-3 minutos. Em alguns casos, especialmente com aplicações complexas, pode ser necessário ajustar manualmente as definições iniciais para garantir que a IA identifica com precisão os pontos focais.
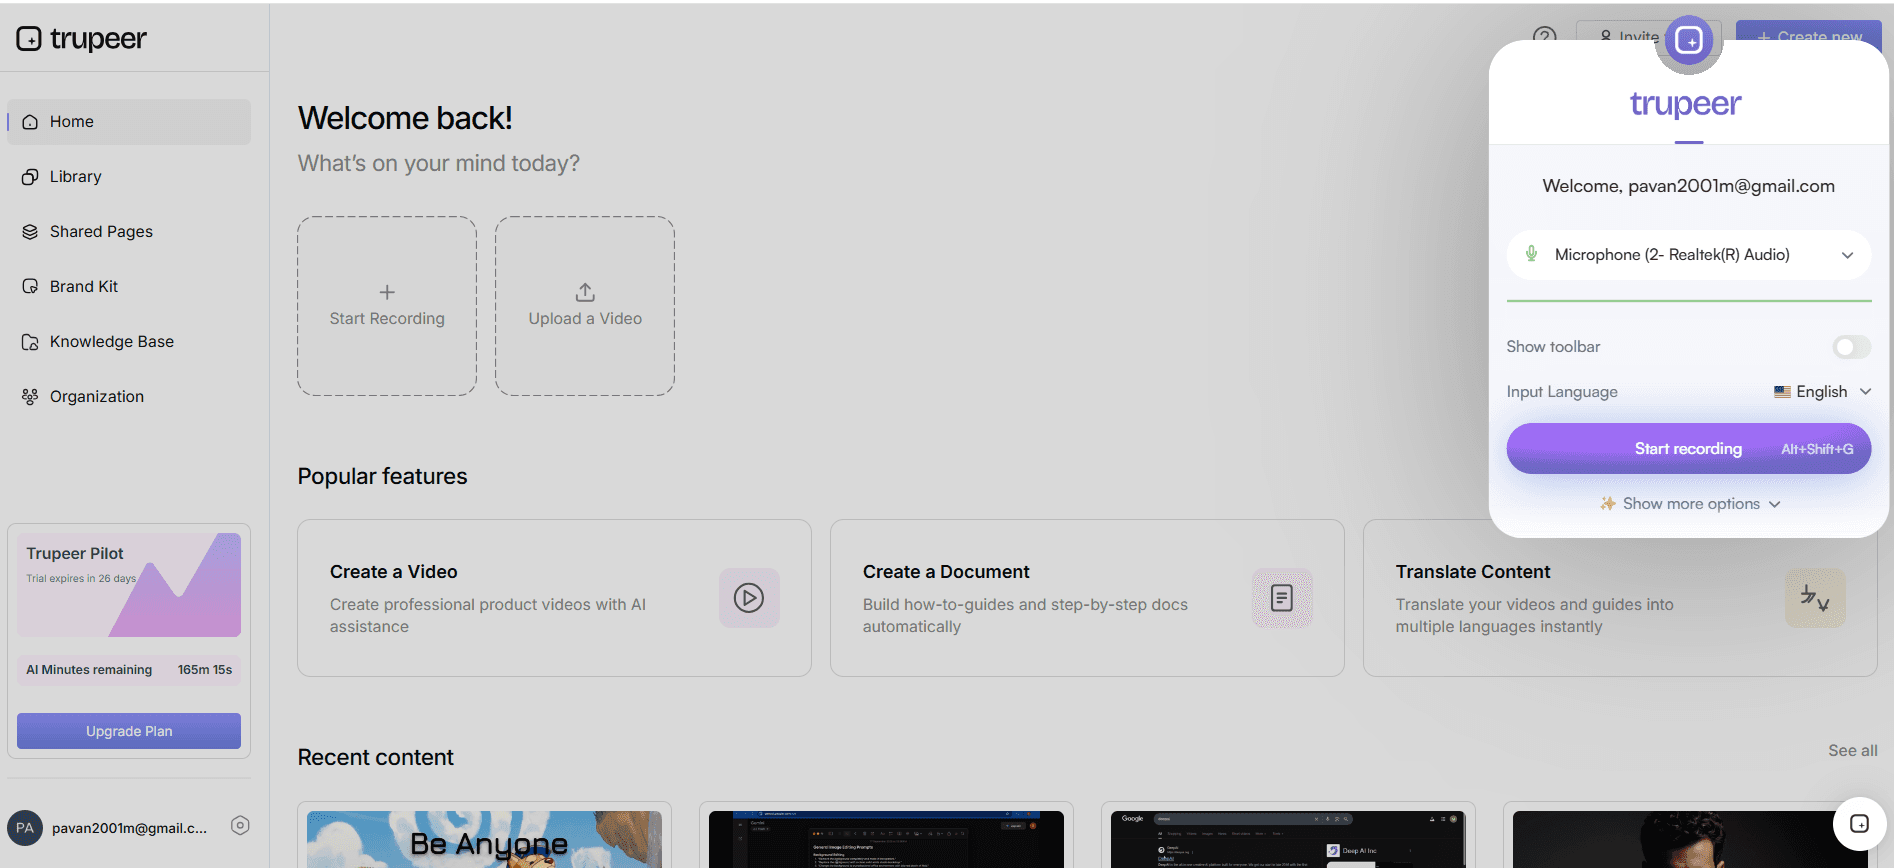
Passo 2: Configurar a gravação silenciosa do ecrã
Em seguida, opte por uma gravação silenciosa do ecrã com narração automática por IA. Isto permite-lhe concentrar-se na sua apresentação sem se preocupar com narração em simultâneo. A IA da Trupeer trata do voiceover após a captura. Basta clicar na opção de gravação silenciosa e iniciar a sua sessão. Após a gravação, a IA irá gerar uma narração com som natural, que demora aproximadamente 5-7 minutos, dependendo da duração do vídeo. Esta abordagem é ideal para garantir que quaisquer ajustes de zoom manual feitos durante a gravação não interrompam o fluxo narrativo mais tarde. As equipas que avaliam ferramentas muitas vezes começam com uma comparação de alternativas ao Loom antes de padronizarem um fluxo de trabalho.
Passo 3: Rever a narração gerada por IA
Após a gravação, reveja a narração gerada por IA. Abra o ficheiro gravado no editor da Trupeer e ouça a narração em conjunto com o vídeo. Pode ajustar o ritmo e o tom, se necessário, o que é especialmente útil se notar momentos em que os ajustes de zoom manual possam ter alterado o foco. Este processo de revisão demora normalmente 10-15 minutos para um vídeo de 30 minutos. Certifique-se de que a narração está alinhada com os pontos-chave da sua apresentação e ajuste conforme necessário para corresponder a quaisquer correções de zoom manual.
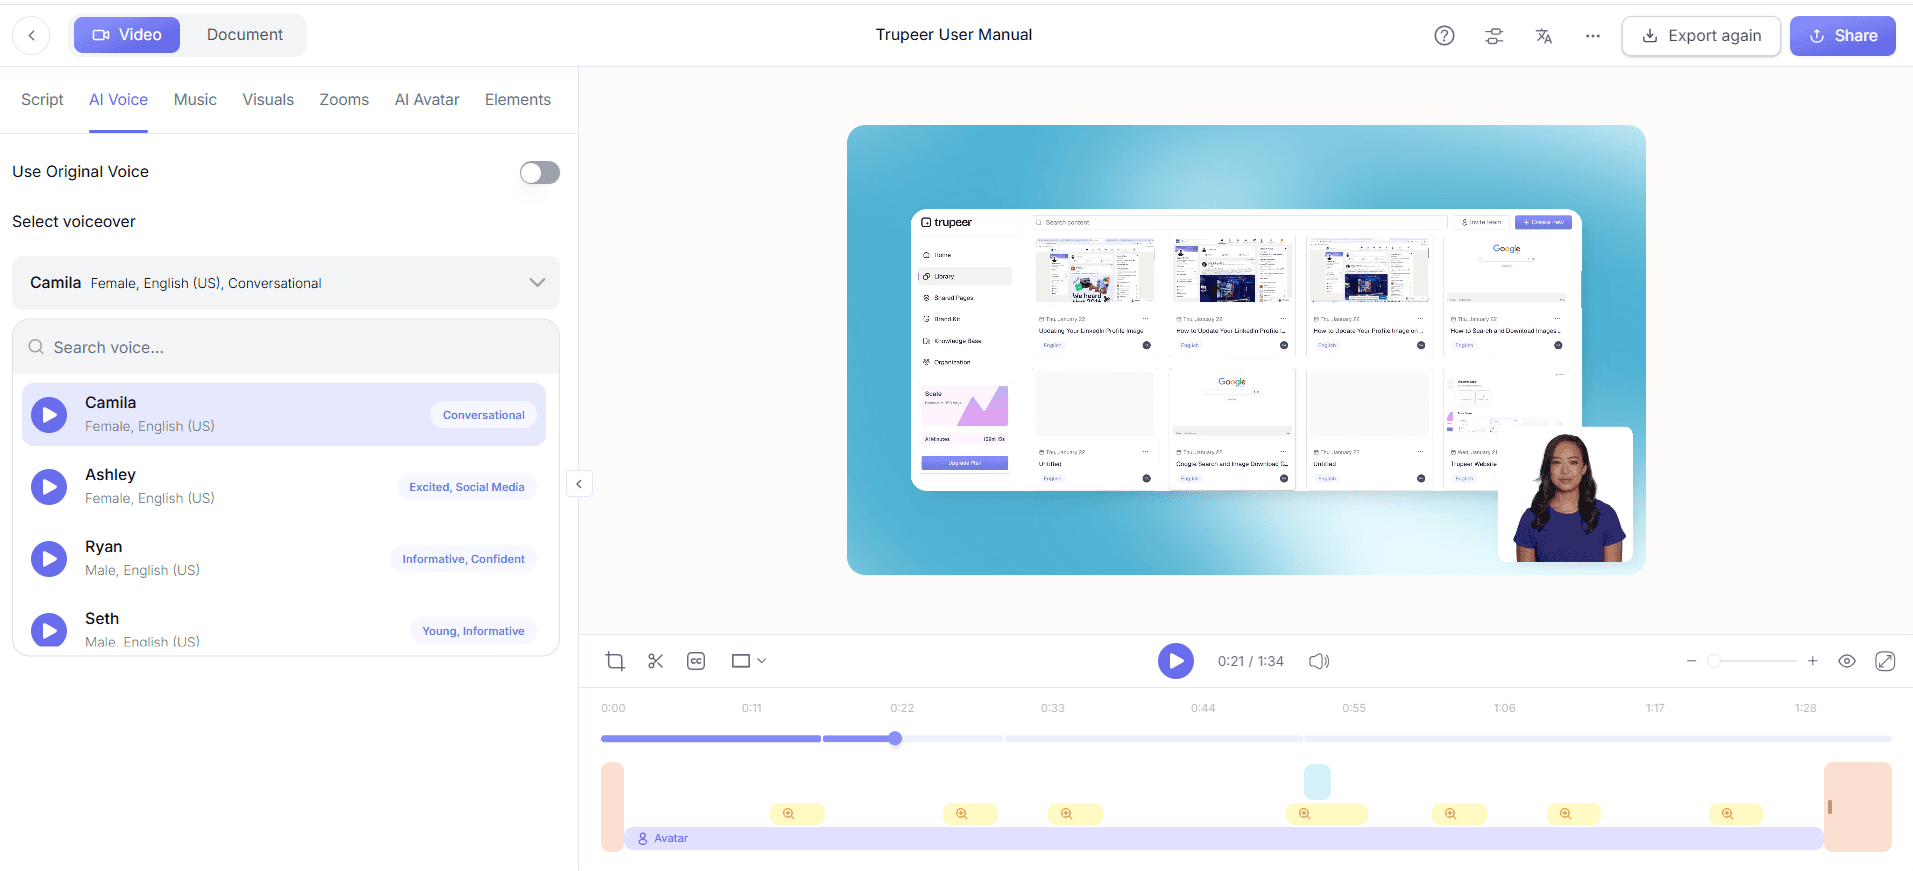
Passo 4: Implementar capítulos automáticos e deteção de segmentos
Use os capítulos automáticos e a deteção de segmentos da Trupeer para organizar o seu vídeo. Esta funcionalidade divide a gravação em segmentos lógicos, facilitando a identificação de onde foi aplicado o zoom manual. Este processo de segmentação demora cerca de 5 minutos. Navegue até ao editor de segmentos e reveja cada secção. Se um erro de auto-zoom tiver sido corrigido manualmente, certifique-se de que o segmento reflete essa alteração de forma clara. Isto ajuda na navegação eficiente do vídeo e pode melhorar a compreensão do público.
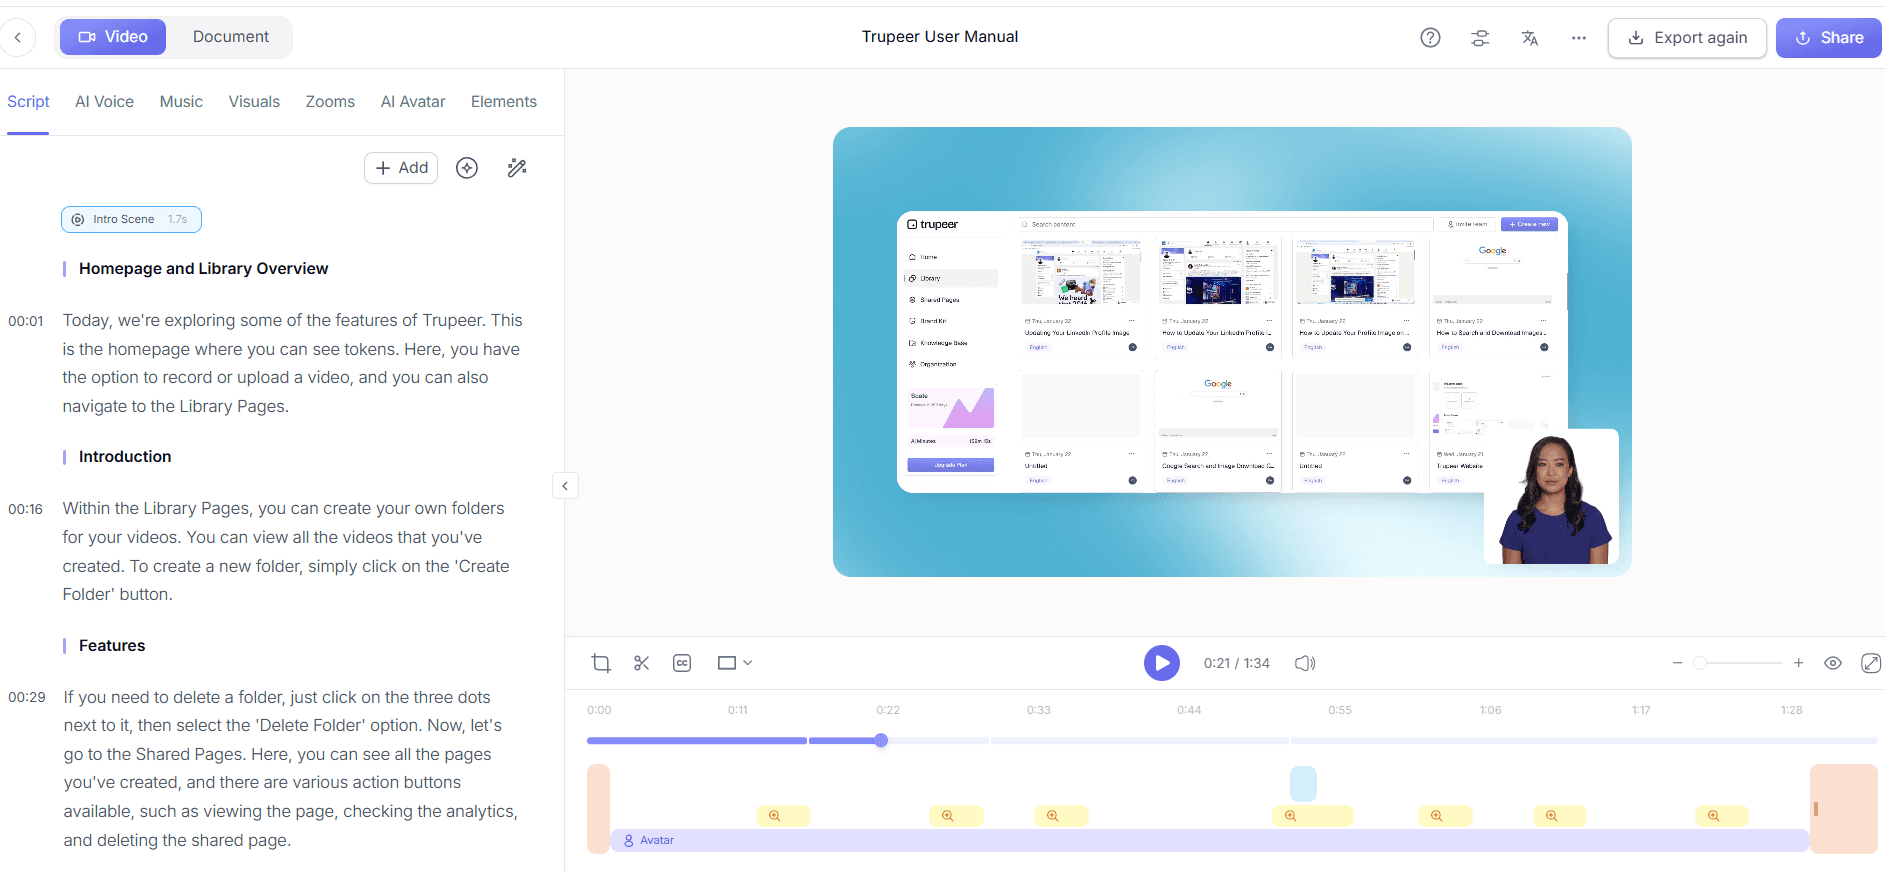
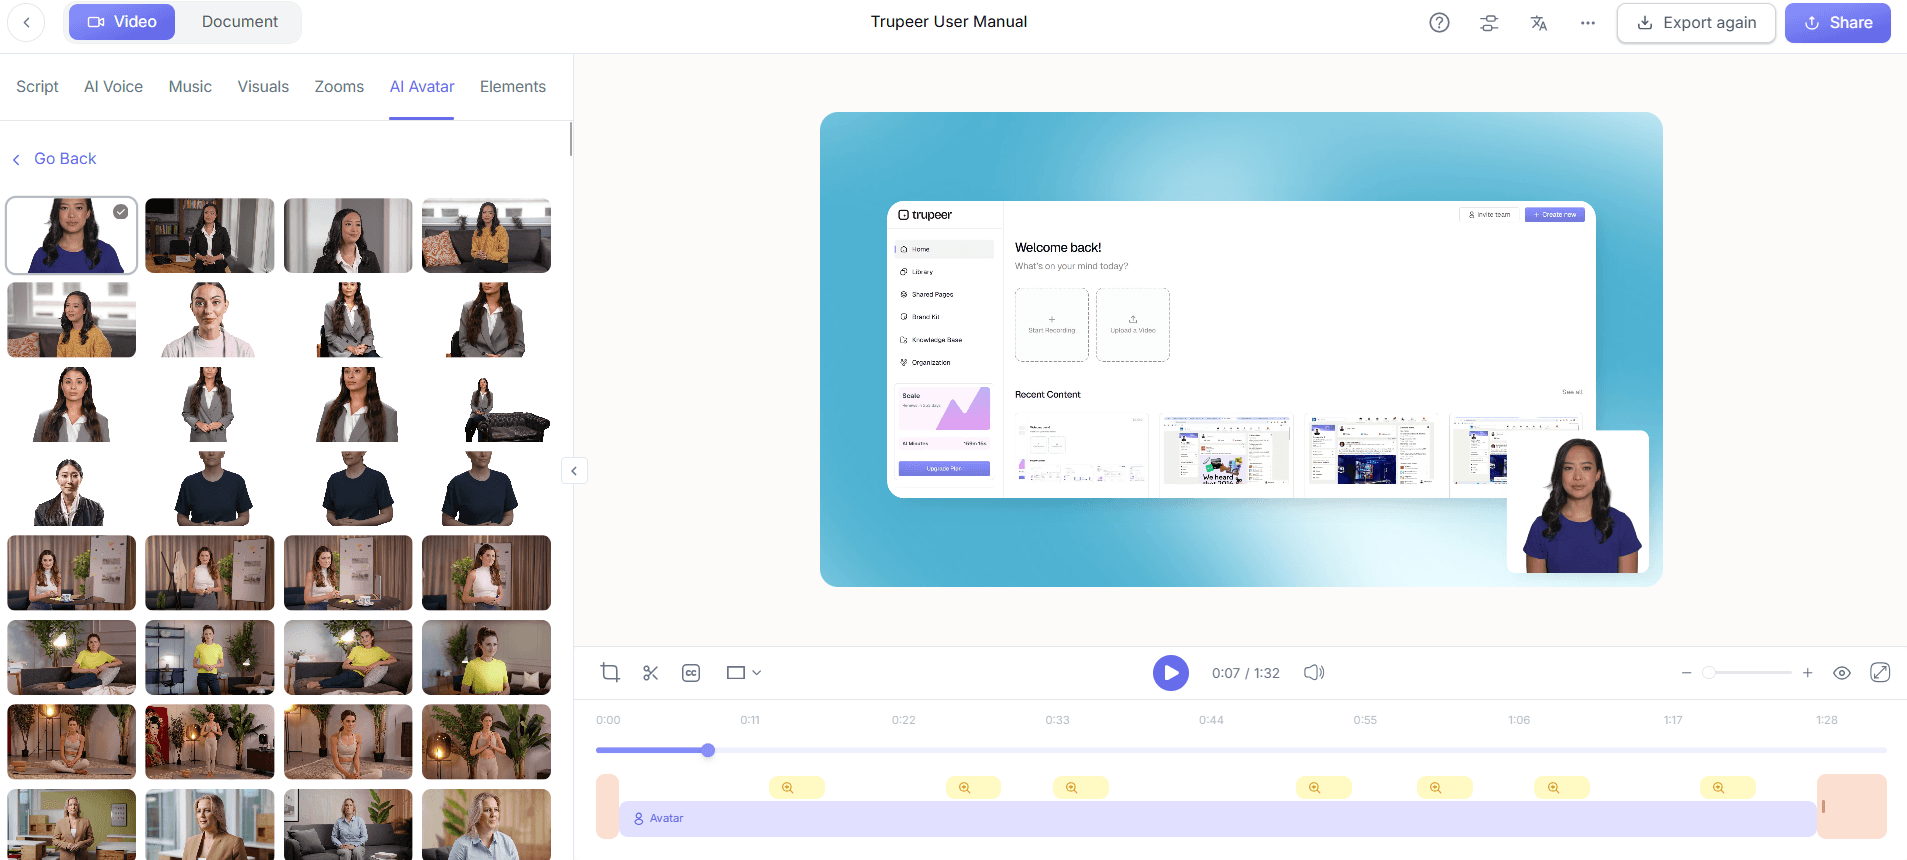
Passo 5: Personalizar com avatares de IA
Adicione avatares de IA ao seu vídeo para as partes em que o envolvimento visual é crítico. Selecione avatares a partir da biblioteca de stock da Trupeer ou carregue os seus próprios através da integração com HeyGen. Este processo é simples: escolha o seu avatar e, em seguida, aplique-o nos segmentos de vídeo pretendidos. Os avatares mantêm a atenção dos espectadores e podem ser o ponto focal para o zoom manual, especialmente durante apresentações de conteúdo estático. Este passo pode demorar cerca de 10 minutos, dependendo do nível de personalização.
Passo 6: Finalizar e exportar
Quando o seu vídeo estiver editado de acordo com o que pretende, finalize exportando no formato desejado com as opções de exportação multi-formato da Trupeer. Escolha entre MP4, HTML ou PDF, dependendo das suas necessidades de distribuição. O processo de exportação é rápido, muitas vezes concluído em 2-3 minutos, garantindo uma saída de alta qualidade que reflete os seus ajustes de zoom com rigor. Este passo final garante que o seu vídeo está pronto para ser partilhado em várias plataformas, mantendo todas as melhorias de zoom manual intactas.
Que dicas ajudam a gerir decisões de zoom?
Gerir decisões de zoom de forma eficaz envolve uma combinação de planeamento estratégico e ajustes táticos. Aqui vão algumas dicas para o orientar:
Planeie a sua apresentação. Antes de começar, defina os pontos-chave em que são necessários ajustes de zoom para manter o foco e a clareza.
Use uma combinação de controlos de IA e manuais. Use a IA para operações padrão, mas intervenha manualmente nas secções cruciais para garantir precisão.
Teste a sua configuração. Faça testes com as funcionalidades da Trupeer para ver como funciona o auto-zoom e onde pode ser necessário introduzir dados manualmente.
use avatares de IA. Incorpore avatares para manter o envolvimento dos espectadores durante segmentos estáticos, melhorando o apelo geral do vídeo.
Revise e edite. Reveja sempre as gravações para identificar áreas em que o zoom manual foi benéfico, ajustando as definições futuras em conformidade.
Mantenha a consistência. Mantenha um estilo de zoom consistente entre sessões para reforçar a identidade da marca, usando uma AI manual creator tool para orientações.
Acompanhe o feedback dos espectadores. Use análises para compreender como os espectadores respondem às suas táticas de zoom e refine a sua abordagem com base nos dados.
Para públicos globais, adicionar AI video translation alarga o mesmo fluxo de trabalho a mais de 40 línguas com sincronização labial.
Perguntas frequentes
Como posso substituir as decisões de auto-zoom na Trupeer?
Substituir as decisões de auto-zoom na Trupeer é simples. Durante a gravação, ajuste manualmente o zoom clicando na opção de controlo manual. Isto irá pausar a função de auto-zoom, permitindo-lhe definir o foco conforme necessário. Esta capacidade é particularmente útil durante secções específicas em que a IA pode interpretar mal os sinais de foco. Após a gravação, reveja o vídeo e faça ajustes adicionais através do editor da Trupeer para garantir clareza e consistência.
Que benefícios oferece o zoom manual em comparação com o auto-zoom?
O zoom manual oferece maior precisão e controlo, permitindo aos apresentadores realçar detalhes específicos que o auto-zoom pode não detetar. Garante que o foco permanece no conteúdo crítico, evitando distrações ou interpretações erradas. Isto é especialmente benéfico em apresentações detalhadas em que cada elemento visual contribui para a narrativa. O zoom manual também pode adaptar-se a estilos de apresentação únicos, melhorando o envolvimento e a compreensão geral.
A Trupeer consegue gerir definições de auto-zoom e zoom manual no mesmo vídeo?
Sim, a Trupeer pode gerir definições de auto-zoom e zoom manual dentro de um único vídeo. Os utilizadores podem começar com auto-zoom para definições gerais e alternar para zoom manual em secções específicas que exigem mais foco. Esta flexibilidade permite aos utilizadores adaptar as suas apresentações às suas necessidades e preferências do público. Ao combinar ambos os métodos, a Trupeer garante uma abordagem equilibrada à entrega do conteúdo em vídeo. Quando os SOPs entram na mesma conversa, uma comparação de alternativas ao Scribe ajuda a clarificar o âmbito.
Usar zoom manual afeta a qualidade do vídeo?
Usar zoom manual não afeta a qualidade do vídeo na Trupeer. A plataforma foi concebida para manter uma saída de alta resolução independentemente dos ajustes de zoom. Os controlos manuais estão integrados para funcionar de forma suave com o motor de gravação, garantindo que todo o conteúdo permanece claro e profissional. Mesmo com mudanças frequentes de zoom, a tecnologia da Trupeer mantém uma qualidade consistente, proporcionando uma experiência de visualização suave e polida.
Existe uma forma de automatizar definições de zoom manual para gravações futuras?
Embora as definições de zoom manual sejam controladas inerentemente pelo utilizador, a Trupeer permite-lhe guardar predefinições de zoom. Estas predefinições podem ser aplicadas a gravações futuras, automatizando o processo de configuração inicial. Ao usar estas definições guardadas, garante consistência entre várias sessões, reduzindo o tempo de configuração e assegurando que os seus ajustes manuais cumprem os padrões da sua apresentação. Esta funcionalidade é especialmente útil para apresentações recorrentes ou séries que exigem uniformidade.
Artigos relacionados