
Cómo extraer una foto de un vídeo en Canva
Aprende a extraer una foto de un vídeo en Canva capturando un fotograma y exportándolo como imagen. Sigue este sencillo tutorial y crea guías visuales claras con Trupeer.
Esta guía ofrece un recorrido completo sobre cómo capturar una imagen estática de un video en Canva.
Sigue los pasos a continuación para extraer de manera eficiente la foto deseada de tu proyecto de video.
Para capturar una foto de un video en Canva, sube el video, colócalo para mostrar el fotograma deseado y luego descarga el diseño como un archivo de imagen (PNG o JPEG). Aunque Canva no tiene una función dedicada de "captura de fotograma", esta solución alternativa te permite extraer eficazmente una imagen estática.
Guía paso a paso:
1. Sube tu video:
Abre tu proyecto de Canva y sube el video que deseas usar. Arrástralo al lienzo.
2. Establece el fotograma:
Mueve el cabezal de reproducción (el control deslizante) en la línea de tiempo del video hasta el fotograma que te gustaría capturar. Cambia el tamaño y coloca el video en el lienzo según sea necesario.
3. Descarga el fotograma como imagen:
Haz clic en "Compartir" en la esquina superior derecha.
Selecciona "Descargar".
Elige PNG o JPEG como tipo de archivo.
En “Seleccionar páginas”, elige solo la página actual.
Guía paso a paso: cómo capturar una foto de un video en Canva
Paso 1
Para empezar a capturar una foto de un video en Canva, abre un diseño existente que contenga el video. Utiliza el temporizador de duración situado debajo del video para reproducirlo y detenerlo con precisión en el momento que deseas capturar.

Paso 2
Una vez que hayas identificado el fotograma exacto que deseas capturar, haz clic en "S" para dividir el video. Como alternativa, haz clic con el botón derecho en el video y elige "Dividir página" para aislar el fotograma.
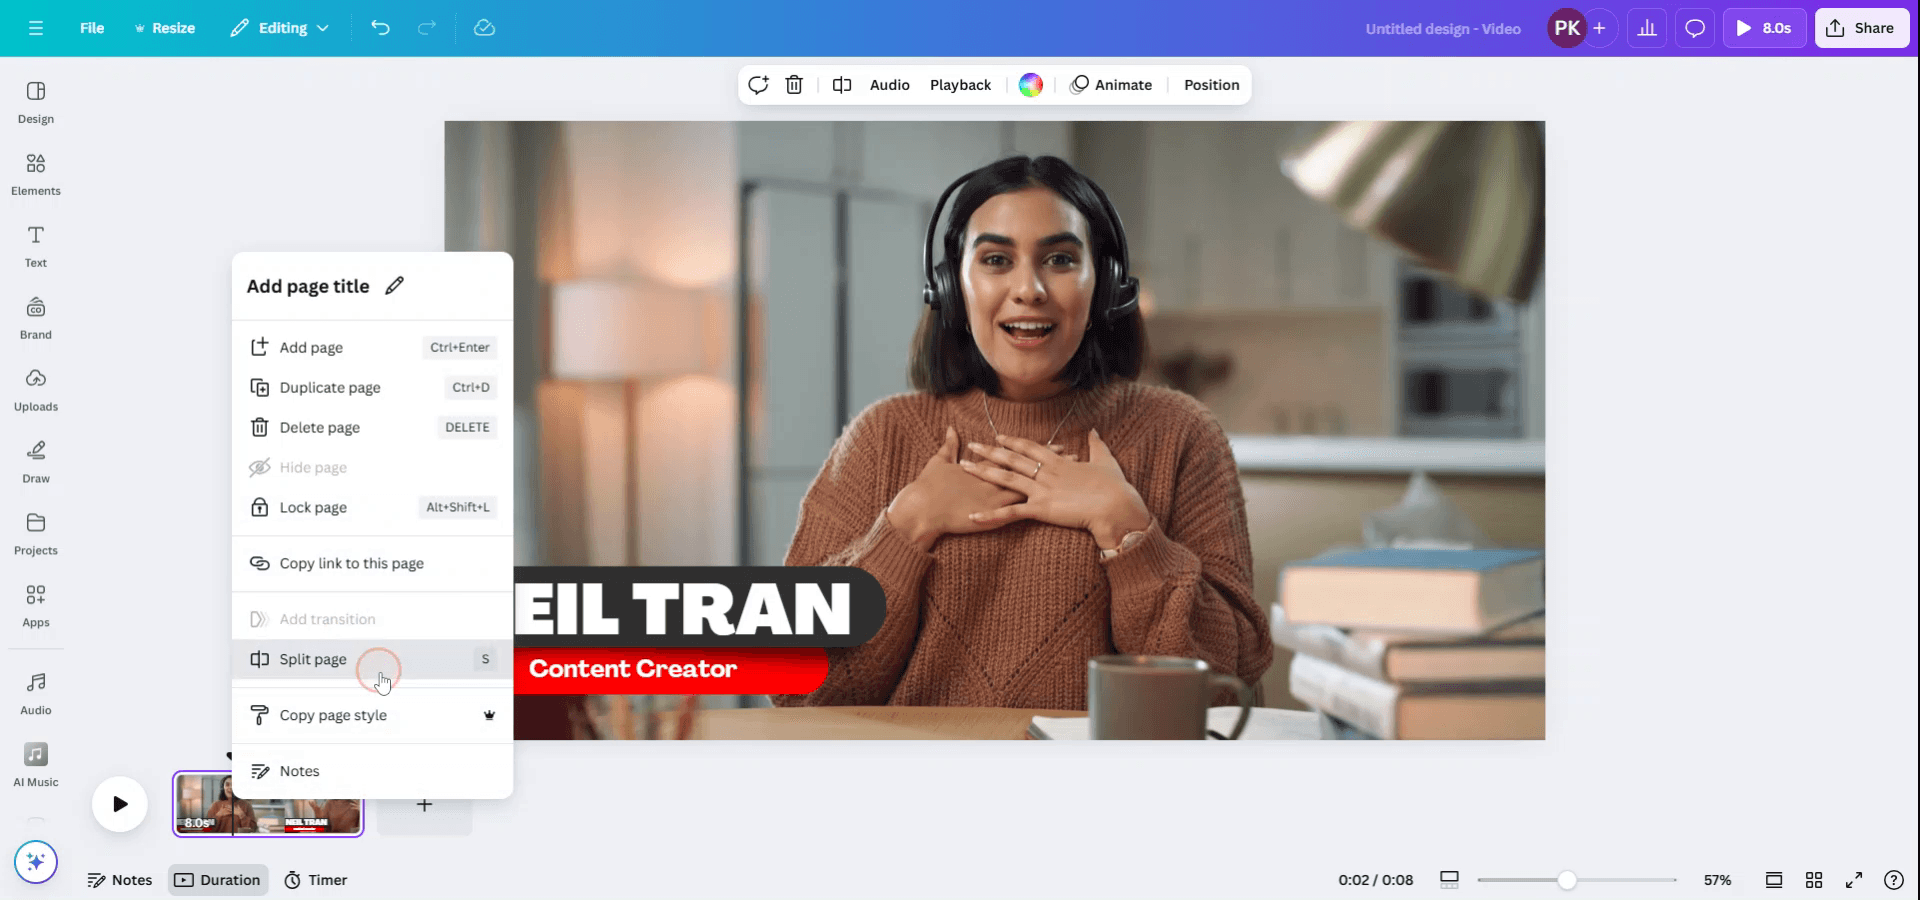
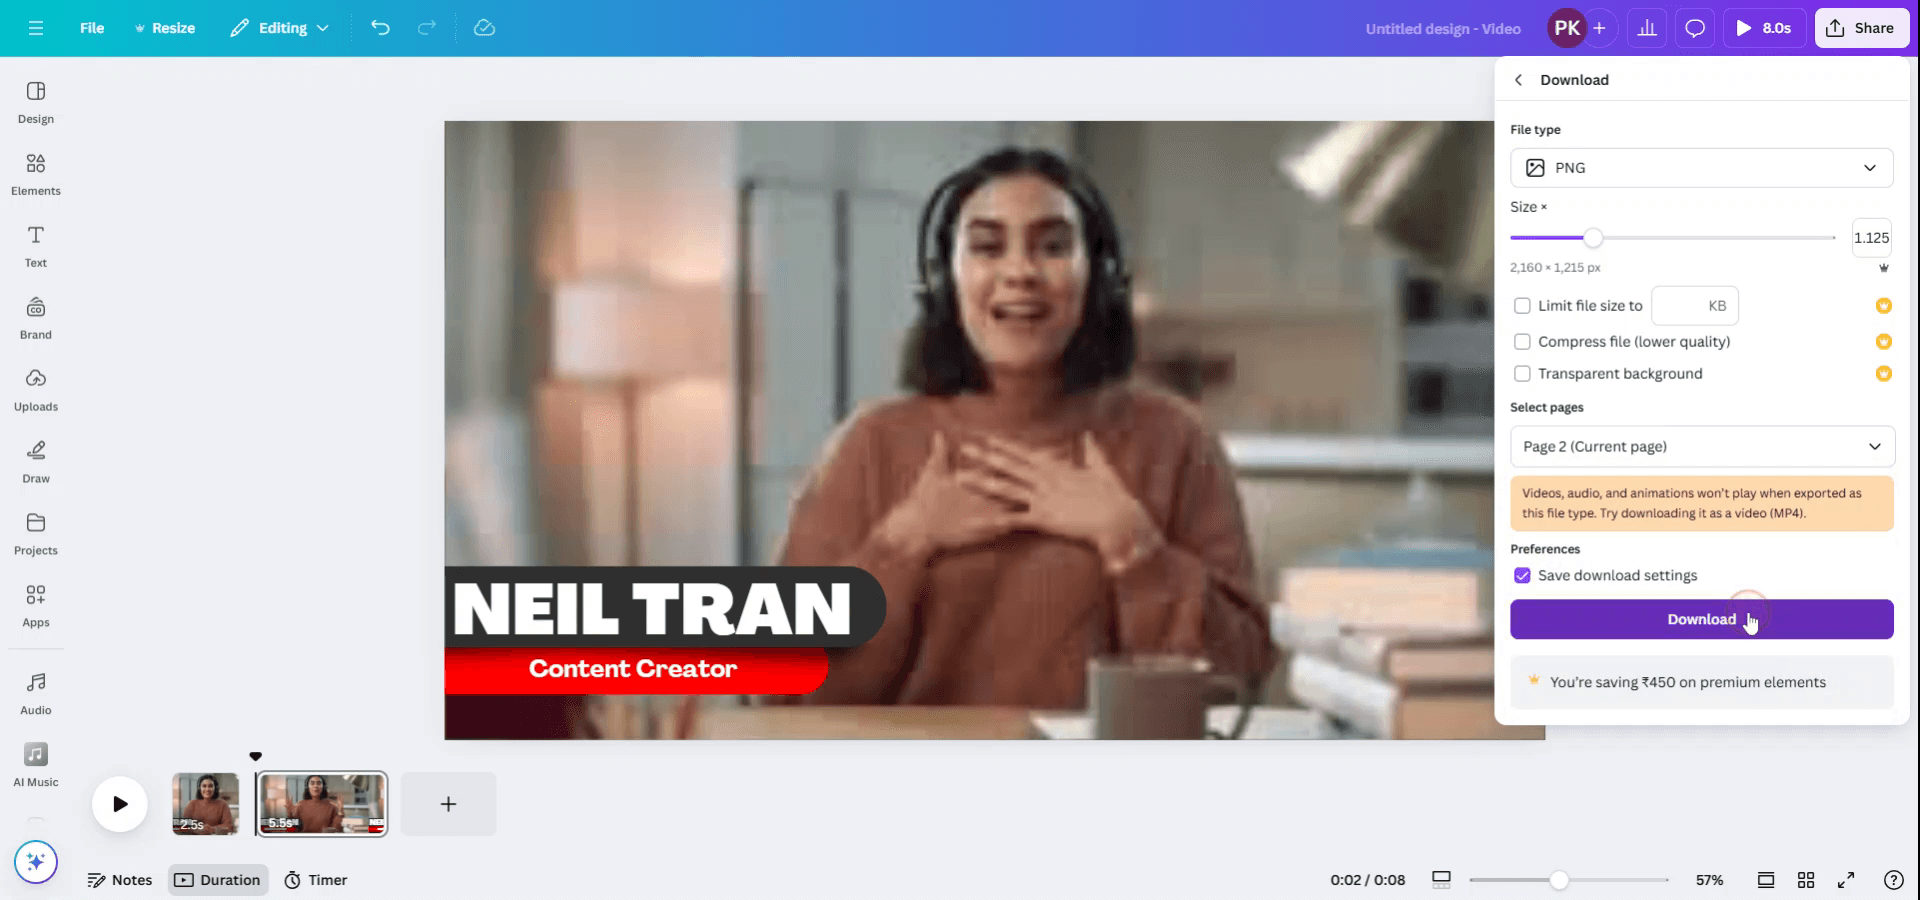
Paso 3
El fotograma elegido aparecerá ahora en una nueva página, como la Página 2. Para descargar este fotograma como foto, haz clic en el botón "Compartir" y selecciona "Descargar" en el menú desplegable.
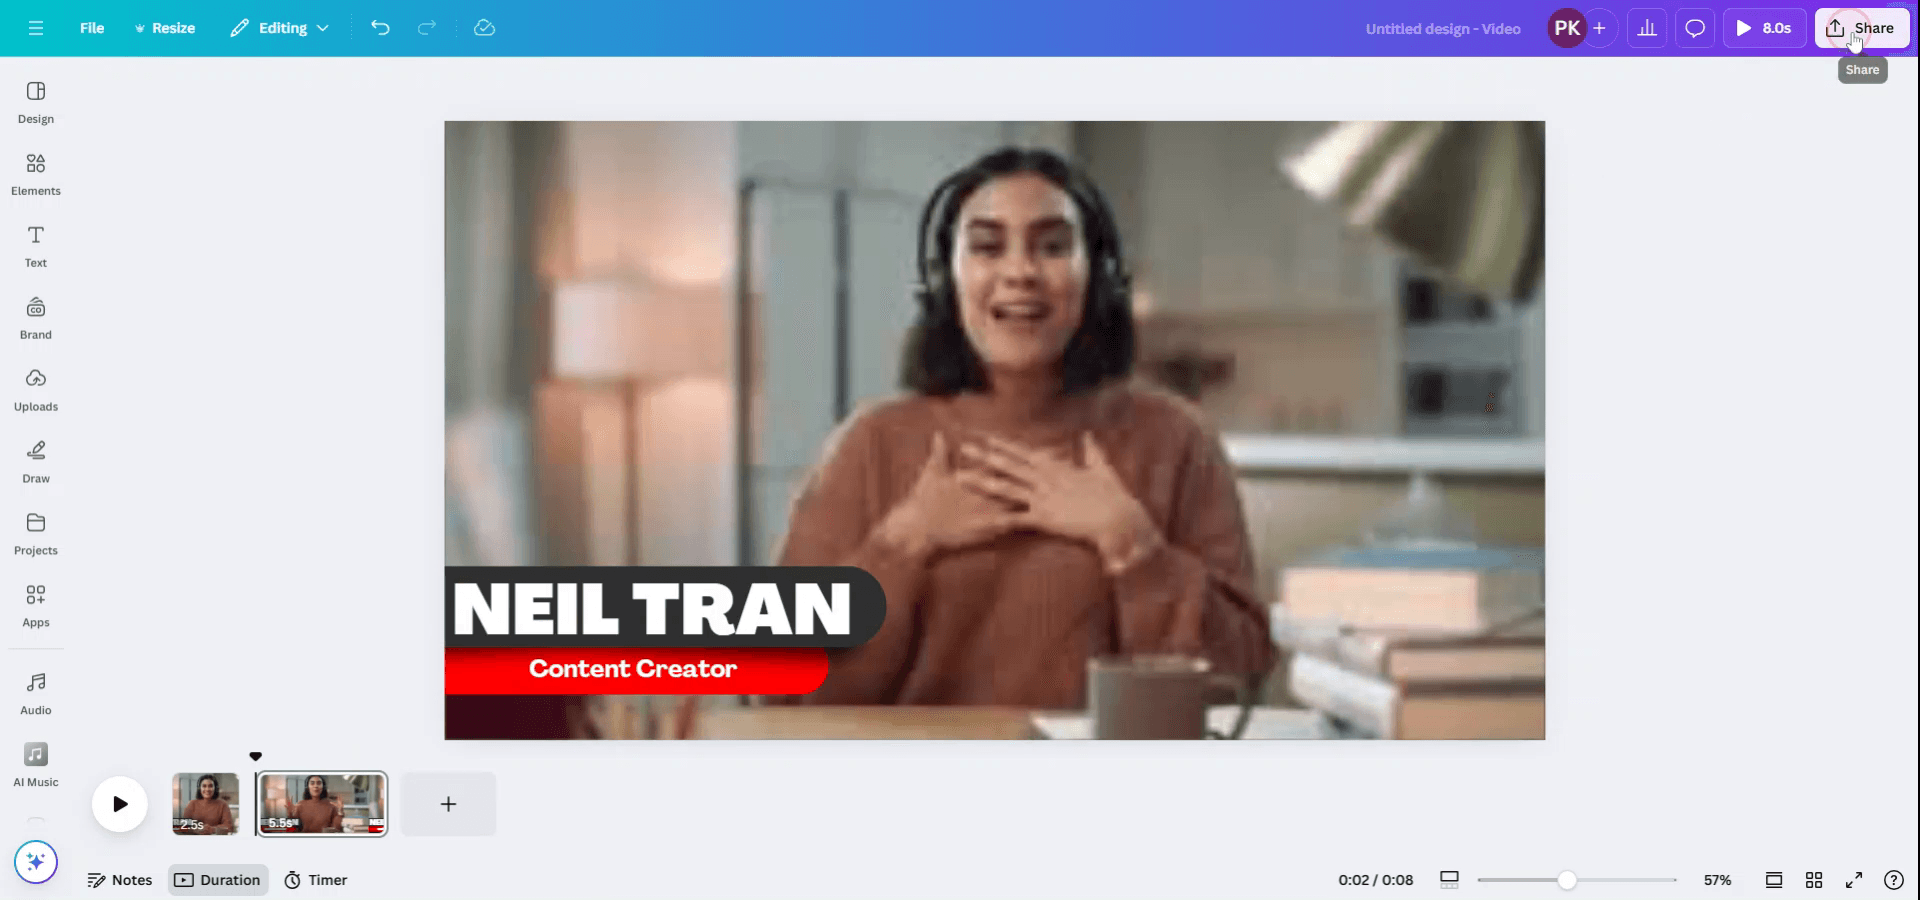
Paso 4
Establece el tipo de archivo en PNG y ajusta el tamaño según sea necesario.
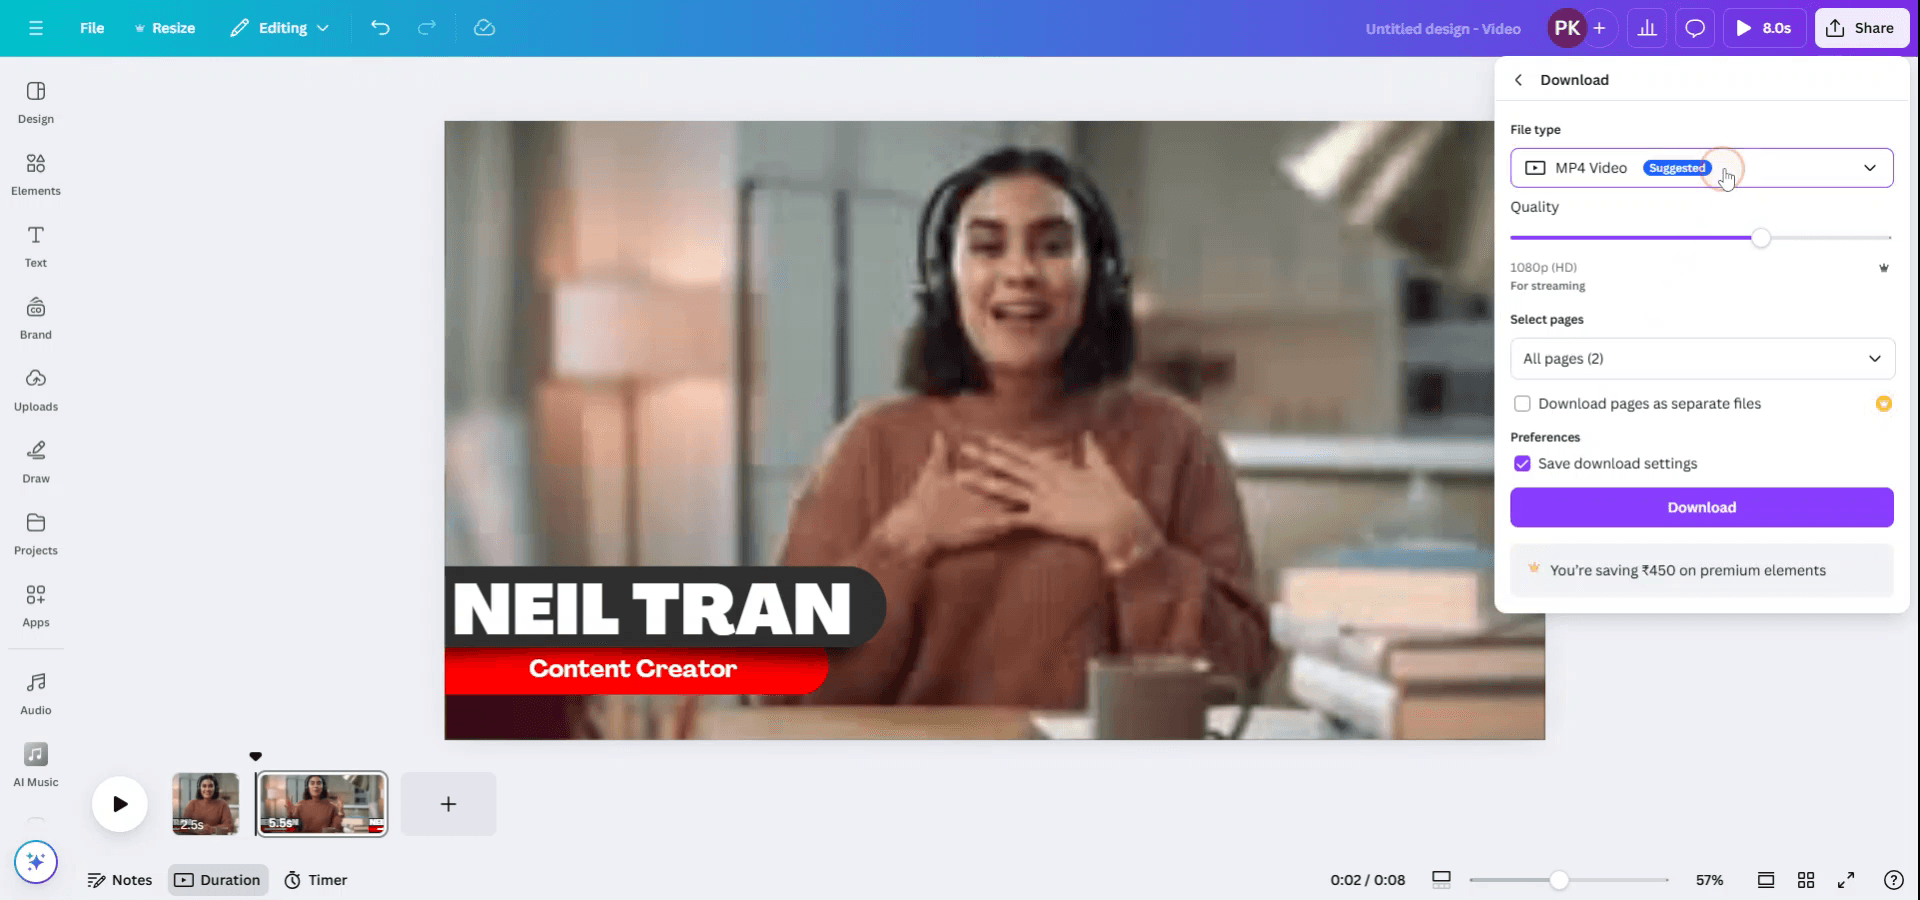
Paso 5
Asegúrate de haber seleccionado la página correcta (Página 2) donde se encuentra la foto deseada antes de continuar.

Paso 6
Una vez confirmados todos los ajustes, haz clic en "Listo" y luego en "Descargar" para guardar la foto en tu dispositivo.
Consejos profesionales para sacar una foto de un vídeo en Canva
Pausa en el fotograma deseado: Reproduce el vídeo y pausa justo en el fotograma exacto que quieres capturar como imagen.
Haz una captura de pantalla: Usa la función de captura de pantalla de tu ordenador o dispositivo (por ejemplo, la herramienta Recortes en Windows, Command+Shift+4 en Mac) para capturar el fotograma.
Sube la captura de pantalla a Canva: Después de capturar la pantalla, súbela a Canva arrastrándola y soltándola o usando la pestaña "Subidas".
Usa la herramienta de edición de vídeo: Canva te permite recortar y dividir vídeos. Usa esta función para centrarte en la parte del vídeo de la que quieres sacar una foto antes de hacer la captura de pantalla.
Usa el editor de imágenes de Canva para mejorarla: Una vez que la imagen se haya subido, usa el editor de imágenes de Canva para ajustar el brillo, el contraste y aplicar filtros para darle un toque profesional.
Errores comunes y cómo evitarlos al sacar una foto de un vídeo en Canva
Captura de pantalla de baja calidad: Si haces una captura de pantalla de un vídeo de baja resolución, la calidad de la imagen puede ser mala.
Solución: Asegúrate de que el vídeo tenga alta resolución antes de hacer la captura de pantalla para mantener la claridad de la imagen.Elementos no deseados en el fotograma: A veces, otras partes del vídeo pueden aparecer en el fotograma que quieres capturar.
Solución: Recorta el vídeo en Canva antes de pausar para aislar el fotograma deseado o usa herramientas de recorte después de capturar la imagen.No ajustar el tamaño de la imagen: Después de subir la captura de pantalla, puede que olvides redimensionarla para que encaje en tu diseño.
Solución: Usa las opciones de cambio de tamaño de Canva para ajustar la imagen y que encaje perfectamente en tu diseño.Pérdida de la relación de aspecto: Redimensionar la imagen puede deformar la relación de aspecto original.
Solución: Mantén pulsada la tecla "Shift" mientras redimensionas para conservar las proporciones correctas de la imagen.Limitaciones del formato de archivo: Las capturas de pantalla no siempre están en el mejor formato para Canva.
Solución: Guarda las capturas de pantalla en formatos de imagen comunes (PNG o JPG) antes de subirlas a Canva.
Preguntas frecuentes comunes para extraer una foto de un video en Canva
¿Puedo extraer directamente una foto de un video en Canva?
No, Canva no tiene una función integrada para extraer fotos de videos. Primero necesitas capturar el fotograma mediante una captura de pantalla.¿Qué formatos de video puedo subir a Canva?
Canva admite subidas de video en MP4, MOV y otros formatos de video comunes.¿Puedo editar la foto después de capturarla de un video?
Sí, una vez subida a Canva, puedes usar las herramientas de edición de la plataforma para mejorar o ajustar la imagen.¿Hay una mejor manera de extraer fotos de alta calidad de un video?
Si necesitas una imagen de mayor calidad, considera usar un software dedicado de conversión de video a imagen antes de subirla a Canva.¿Puedo usar el fotograma de un video con fines comerciales?
Asegúrate de tener los derechos adecuados para usar el contenido del video. Canva ofrece videos e imágenes de archivo con derechos de uso comercial, pero los videos personales podrían requerir permiso o licencia.¿Cómo grabar la pantalla en Mac?
Para grabar la pantalla en un Mac, puedes usar Trupeer AI. Te permite capturar toda la pantalla y ofrece capacidades de IA como añadir avatares de IA, añadir voz en off, y hacer zoom in y out en el video. Con la función de traducción de video con IA de trupeer, puedes traducir el video a más de 30 idiomas.¿Cómo añadir un avatar de IA a una grabación de pantalla?
Para añadir un avatar de IA a una grabación de pantalla, necesitarás usar una herramienta de grabación de pantalla con IA. Trupeer AI es una herramienta de grabación de pantalla con IA, que te ayuda a crear videos con múltiples avatares, y también te ayuda a crear tu propio avatar para el video.¿Cómo grabar la pantalla en Windows?
Para grabar la pantalla en Windows, puedes usar la barra de juegos integrada (Windows + G) o una herramienta avanzada de IA como Trupeer AI para funciones más avanzadas como avatares de IA, voz en off, traducción, etc.¿Cómo añadir voz en off a un video?
Para añadir voz en off a los videos, descarga la extensión de Chrome de Trupeer AI. Una vez registrado, sube tu video con voz, elige la voz en off deseada de Trupeer y exporta tu video editado.¿Cómo hago zoom en una grabación de pantalla?
Para hacer zoom durante una grabación de pantalla, usa los efectos de zoom en Trupeer AI, que te permiten acercar y alejar en momentos específicos, mejorando el impacto visual de tu contenido de video.
La gente también pregunta
Generador de documentación técnica
Software de base de conocimientos
Cómo convertir una imagen en una página para colorear en Canva
Cómo imprimir por ambos lados en Canva
Tutoriales relacionados

