
FigmaをUI3に更新する方法
この簡単なガイドで、Figmaの新しいUI3インターフェースへの切り替え方法を学びましょう。わずか数回のクリックで、更新されたデザイン体験を利用できます。
このガイドでは、Figma で UI 3 機能を有効にする方法を学びます。これは、Figma のインターフェースを操作して新しい UI 機能にアクセスし、有効化する手順です。
以下の手順に従って、Figma で利用可能な最新の UI 機能を導入し、ユーザー体験を向上させましょう。
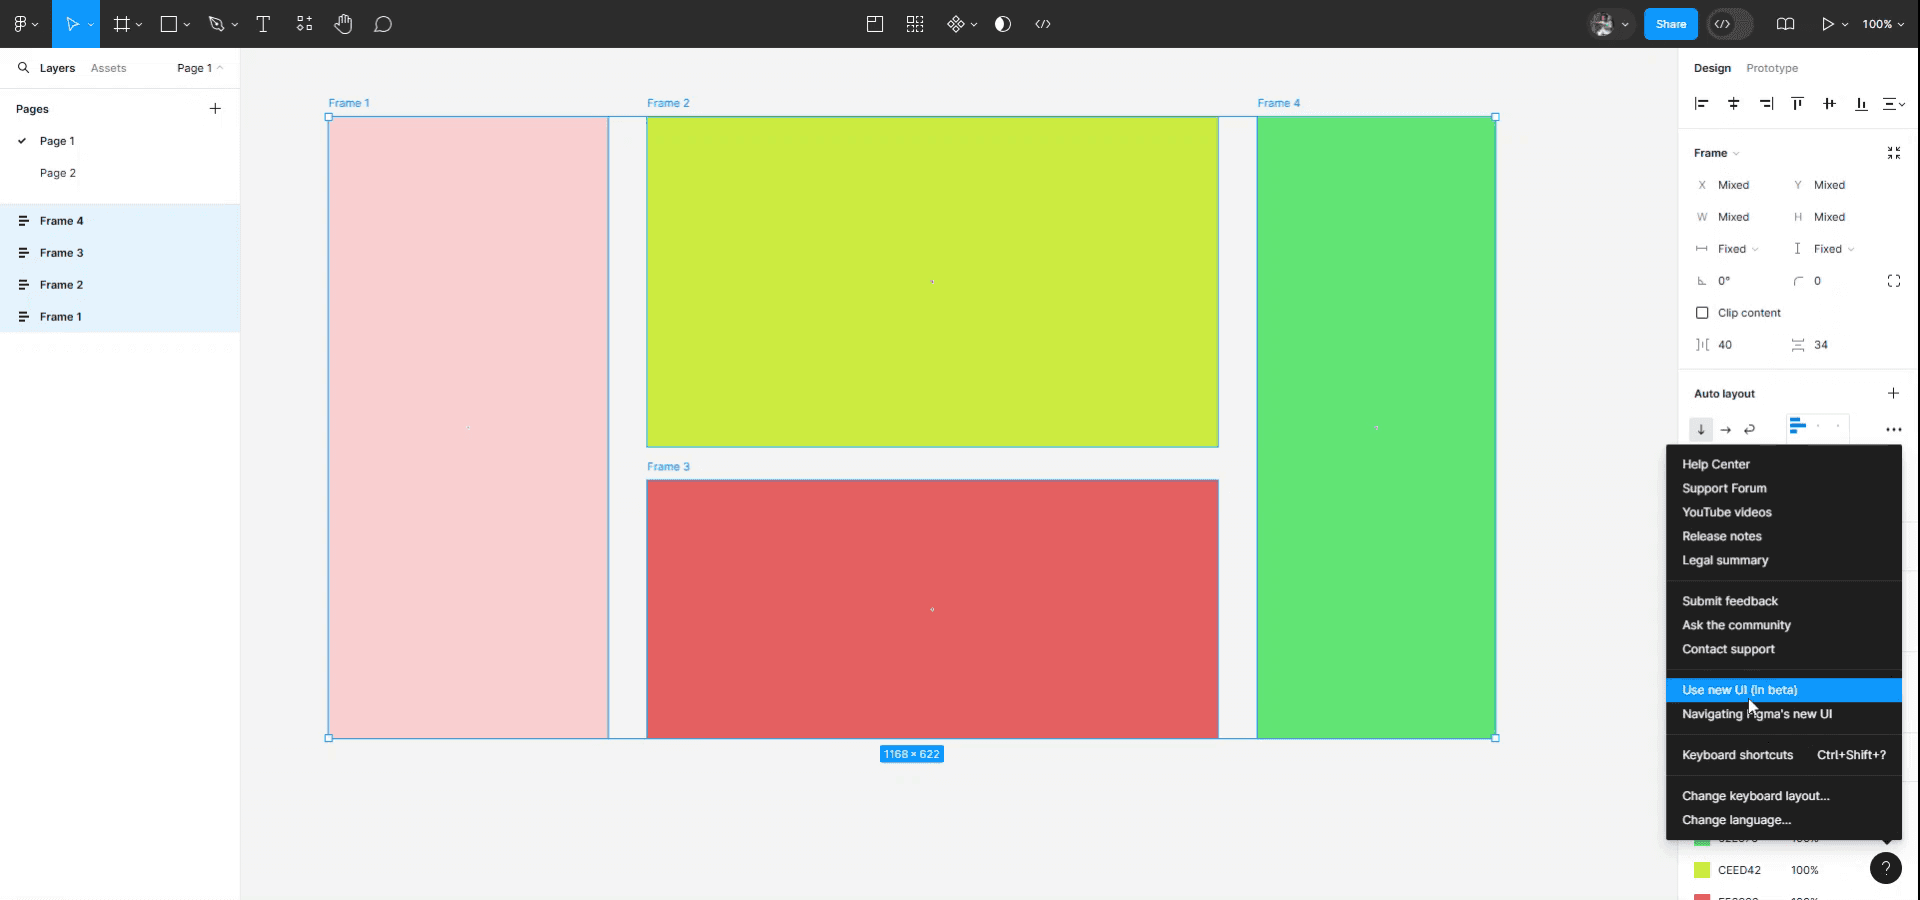
Figma を新しい UI3 に更新するには、デザインファイルを開き、右下隅にある「?」(ヘルプ)アイコンをクリックします。次に「新しい UI を使用(ベータ版)」を選択して、再設計されたインターフェースに切り替えます。ファイルブラウザからは、ファイル > 表示 > 新しい UI を使用 でもこのオプションにアクセスできます。
手順の説明:
1. Figma を開く:
Figma を起動し、任意のデザインファイルを開きます。
2. ヘルプメニューにアクセスする:
ウィンドウの右下にある「?」ヘルプアイコンをクリックします。
3. 新しい UI を有効にする:
メニューから「新しい UI を使用(ベータ版)」を選択します。Figma が更新され、インターフェースが切り替わります。
4. (任意)古い UI に戻す:
必要に応じて、「?」アイコンをもう一度クリックし、「以前の UI に戻す」を選択します。
手順ガイド:Figma を UI3 に更新する方法
ステップ 1
Figma で UI ツリーを有効にするには、まずインターフェース右下にあるヘルプアイコンへ移動します。それをクリックすると、メニューが表示されます。
ステップ 2
このメニューで、「ベータ版の新しい UI を使用」を見つけてクリックします。
「ベータ版の新しい UI を使用」をクリックすると、ユーザーインターフェースが最新バージョンに更新され、新しい UI の改善が含まれます。
FigmaでUI 3を手に入れるためのプロのコツ
Figma CommunityからUIキットをダウンロードする:
Figma CommunityでUI 3を検索して、あらかじめ用意されたUIキットやテンプレートを見つけましょう。デザインのニーズに合わせたさまざまなUIキットが見つかります。FigmaのUIキットを使う:
Figmaには、Material UIやiOS UIのような組み込みのUIキットがいくつかあります。「UI 3」が特定のバージョンやテーマを指している場合は、Figmaのコミュニティセクションでそのバージョンを検索するか、類似のキットを見つけることができます。UIキットをインストールする:
Figma Communityや別のソースでUI 3キットを見つけたら、複製をクリックして、そのキットをFigmaのワークスペースに追加します。複製後は、自分のプロジェクトでUI要素を使用したり、編集したりできます。UI 3キットをカスタマイズする:
コンポーネント、色、タイポグラフィ、余白を調整して、ブランドやデザインの好みに合うようにキットをカスタマイズします。更新を確認する:
UIキットは、コミュニティや作成者によって頻繁に更新されます。最新の機能や要素を使えるように、更新情報を定期的に確認しましょう。
FigmaでUI 3を入手する際によくある落とし穴とその回避方法
間違ったUIキットのバージョンを選ぶ:
対処法: UIキットのバージョンがデザイン要件に合っているかを再確認しましょう。特に「UI 3」がAndroid 3やMaterial 3のような特定のソフトウェアバージョンに関連している場合は重要です。ワークスペースを散らかしてしまう:
対処法: Figmaのワークスペースを整理整頓しておきましょう。複数のUIキットを使う場合は、デザインファイルが散らからないように、別々のページやフォルダに配置します。UIキットをカスタマイズしない:
対処法: UIキットをそのまま使うだけにしないでください。ブランドやユーザー要件に合わせてカスタマイズし、デザインに独自性を持たせて、ありきたりに見えるのを避けましょう。異なる画面サイズ向けの最適化を忘れる:
対処法: UIキットは特定の画面サイズ向けに作られていることが多いです。さまざまなデバイスや解像度で動作するように、キットのコンポーネントを調整してください。
FigmaでUI 3を入手する際のよくある質問
FigmaのUI 3とは何ですか?
「UI 3」は、特定のデザインシステムやフレームワークにおけるUIキット、テーマ、またはバージョンを指す場合があります。ご利用の文脈で「UI 3」が何を指しているのかを確認することが重要です。Figma CommunityでUI 3を見つけるにはどうすればよいですか?
Figma Communityの検索バーを使って、デザイン要件に合うUI 3のキット、テーマ、テンプレートを見つけてください。ダウンロード後にUI 3キットを編集できますか?
はい、UI 3キットをワークスペースに複製したら、コンポーネント、色、タイポグラフィ、その他の要素を自由に編集できます。UI 3にモバイルアプリ向けの特定のUIキットはありますか?
UI 3キットにはモバイル版がある可能性があります。「UI 3 mobile kit」で検索するか、モバイル対応の詳細を確認してください。カスタマイズしたUI 3デザインをチームと共有できますか?
はい、UI 3キットをカスタマイズしたら、Figmaファイルをチームメンバーと共有して、デザインを共同作業できます。Macで画面録画するには?
Macで画面録画するには、Trupeer AIを使用できます。画面全体をキャプチャでき、AIアバターの追加、ナレーションの追加、動画内のズームイン・ズームアウトなどのAI機能も利用できます。TrupeerのAI動画翻訳機能を使えば、動画を30以上の言語に翻訳できます。画面録画にAIアバターを追加するには?
画面録画にAIアバターを追加するには、AI画面録画ツールを使用する必要があります。Trupeer AIはAI画面録画ツールで、複数のアバターを使った動画作成を支援し、動画用のオリジナルアバター作成にも役立ちます。Windowsで画面録画するには?
Windowsで画面録画するには、標準搭載のGame Bar(Windows + G)や、AIアバター、ナレーション、翻訳などの高度な機能を備えたTrupeer AIのような先進的なAIツールを使用できます。動画にナレーションを追加するには?
動画にナレーションを追加するには、Trupeer AIのChrome拡張機能をダウンロードしてください。サインアップ後、音声付きの動画をアップロードし、Trupeerから希望のナレーションを選んで、編集した動画を書き出します。画面録画でズームインするには?
画面録画中にズームインするには、Trupeer AIのズーム効果を使うと、特定のタイミングでズームイン・ズームアウトでき、動画コンテンツの視覚的なインパクトを高められます。
おすすめの記事
関連チュートリアル

