
So änderst du die Deckkraft in Canva
Lernen Sie, wie Sie die Deckkraft von Elementen in Canva ändern, um transparente Effekte zu erzielen. Schritt-für-Schritt-Anleitung zum Anpassen der Transparenz von Text, Bildern und Formen
Um die Deckkraft oder Transparenz eines Elements in Canva anzupassen, wählen Sie das Element aus, suchen Sie das Transparenzsymbol (Schachbrettmuster oder ausgegrautes Quadrat) und verwenden Sie den Schieberegler, um die Transparenzstufe anzupassen. Sie können auch einen bestimmten Zahlenwert (0-100) in das Eingabefeld eingeben.
Detaillierte Schritte:
1. Wählen Sie das Element aus: Klicken Sie auf das spezifische Bild, Textfeld, die Form oder ein anderes Element in Ihrem Canva-Design, das Sie transparent machen möchten.
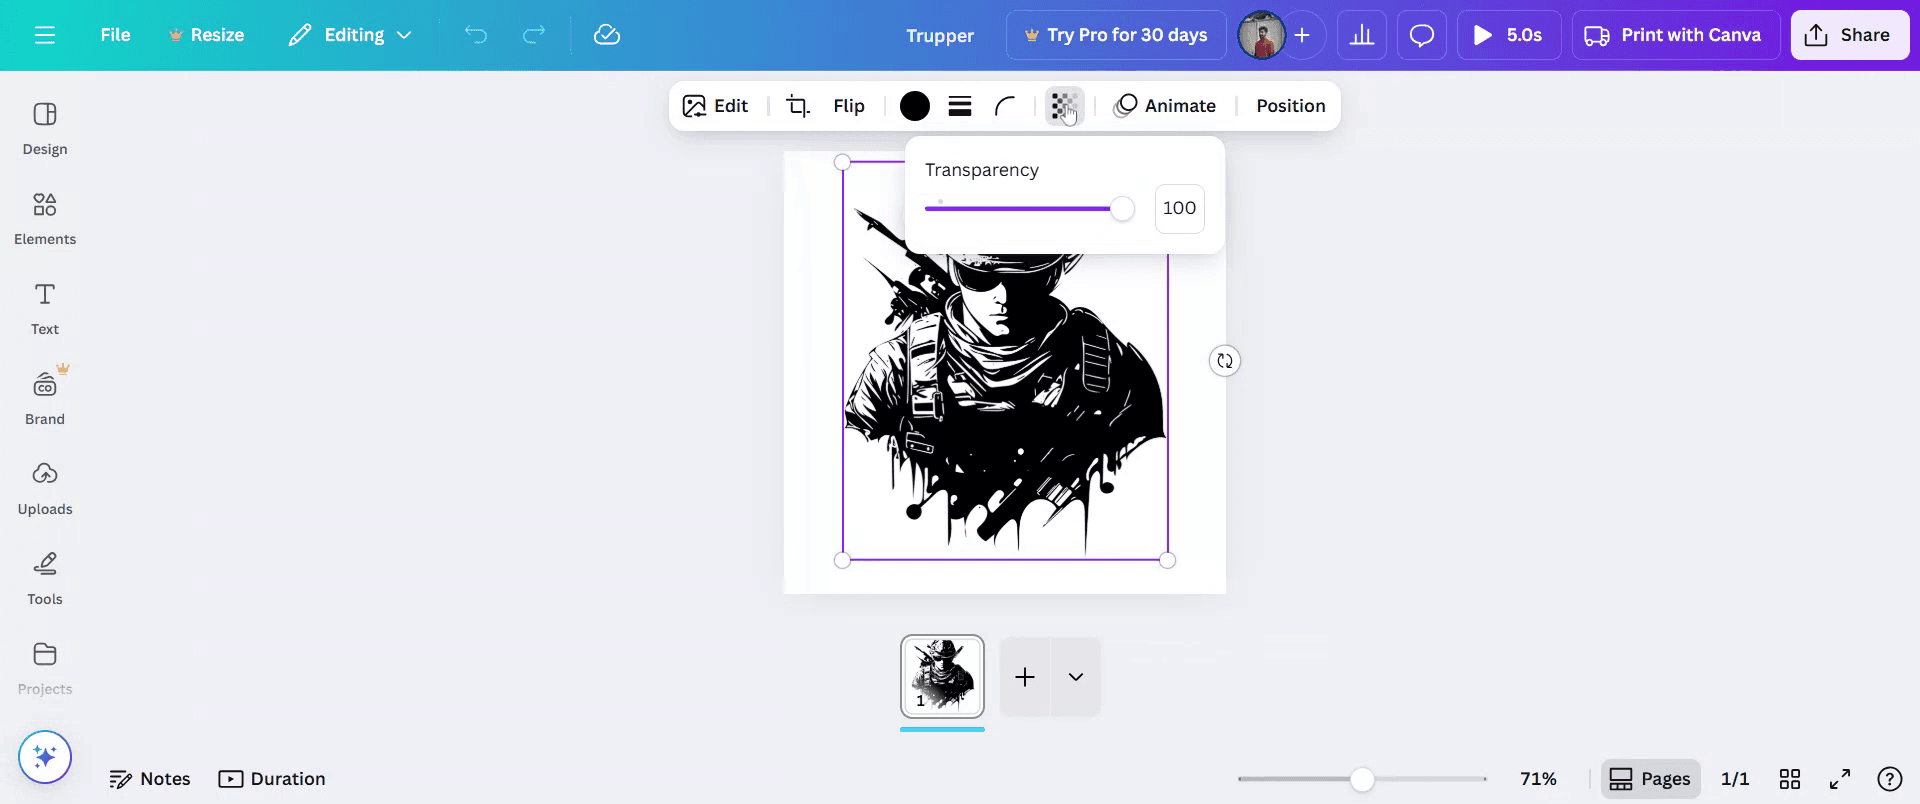
2. Rufen Sie das Transparenzwerkzeug auf: Suchen Sie das Transparenzsymbol, das wie ein Schachbrettmuster oder ein ausgegrautes Quadrat aussieht. Dieses Symbol befindet sich normalerweise in der oberen Symbolleiste des Canva-Editors.
3. Passen Sie den Schieberegler an: Sobald es ausgewählt ist, wird ein Schieberegler angezeigt. Ziehen Sie den Regler nach links, um die Deckkraft zu verringern (das Element wird transparenter), oder nach rechts, um die Deckkraft zu erhöhen (das Element wird weniger transparent). Sie können auch einen bestimmten Prozentsatz (0-100) in das Eingabefeld neben dem Schieberegler eingeben.
4. Vorschau der Änderungen: Während Sie den Regler anpassen, sehen Sie, wie sich die Transparenz des Elements in Echtzeit auf Ihrer Designfläche aktualisiert.
5. Schließen Sie Ihr Design ab: Klicken Sie irgendwo außerhalb des ausgewählten Elements oder Objekts, um die Auswahl aufzuheben und die Deckkraftanpassung abzuschließen.
Schritt-für-Schritt-Anleitung: So ändern Sie die Deckkraft in Canva
Schritt 1
Beginnen Sie damit, ein vorhandenes Projekt in Canva auszuwählen, das Sie bearbeiten möchten.

Schritt 2
Klicken Sie anschließend auf das spezifische Element im Projekt, das Sie ändern möchten.

Schritt 3
Klicken Sie auf die Option 'Transparenz' und passen Sie die Transparenzstufe nach Ihren Wünschen an.
Schritt 4
Wenn Sie mit den Änderungen zufrieden sind, klicken Sie auf 'Teilen', um Ihr Projekt zu verteilen.

Profi-Tipps zum Ändern der Deckkraft in Canva
Öffnen Sie Ihr Design in Canva
Melden Sie sich bei Canva an und öffnen Sie das Design, in dem Sie die Deckkraft eines Elements anpassen möchten.Wählen Sie das Element aus, das Sie bearbeiten möchten
Klicken Sie auf das Bild, das Textfeld, die Form oder die Grafik, deren Transparenz Sie ändern möchten.Klicken Sie auf das Deckkraft-Symbol
Schauen Sie oben rechts in der Symbolleiste und klicken Sie auf das kariert dargestellte Symbol, das für Transparenz steht.Passen Sie den Deckkraft-Regler an
Verwenden Sie den Schieberegler, um die Deckkraftstufe zu ändern. Schieben Sie nach links, um die Deckkraft zu verringern, und nach rechts, um sie auf bis zu 100 Prozent zu erhöhen.Vorschau ansehen und feinjustieren
Überprüfen Sie Ihr Design, um zu sehen, wie die angepasste Deckkraft wirkt. Nehmen Sie bei Bedarf weitere Änderungen vor, um ein ausgewogenes und klares Ergebnis zu erzielen.
Häufige Fehler und wie man sie vermeidet
Deckkraft-Symbol nicht sichtbar
Stellen Sie sicher, dass Sie ein Element ausgewählt haben. Das Transparenzsymbol erscheint nur, wenn ein bearbeitbares Objekt aktiv ist.Deckkraft wird nicht auf den Hintergrund angewendet
Um die Hintergrunddeckkraft zu ändern, fügen Sie eine Form oder Ebene über dem Hintergrund hinzu und passen Sie stattdessen deren Transparenz an.Vergessen, den Text separat anzupassen
Wenn Sie gruppierte Elemente bearbeiten, denken Sie daran, dass Text und Formen möglicherweise einzeln angepasst werden müssen.Niedrige Deckkraft macht Elemente schwer erkennbar
Vermeiden Sie es, die Deckkraft zu niedrig einzustellen, besonders bei wichtigen Elementen wie Text oder Logos, damit die Lesbarkeit erhalten bleibt.Deckkraft bleibt beim Download nicht erhalten
Transparenzeffekte können in PDF- oder JPG-Formaten anders aussehen. Verwenden Sie PNG für bessere Ergebnisse, wenn Sie Designs mit Deckkraft herunterladen.
Häufig gestellte Fragen zum Ändern der Transparenz in Canva
Wie passe ich die Transparenz eines Elements in Canva an
Wählen Sie das Element aus, klicken Sie in der Symbolleiste auf das Transparenzsymbol und verschieben Sie den Schieberegler auf die gewünschte Stufe.Kann ich die Transparenz für mehrere Elemente gleichzeitig ändern
Ja, Sie können mehrere Elemente auswählen und die Transparenz gemeinsam anpassen.Funktioniert Transparenz bei Text und Bildern
Ja, Sie können die Transparenz von Texten, Bildern, Formen und anderen Designelementen ändern.Kann ich einen benutzerdefinierten Transparenzprozentsatz festlegen
Ja, Sie können den Schieberegler verwenden oder zur genauen Steuerung manuell eine Zahl von 0 bis 100 eingeben.Ist Transparenz in der kostenlosen Version von Canva verfügbar
Ja, Transparenzsteuerungen sind sowohl für kostenlose als auch für Pro-Nutzer verfügbar.Wie nimmt man auf dem Mac den Bildschirm auf?
Um auf einem Mac den Bildschirm aufzunehmen, können Sie Trupeer AI verwenden. Es ermöglicht Ihnen, den gesamten Bildschirm aufzunehmen, und bietet KI-Funktionen wie das Hinzufügen von KI-Avataren, Voiceover sowie Zoom ein und aus im Video. Mit der KI-Videoübersetzungsfunktion von Trupeer können Sie das Video in über 30 Sprachen übersetzen.Wie fügt man einer Bildschirmaufnahme einen KI-Avatar hinzu?
Um einem Bildschirmaufnahme-Video einen KI-Avatar hinzuzufügen, müssen Sie ein KI-Bildschirmaufzeichnungstool verwenden. Trupeer AI ist ein KI-Bildschirmaufzeichnungstool, das Ihnen hilft, Videos mit mehreren Avataren zu erstellen, und Ihnen auch dabei hilft, Ihren eigenen Avatar für das Video zu erstellen.Wie nimmt man unter Windows den Bildschirm auf?
Um unter Windows den Bildschirm aufzunehmen, können Sie die integrierte Game Bar (Windows + G) oder ein fortgeschrittenes KI-Tool wie Trupeer AI für erweiterte Funktionen wie KI-Avatare, Voiceover, Übersetzung usw. verwenden.Wie fügt man einem Video ein Voiceover hinzu?
Um Voiceover zu Videos hinzuzufügen, laden Sie die Trupeer-AI-Chrome-Erweiterung herunter. Nach der Registrierung laden Sie Ihr Video mit Stimme hoch, wählen Sie das gewünschte Voiceover von Trupeer aus und exportieren Sie Ihr bearbeitetes Video.Wie zoome ich in einer Bildschirmaufnahme?
Um während einer Bildschirmaufnahme hineinzuzoomen, verwenden Sie die Zoom-Effekte in Trupeer AI, mit denen Sie zu bestimmten Momenten hinein- und herauszoomen können, was die visuelle Wirkung Ihrer Videoinhalte verbessert.
Empfohlene Lektüre
Generator für technische Dokumentation
Wie man ein Journal in Canva erstellt
Wie man in Canva doppelseitig druckt
Verwandte Tutorials

