

How to Group Elements in Canva
Learn how to group and ungroup elements in Canva to move and edit them together. Ideal for organizing layouts and speeding up your design workflow.
The process of grouping elements in Canva is a straightforward method that enables users to collectively manage multiple items.
This feature allows for easy resizing, moving, and editing of elements as a single unit, streamlining the design process and enhancing efficiency.
Grouping elements in Canva allows you to move, resize, or edit multiple items as a single unit great for maintaining layout consistency.
On Desktop
1. Select Elements
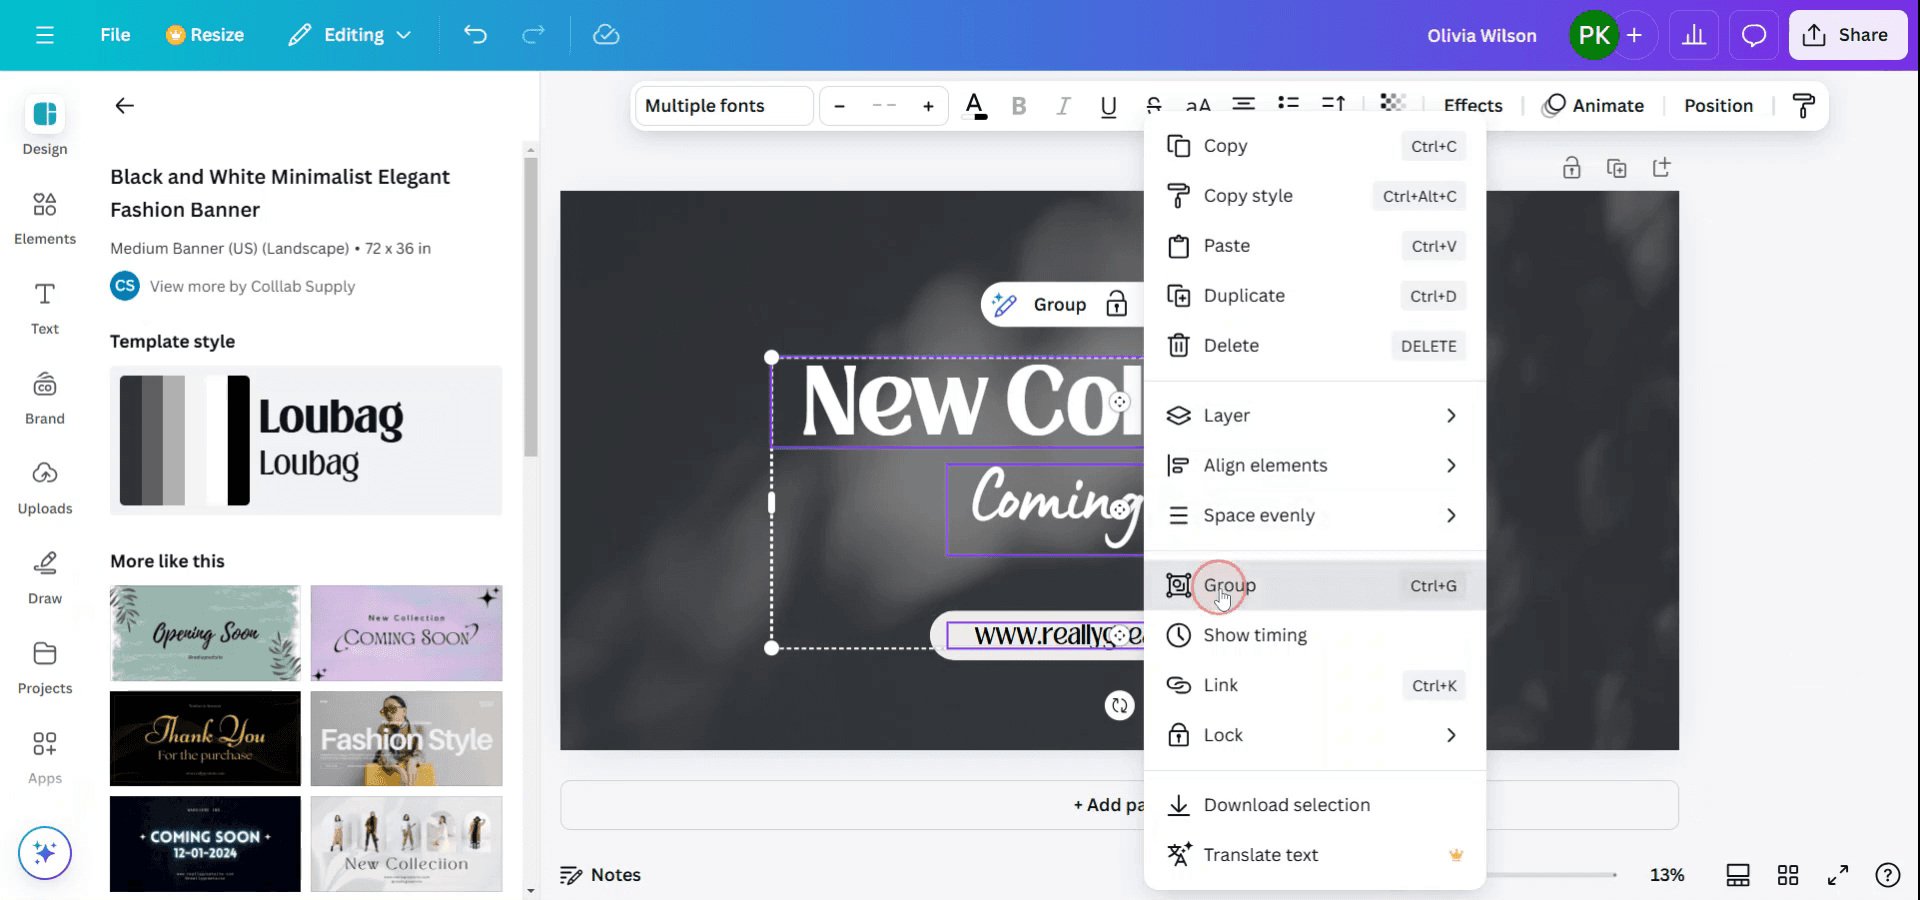
Click and drag your cursor over the elements.
Or hold Shift and click each element individually.
2. Group the Elements
Right-click and choose “Group”
Or use the shortcut:
Ctrl + G (Windows)
Cmd + G (Mac)
Or click the “Group” button on the top toolbar.
3. Done!
Now you can move, rotate, or resize the entire group as one.
On Mobile
1. Tap and Hold
Tap and hold on an element until you see the option to “Select multiple.”
2. Tap Additional Elements
Tap on all other items you want to include.
3. Tap “Group”
Use the “Group” button on the floating toolbar.
Ungrouping Elements
Desktop: Select the group and either
Right-click > Ungroup
Or use Ctrl + Shift + G (Windows) / Cmd + Shift + G (Mac)
Mobile: Tap the grouped items and tap “Ungroup.”
Step-by-Step Guide: How to Group Elements in Canva
Step 1
To initiate the grouping of elements in Canva, first select the desired elements by holding down the Shift key. This action allows for the selection of multiple elements simultaneously.

Step 2
After selecting the elements you wish to group, perform a right-click to access the context menu. From this menu, choose the 'Group' option to consolidate the selected elements. Alternatively, you can use the keyboard shortcut by pressing Ctrl + G for a quick grouping action.
Pro tips for grouping items in Canva
Select Multiple Elements:
Hold down theShiftkey (orCmdon Mac) and click on all the elements you want to group. Alternatively, click and drag to select multiple elements at once.Group the Selected Elements:
Once the elements are selected, right-click on one of them and choose "Group" from the context menu, or pressCtrl + G(Windows) orCmd + G(Mac).Resize and Move Together:
After grouping, you can resize or move all the elements together as one. Simply click and drag the grouped set to reposition it, or use the corners to resize the entire group.Ungroup When Necessary:
If you need to edit a single element within a group, right-click and select "Ungroup" or use the shortcutCtrl + Shift + G(Windows) orCmd + Shift + G(Mac).Group Elements for Consistency:
Grouping can help you maintain alignment and consistency throughout your design by ensuring multiple elements move and scale together.
Common pitfalls and how to avoid them for grouping in Canva
Accidentally Grouping the Wrong Elements:
Fix: Double-check which elements you’ve selected before grouping. You can always ungroup and redo it if needed.Not Being Able to Edit a Single Element:
Fix: After grouping, remember you can ungroup to make individual edits. Ungrouping temporarily separates the elements for detailed adjustments.Misalignment After Grouping:
Fix: Ensure that the elements are aligned properly before grouping. Use Canva’s alignment tools (e.g., grid, snapping) to make sure everything is evenly spaced.Grouping Layers Accidentally:
Fix: If you group a layered element (like a background and foreground element), make sure that all items you want grouped are on the same layer.Not Knowing When to Group:
Fix: Group elements when you need to move, resize, or adjust them consistently across your design. Avoid grouping if you need to edit them independently.
Common FAQs for grouping in Canva
How do I group multiple elements in Canva?
Hold down theShiftkey (orCmdon Mac) and select the elements you want to group, then right-click and select "Group" or pressCtrl + G(Windows) orCmd + G(Mac).Can I group text with images in Canva?
Yes, you can group any elements, including text and images, as long as they are selected together.Can I ungroup elements in Canva?
Yes, you can ungroup by right-clicking and selecting "Ungroup" or using the shortcutCtrl + Shift + G(Windows) orCmd + Shift + G(Mac).Can I move a group of elements at once?
Yes, once grouped, you can move the entire set of elements by clicking and dragging the group.What happens if I group elements by mistake?
You can ungroup them easily by right-clicking and selecting "Ungroup" or using the keyboard shortcut.How to screen record on mac?
To screen record on a Mac, you can use Trupeer AI. It allows you to capture the entire screen and provides AI capabilities such as adding AI avatars, add voiceover, add zoom in and out in the video. With trupeer’s AI video translation feature, you can translate the video into 30+ languages.How to add an AI avatar to screen recording?
To add an AI avatar to a screen recording, you'll need to use an AI screen recording tool. Trupeer AI is an AI screen recording tool, which helps you create videos with multiple avatars, also helps you in creating your own avatar for the video.How to screen record on windows?
To screen record on Windows, you can use the built-in Game Bar (Windows + G) or advanced AI tool like Trupeer AI for more advanced features such as AI avatars, voiceover, translation etc.How to add voiceover to video?
To add voiceover to videos, download trupeer ai chrome extension. Once signed up, upload your video with voice, choose the desired voiceover from trupeer and export your edited video.How do I Zoom in on a screen recording?
To zoom in during a screen recording, use the zoom effects in Trupeer AI which allows you to zoom in and out at specific moments, enhancing the visual impact of your video content.
People also ask
Technical Documentation Generator
Related Tutorials

