

Canvaで要素をグループ化する方法
Canva で要素をグループ化・グループ解除して、まとめて移動・編集する方法を学びましょう。レイアウトの整理やデザイン作業の効率化に最適です。
Canva で要素をグループ化するプロセスは、ユーザーが複数のアイテムをまとめて管理できる簡単な方法です。
この機能により、要素を1つの単位として簡単にサイズ変更、移動、編集でき、デザイン作業を効率化し、生産性を高めます。
Canva で要素をグループ化すると、複数のアイテムを1つの単位として移動、サイズ変更、編集できるため、レイアウトの一貫性を保つのに最適です。
デスクトップの場合
1. 要素を選択する
カーソルを要素の上でドラッグします。
または、Shift を押しながら各要素を個別にクリックします。
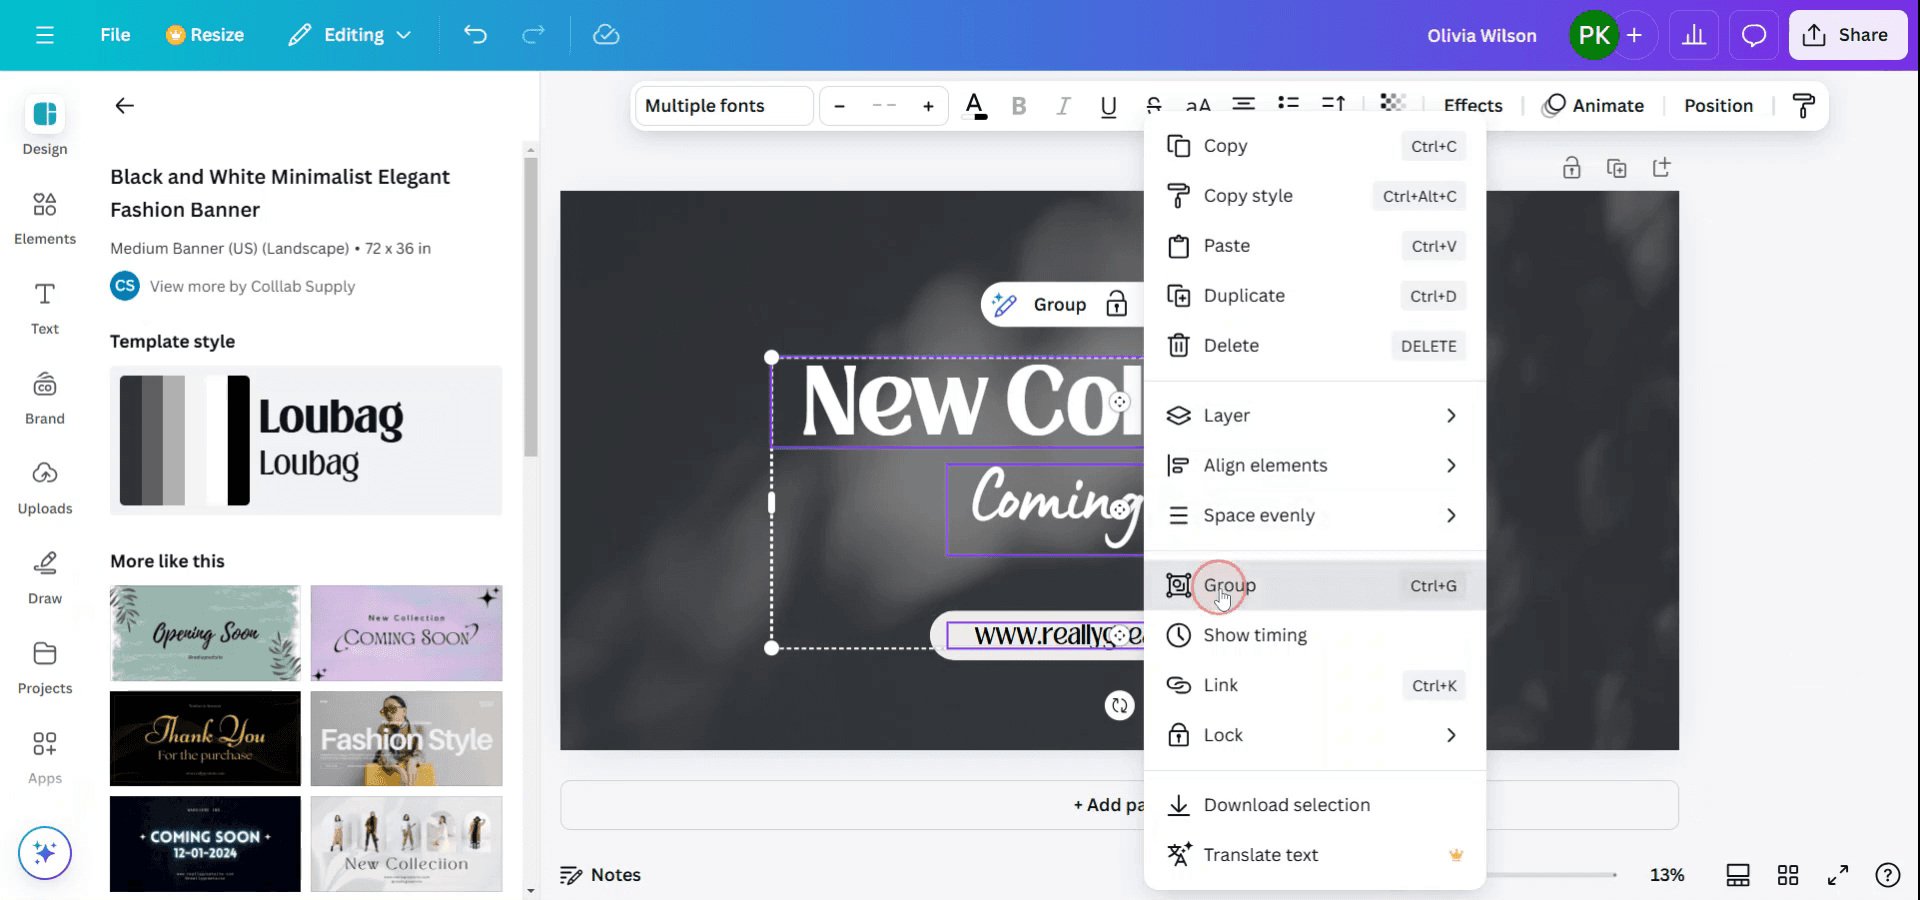
2. 要素をグループ化する
右クリックして 「グループ」 を選択します。
または、次のショートカットを使用します。
Ctrl + G(Windows)
Cmd + G(Mac)
または、上部ツールバーの 「グループ」 ボタンをクリックします。
3. 完了!
これで、グループ全体を1つとして移動、回転、サイズ変更できます。
モバイルの場合
1. タップして長押し
要素をタップして長押しすると、「複数選択」のオプションが表示されます。
2. 他の要素をタップする
含めたい他のアイテムをすべてタップします。
3. 「グループ」をタップ
フローティングツールバーの「グループ」ボタンを使用します。
要素のグループ解除
デスクトップ:グループを選択し、次のいずれかを行います。
右クリック > グループ解除
または Ctrl + Shift + G(Windows)/Cmd + Shift + G(Mac)を使用します。
モバイル:グループ化されたアイテムをタップし、「グループ解除」をタップします。
ステップごとのガイド:Canva で要素をグループ化する方法
ステップ 1
Canva で要素のグループ化を開始するには、まず Shift キーを押しながら目的の要素を選択します。この操作により、複数の要素を同時に選択できます。

ステップ 2
グループ化したい要素を選択したら、右クリックしてコンテキストメニューを開きます。このメニューから「グループ」オプションを選択して、選択した要素をまとめます。別の方法として、Ctrl + G を押すキーボードショートカットを使えば、すばやくグループ化できます。
Canvaでアイテムをグループ化するためのプロのヒント
複数の要素を選択する:
Shiftキー(MacではCmd)を押しながら、グループ化したいすべての要素をクリックします。あるいは、クリックしてドラッグし、一度に複数の要素を選択します。選択した要素をグループ化する:
要素を選択したら、そのうちの1つを右クリックしてコンテキストメニューから「グループ化」を選ぶか、Ctrl + G(Windows)またはCmd + G(Mac)を押します。まとめてサイズ変更と移動をする:
グループ化すると、すべての要素を1つとしてまとめてサイズ変更したり移動したりできます。グループ化したセットをクリックしてドラッグし、位置を変更するか、角を使ってグループ全体のサイズを変更するだけです。必要に応じてグループ解除する:
グループ内の1つの要素だけを編集する必要がある場合は、右クリックして「グループ解除」を選ぶか、ショートカットCtrl + Shift + G(Windows)またはCmd + Shift + G(Mac)を使用します。一貫性のために要素をグループ化する:
グループ化すると、複数の要素が一緒に移動し、拡大縮小されるようになるため、デザイン全体で配置と一貫性を保ちやすくなります。
Canvaでのグループ化でよくある落とし穴とその回避方法
誤って別の要素をグループ化してしまう:
対処法: グループ化する前に、選択した要素が正しいか必ず確認してください。必要ならいつでもグループ解除してやり直せます。1つの要素を編集できない:
対処法: グループ化した後でも、個別編集するにはグループ解除できることを覚えておいてください。グループ解除すると、要素が一時的に分離され、細かい調整ができます。グループ化後のずれ:
対処法: グループ化する前に、要素が正しく整列していることを確認してください。Canvaの整列ツール(例:グリッド、スナップ)を使って、すべてが均等に配置されていることを確かめましょう。レイヤーを誤ってグループ化してしまう:
対処法: 背景要素と前景要素のようなレイヤー化された要素をグループ化する場合は、グループ化したいすべての項目が同じレイヤー上にあることを確認してください。いつグループ化すべきか分からない:
対処法: デザイン全体で一貫して移動、サイズ変更、調整したいときに要素をグループ化してください。個別に編集する必要がある場合は、グループ化を避けましょう。
Canvaでのグループ化に関するよくある質問
Canvaで複数の要素をグループ化するにはどうすればよいですか?
Shiftキー(MacではCmd)を押しながら、グループ化したい要素を選択し、右クリックして「グループ化」を選ぶか、Ctrl + G(Windows)またはCmd + G(Mac)を押します。Canvaでテキストと画像を一緒にグループ化できますか?
はい、テキストや画像など、選択を一緒に行えば、どの要素でもグループ化できます。Canvaで要素のグループ化を解除できますか?
はい、右クリックして「グループ解除」を選ぶか、ショートカットのCtrl + Shift + G(Windows)またはCmd + Shift + G(Mac)を使ってグループ化を解除できます。要素のグループをまとめて移動できますか?
はい、グループ化した後は、グループをクリックしてドラッグすることで要素全体を移動できます。誤って要素をグループ化してしまった場合はどうなりますか?
右クリックして「グループ解除」を選ぶか、キーボードショートカットを使えば簡単に解除できます。Macで画面録画するには?
Macで画面録画するには、Trupeer AIを使うことができます。画面全体をキャプチャでき、AIアバターの追加、ナレーションの追加、動画内でのズームイン・ズームアウトなどのAI機能を提供します。TrupeerのAI動画翻訳機能を使えば、動画を30以上の言語に翻訳できます。画面録画にAIアバターを追加するには?
画面録画にAIアバターを追加するには、AI画面録画ツールを使用する必要があります。Trupeer AIはAI画面録画ツールで、複数のアバターを使った動画の作成を支援し、さらに動画用の自分専用アバターの作成もサポートします。Windowsで画面録画するには?
Windowsで画面録画するには、標準搭載のGame Bar(Windows + G)や、AIアバター、ナレーション、翻訳などのより高度な機能を備えたTrupeer AIのような高度なAIツールを使用できます。動画にナレーションを追加するには?
動画にナレーションを追加するには、trupeer ai chrome拡張機能をダウンロードします。サインアップ後、音声付きの動画をアップロードし、trupeerから希望のナレーションを選んで、編集した動画を書き出します。画面録画でズームインするには?
画面録画中にズームインするには、Trupeer AIのズーム効果を使います。特定の瞬間にズームイン・ズームアウトでき、動画コンテンツの視覚的な印象を高めます。
こちらもよく検索されています
関連チュートリアル

